7 plus 2
-
Posts
69 -
Joined
-
I've seen the neuro surgeon and now an orthopedic surgeon and after them seeing the CAT scan, the X-rays and the MRI, both of them said "How are you even walking". I'm scheduled for fusion surgery on L2 to L5 in the late spring or early summer of 2015 by the orthopedic surgeon. Then it's 4-6 months in a brace. After that the surgeon claims I should have limited movement in this region, but movement just the same. Hopefully this will aleaviate the pain and I can start post more progress on SB1415.
-
What are the Webers jetted for? How much? We're talking 40DCOEs right?
-
Getting in with the roof down is not a problem. I haven't tried with the roof up 'cause it is in pieces (as templates for the guy who was going to make me a new one). Maybe I will find it's not that bad if I keep the tyre pressure around 20 psi. Some one told me that is what it's supposed to be, being part of the suspension. But, I still have a lot to do and working on it for more than 10 minutes at a time is painful. I took the carbs apart (dual Weber 40 DCOE) and after assessing the price for parts and new jets for the larger engine, it's better to just buy 2 new ones.
-
Sorry I haven't been posting like I was, but back problems (2 slipped vertebrae) have been keeping me off my feet. Yes that was vertebrae and not discs, the two discs on these vertebrae have been worn to nothing. Been to a Neuro-surgeon and he wants to fuse 5 vertebrae (L 1-5) which will leave me unable to bend at the waist. Plus, he said that driving a harsh riding vehicle will possibly break the bones once fused. Now that I have the time to finish the car, I shouldn't be driving it when it's done. Hell on earth!!!
-
I also hear that you have to do a tyre off "tune up" after 200 miles as well. What a pain!! That's what you get for wanting to be unique. I did do multiple coarses of hitting the rim all the way around with a large rubber mallet while tuning. This, I supposed, would help seat the spokes and nipples.
-
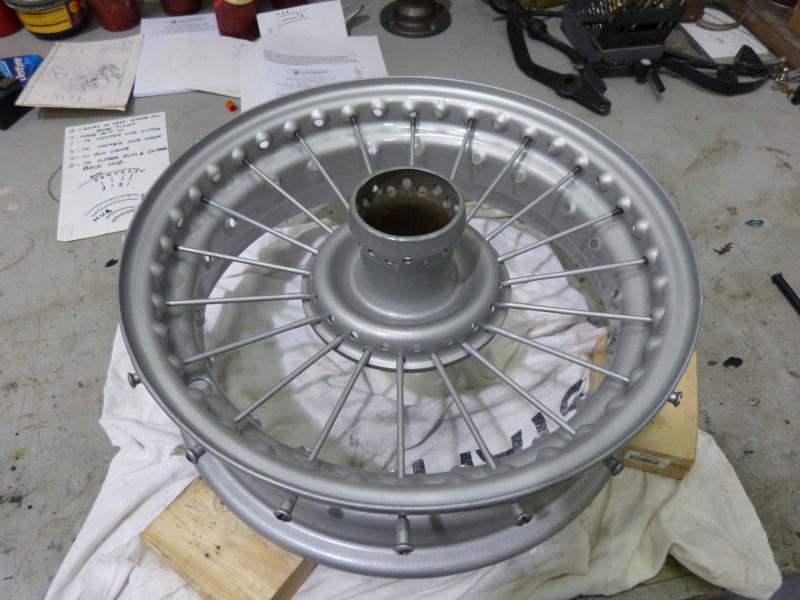
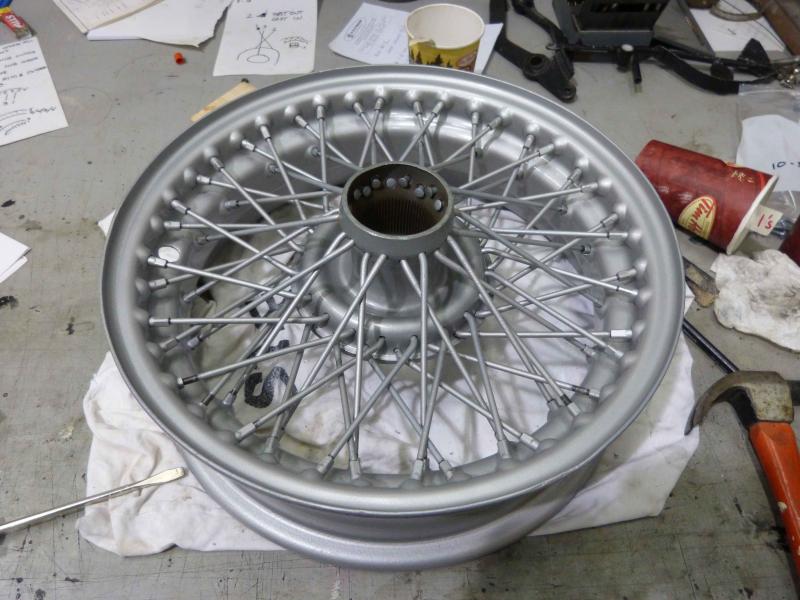
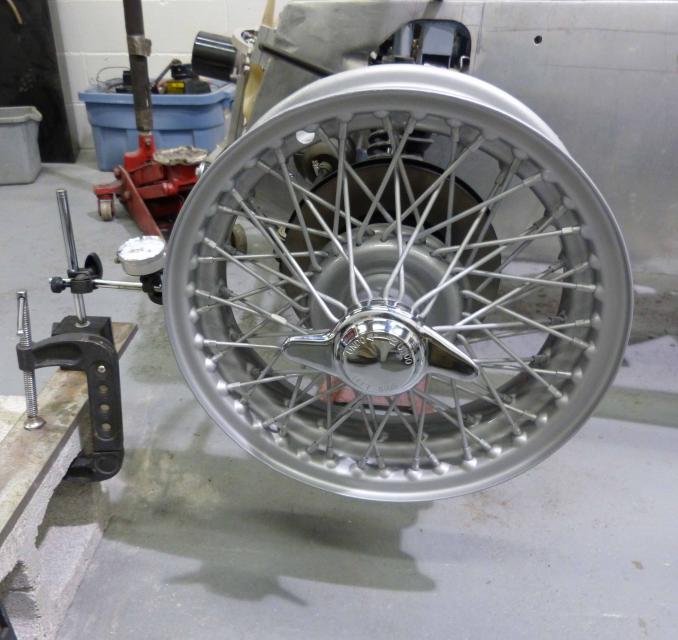
So everything painted it was time to re-assemble the wire wheel. Picture 1: the lacing begins Picture 2: almost done Picture 3: time to start adjusting I had numbered each row of spokes and kept them together in coffee cups all through the ordeal. I also made notes and diagrams as to the order they came out and which number row went where. I tightened the spokes till no more threads showing to keep it even. Then tightened them all some more, a ½ turn each, till they started to get tight. Using the average tone (sound made by hitting them with a taped screwdriver) of the spokes on another rim I tightened a little bit more. I then mounted the rim on the front axel of the car and started adjusting: first, the short spokes for out of round; then the long spokes for lateral run out. I marked four locations, 12:00 o’clock (at the seam and valve stem hole), 3:00 o’clock, 6:00 o’clock , and 9:00 o’clock, then noted the highest spot. Tedious work to say the lease. I’m pleased to say that they are now all done (after a day of adjusting) and the out of round is less than 30 thou, the run out is less than 40 thou. The out of run is worse at the seam and I figured that is probably normal. Now I have to touch up the paint on the nipples… and get the tyres mounted without much damage.

-

Need help with the single rail transmission gear shift.
7 plus 2 replied to 7 plus 2's topic in General Tech
TheDingo8MyBaby : Thanx, that's exactly what I've been looking for!!!!! -
Newmarket Iron, when it was an auto wreckers, used to allow everyone to remover their own parts. Then one day some guy, using 2 fender jacks on the front bumper of a pickup truck, while getting a part from under the vehicle, was found by Dave, one off the owners of the yard, crushed to death. When in doubt...don't
-
My neighbors arms are bigger than my thighs. Let's just say he doesn't fit in my seven.
-
If you are a DIYer, like most here, you should already know that a jack, of any kind, is not all that you should use if you plan on getting under the vehicle. Jack stands are also needed. However, the surface you are doing the work on is also critical. My neighbor at my shop, and his friend, where working on the suspension of his SUV. They had a floor jack and axel stands and thought they were safe. Both front wheels where off. But… they where working on his gravel driveway. They where hitting a particularly stubborn piece when the whole lot shifted and fell on them. My neighbor, with adrenaline flowing, lifted the SUV off his chest and then ran to the other sided and lifted the vehicle off his friends arm. Long story short, his friend had a broken arm and pinched nerve. My neighbor had 3 broken ribs on each side and a punctured lung. Moral: be VERY careful when working under any vehicle.
-
Need help with the single rail transmission gear shift.
7 plus 2 replied to 7 plus 2's topic in General Tech
Thanx TheDingo8mybaby Upside down is not a problem. I worked in printing for 27 years back when we used film, so I can read upside down and back to front no problem. I have this trany in my Elan Plus2 and have 2 of these shifters on the shelf at the shop. (had 2, I removed the ball from one and it’s in the top picture) Unfortunately, the 2 types are different. Dave I heard back from Quaife today and here’s what they said: “I’m afraid we do not make replacement shifters for that gearbox. If you could find a Quaife part number off the USA7s forum I could check our old stock however, it is highly unlikely that we stock them anymore.” I’ll e-mail them this link and see if they have it. You say there are 2 lengths, and this is the short one? The threads are the right size for the trany? If you could e-mail me pictures that would be greatly appreciated. E-mail is: seven_plus2@rogers.com Thanx -
Need help with the single rail transmission gear shift.
7 plus 2 replied to 7 plus 2's topic in General Tech
Thanx Dave Quaife e-mailed back but isn't familiar with this trany (must be some young guy at the Quaife end) I e-mailed him back with the pictures I posted above. The schematic I posted was from an after market catalogue circa 1992. Derek -
Need help with the single rail transmission gear shift.
7 plus 2 replied to 7 plus 2's topic in General Tech
Hi Ross/Bob Thanx for your response. My box was rebuilt in 1994 and un-used since. The shifter is the only part I need. However, I'll keep this in mind (as long as yours' has a shifter). Shipping may not be a problem, but I'd have to check my contact first. -
Need help with the single rail transmission gear shift.
7 plus 2 replied to 7 plus 2's topic in General Tech
Hi Dave Thanx for your response. I should have mentioned that I have the Haynes version of the Cortina MKII manual but on the single rail page it doesn't even show the shifter (page 100 if you have the same manual). If you have a different publisher for your manual, it may show it. Just went to the Quaife UK web site but could not find just the shifter. I've e-mailed them and will let you know their response. Watch this space!!! Thanx again. -
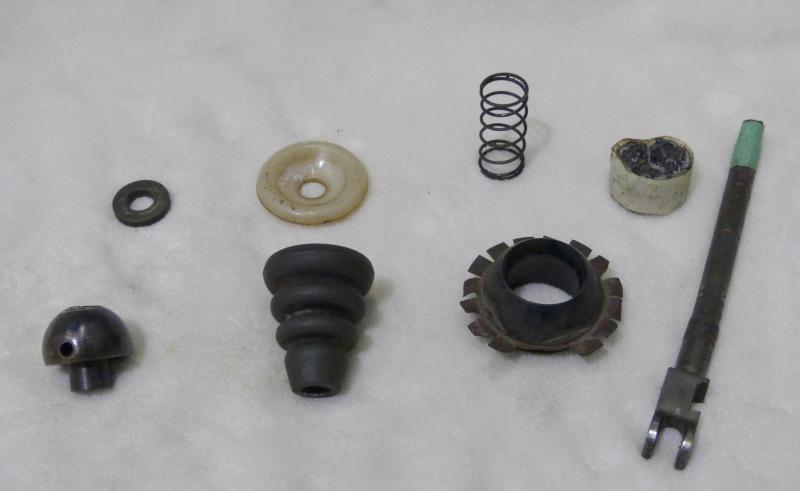
Does anyone have the single rail transmission found on the 1968 and later Cortina? I’m installing this type in my 1962 Lotus 7 S2 (I lost the original 3 rail and the extension, the reason for which is too lengthy to go into). It’s been years since I took the shifter out and can’t remember how it goes back together. Add to that, the plastic rotator ball has disintegrated. I’ve included a schematic, which shows it, but not apart. I’ve also included 2 pictures: 1 of the parts I have (which may include some not from that shifter???); one as I think it is assembled above the screw in cup. Top row right is the disintegrated rotator ball held together with masking tape. Bottom row left is a rotator ball from the 3 rail type which I may use as a guide for a machine shop to make a metal one. Any help would be greatly appreciated.