Blindcars
-
Posts
55 -
Joined
Content Type
Profiles
Forums
Store
Articles
Gallery
Events
Library
Everything posted by Blindcars
-
thanks for all the replies. The car is sold AND best of all i think the new owner has some ideas and the skills to take it to a new level among the WCM Ultralights!! Its been a blast here and what a great bunch of co enthusiasts.
-
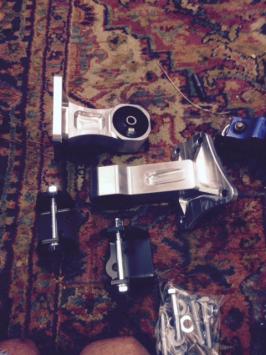
for sale is an WCM S2K partially built project. Honda VTEC motor with approx 20k miles on it. I started the build but vision changes are making it increasingly frustrating so I'm putting it up for sale. All parts are new.. It is a roller ( all suspension in place), with upgraded Heim joints, 12" front and rear wilwood brakes, billet motor mount system with poly bushings, custom made poly bushings on rear diff mounts, recommended rear diff brace fabricated / installed, reinforced diff mount nose piece, NEW Team Dynamic pro wheels with NEW Toyo R888's mounted with lightweight alloy lug nuts Shocks and springs are QA1's also NEW. Rear axle CV'S and hub bearing were rebuilt before installation. Hood has never been mounted ( new billet hood hinge supports included) also have the 7 logo for the grille (bought from a person on here in AU). Radiator is mounted but not finish plumbed ( have the billet water neck with temp bung installed and stainless overflow tank, all of which will need to be mounted). No sheet metal work has been done (i.e. Floors, footwells, body skin, etc). Custom built header system will be done by next week. Basically i was getting all the parts mounted, addressing all the recommended upgrades, improving some things ( steering column shaft relocation THRU the lower dash support bar for increased leg room, billet motor mount system with poly bushings, machined rear lower shock spacer to prevent bolt bending, Derale HO 2 speed elect fan) and some other things before Dismantling it and sending the frame out for powder coating. Just too frustrating to continue 👀 so here is a chance to build it your way from a roller state with most every upgrade done already. Price is 15k Pm me if interested and i can send pics. The new format here is hard for me to work with lol I also have a 1966 Austin Healey BJ8 that is possibly going to be sold also if anyone is into British cars. 2 owner car ( a true survivor car) original interior, motor, etc. awesome mechanical condition and NO rust . Thanks
-
Anybody have TPI-TECH gauges in their S2K Ultralight and might be interested in picking up a set of new ones to keep as spares ( no senders)? Have a complete set that came out of the dash of the car i bought. Pm me if any intrest
-
Anybody have TPI-TECH gauges in their S2K Ultralight and might be interested in picking up a set of new ones to keep as spares ( no senders)? Have a complete set that came out of the dash of the car i bought. Pm me if any intrest
-
Ultralite S2K - raising the steering column?
Blindcars replied to NecronomiconJules's topic in General Sevens Discussion
I am currently building a S2K and went the route no one jas gone yet, thru the bar, versus going on top. I didnt like the above the bar look (personal taste) and wanted to use a larger wheel than can be used in stock formation. Im having problems posting pics but would gladly email so someone could add here if wanted. Leo -
i have 2 NEW in the box red anodized QA 1 82 series shocks for sale. Never been installed. Would like $200.00 for the pair. QA1 hasnt made the red anoduzed ones for some time and according to them have no plans to. I purchased new silver ones for my build and dont need these just sitting around. If you car has the red ines here is a chance to pick up a spare NEW set for less than what the same series shock sells for today ( my silver ones were 167.00 ea)
-
What a beautiful car!!! Grabbing it at the offered price was a NO BRAINER!!! Like a giveaway! Im jealous and pics of progress expected
-
Ugh.. Forgot to add.. The rear studs are easy to find in longer length. Ebay.. 20.00 for 10 studs withe the correct diameter knurled shoulder. The fronts are the tricky ones because they have to thread into the Wilwood hubs. Mine thread in 1" before they seat which leaves me 2" of stud sticking out for the rotor hat and wheel.
-
Their part number is BH12X1.25x100F
-
Bel-Metric Fastners 1-800-544-1624 Here is the ussue: I searched high and low to find 3" studs in a 12x1.25 and 10.9 hardness. Nada, just not available unless you want to have it custom made at around $18.00 per stud. What i did find from Bel-metric was M12x1.25x100 full thread 10.9 hex head bolts. 100mm translates to 4" of full thread. I took the bolts when recived and had a friend who owns a fastber supply to cut the heads of at the length i needed (3"). Bel-Metric waa the only supplier i found that had a "full thread" bolt in 10.9 hardness above 2 1/2 inches. He said they had a 100 in stock and are rare to find so he typically buys the lot when he finds them. Not cheap, 10 bolts will run you $85.60 but its better than $16 to 20 per custom made stud Hope info helps
-
Forgot to add that thet are a 10.9 hardness
-
i have (10) 12x1.25 two and 1/4" wheel studs for the Wilwood hubs on a ultralight that i wont be using as i had to go to a 3" long stud dye to the use of spacers on the front. Free if anyone needs them.
-
What has occupied my brain today is this aspect: the bushing in the spindle "should" only affect the rotational runout in an up and down manner due to the small egg shape of the bushing. It shouldn't make it have side to side variations. Tomorrow ill move all the hub and rotor assembly to the other side and see if the problem moves with it. If it does then ill have to dig deeper into is the race set evenly, bearing issue, or a mis machined hub. None of which i think is a possibility. Leo
-
While assembling the car i spun the wheel to check out the newly assembled hub/rotor/wheel and heard the rotataing rotor hit the pads, then not hit, then hit, etc.. That pretty much said something was amiss. Looking closer i could actually see the runout changing at the rims face. Yes, Dave W, a machine shop is in the cards . Get the bushing on the spindle cured and that should locate the hub bearing correctly which likewise will get me into acceptable runout specs.
-
Ugh.. Excuse the typo's. I do know how to spell but my phone decided to change some things. Need a 2 min edit time window on posts
-
just curious what a maximum allowable run out if a front hub should be? Noticed that the rotir was slightly contacting the pads, then not cintacting them so i decided to investigate. Runout on the hub face showed a 5 thou variance, reinstalled rotor and hat, measured on the face of it and there was a 20 thou variance, install wheel and check off the face of the rim and was out by 50 thou. Root of problem is an egg shaped bushing on tge spindle whis is used to change the spindle size from that of a fiero to that of a pinto ( which is what the wilwood hubs fit). So what is an acceptable runout? Im thinking like 2 or 3 thousandths Thanks Leo
-
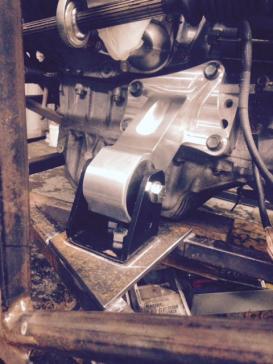
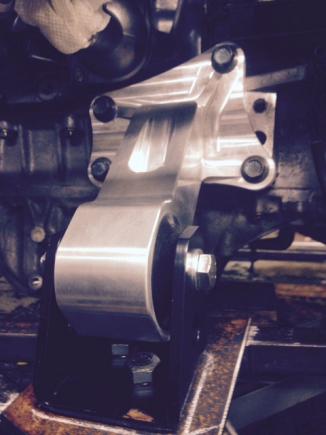
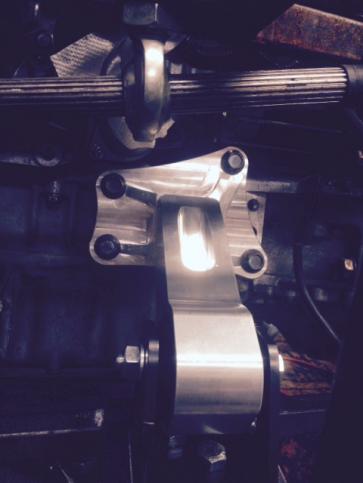
Motor height was detenined by the 1/4 plate. I set the clearance between the highest point of the engine and the hood at an 1/8". Took some fiddling with tapered wedges to get the height just right. Other cars clearnces might be different and that is handled by using a different thickness of mountaing plate. What i really liked about this mount is that it was designed so that it orientated the motor pefect. Bith pads end up on the same horizontal plane. The top of the intake is level when checked, and the valve cover is at 10 degrees incline to the passenger side. Pretty much exactly where Lorren said it needed to be. Leo
-
Finally got the motor set into the new chassis and decided I wasn't a big fan of the motor mounts that came with the LM chassis so I decided it was time to upgrade them. I wanted poly motor mounts, and something available off the shelf rather than fabricating a lot. I finally ended up buying a set of INNOVATION MOUNTS billet S2000 mounts from Ballade Sports in CA as they had the cheapest price from all the suppliers I looked at. They have a wide choice of the poly compounds (I chose 75a due to comments on different forums), they are direct bolt on and required minimal change/fabrication to work. I also purchased an optional stainless heat shield for the passenger side mount. To install them required removing the existing factory Honda brackets, cutting the 2" square tube off the chassis, fabricating two 1/4 inch thick plates for the mounts to set on (I am also going to install some additional 1" square tube gussets under the plate), bolting the U shaped brackets supplied with the mounts to my fabricated 1/4" plates and it is a wrap. Motor sets just where it should and hopefully my choice of 75A was a good one.

-
Speacking of exchaust systems it is coming up soon on the fabrication lost as i will soon have a hood and can finalize setting the engine. So what double skinned muffler are most using on the WCM Ultralight? I dont want a single skin as i dont want flesh left on the muffler . What size inlet and outlet? Thanks Leo
-
Why the "upgrade" to different size springs? Leo
-
From Lorren: the measurement is 7 ". I am running the QA1 small body shocks with a dia 1 7/8" which is the smallest dia spring you can purchase Leo
-
Pleaseee anyone? Kinda stuck until i resolve the correct dimension the upper mount should be at.. Thanks in advance Leo
-
I also measured the loacations of the mounts on the chassis that was under the Can Am style body and the attachment mounts on it are at 6 3/4" center to center. With more data i think i am going to have to move the upperount to its correct location as that is what seems to be causing the problem. Now, i just need the corect measurement . Leo
-
I am having a problem with the halfshafts on the rear differential hitting the rear coilover springs i have tried backing off on the various supension tubes (notably the two that locate the hub fore and aft) all to no avail. So my question is this: there sre 2 heim joint retainers that are visible right at the front edge of the tire when looking at the car from the side of the car . Measuring mine, from the center of the socket on the stripper bolt head to the same place on the one above it i measure 4.75". Can anybody measure theirs for me and tell me what theirs measures? I have checked it against one other persons car and there is a 3 " difference betwen theirs and mine! So i am wondering if their was a screw up in the placement mine which is causing the issue i am having . Loren gave me the measurements of the tube lengths and i have double and triple checked to be sure the correct lengths are where they need to be. As it is, i am adjusted out to the last thread on the heims and am right up against the spring. Thanks Leo
-
The hard part is finding "non standard" bushings like the ones on our rear diff mount :(the ones on my prior chassis is a totally different size than my new chassis), hence the reason i was going to have my machinist friend machine me some. However, turning Duro 85 polyurethane is proving to be a challenge as it wants to deform when machining. With the listed dimensions on the link i posted i should be able to source a "factory" made poly bushing. By knowing the dimensions ( where the link comes into play ), i can figure out energy suspensions part number for the bushing i need. Also i dont have to buy a "kit", i can buy just one bushing if so needed .