pickles
-
Posts
77 -
Joined
Content Type
Profiles
Forums
Store
Articles
Gallery
Events
Library
Everything posted by pickles
-
Unfortunately, they were correct ... I do not qualify without a valid prescription from a doctor!
-
Hi I am incensed … and I know that this is going to be a controversial subject … I would never normally post something like this because of the political divide in the US. So generally, I would keep my posts to cars and cooking. But I just have to vent. I am lucky to have a wife who is the main ‘breadwinner’ which allows me to pursue ‘hobbies’ … one of these is volunteer work … I am a volunteer firefighter, also a volunteer EMT. So, I get regular boosters/vaccines for all sorts of things. So skipped down to my local CVS to get a Flu & Covid booster … only to be told I was not old enough and no pre-conditions that warrant the shot for Covid. Ah Ha … I reached into my wallet and pulled out my National EMT card, “Unfortunately sir you are still ineligible” In what sane world can this happen? At the start of pandemic I took training to administer the vaccine, so I can give it but can’t receive it !? Probably nearly 25% of my calls begin with “Difficulty Breathing” I wonder how many people like me are going to be “Oh perhaps I’ll give this one a miss!” OK rant over and apologies if this post offends … back to cars! And yes my Caterham still will not start. 😊 Pickles
-
That is correct the inertia switch controls the fuel pump, and this does prime, if I disconnect the inertia switch the pump does not run. Thus I eliminated the inertia switch as an issue.
-
OK Sleuths Not getting much response from the official channels so let's try our trusted USA7s forum 😊 Have completed the build of my 620R, unfortunately it will not start or fire. I turn the key and dis-engage the immobilizer. I hear the fuel pump prime and there is fuel at the rail The dash display indicates that the gearbox is in neutral. And the red ignition light is illuminated. The battery is good and the engine turns over. I am not getting a spark at the plugs and am thinking due to the dry plug and lack of gas smell, that the injectors are not firing. I have checked all fuses and relays … all good. I took a look at the Crank Position sensor … ah ha! I thought its resistance should measure 450 Ohms … it is reading ‘Open Line’. Got a new one and that did same on the same thing on bench. Hmmm …. Then realized that the resistance, like voltage measurements would only be visible as a metal object passed through the magnetic field. So this now checks out. Would love to get something out the ECU/OBD port but as Caterham aficionados know the ECO does not talk OBD2 … so may be out of luck here. So Guys and Gals! What ya got that is going to get this old man on the road! Pickles
-
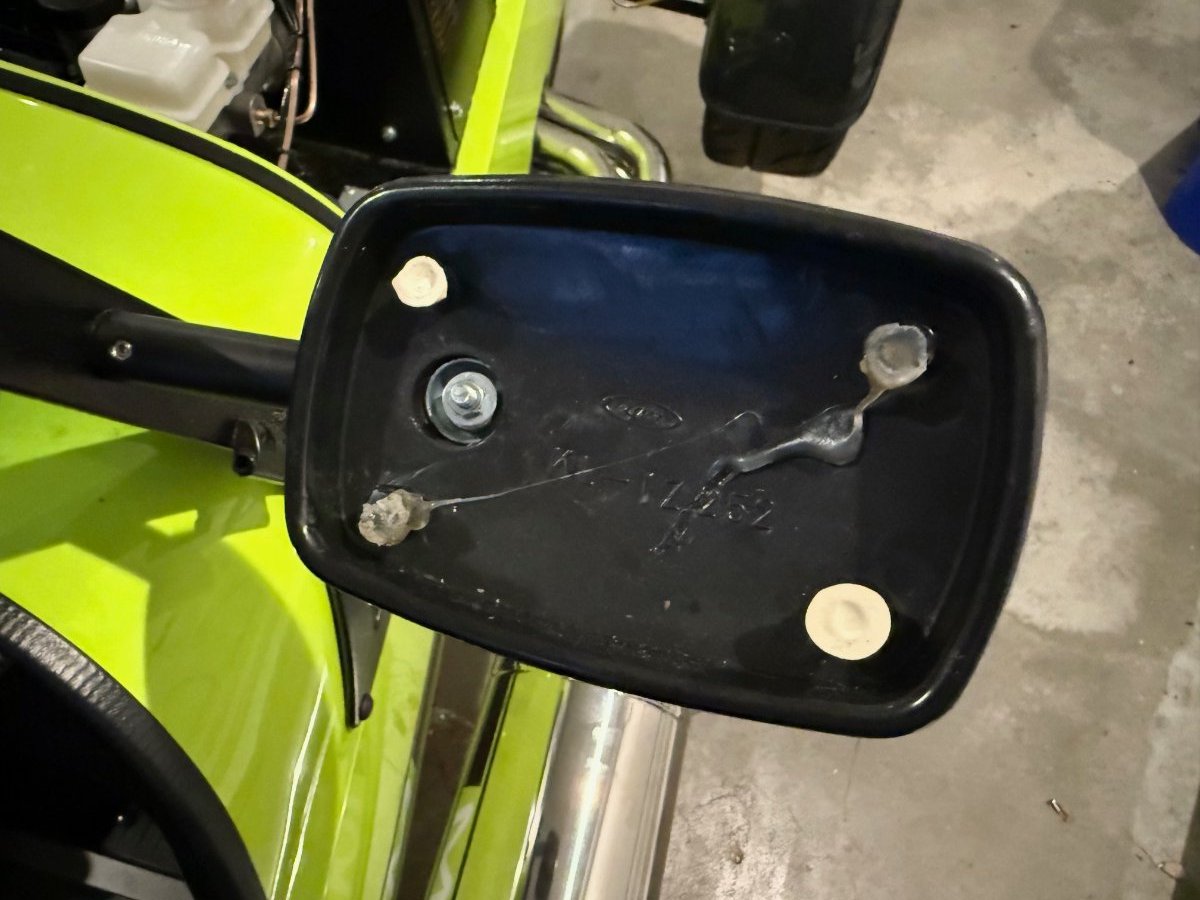
Hi Anybody know what the flexible glue is that holds the glass mirrors in place? As part of the build you pry out the mirror then attach the side fitting and then re-assemble. Following day I returned to the car and mirror was on floor in pieces. Note* don't order new mirror(s) ... they are $80 a pop plus shipping. Went to local glass/mirror shop they cut me 2 new ones for $11 ... a bargain! But I digress, ... the glue is on two of the plastic posts and its texture ... how do I describe it? ... it's like the best booger you ever picked out your nose Cheers Pickles

-
2025 Caterham 620R fully loaded. Just landed with practically no miles
pickles replied to Deman USA's topic in Cars For Sale
Oh My! The tariffs have hit hard. My similar spec'd 620R was more than 25% less back in Apr 25'. Apologies I am originally from the UK now living in the US, this was not Colin Chapman's original idea of affordable racing ... but it is a hell of a ride! (As someone once said to me "I have never known a car that every day I drive it, it tries to kill me!) Somebody will have an absolute blast in it! Pickles. -
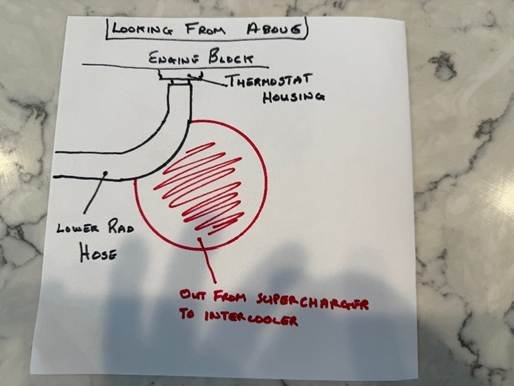
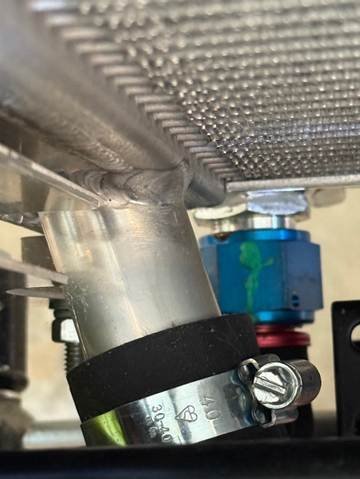
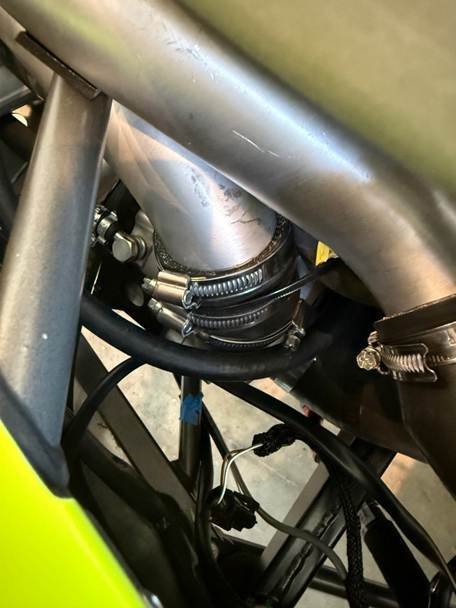
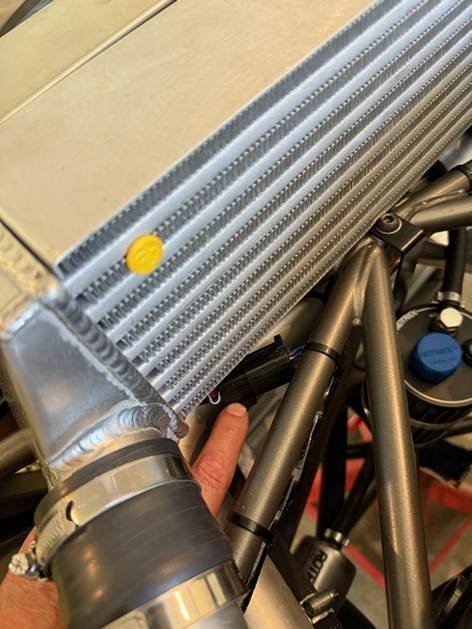
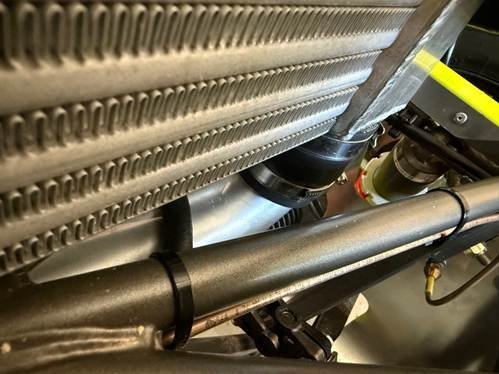
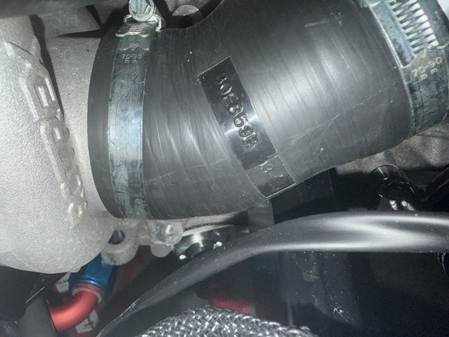
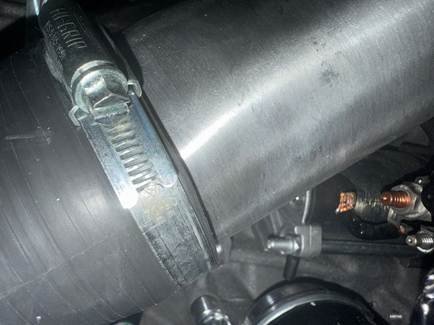
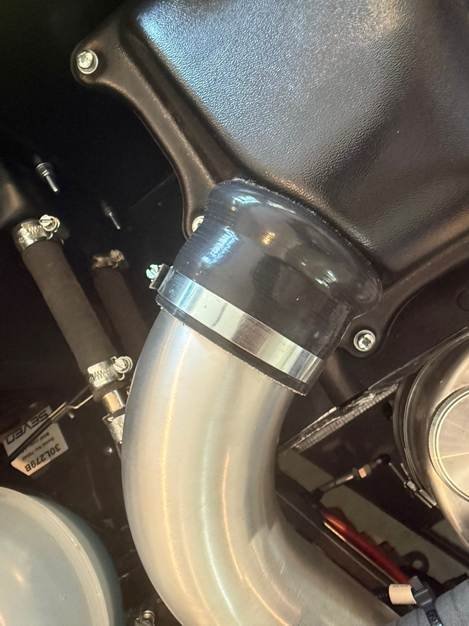
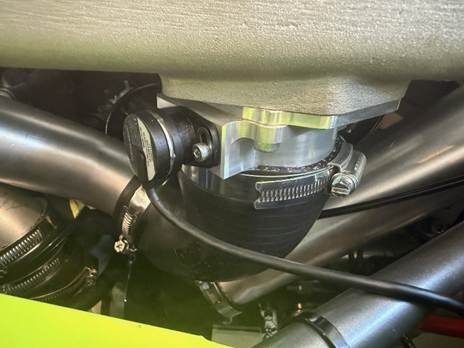
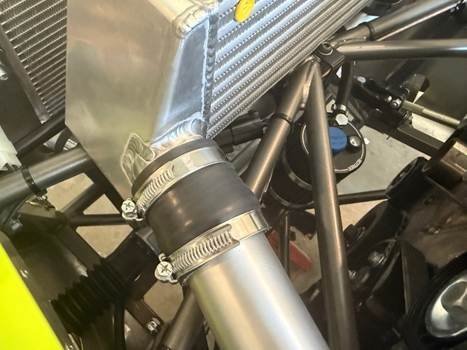
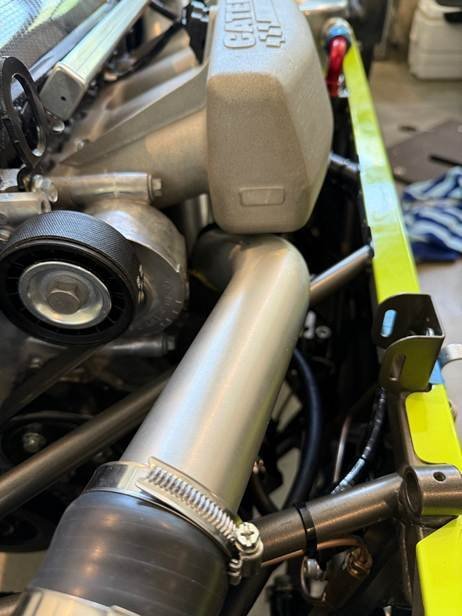
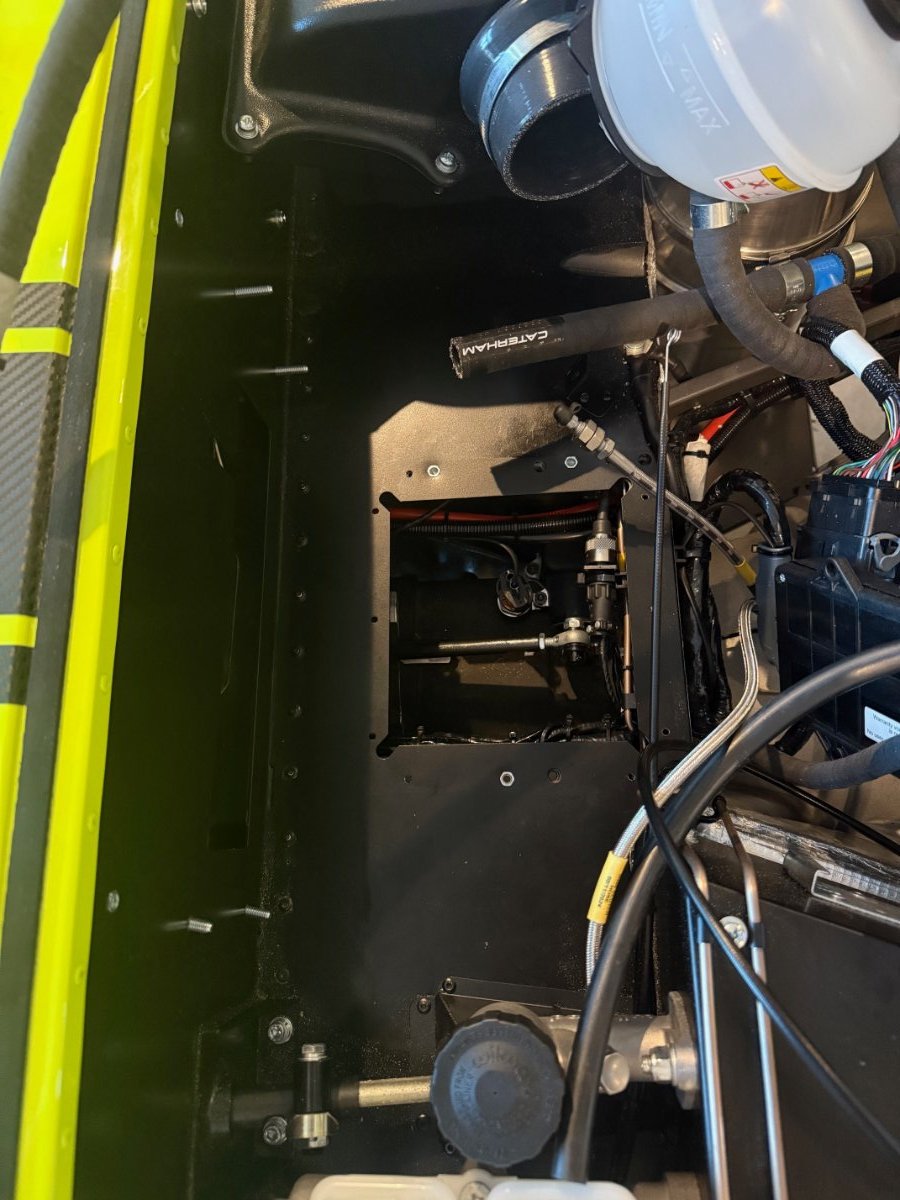
Radiator / Intercooler / Supercharger plumbing!! 1. Bottom radiator hose to engine thermostat. What a PITA! Please see diagram below. The bottom radiator hose is 2 pieces of black rubber tube with a connector approx. halfway secured with hose clamps; with the engine/thermostat side having a curved 90 degree bend My first try gave me this (excuse crap drawing):- The only way to subsequentially fit the supercharger to cooler outlet pipe would be to crush the engine coolant pipe. So after referring to a document that Caterham sent me (It is a workshop doc that I am not sure I am allowed to post) , I could see the engine coolant pipe was a slightly different shape and shorter after the 90 degree bend. I removed the pipe at the union and began the dance of cut a little bit, refit, cut a little more etc. I did this about 4-5 times and probably removed at least an inch until I created enough clearance to be able to fit the super charger exit pipe (it was still incredibly close). See below, again another crap drawing 😊 So finally I was able to get the clearance, but I had shortened the hose so that now it was too short to fully engage with the connector piece to the other side that went to the radiator. But luckily on the radiator side the bottom aluminum outlet is very long and the hose was fully mated so I just loosened the clamp and moved the hose forward to give me the extra length … see below (Not a crap pic, an actual photo 😊) :- 2. OK, Now the Supercharger => Cooler lower pipe. Don’t bolt super cooler to chassis … leave it loose. Pay attention to hose clamps, position in relation to other items to be fitted and also access for tightening. I had to loosen, twist, take off, rotate a number of them, a number of times! Put (Force!) the lower pipe onto the supercharger outlet. This is again a PITA but after twenty attempts I got it to fit … took a break in the middle to go to the ER room for a broken knuckle! But hey it was worth it! Make sure it will fit to the cooler at the other end before tightening the 3 clamps. I had to remove the plastic tie clamp and rotate this connection to get the other end of the pipe to fit under the cooler. Do not fit the pipe to the cooler just yet. But eventually it should fit like this. 3. Need to tackle the Air filter to supercharger pipe. Test fit this pipe several times, but the final sequence is… First bottom rubber hose to charger and clamp (Note orientation with indent to clear the engine mount) , take off air filter box and then do final install of the long inlet pipe, refit the air box and tighten both hose clamps. 4. Fit the Air Intake plenum back on. This is going to seem weird, as you would think putting the tubing from the intercooler to intake would be first. I beat this square … I beat it round … but in the end I put the intake on first … remember to attach the throttle cable first! Then attach the intake to the head. 5. Attach Intercooler outlet to Engine intake So you need to try this fit many times and wrap that pipe in tape because you will be scratching it! But take a look at all 3 photos below, especially the last one to see the orientation. You will need to move the rubber hose in twist and depth on insertion to get to fit (that almost sounds sexual! ... but it is truly orgasmic when you get it to fit) Also move the actual super cooler to create more room
-
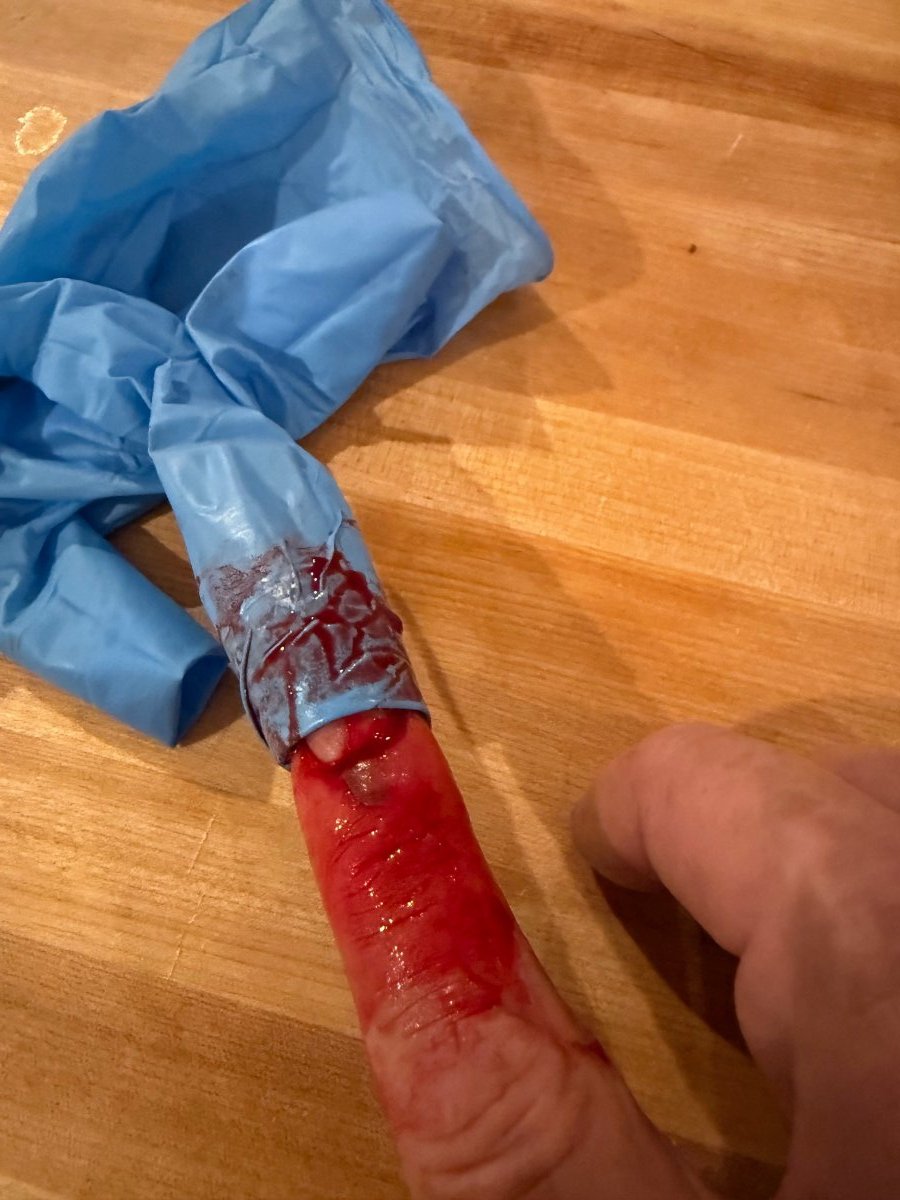
OK Fluids and some blood! Engine Oil ... 3 ltr in engine 3 ltr in dry sump tank … check Gearbox … see earlier post … check Coolant … 5.1 ltr … check Supercharger fluid … on the to-do list … check Diff … hmmm… lets tackle this! I was under the assumption just like my 360 build, no fluids are in the car or components! On the 360 build, to fill the differential you need to lift the wood floor in the rear of the car to access diff for filing. So I removed the pre-fitted carpet … cursing the glue holding it down … to then realize the wooden section could not be removed due to the 2 support struts on the chassis to diff casing. OK …. My brain gears rotate … lets treat this like an outboard motor, remove the lower plug and fill/pump the oil into the unit from below! So! You have to imagine this … I am under the car lying on my back. I have just hacked my finger on the fitting and the chassis … it is bleeding profusely … I am a qualified EMT … Hmmm probably going to lose the nail and need a stich or 2 … Nah! Some Super Glue/tape/rubber glove should tie me over. (I am such an idiot) I get the bottom fill plug removed … 1.2 ltr of fluid pours over my face … chest … garage floor … I am laughing like a madman … and then I spot this!
-
Hi Am looking for some pictures & info with regard to the supercharger lubrication plumbing in particular the connection between the reservoir and the filter and priming bulb. Also the height that the reservoir canister is set at. Cheers in advance Pickles
-
LOL ... you are right ... the need for a 'maestro' occurs a lot, luckily mine was the build support team back in the UK.
-
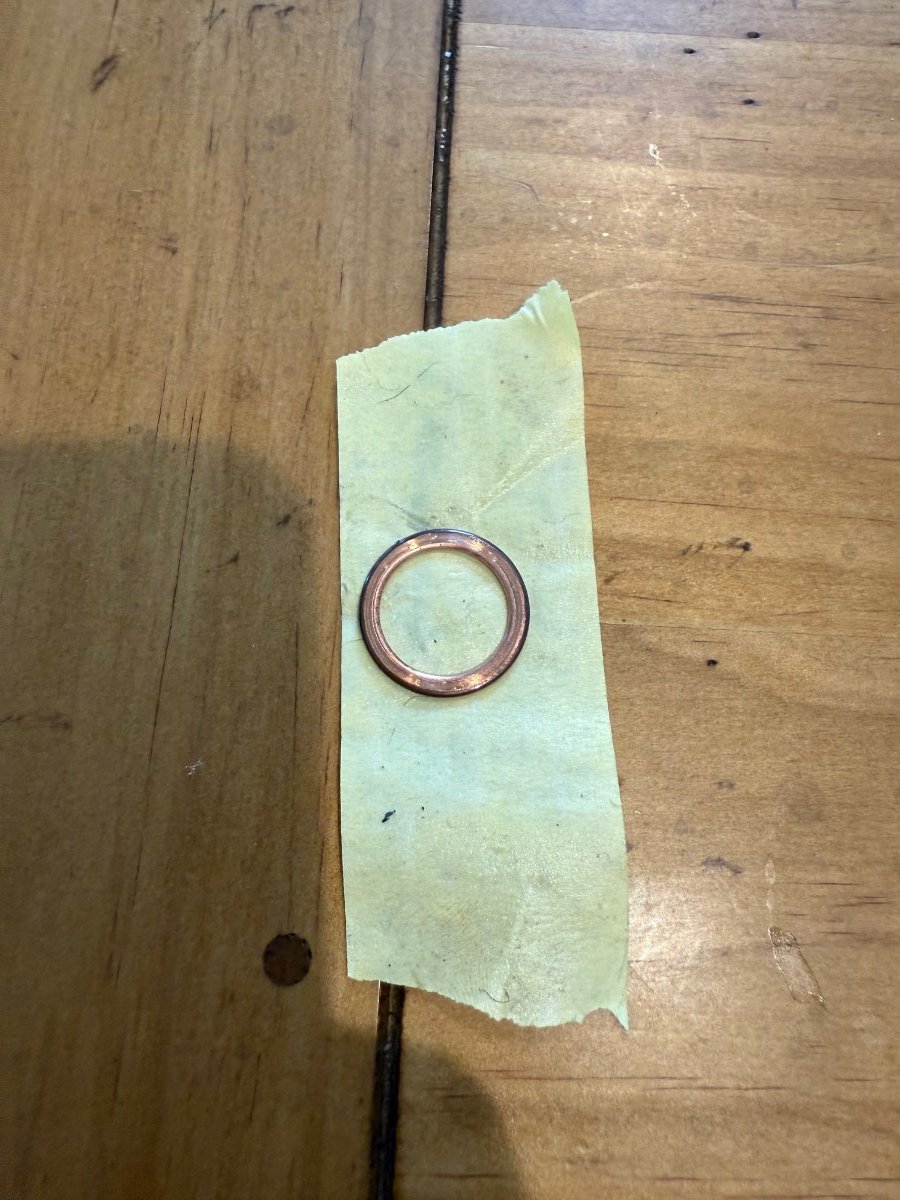
So I almost cried !! I resembled the various pieces I had taken off to get to the access panel above the gearbox. Just as I was tightening the final bolt on the car heater, I noticed a small rubber hose cable-tied to the chassis. Traced it back to the oil catch can. Oh! It must be a breather for the tank … but in that case why has it a piece of tape on the end with another cable-tie on it, also there is already another tube on the tank as a breather…what else is in reaching distance of the pipe that would need a breather? Hmmmm the Sadev gearbox? Yep that’s the culprit, and guess what? to get it on I have once again take out the heater/ECU/access panel to get it to fit! Now this was the bit got me laughing! In a sort of mad-man way. While I was now attaching the breather tube, why not fill the gearbox with oil as the fill plug is really only accessible via the access panel. Took out the fill plug and then looked for some tube to insert and pour in oil. No tube so I went to local H/W store to procure some … before I left, just in case I get waylaid I put some masking tape over the exposed hole in the gearbox (I took the plug with me to ensure I got the correct size tube) Job done! Breather pipe fitted, gearbox filled with oil! Re-assembled heater etc, all good to go! I did a bit of a tidy-up and picked up the piece of tape I had put over the gearbox oil fill hole … see photo for what I found! Again I am taking out heater etc to now fit the cooper gasket … I am laughing like a mad-man rocking back and forth in an asylum!
-
Finally, some progress!! Have been running around the country catering various events and weddings which has put me back at least 6 weeks. But I reached out to Caterham UK for some advise. The Sadev box has 3 different electric connections. There is an access panel just above the gearbox in the engine bay. You have remove the engine bay side of the heater / ECU /Battery (Who the hell Spec'd the vehicle with a heater ? ... Oh sh*t! that would be me!) and then drill out a few rivets to expose the gearbox ... plus all the flesh and blood spent trying to do this via hand manipulation! Took me then 30 seconds to connect the electrics. I was ecstatic!! But ... the next question how do I fill the gearbox with oil? Anybody out there with the Sadev gearbox ?
-
I have the first (or closest to my touch attached), but he next one is further into the tunnel ...I can touch both female & male, but cannot encourage them to mate (Now there's a phrase you won't often hear on a car discussion website ) I think I may end up purchasing one of those bore scope cameras so I can truly look at the orientation rather than guess with two fingertips.
-
Unfortunately, the couple of electrical connections I am fighting on the SADEV box are not accessible via the tunnel from within the vehicle, they are closer to the engine within the tunnel.
-
Had to drive to Utah and back 5000 miles ... cook a 4 day event ... even dragged the wife, so a number of weeks have slipped by without me working on the car. Until today ... had a couple of friends round, promised them beer and pizza ... for the engine/gearbox install. What a PITA! I have done a 360 build before, so thought I knew what we were in for, but this was a different dimension. The main issue ... this was already a rolling chassis ... sounds like it should be easy but Nah! I thought I was prepared Removed intake / Super charger / alternator / starter / most of the 4 radiators (Engine, Oil, Super Charger, Inter-cooler) I knew the tilt/lower/move forward the engine/gearbox assembly ballet. But the curve ball here was the prop shaft (loose in the tunnel) and the rear diff already on the vehicle added a fourth and maybe fifth dimension. Spent 2 hours trying to align the gearbox spline and prop shaft, until finally it just went into place. No idea what the magic sauce was but it worked! Then the next hurdle, which I have currently not solved. I have the SADEV gearbox, there are a couple of electrical connections on top of the gearbox housing. The car loom has these hanging down in the tunnel ... so short you can't connect during the install, and so short that I need child hands to connect afterwards. But hey we spent another 2 hours trying and gave up to hit the booze. But that being said the Engine/Gearbox are in!!
-
I deserve this!
-
Trust me there always will be something that is NOT smooth and easy! That is the joy of owning a 7
-
Hi CarYenta Probably more so in the sense that a fiberglass wing is not as strong as CF. I chose rubber spray coating but others have used stick on foam lining which works really well. Sort of a dense black foam about ¼’ thick. Pickles
-
Hi CarYenta I was asking myself the same question a few weeks back ... having just got a delivery of a 620R ... so am guessing you are in the same position as me ... you have a rolling chassis and then an engine/gearbox, plus a box of other bits such as exhaust etc. I have previously built a 360 so am familiar with the Duratec install, but this is slightly different in the sense that during a regular build the engine/gearbox, go in relatively early in the build, whereas this is right at the end. I am going to be installing the drivetrain in next couple of days so will shout out with any info I can. I have the SADEV gearbox but am expecting install will be pretty similar to the 620S. Just looking at the engine bay and thinking back to my 360 build I can already envisage I may have to remove a few pieces such as engine mounts and duct work to squeeze the drivetrain in! Pickles
-
Sprayed the underside of the mudguards with 3M Rubberized undercoating to prevent spider cracking from stone damage. Just removed the rear and masked and then cursed the front ones for being such a pain to remove, then I masked the whole car. My previous build I used 'Big Heads' on the front cycle wings which meant they were easy to remove. I know someone will ask ... Why are you using 'Cooking Foil' as paint masking ... trust me ... try it ... makes things soooooooo much easier!!
-
Hey Many thanks for the offer, may take you up on that! Things are a bit in limbo as next week have to drive to MA ... pickup a 28' truck and drive it to Utah ... do a 4-day catering event and then back again ... so think that will blow 2 weeks :-) Cheers Pickles
-
The Adjuster and locking ring and the offending hose clamp once I was able to finally loosen it ... suffice to say will ditch the clamp and replace with a large cable tie which can then be cut off easily for future adjustments.
-
Opps Duplicate post
-
My wife would kill me!!! But saying that as soon as she sees the cost ... I am toast!
-
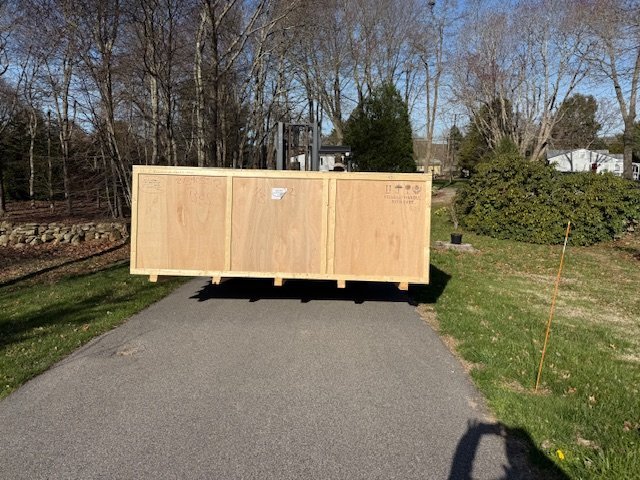
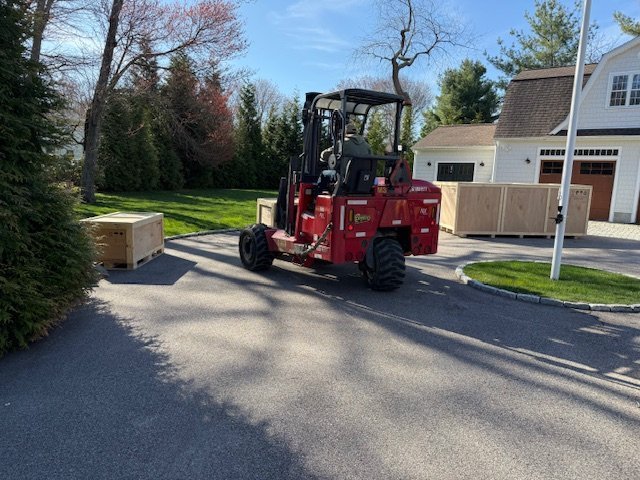
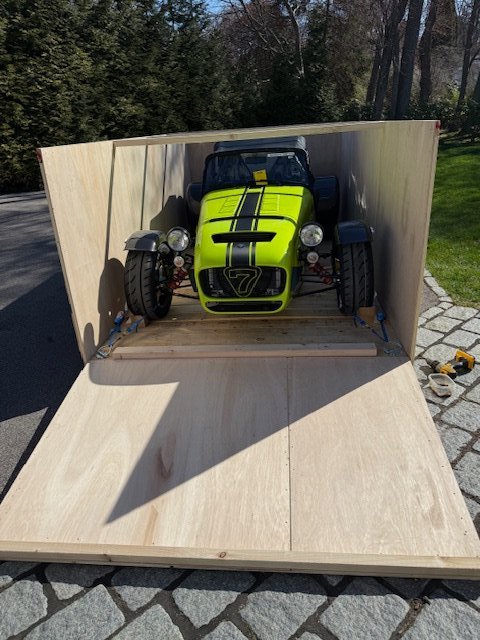
Compared to most builds this will hopefully be pretty boring (how can any Caterham be described as boring !! ) in the sense the 620 comes into the US as a rolling chassis. Here's the unboxing ...