
searya
-
Posts
72 -
Joined
-
Funny you say that. A few years ago i created a thread on how to create a Carbon Fiber Rear diffuser. Didn't do a great job of showing the final product in the thread though and the diffuser was off in the pics above but will be back on for the new season! For the load cell and arduino option what was your thought for placement to get measurements? I would love to see what kind of downforce different heights and angles provided.
-
Thanks. Next up is to play with some front wing designs in case i need to balance out my new rear wing.
-
Will do and guess I am also due for a new corner balancing now too.
-
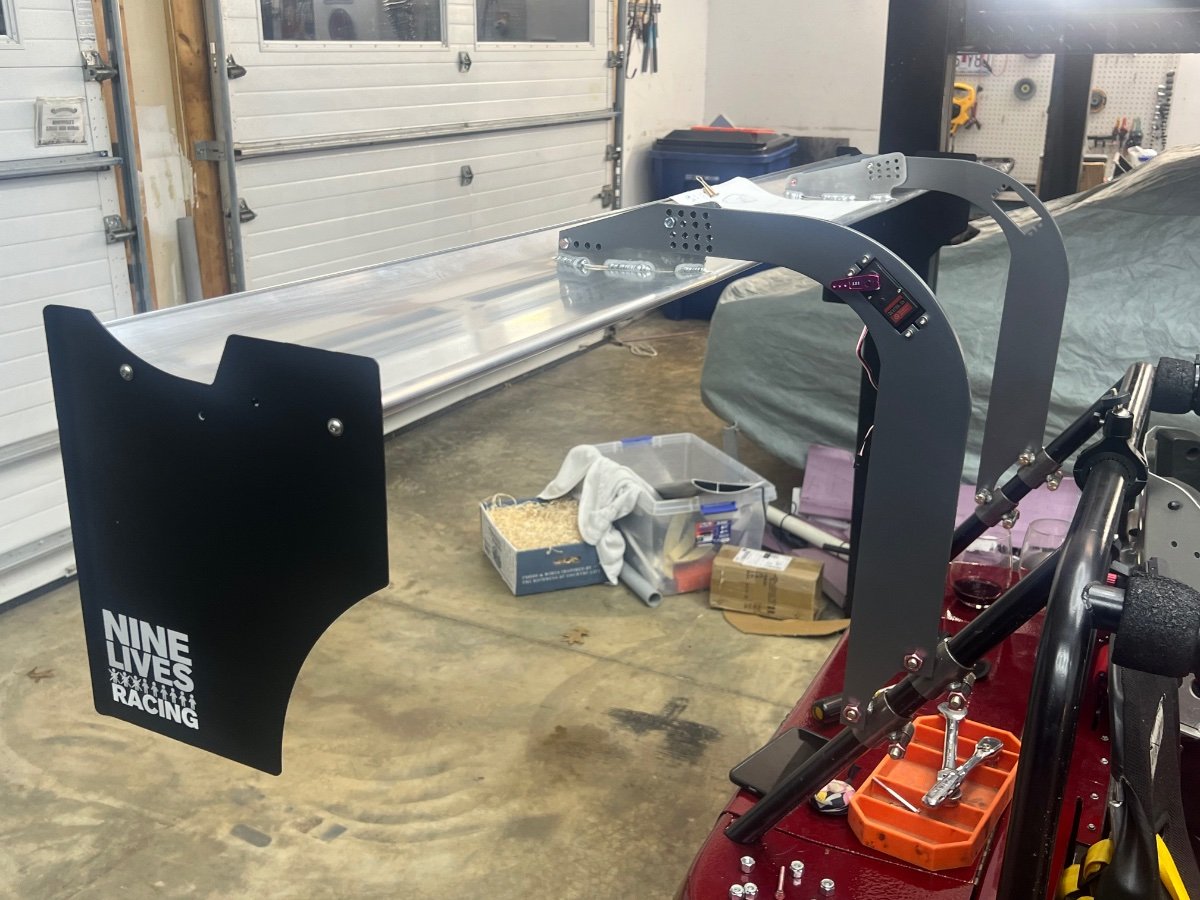
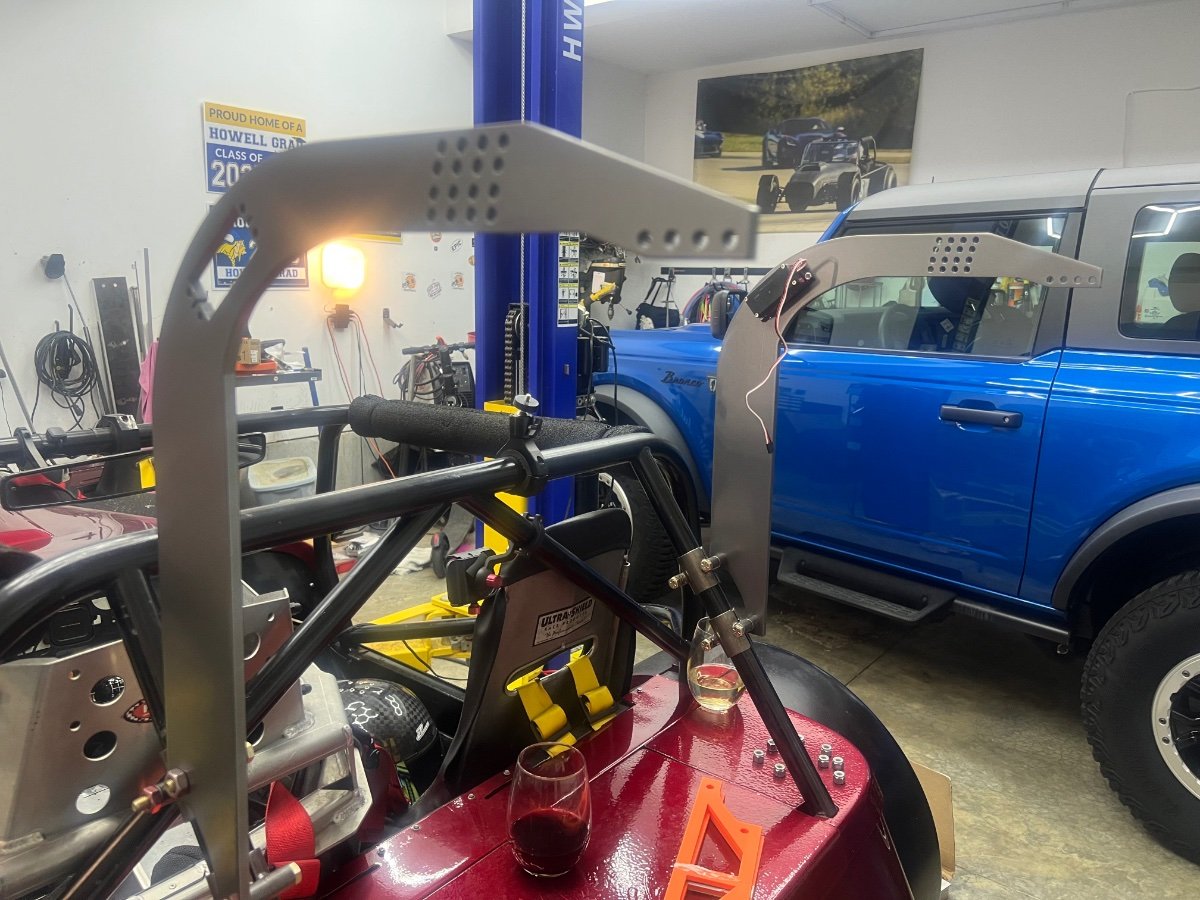
you bet. onShape is fantastic. Work online, no big computer needed to run the software, easy to collab and do stuff with a kid at college etc. And after i had the final all it took was upload to send cut send and the final was exactly like the 3d models. If anyone is thinking of doing the same mount location, all that would be needed is to change the CAD model to match the angel of your rollbar (mine was 55 degree angle)
-
Don't worry we only buy box wine
-
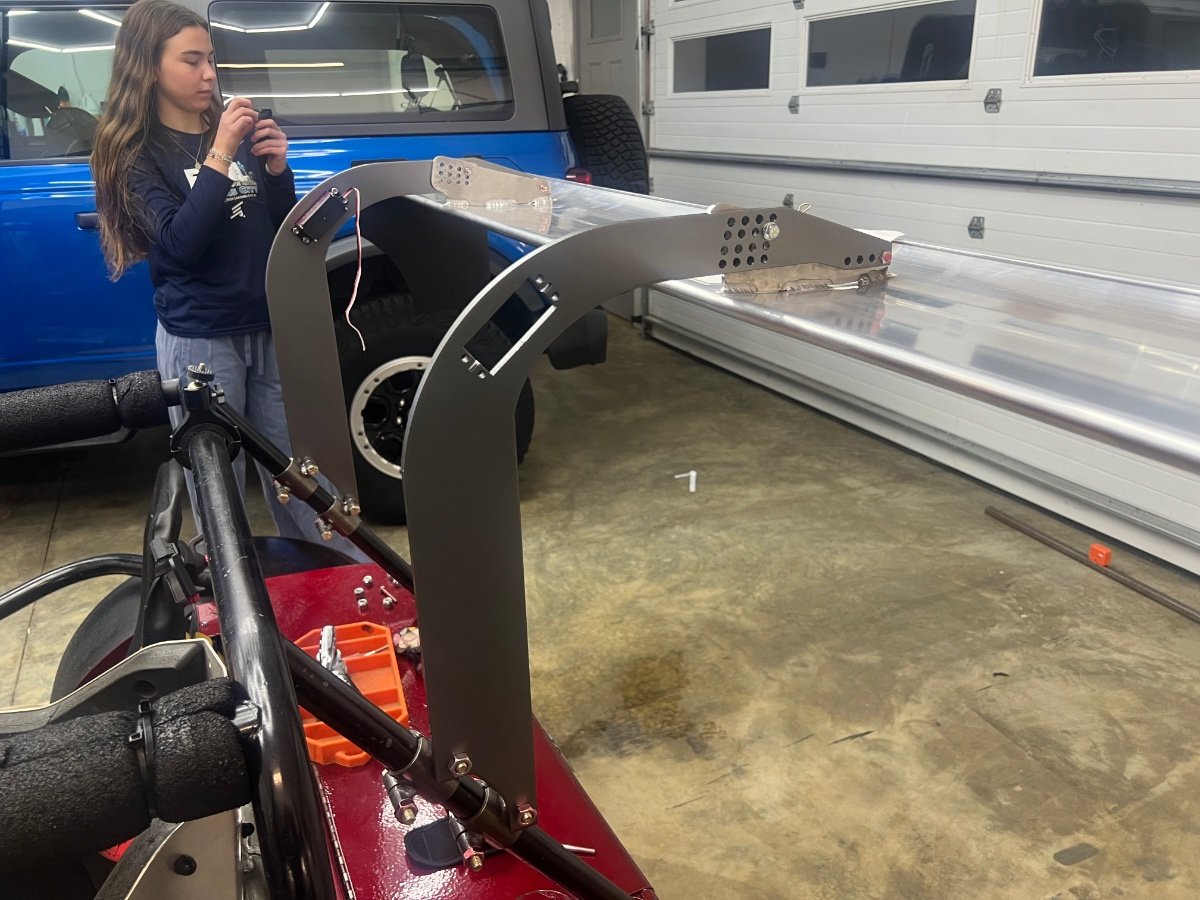
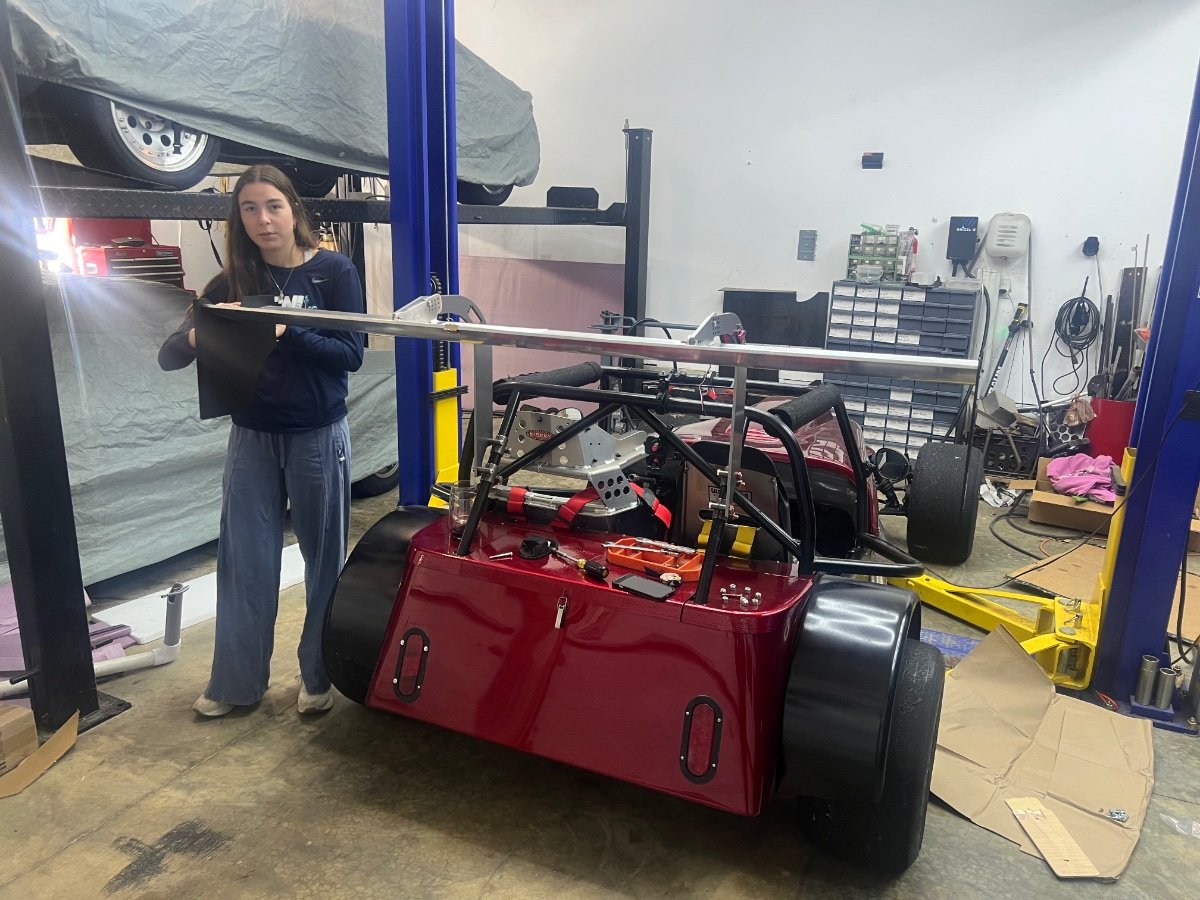
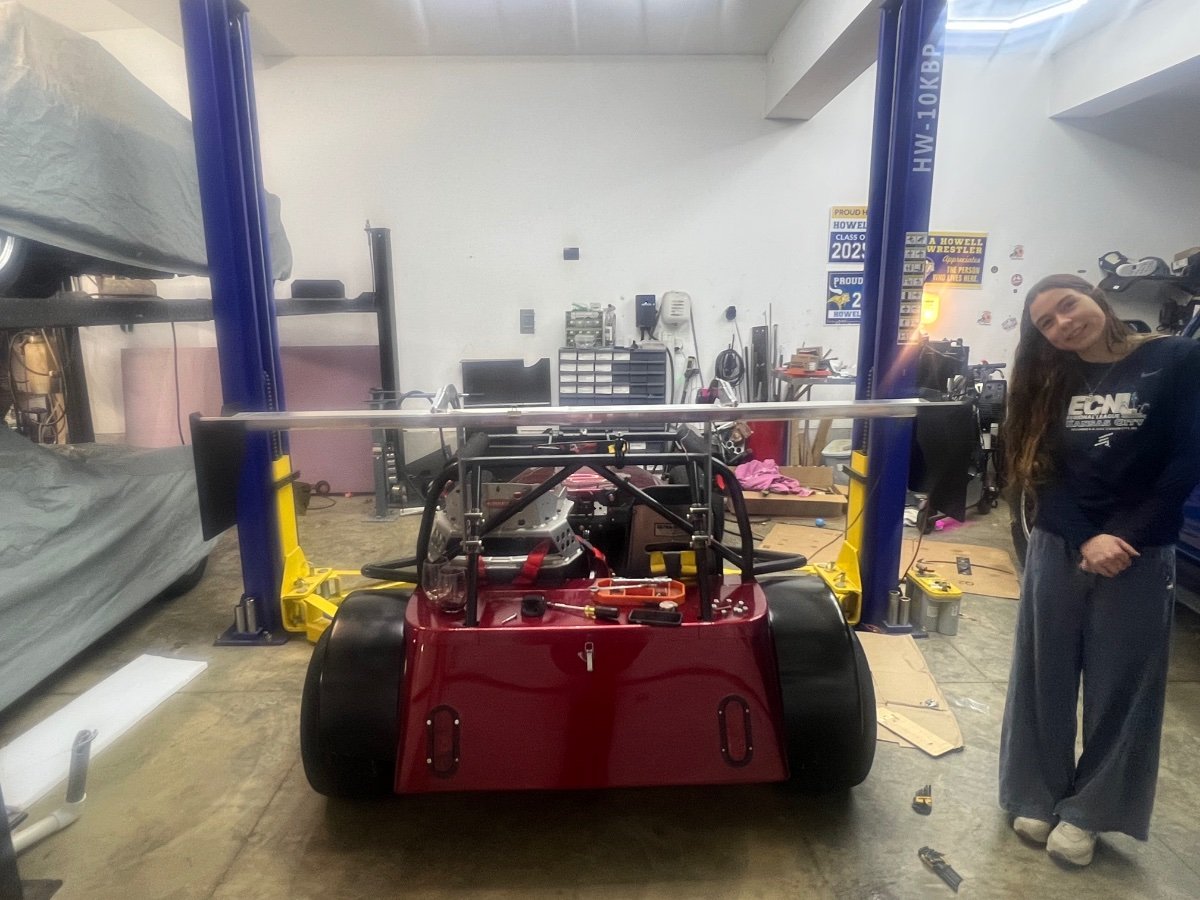
Total Weight of wing and uprights was 21lbs. Originally I wanted to build the wing from carbon fiber with a foam core. But i really do hate making carbon fiber and so far i have been too cheap to buy one. I still may do it though sometime when i am bored :). As to with the wing is 71" wide and goes right to the edge of the tires. I just HPDE days so no rules for me to follow
-
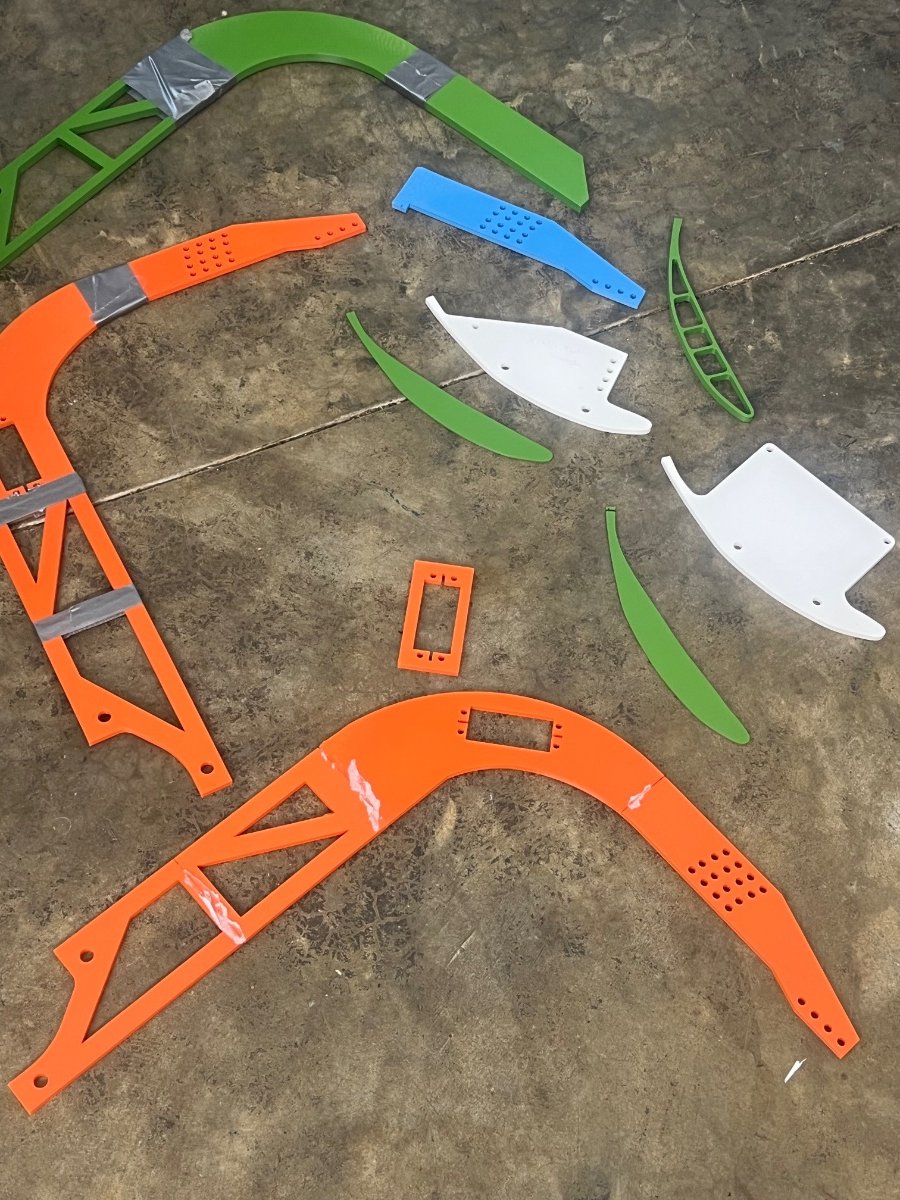
Lost control 2 times last year on track so decided to make my winter project adding some rear aero/downforce. Attached are some pics of the plastic prototypes and the final product. My son and I used onShape a free online CAD program to design the mounts then did like 10 different iterations of 3d plastic models before having Send Cut Send cut the final version out of aluminum. We also designed in a slot for a big servo motor. The plan there is to later add a second element with drs capability. For the drs capability I bought an arduino microprocessor with an accelerometer and gyroscope. I then coded it so that if I hit the brakes, have x amount of g force or yaw rate the second element will close. Else it will open after a second (that is while on a straight). I attached the mounts to the angled part of the roll bars. My thought there was I can raise it higher/more forward or lower and backwards plus change the angle of attack in the wing. Also the wing can be removed entirel with 4 bolts. In all positions the wing will be at best right over the rear suspension (high/more forward) or behind the rear trunk (low/back). So once I get it track tested I will see if any front aero is needed as well.

-
Clutch: Powertrain Technololgy 7.25 3 disc clutch and button flywheel (3 discs x .105" thick / 1-5/32" x 26 tooth / Chevy LS V-8) ( CH316A1Z90) with Button Flywheel (FH105) 7.25 Discs -Ceramettalic (3pk .105 6R, 2E+1C Zsprintgs with Bolt Kit NK105166) 1 https://www.powertraintech.com/collections/clutches-flywheel/products/7-25-clutch-flywheel?variant=32944934092940 500 Powertrain Tech 168t Flexplate 1 Clutch, Button Flywheel, flexplate all bought on facebook marketplace 0 Throwout Bearning (Hydro-MAX drop-in floating HRB for small diameter racing clutches, 1.385" ID Standard Height - OAL 2.28 - 3.03" / With external bleeder kit, no supply line) RH7101 part number 1 https://www.powertraintech.com/collections/hydraulic-release-bearings/products/hydro-max-drop-in-floating-hrb-for-small-diameter-racing-clutches-1-385-id?variant=33664925663372 333 Clutch Alignment Tools (Ram Clutches 03-013 Steel Alignment Tool) 1 https://www.amazon.com/gp/product/B008LX9WJS/ref=ppx_yo_dt_b_search_asin_title?ie=UTF8&psc=1 49 Allstar - ALL46100-24 -3 24" Clutch Line Kit (NE -3 AN STRAIGHT END AND ONE 3/16 INVERTED FLARE 90 END) 1 https://www.amazon.com/dp/B009Q750Q2?psc=1&ref=ppx_yo2ov_dt_b_product_details 27 Detailed install instructions are above with pics. I love the 7.25 inch lightweight flywheel. Car spins up so quickly and also helps with engine braking which allows me to carry more spread before and into a turn. Triple disk is overkill as a single disk can hold 400hp/torque but I got crazy deal on the kit off of facebook so I guess if I every decide to add twin turbo's I am set!
-
Transmission: Tremex TKX TCET17722 GM close Ratio https://www.speedwaymotors.com/TREMEC-TCET17722-TKX-Close-Ratio-5-Speed-GM-Manual-Transmission,452008.html?utm_medium=CSEGoogle&utm_source=CSE&utm_campaign=CSEGOOGLE&gclid=Cj0KCQiAwJWdBhCYARIsAJc4idCLaTZyTE2LFj- sJ41h306pYWq6Yn6NQH4dLeaKryFbgKJPCvaBhlYaAt_5EALw_wcB 2655 Sonax 31 spline 1350 size slipyoke https://www.sonnax.com/parts/3347-slip-yoke 100 original driveshaft is a 1310 size so if you get this you will also need the moog uJoint listed below MOOG 348 U-joint size 1310 (driveshaft) to 1350 (sonnax slip yoke) https://www.amazon.com/dp/B000N8NIWQ?psc=1&ref=ppx_yo2ov_dt_b_product_details 25 again driveshaft side is 1310 so make sure you match this to your selected yoke Transmission Mount - Duralast 2268 Autozone 8 Bell housing GM 621 Offcially Licensed Repro from MelroseCorvette.com 1 https://www.amazon.com/Melrose-T-Top-Int-Licensed-Bellhousing/dp/B00LNEQCPE 189 Not much to say here but the TKX transmission is great. About 100lbs so 25 heavier than the old T5 but can handle up to 600hp and Torgue or more. Remember to get the close ratio part listed above. It is so nice to be able to use a 5th gear now! The old t5 it was pointless and 5 was overdrive ratio.
-
Never finished my postings for the next guy that does the conversion but I will say I HIGHLY recommend it. The LS power is fantastic. Driveability is the same and it is so nice to be able to keep up with and pass most folks out there again! Below are the rest of my parts list and other knowledge gain from doing the conversion and tracking the car for 2 years now!
-
Didn’t see the car you mention but 2 years ago at the Porsche club track day at wwt raceway one of the members told me he had ordered a 620. Maybe ask around the pca circles.
-
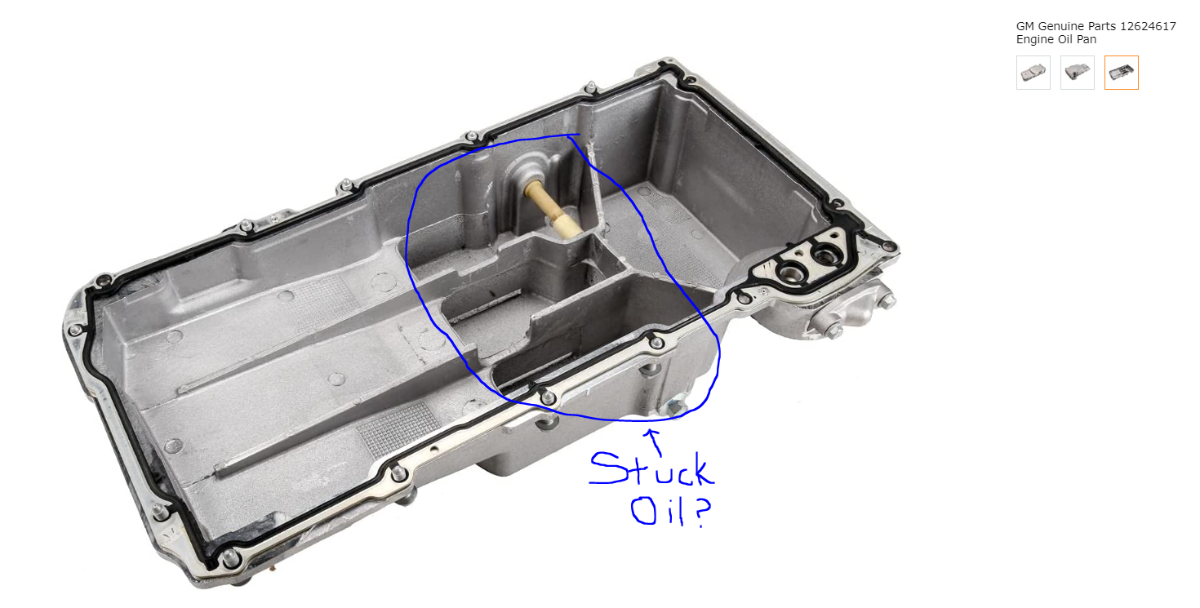
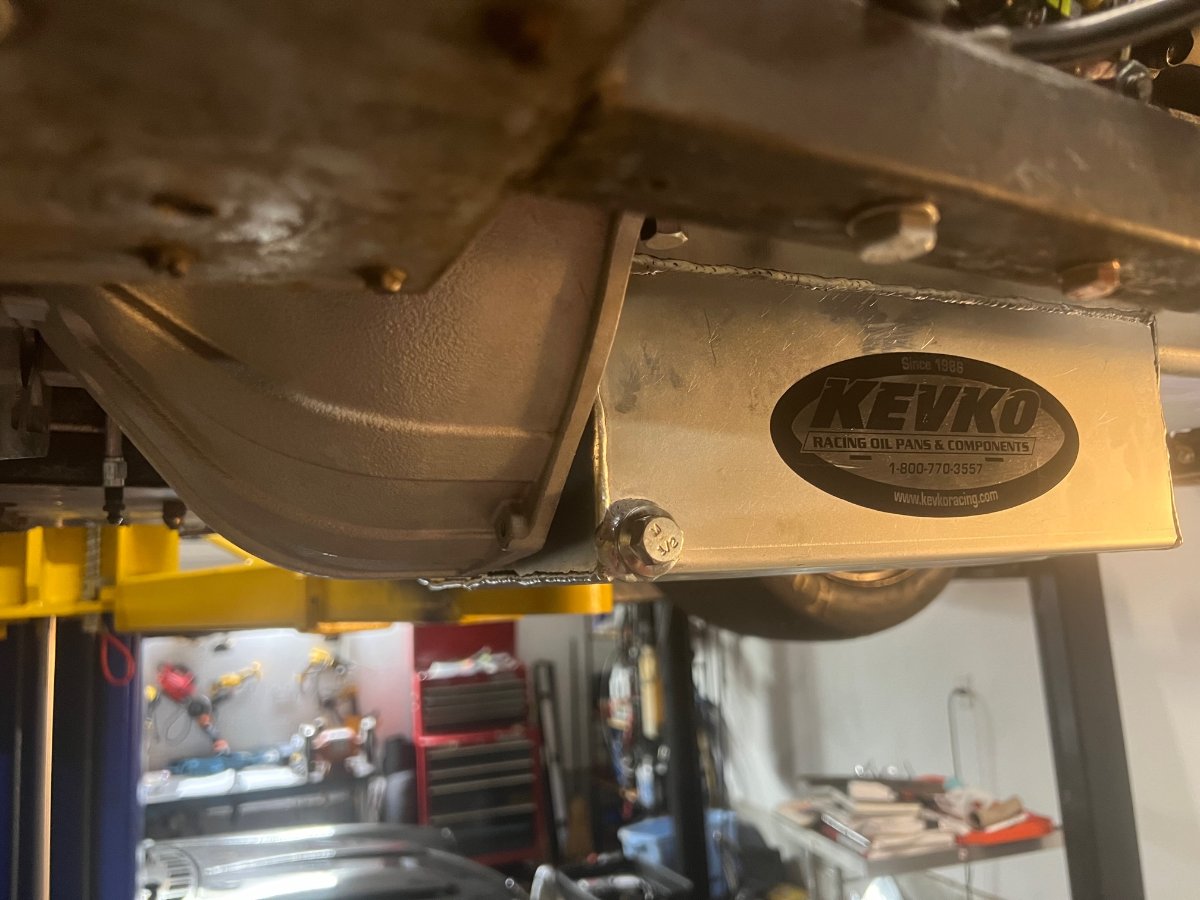
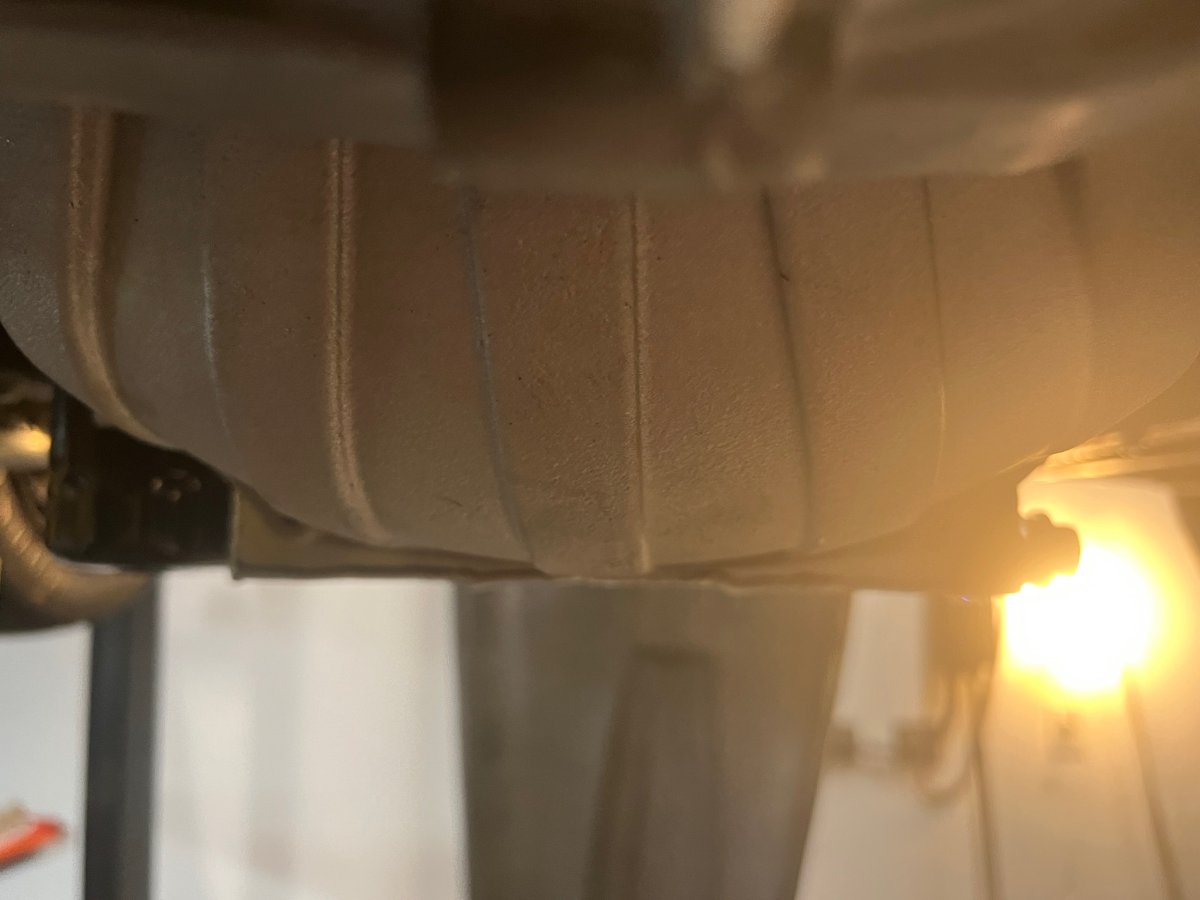
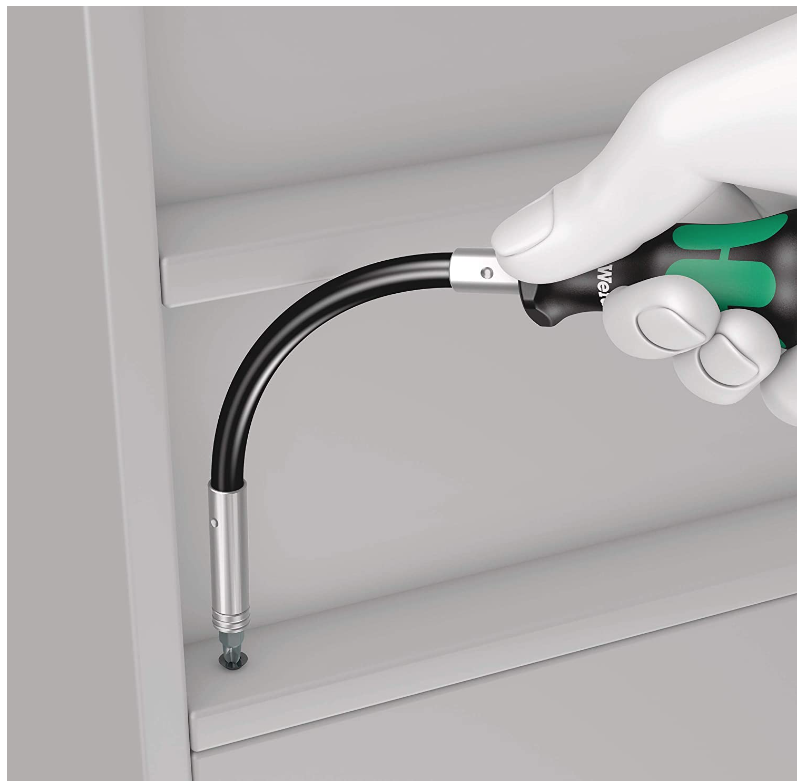
Oiling system - Oil Pan: I went with a went sump system for two reasons, 1 Cost of a dry sump system and 2 not knowing how i would make the dry sump pump and tank fit. Having had oiling issues on my C6Z06 I wanted to have as much protection as possible short of the dry sump. For that I wanted to have a 'racing baffled' oil pan and an Accusump / Oil Accumulator system that would feed oil it need it in a turn. Important Learnings: Oil Pan Height/Depth is VERY important. You want the shallowest pan you can get. Scott Minehart recommends the stock LS3 pan with is 4 5/8inches deep. I did not want that pan as it does not have racing baffles and only holds 5 quarts. Plus looking at the design of the pan I am still confused on how oil doesn't get stuck in 'valleys' away from the pickup tube. See pic below. I found other online pics and could see any holes to allow oil out of those areas to the pickup tube area. I originally bought and installed a beautiful Moroso Oil Pan that was 6 inches deep/tall. I figured the extra inch and 3/8s would hurt but trust me it does. After lightly scraping the pan a few times I removed that pan and went with the Kevko Pan listed in the parts section above. The Kevko pan is 5 inches deep and race baffled to keep the oil next to the pickup tube. This fit great and lined up with the bottom of the bellhousing. I HIGHLY recommend installing the oil pan before the transmission. The Two oil pan bolts in between the bellhousing and pan took me 90minutes to screw in. Still not sure I could do it again. To get those two I had to use a flexible screw driver with a socket bit on top. Even fitting the bit and screwdriver in was extremely difficult.
-
Here is the final Parts List for my setup. Oiling System: Oil Pan Kevko LS1002 f-body race baffled 5 inch deep oil pan with spin on filter 1 https://kevkoracing.com/products/ls-f-body-5-deep?variant=12379420426302 475 Oil Pickup Tube Kevko LS-1002-1 for 5" deep pan 1 https://kevkoracing.com/products/ls-103 120 Oil Pan Gasket (GM Genuine Parts 12612350) 1 https://www.amazon.com/dp/B014O1IJW6?psc=1&ref=ppx_yo2ov_dt_b_product_details 33 Oil Filter (13/16-16 thread size) ACDelco GM Original Equipment PF46E Engine Oil Filter Parts master 61042 (3inches tall) alternatives that may be work but could be taller, Fram HM3506, purolator l14006, wix61042, champ PH44 1 https://www.amazon.com/gp/product/B00496ILZC/ref=ppx_yo_dt_b_search_asin_title?ie=UTF8&psc=1 11 Accusump 3qt and Mounting Brackets 1 FaceBook Marketplace 200 Accusump AN10 Hoses and Connectors 1 old LS7 stuff 0 Runs from front of engine to accusump Stock LS1 windage Tray 1 part of engine purchase 0 GM Genuine Parts 12677837 Engine Oil Pressure Sensor 1 https://www.amazon.com/dp/B076JKKG4P?psc=1&ref=ppx_yo2ov_dt_b_product_details 38 attached near accusump in pics m16x1.50 male oring to 10 AN male (for accusumpt feed into LS block oil galley) 1 https://www.amazon.com/dp/B0B7BM1862?psc=1&ref=ppx_yo2ov_dt_b_product_details 11 installed at front of engine on drivers side LS Oil Pump Pickup Tube Girdle (holds down the oil pickup tube using two screws vs 1) 1 https://www.amazon.com/dp/B08LX6FT1Y?psc=1&ref=ppx_yo2ov_dt_b_product_details 15 Kevko pickup tube comes with one but I used this one instead as I had already bought it. 1/2 NPT Male to 10AN Male adapter (goes it the on off valve of accusump) 1 https://www.amazon.com/dp/B000CILYVY?psc=1&ref=ppx_yo2ov_dt_b_product_details 9 Meiling 10295 Oil Pump (High Pressure with Standard Volume) 1 https://www.amazon.com/Melling-10295-High-Pressure-Pump/dp/B001T8H0JG/ref=sr_1_5?crid=DU4GIAM6UL12&keywords=meilling+10295&qid=1650303457&s=automotive&sprefix=meilling+10295%2Cautomotive%2C98&sr=1-5 139 Part of the engine. I just bought a new one when doing my engine build. Pin (.26 or .38inch pins) Spanner Wrench (.6inch to 4.7inch width) to hold ends of Accumulator from Spinning when installing Valves 1 https://www.amazon.com/dp/B07HFFR9RR?ref=ppx_yo2ov_dt_b_product_details&th=1 12 -10AN Female To -10AN Male W/ 1/4 NPT Side Port Gauge Sensor BLACK Couple (FaSSter Performance Products) 1 https://www.ebay.com/itm/142769999090 15
-
Now that I have everything working below these following posts are detailed write up of what was needed for each area.
-
So long time without posting an update but as I mentioned above I spent all the spare time I had finishing the car so I could make my first track day with it last weekend 4/15. The car did great but my weekend was short lived so I didn't get to compare lip times etc. I was at Putnam raceway in Indiana with 10/10ths motorsports. I instruct with them and run the Advanced group and then my friend runs right after me using my car in the intermediate group. Saturday was a beautiful day and I was up first. I had a 30 minute session and spent the first 20 minutes or so of it doing 5/10 and watching the gauges even in the turns. I was pleasantly surprised to see nothing looking off. Oil pressure looked great (maybe even a little high?) but was between 45 in the turns to 95 at WOT down the straights. After owning a c6z06 that would dip to under 10 in some turns I liked this MUCH better. AFR looked good, water temp was great and the car just seemed to drive like you would hope for. The last 10 minutes I started to push it more and all continued well. After my session, I jumped out and my buddy jumped in for his 30 minute session. He got to go much more all out than me as the tires were now sticking really well. He loved the new power and the new transmission/clutch combo. After the car ran for that first hour we did a nut, bolt, coolant, oil, fuel, catch can, belt, leak, tensioner, melted wire, and anything else we could think of check and then did a 'happy dance' that nothing looked off. In reality we were really expecting some problem but to our amazement every connection and system was good and we had a full and beautiful day ahead of us! A few minutes after finishing the check I was back out with the advance group and was ready to have some fun pushing it! I spent the first lap rewarming the tires and then started to push about 8/10th. I made it to the 7th turn, which you come into at 90ish and have to hard brake down to 45 for a 90 degree right hander. When I began my turn in my 20year old driver side upper ball joint (which is in reality a tie rod end on a stalker) broke causing the front drive tire to cave inward. The car was easy to catch and even mid turn easy to see the problem so I straightened it out as best I could and slid/drove into the grass. After being towed off it took us until the end of the day to get a new upper ball joint/tie rod end. My friend got to do half of his last session and then one more 30 minute session with the novice group (while I was instructing) so we could make further our shakedown. After the repair all seemed good again but next day it went from 80 and sunny to 50 and drizzly so our weekend was done. So fingers crossed for good weather and no issues for our next session at NCM Memorial day weekend.