Nocturnal005
-
Posts
42 -
Joined
-
Last visited
-
I checked into hagerty and was given a quote that was essentially the same premium as I'm paying via state farm but with significantly less coverage. One thing that I did like w the hagerty quote was the guaranteed value they provide in the event of loss. I elected to stay with my current insurance after the quote.
-
The o-rings to hold the gauges in place from rotating were already cracking on my new build, so I measured them and came up with these as a suitable replacement. https://www.theoringstore.com/store/index.php?main_page=product_info&products_id=6678 They are made of UV and weather resistant material and should fare better.
-
SPCNS (Caterham) registration in the SF Bay Area
Nocturnal005 replied to Maggie S.'s topic in General Sevens Discussion
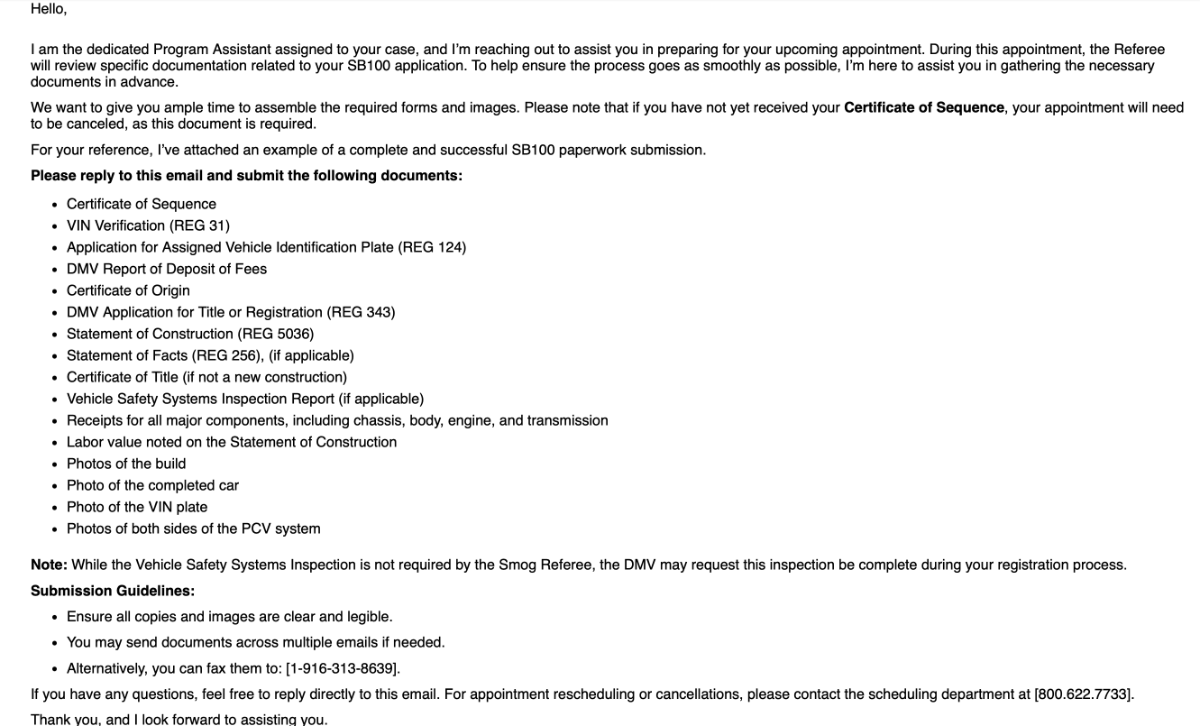
Your experience was my initial experience with the DMV (they were ready to issue me plates on the spot, registered like a new car I bought off the lot), until I specifically requested to use SB100 exemption process. I actually had to prove to the DMV agent that the SB100 process existed in the first place by showing the agent the DMV website online re SB100. The whole point of the SB100 is it allows you to be smog exempt in the future based on a one time inspection...if you pass you are provided with an underhood sticker that shows the car is exempt from smog inspection. You just need to show that the car meets the requirements circa 1957, which only requires a closed PCV setup. I don't mean to scare you but it will be interesting to see if you will need to do a smog check in the future since I assume you did not receive a smog exemption sticker. I'm not sure when that time arises what smog standards the car will be held to, since it appears you are registered as model yr "0000". The car is definitely cleaner than an original lotus, since it has a cat, etc., but it also doesn't have things like EGR, charcoal canisters, etc that are required these days w modern cars. Will you report back on your experience when the time arises? I really hope that you've found an easier way to register these cars. The SB100 process was not fun to go through. https://asktheref.org/services/unusual-vehicles/
-
As of last week I've 100% completed the grueling SB100 California reg process. For reference I started registration in mid April and finished the last week of August. Most of that time was spent waiting for appointments: safety inspection shop, CHP Vin verification, BAR virtual and in-person appointments. The DMV caused me some time by giving inaccurate information regarding VIN verification (5+ hours at the DMV wasted). But now I have a crookedly applied sticker that says my car is smog exempt for life, and a license plate! If any of you are struggling through the same process I can offer some advice and moral support. I can say having gotten to the other side it was totally worth it. All in all my Caterham build adventure has taken me 6 months (a month to build, and 5 months to get the car legal for the road). Hopefully smooth sailing from here on out!
-
I got a quote this am, see below. Sharing in case this helps others. Was always curious how Hagerty or other car insurance compares so if you are willing to share that would be great. For reference I live in the bay area, CA.
-
thanks for all of the insurance tips! I asked state farm for a quote for one way. Let's see what they come up with. My thoughts on the one way. Car won't be left anywhere, chances of theft and damage hopefully low. If I end up hitting someone, i'll end up repairing the car myself anyway and it's my mistake that I should pay for. If someone hits me, their insurance will pay (unless uninsured). Likely any mishap would be on the track, which would not be covered anyway. So, wiling to take my chances to have a lower monthly recurring cost. Let's see what the savings diff would be. I added this finishing touch today, inspired by Caterham's 620R demonstrator.
-
Who are you guys using for insurance? Looking to get liability coverage only. Anyone have issues with state farm? This morning I was able to go to the BAR inspection and now have a crookedly placed, but official SB100 exemption sticker! One more trip to the DMV and this entire reg process should be DONE!
-
I finally corner weighted the car. With 1/2-3/4 tank of gas the car weighs in at 1206 lb, which is 548kg. Since the curb weight is supposed to be 560kg, I’m pretty happy with this!
-
Ok, I'm ready for a bit more power and a little less weight. I think I want to do a decat pipe, but am thoroughly confused by the parts website. My guess is this is the correct fitment, but they don't seem to have a polished version. Also, anyone have luck with custom mapping? The factory maps seem to be rich. I would like to know what gains I might expect; it's been a while since I've had an NA car. If the gains are ~5hp or so I'll not bother, but if double digits can be found I'm all in.
-
i agree w WDB. it's just squeeze out; you'll be fine.
-
Look for this. Located in a random box no where near the steering wheel or hub.
-
There's just zero clearance for the trans in some spots, particularly near the bellhousing. My bell housing is touching the insulation foam particularly on the left side (it was hard to remove the thin cardboard I used for tunnel protection at some points). No amount of pry bar, loosening bolts, etc seemed to help. Glad to report that there seem to be no ill effects after ~1000 miles. There seems to be no metal to metal contact in my case, but the padding definitely is compressed in spots.
-
I ran into the same issues (weeping adapter and mushy pedal). I solved the weeping by replacing the washer and trying again. The old washer certainly looked like it should have sealed properly given the crush observed when I removed it. The pedal did not become firm until i had a couple of drives and then a re-bleed. Now the pedal is super firm with not a lot of travel. I suspect there are hiding spots for air bubbles that you might not be able to purge w the car static. As long as it's drivable i'd take it for a couple of laps around the neighborhood and try rebleeding again.
-
Please Review These Build Specs: 420R
Nocturnal005 replied to rider's topic in General Sevens Discussion
I would be concerned with a cage in conjunction with the three point belts... -
Please Review These Build Specs: 420R
Nocturnal005 replied to rider's topic in General Sevens Discussion