
CarYenta
-
Posts
86 -
Joined
-
Last visited
Content Type
Profiles
Forums
Store
Articles
Gallery
Events
Library
Everything posted by CarYenta
-
I saw some first-start recommendations to have 5 gallons in the tank, maybe there is some initial priming pressure that helps with which no longer applies to me. When cold, it cranks rapidly without firing, sounds perfectly normal cranking, just zero firing at all. The two times I've started from cold successfully, I've waited several minutes after the initial cranking disappointment, and after that waiting period, it fires immediately and crawls up to a grumpy idle speed about 1000 rpm. When warm, the engine fires immediately without delay, but again nearly bogs until garnering strength to hold at about 1000 rpm.
-
Ok - I had only 2 gallons in the tank the first two times cold starting from a jerry can, but have just filled up with 9.5 additional at the gas station. Maybe the additional fuel will help. Does holding the throttle open give additional fuel, or only additional air? Will it be more likely to flood if held open?
-
Thanks! I have idle set to right about 1000 now and it seems pretty steady, but has some significant delay in response. If I move it up to 1200 or so, it has much faster response but then it starts oscillating between 1200-2000 rhythmically when warm. Would the PGM ecu help fix this? I think Beachman said he's a vendor of theirs. To cold start the car, I seem to require excessive cranking. 5 sets of 10 seconds of cranking, then wait 5-10 minutes, then it starts right up. Would having the throttle very slightly depressed help this, or hurt this? I'm worried about flooding but I also don't exactly understand what's happening when starting a car with the throttle depressed slightly.
-
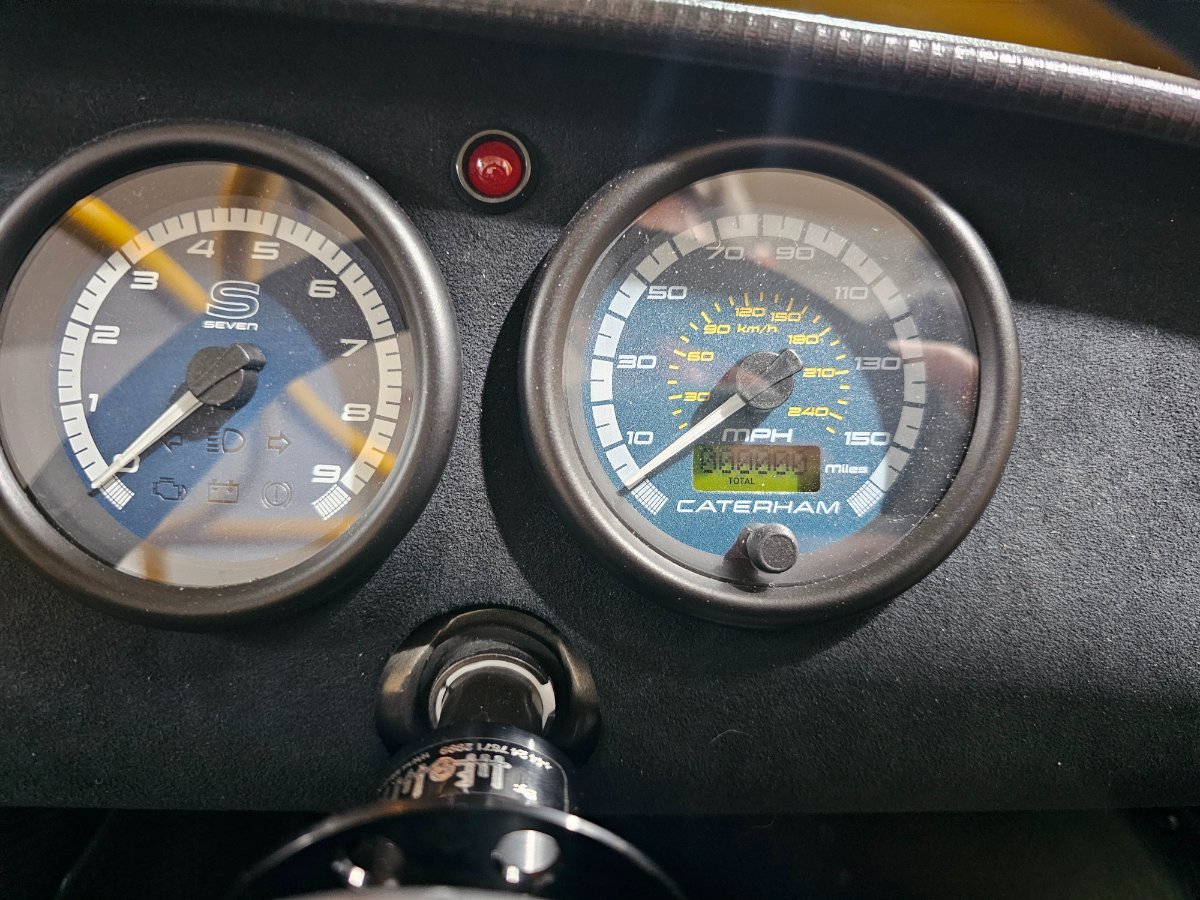
Well I've bled the brakes 4 times, there still seems to be air in the system. I managed to melt a hole into my power bleeder hose which somehow ended up resting upon the exhaust also 😆 Also noticed my fuel gauge reads empty even though I just filled it. Should I check the sender on the tank? For the red light between the tach and speedo, I charged the battery with a CTEK MXS 5.0 for the agm battery and the light was no longer illuminated upon turning the key, so that was a correct diagnosis by MV8.

-
There is only one orientation that would fit with the pipe bend and two spring attachment points for the 4 into 1 pipe. It appears the OEM literature shows it pointing down as well. Hopefully that won't be an issue!
-
Single throttle body:
-
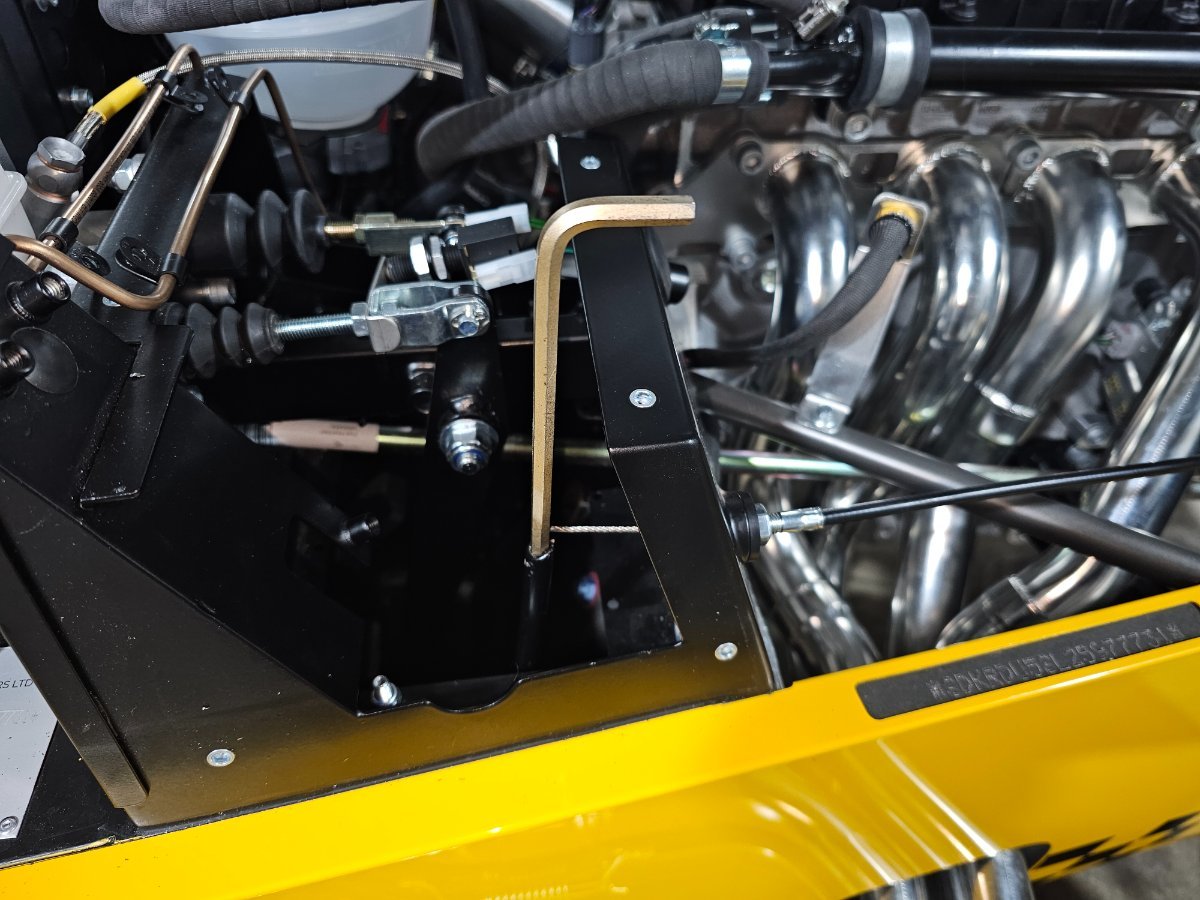
Ah ok. For the throttle pedal, it requires bending to have full actuation from the factory, otherwise you only get maybe 1/4 actuation. The way I bent it, it allows the pedal when fully released to have slight slack so that the throttle body idle screw sets the idle, not the pedal stop. Prior to bending, the pedal itself was setting idle, and far too high. When fully depressed and on the pedal metal stop, there's 1 mm or so extra that the cable could move, so it should be ok on that front.
-
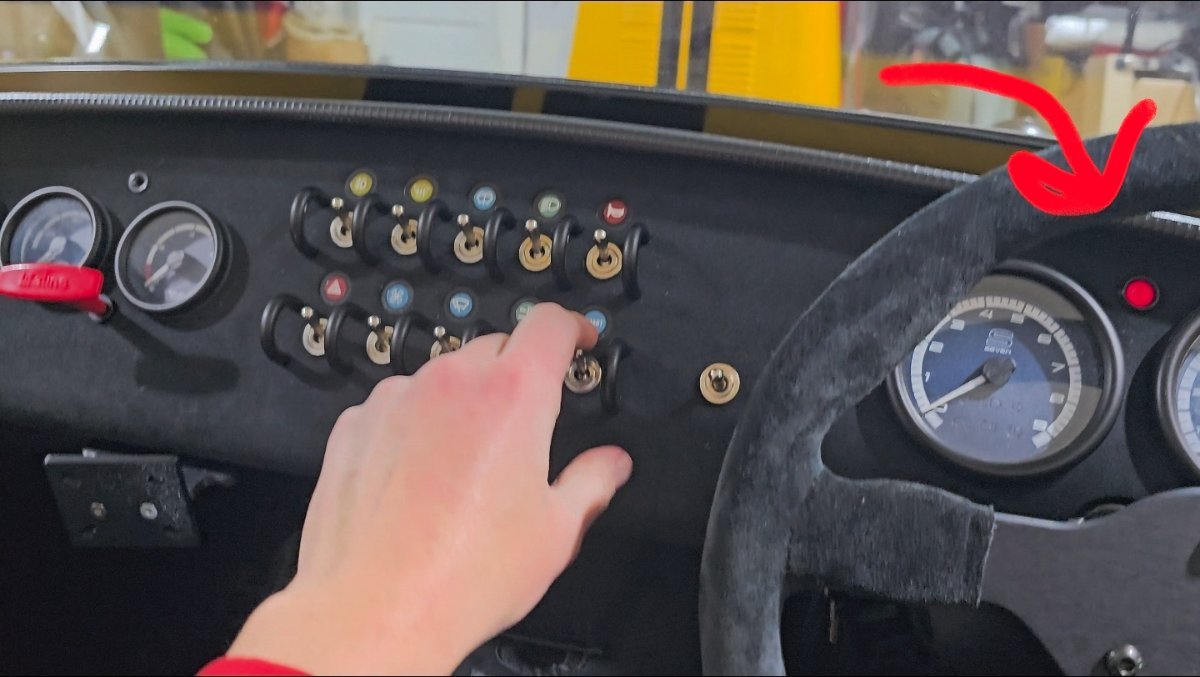
Moment of truth! Cranked with fuel unplugged, no pressure. Cranked more. And more. And more. Hmm. Took out spark plugs and sure enough after 15 seconds of hoping I'm not ruining everything, oil pressure! Plugs back in, start, nothing. Try again nothing. Huh. Start playing with the lights and indicators, then notice there's a red light in between the tach and speedo that is now lit up. What's that. Was my immobilizer not being recognized? Crank, starts instantly. Except it goes to about 4k revs so I shut it off immediately :P Had to bend the throttle pedal a bit more as it wasn't closing all the way and my throttle return bolt was maxed out. Try again and now butterfly is too closed. Idle screw is extremely sensitive. Once I had it going, adjusted on the fly to a normal sound. Good! Supercharger .rimer is working, I'm spraying coolant all over now so it's bled. After another 10 seconds running I start smelling things. I see white smoke out the back. Reminds me of a blown head gasket. Turn off, inspect, try again, smells like burnt paper. After about 10 seconds into regardless of the idle screw, the throttle seems to surge up and down rythmically a thousand rpm. Running at about 3k and it doesn't do that anymore, but that seems too high. Tightened up the intake manifold a little bit more, seemed to reduce some intake noise. Didn't seem to help the idle surge or smoke. What do I look for next?? Can see that red light between the gauges is illuminated when the key is in run, and it blinks bright red once upon starting then maintains red. What is it? Why wasn't it on at first? Is it the battery and then my battery is getting low from all these starts? The manual says it's a gear change indicator but I think not...
-
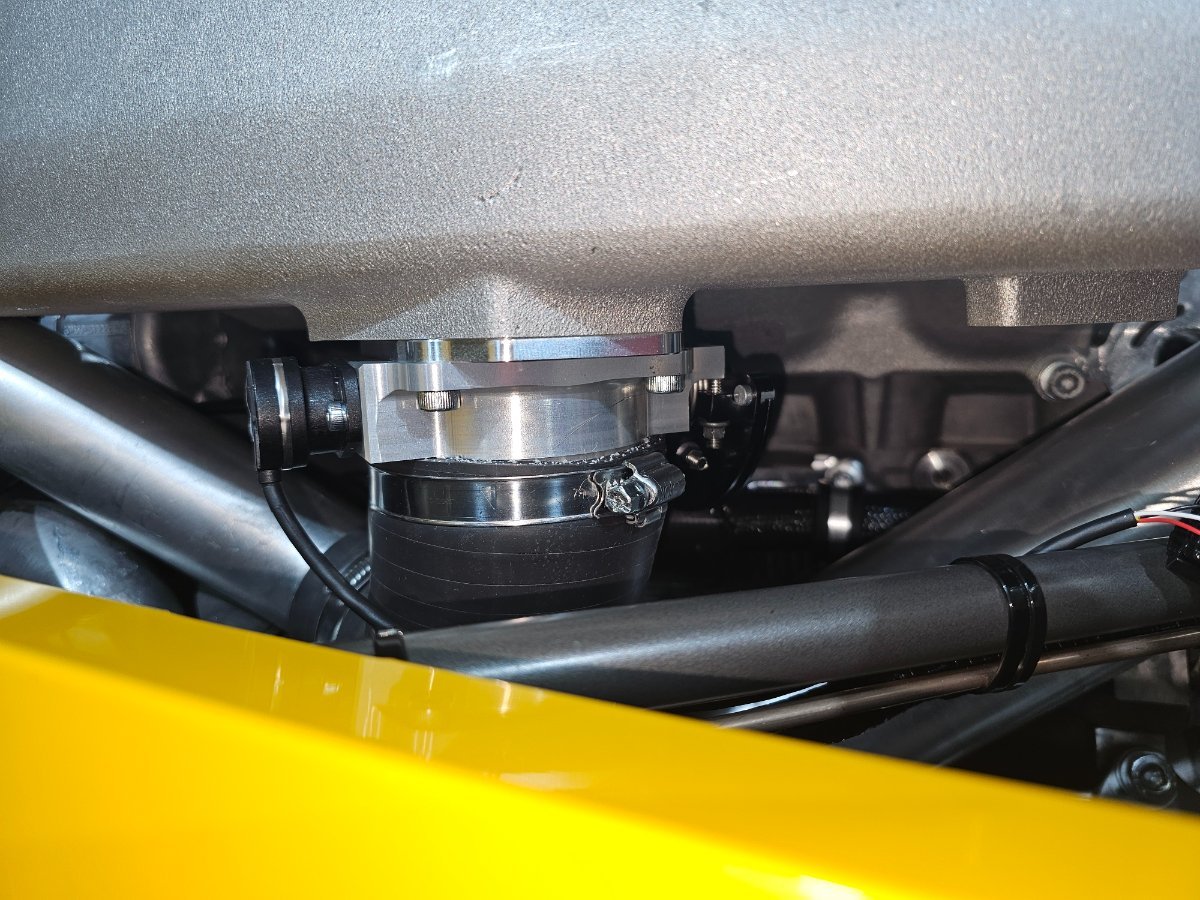
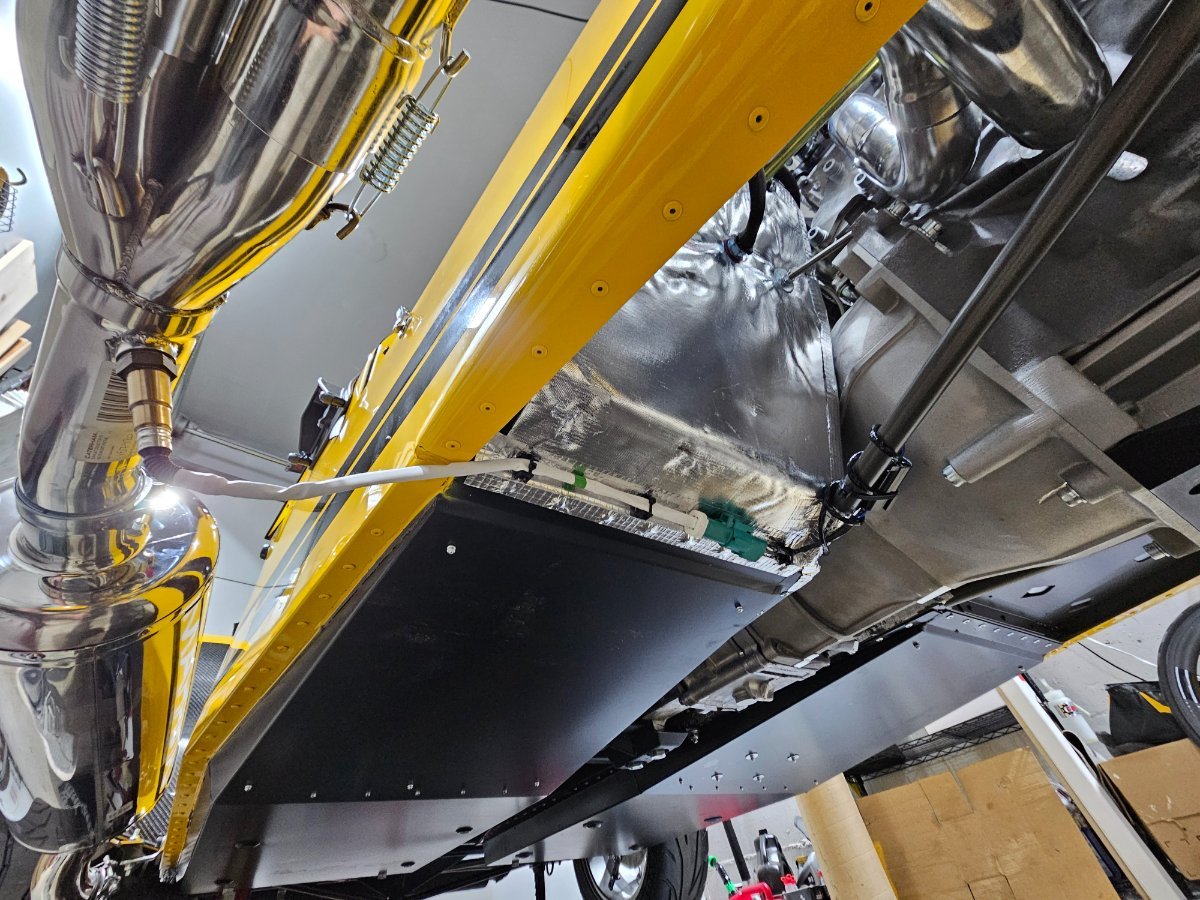
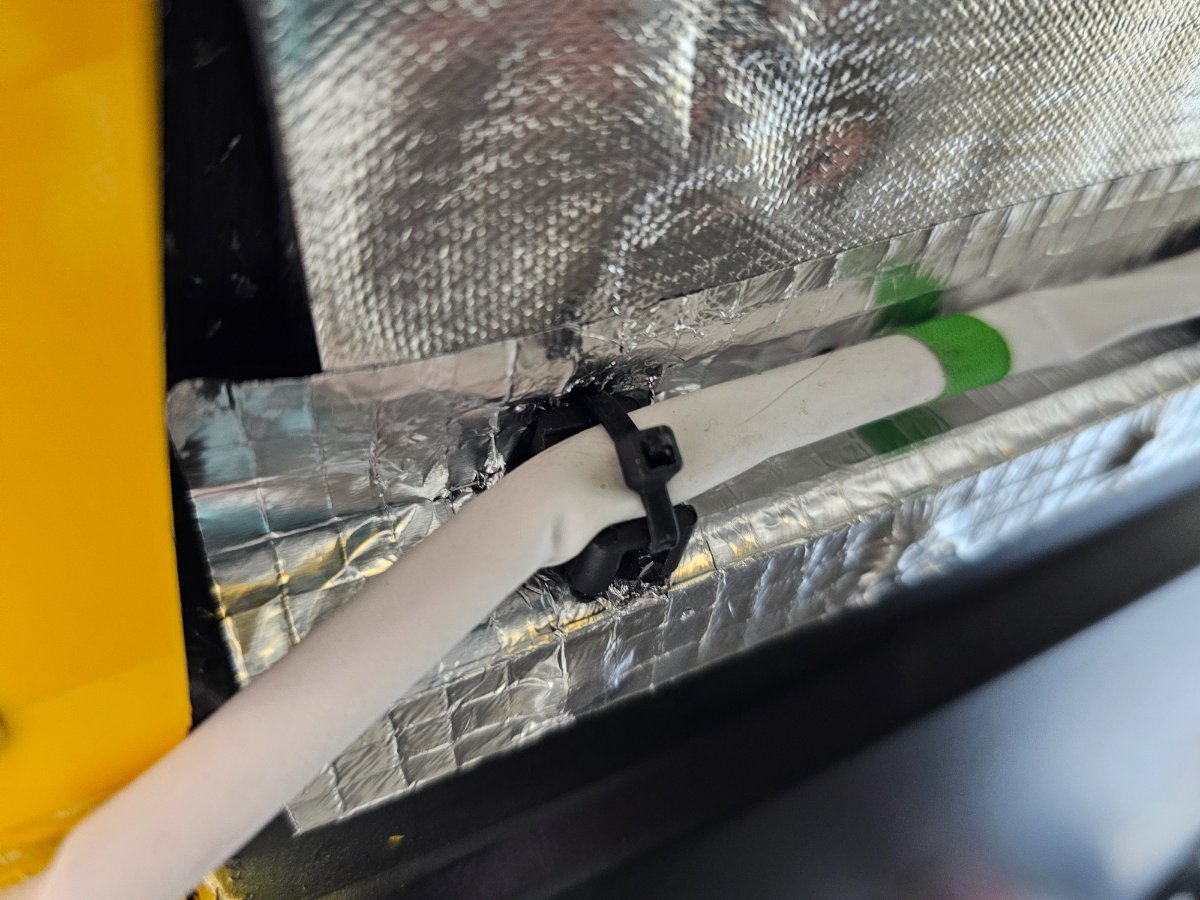
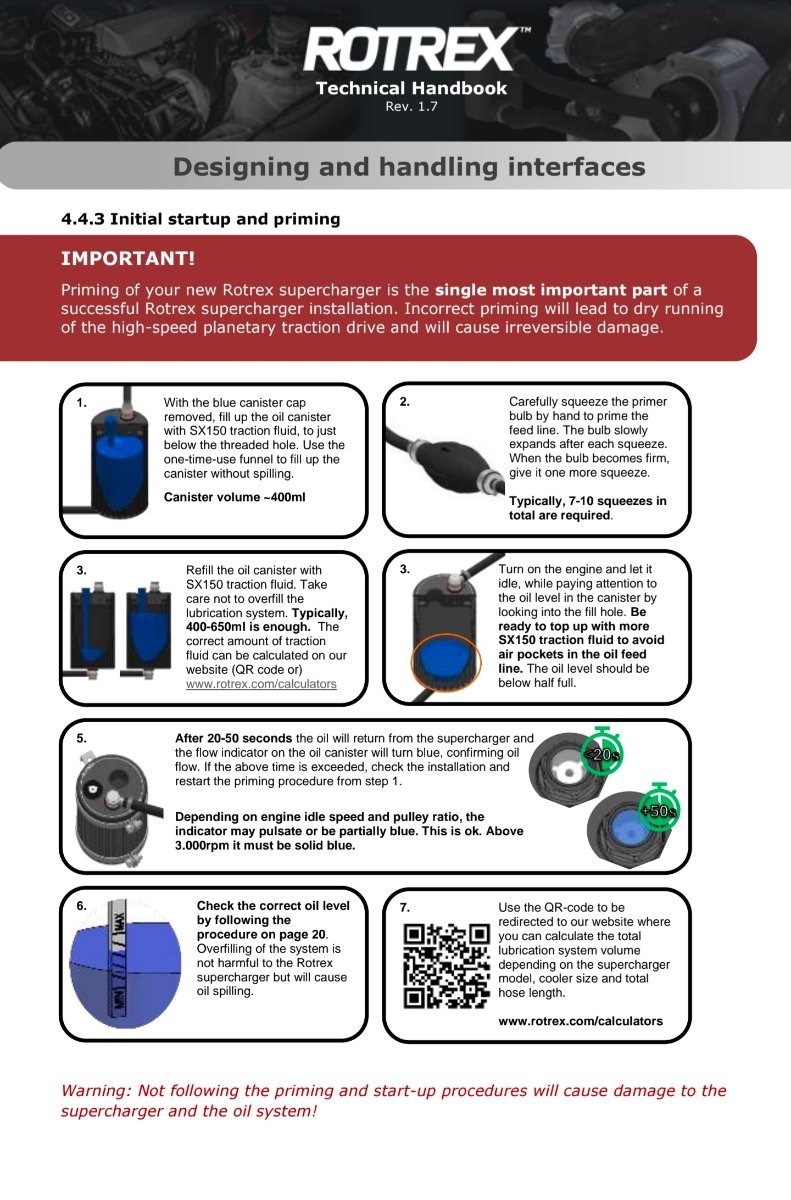
Finally got the bits to route the exhaust sensor. There were no attachment points from the factory, so used purple meanie's method. Drilling at this angle is a bit difficult. Added in 3x rivnuts and m3 bolts with some tiny cable dealies from Amazon. Also put on the engine cover sticker....but it looks a lot smaller than others online. That is odd. All fluids are in, I'm only waiting on a Rotrex priming bulb which was omitted in my kit (thanks Pickles once again!). These come from Greece. They sent me an oil filter the first time by accident. Hopefully can do first start next week when it finally arrives. I think the flow looks like: 0) radiator plug is out. 1) primer bulb the supercharger until the bulb is firm. 2) with inertia switch unplugged, crank the car for a little bit until oil pressure shows. 3) plug in inertia switch and press it. 4) turn ignition on and off a few times to help prime the fuel 5) check supercharger fluid level and primer bulb again to firm. 6) start car and idle, supercharger fluid flow indicator should be sort of flowing after 40 seconds, but must be solid flow above 3k rpm. 7) meanwhile idling, bleed the coolant with the radiator plug out. 8) hope to god you bled the brakes and clutch properly. Priming guide for the C30-94 appears to be the same for all (I think that's the supercharger model)
-
 14% is a real bummer. I try to think how cheap cars are still compared to a lot of other countries like Australia, Switzerland, Denmark, or the real crazy Singapore for things like this. And who knows, maybe Caterham won't be around much longer and this will be priceless to have a new one you created.
 -
2025 Caterham 620R fully loaded. Just landed with practically no miles
CarYenta replied to Deman USA's topic in Cars For Sale
I recommend you drive it! At that price it really makes me want two... -
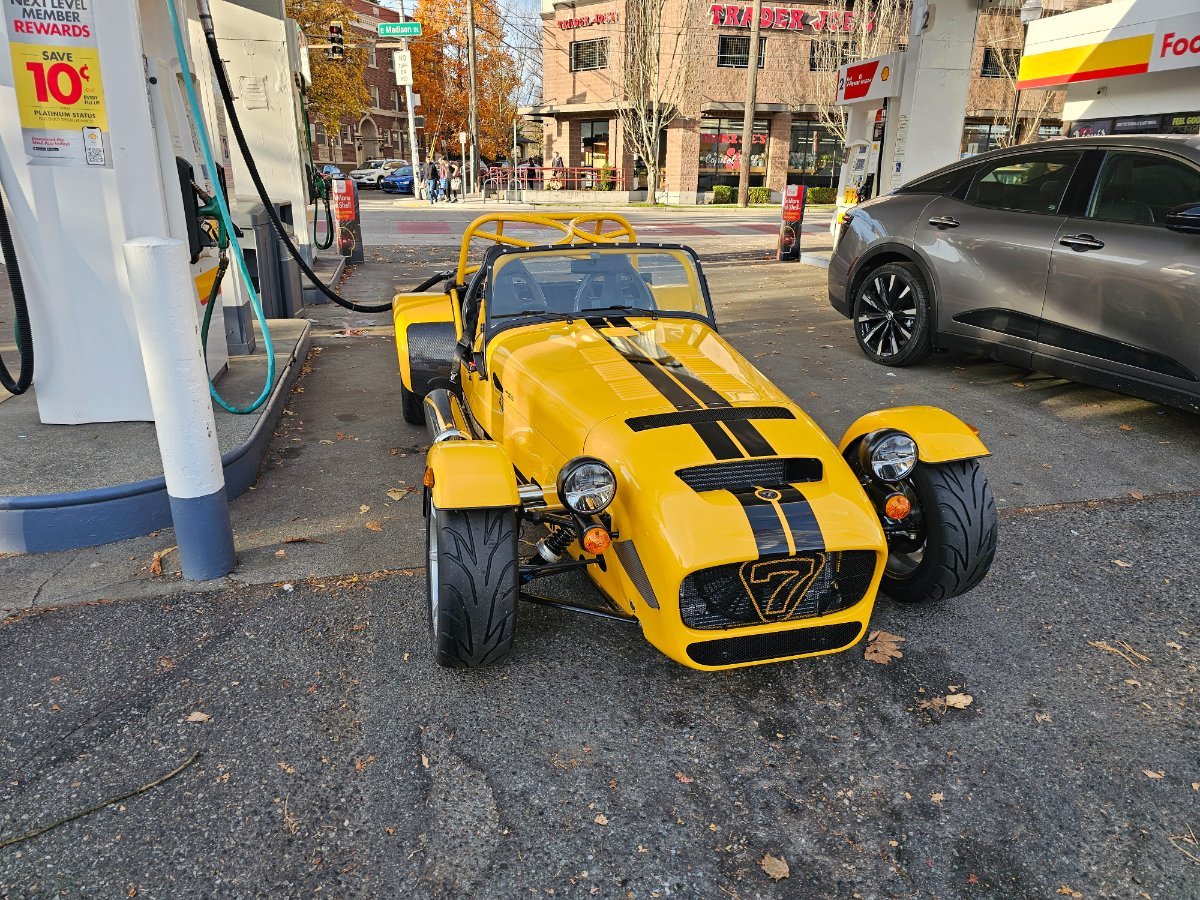
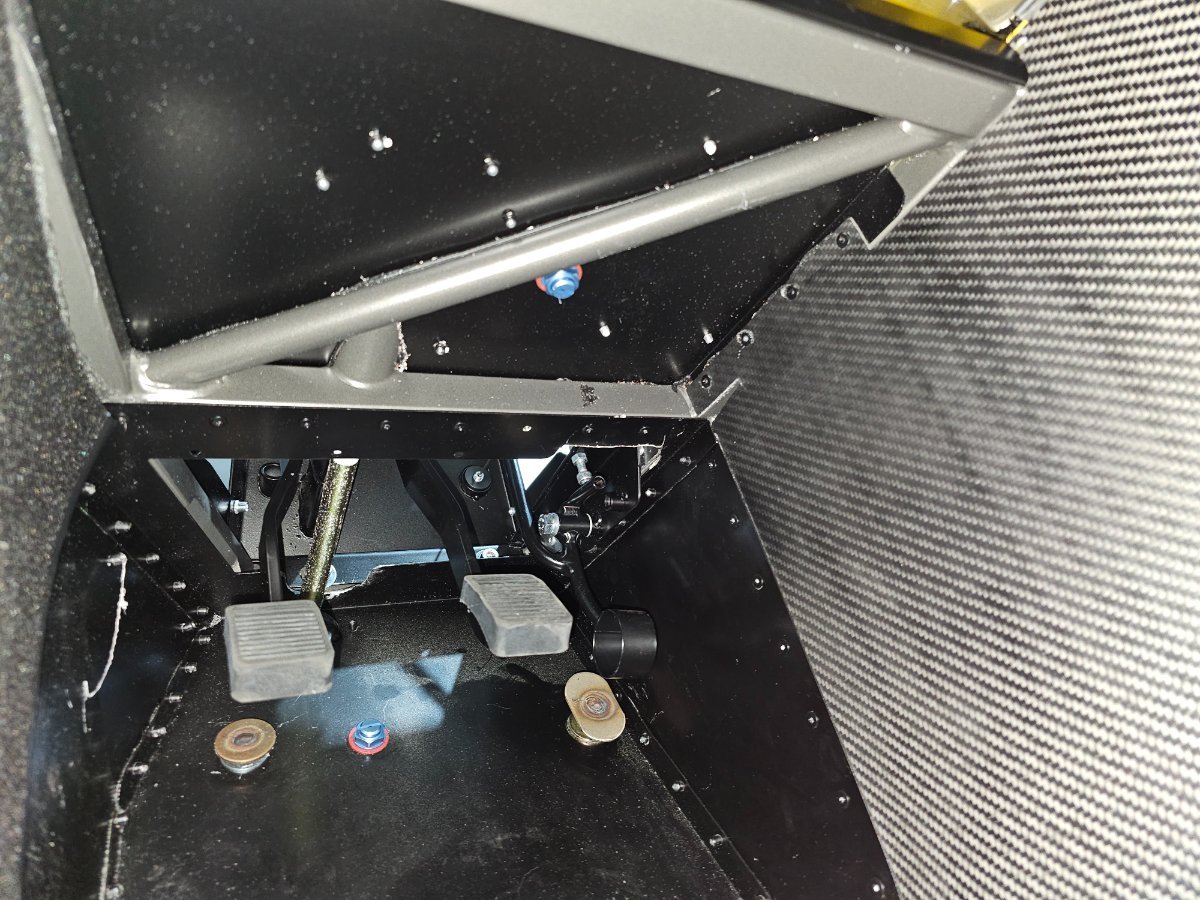
Car is now registered in WA state! Wahoo, only took about 2 hours at the DMV. The state patrol also granted me a front license plate exemption as a separate document I need to carry around in the car at all times. I'll just put it in the glovebox... I attached the throttle cable at what seems like a reasonable starting position. Bent the pedal with an Allen wrench and a piece of wood. Good to note that there are two things that bend - the little throttle stop arm that limits travel towards your leg, and the main tube. I initially only bent the large tube, but then it required the throttle stop to be all the way out, so the pedal was far too high in the air compared to the brake. I then bent the little arm a little, but that didn't do it so stuffed some wood vertically into the foot well so that I could bend the main tube back using my foot. What a dumb throttle pedal design! I appear to have full throttle actuation now at least. Anyone have a photo of what their idle screw / butterfly arm gap looks like?
-
Alcantara 1-24 momo steering wheel showed up from Caterham as they mistakenly gave me a leather 1-21. Attached is a drill template Bruce graciously created for me. All I can say is, drill from the back onto a piece of wood, and expect the bit to slip if your initial tap isn't quite deep enough. Really give it a thwack and start with the tiniest of drill bits. I ALMOST was off by about 2 mm on the top center but caught myself before making it all the way through and made a second start. Whew. Bolts fit perfectly snug with a 1/4" bit. Now everything is fuzzy Momo QR Hub Template V3.pdf
-
2025 Caterham 620R fully loaded. Just landed with practically no miles
CarYenta replied to Deman USA's topic in Cars For Sale
Dont get me started on my mountain bike's value Jest aside, I was hoping for a better BaT result. You certainly have a bunch of great photos to go off of now, I think that should expedite a sale. Should probably put a price in the ad for folks to counter on? -
Once again, Pickles to the rescue! I've spent probably 16+ hours trying to get the intake manifold to intercooler pipe installed without pinching the thermostat coolant tube too much. Turns out I didn't read Pickle's other article well enough which had the answer right in it. So for others like myself - zip tie the darned coolant pipe to the supercharger outlet pipe, and place the aluminum tube on top of it not under nor on the side. I had to loosen all my upstream barb fitting to get enough slack but then it was very simple to do so: Note that the supercharger to air filter tube is out to do this. Fix the elbow to the tube, with your O clasps readied but not tight With the intercooler either locked down or loose, you can put the pipe right into it first and slide the other end right in from the side: Now, with liberal use of silicone spray on both ends of the elbow and the intercooler connection, pivot the tube and elbow clockwise (up) towards the butterfly valve and get one side of the lip over the edge, making sure to remember the large O clasp: Now, pivot pivot pivot. Takes some convincing, so more silicone spray the easier it is: Fiddle around twisting the tube a little, the elbow a little, and it will pop right on. I had previously added so much silicone spray from prior methods that I had to hold the elbow in place to prevent it from sliding a bit while tightening. Done! Look at all those bottle scars.
-
Exhaust is on. Pro tip, the rubber pieces for the exhaust hangers go on top, not on bottom of the mounts 😂 Exhaust was on, hanging waaayyy down, doh! If I were to do it again, I'd try bolting on the exhaust hangers, connecting the rear silencer and connector pipe together, then sliding in the hangers while attaching to the side pipe. I see why people complain about scraping these, even with the hangers on top of the rails, it's pretty low. Anyone know how loud it is if you just modify the side pipe exit to stick outwards? I believe the cat is in the side pipe,band no cat in the rear silencer, right?
-
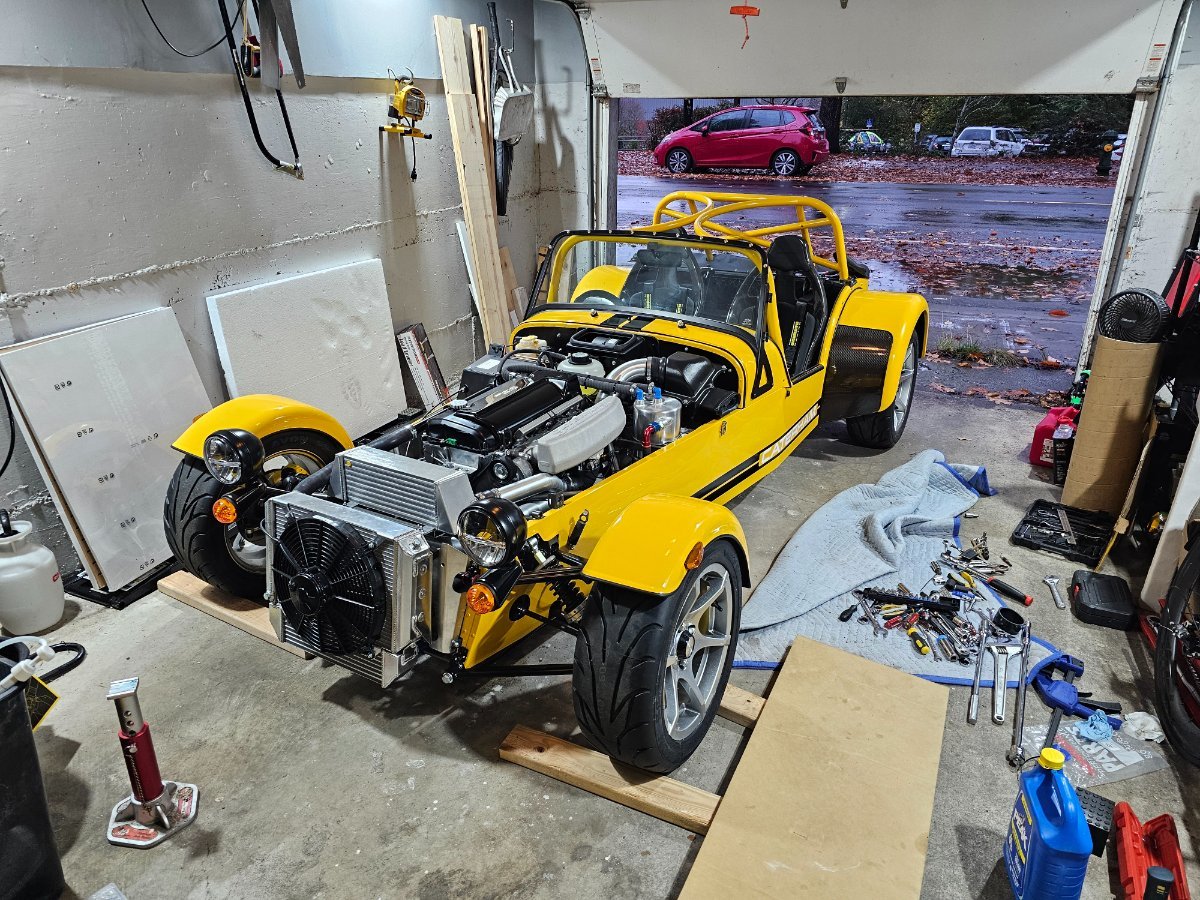
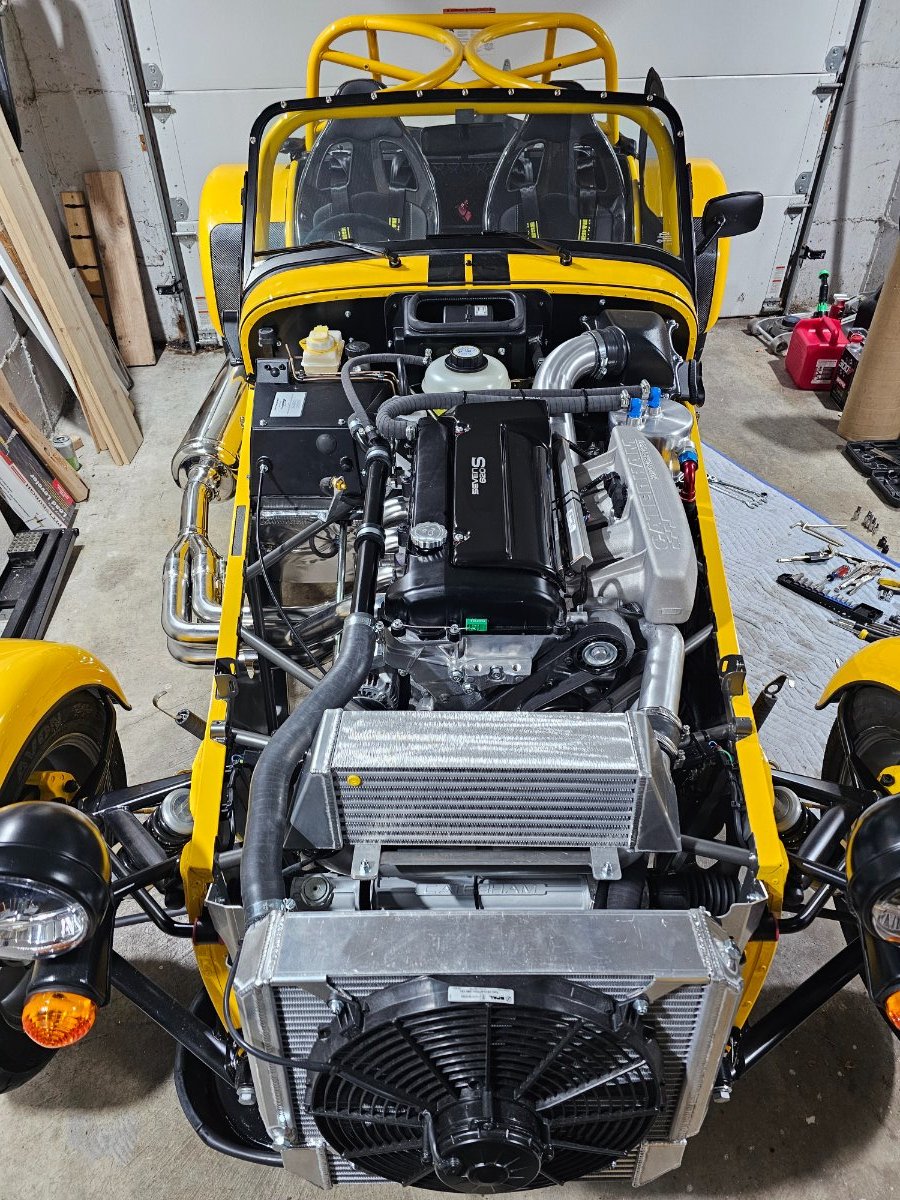
Another pro tip from Pickles, I had my intake side engine mount spacers on the exterior of the mount, acting like washers and not as spacers. I moved them in between the engine block and mount hoping it would give more transmission clearance. Loosened all parts, engine on jack, didn't really move much, hard to tell. Wow, the 4 into 1 exhaust springs really were a pain! Much much struggle but got these on. My kit was missing the 4x m10x20 mm differential to driveshaft bolts as well as the throttle body to intercooler exit "reducing elbow for intercooler". The fit is going to be extremely tight, I'm concerned! I can wiggle the intercooler around to install, but these photos are with the intercooler exit pipe jammed as far is as possible into the intercooler and the intercooler bolt aligned. I will finish the exhaust, tidy up a bunch of wiring with rivnuts, start putting in the fluids, and hook up the shifter while I wait for the elbow and diff bolts to show up. 🎉
-
It has been an incredibly busy summer! Since I'm too short for the stock shoulder belts (metal strap hits the top of my shoulder with the seat scooter forward), I installed some Schroth Flexi 2x2's. For the sub belts, I had to source my own hardware. From Grainger, I ordered four 7/16-14 x 3 in hex head bolts (not the most aero, but whatever) that are inserted in from underneath the floor pan (drill new holes) into a bolt-in harness bracket, into a thick walled 7/16" hole by 1-1/2" long spacer (https://www.grainger.com/product/Spacer-For-7-16-in-Screw-Size-4GVD9), then through the pre-existing sub mount tabs, and then a washer and 7/16-14 nylon nuts. Interestingly, the bolt in brackets on the passenger side, which has fixed rails, interferes with the bolt in harness brackets. I also tried putting the harness brackets above the spacer instead of below, but it would interfere with the seat back instead. I then elongated holes in the floor to get it to fit. I measured wrong! AHHH. I ended up flipping the seat rails 180 degrees from the picture shown to get it to fit and mounted in the original holes. This means, however, that the passenger seat is scooted quite a bit forward instead of slammed back against the back wall. I will need to search for some aftermarket seats rails. I also bought some 40 mm wide nylon washers to cover up the elongated portion of the holes as they were now wider than the stock aero washers (https://www.amazon.com/gp/aw/d/B0DHH73CC3?psc=1&ref=ppx_pop_mob_b_asin_title). Finally, I raised the driver's seat up slightly using Tillet brand nylon seat spacers. They seem near identical to the cheap Amazon ones, but do come in thicker sizing. I also got some longer M8-55 mm hex bolts to attach the sliding seat rail to the seat since the stock ones (M8-40 mm I think?) no longer poked through the washer stack at all. There is considerable thread in the seat, so could have gotten longer ones even, maybe M8-70 mm or so. I added height of an additional three of the 40mm OD washers x 4mm thick for a whopping half inch height increase. I can see so much now. Also, I attached all the coolant hoses and supercharger piping finally. In another thread, Pickles kindly layed out how to get around multiple issues which made my life considerably easier and with -1 broken knuckles. Thanks! Fascinatingly, and perhaps unsurprisingly for Caterham, my builder had dibs on the ruler that day and cut my coolant hoses to the correct length from the get-go, so I had no trouble fitting the lower radiator hose with no interference from the supercharger exit pipe. Next up are manifolds woohoo 🎉
-
Good to know! I assume at some point the heat shielding will wear away at the contact point, but I can deal with that if/when it happens.
-
Looked at an image of a Sadev, can you touch the plugs from the top of the engine bay or any way at all? Could maybe fishing-wire the wired connectors with a long wire cable grabber/claw picker or something to bring them over to the plugs.
-
Nice! Do you have the center console trim off to expose the shifter mechanicals? It was easy for me to connect my two transmission connectors on my 5 speed from the top.
-
That is the plan, if it works, I do not know haha. I think I'll be using a breaker bar and a wedge to get it straight. One more thing to do, my seat when the slider is all the way forward is still to far from the pedals for me. I'm thinking of making a new set of floor pan holes a few inches forward of the existing holes with a step drill bit. Any problems doing that? I'm going to bend the seat slider adjustment rod 90 degrees so it doesn't hit the footwell cross member.
-
Thanks for the links! My kit has the transmission mount spacer which I used. It sounds like if I can't move the left side of the transmission in the tunnel away for more clearance, I should only worry about it if the transmission is up against a hard thing/rail and not so much if it's against the padding?
-
Thanks for the tips! I'm here to learn, not for praise so no worries. The blue painters tape ripped 😂 so I added a few extra layers. Managed to not actually scrape it however. I raised the front of the car up as suggested and that definitely helped in getting the propshaft lined up as well. The top tunnel gaitor I didn't realize was elastic, so it made it over the hand brake no problem, silly me. Had to remove 6 carefully placed zip ties to unplug the heated seat connectors :/ I put a pan under the transmission plug and drained the fluid as recommended, worked great. Except then I had to remove the engine again to change the chain lengths, plugged the hole, put engine back into the car at a large tilt, and unplugged it expecting no fluid to come out. Suffice it to say, that was real dumb! Poured out all over me. Alas, engine is in! Engine mounts on, transmission mounts not quite all the way on. I'm going to install one of the 4 carrier bolts upside down (nut inside the car) as there's two or three extremely stiff wires blocking the bolt from coming in through the top. I guess people in England have to worry about MOT inspection but not I. I had to take off in total: the intake manifold, radiator, intercooler, oil cooler, super charger reservoir, supercharger, alternator, and two pulleys. Also, I was as close as I could get the hoist at one point, it was touching the sway bar, so had to manually push to swing the engine over the upper cross members. I'd recommend anyone thinking of the smaller harbor freight 1 ton hoist to get one with a longer reach. The transmission is a little skewed and is touching the tunnel on the left side. I plan to play around with a pry bar while tightening to see if I can get it centered better. Here's going in before removing the upper left alternator and just below black pulley, with a jack under the transmission to help level it with the propshaft: From underneath helping align with the prop shaft: My askew transmission: Engine in from top with a few things being reinstalled: And done for the day
-
Oh interesting, I will try again! Stock handle.