jimrankin
-
Posts
868 -
Joined
Content Type
Profiles
Forums
Store
Articles
Gallery
Events
Library
Everything posted by jimrankin
-
First: Glad to have another new S2K owner in the group. Conversed with him in private message and he sounds like he will be a great owner for this car, a get it out and drive it guy. On the top speed; I'm running a 3:70 something rear gear, I think RNR's is probably about 4:10, not sure just what Subaru had out there but will find out as I have the differential chapter from Subaru on disc somewhere and it probably has the specs. I have had the car to 125 (indicated, as no GPS on board) running Thunderhill "backwards" where you get to enter the main straight from a slightly down hill sweeper so you carry a lot of speed in. Due to my gear ratio I was no where near red line in 5th and still picking up speed by the end of the straight but I could tell it was near the "aero wall" as the acceleration was slowing rapidly and the straight was running out quickly. Might be one of those cases where the only way to find top speed is to risk a very nasty ticket out on an open section of Highway 5 with a GPS unit on board. RNR's car is MUCH quicker than mine with his lower gearing but I think that we both will be pretty close on top end due to just simple mathematics of power to drag. Unfortunately we seem to have quite a bit of both. Having driven a stock S2000 I can say that once your over 100 MPH by a bit the S2000 seems to pick up speed (only got to 120) as fast as the 7 and would probably get well past 125 with a bit of room. Less aero, same power. Better keep your garage door locked RNR, I'm eyeballing that spare 4:11 dif you have stashed. ;-)
-

heim joints on wcm ultralite /xr7 and other 7s
jimrankin replied to RGTorque's topic in General Tech
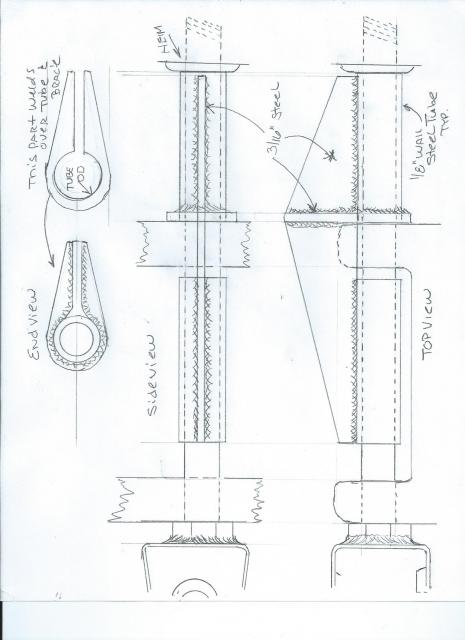
I'm going to drill and tap a 1/4" hole in the flat plate on the "captured by the casting" side. I'll determine the exact spot when I do my fit up before paint and final assembly but it should come close to resting on the casting edges and keep the plate in the line I want. There is also the fact that the whole assembly is going to be torqued pretty tight with the 5/8" bolt so probably wouldn't move anyway. Max stress is right at the fulcrum point (where the bolt leaves the casting, point of both previous breaks). I actually didn't need to make the "notch" as deep as it is as the casting is fairly narrow where the bolt passes through. Will address that when I do a final drawing. Drilling holes is a good idea, just need to keep the maximum amount of metal where the stress is greatest. I used 3/16" wall tube at the "extension" side but with the brace probably could have stayed with 1/8". 1/16" tube is all that would fit on the "captured' side but that seems to be strong enough. Fighting a cold but going to get out to the garage as soon as the sun warms things up a bit and see if I can motivate myself into getting the parts done today. I'll get some dimensions as soon as I finish so you can let me know if you think it will work. Got to be better than the original un-braced bolt set up. -
heim joints on wcm ultralite /xr7 and other 7s
jimrankin replied to RGTorque's topic in General Tech
I liked the look of M.Wirths solution, sound idea so kind of left the original parts I had made shelved while I kept the wife happy for a couple of weeks cruising. [As soon as I get rid of the 15-20 lbs I gained I'll be able to actually bend over to work on the car ;-)]. Meanwhile I picked up some 2" X 3/16" flat stock and a couple more 5/8" nut/bolt/washers to get moving on the MW inspired part. Sad to say that once I made the long plate, the oversized 2 5/8" lower spacer, a short "mid spacer" ( I was running the plate "outside" the upper heim joint with the short spacer at the mid bolt so it ran straight down to the inside of the lower heim) and the mid bolt it all combined weighed several ounce more than the rather crude parts I already had. They flat plates do look nicer, however I'm not sure that they are any stronger. What I ended up with isn't pretty but it weighs in at 1 pound 1 oz. and should add a lot of strength. I will fix the angle of the "flat" brace at 0/180 degrees to the center of the suspension deflection. That deflection is relatively minor so it shouldn't be a problem. One advantage to the MW part is that it is immune to suspension travel moving the maximum support off line. I'll probably dig out the die grinder, clean these up a bit and paint them but here is the rough start. I'll probably do a better blueprint with the changes from the original so someone with some actual metal working tools and experience can turn out a lighter and better looking set.
-
Since it's probably going to be nearly impossible to get another factory built ride out of Ultralite until Loren gets seriously more free time this is the best chance for a sorted out low miles/low abuse S2K at a way more than reasonable (flat ass low!) price I think anyone is going to see for a good long while. If I didn't already have one this one would already be listed as "sold". On a side note: All of the major "7 clones" are unique in their own way, either by being closer to the original simple design, offering "race ready" high performance packages or full line choices but they all share one thing, pure fun. The longer I have my S2K the more I enjoy it, which seems to be the same attitude I find in the owners of every "7" brand I meet. I don't know anything about this particular car but if your out there on the fence about "which one" to buy better get off it before this one is gone. At the reserve price you can drive it for a year or two and if you find something you like better in the future sell it for probably more than you paid. My bet is that once you get it you'll keep it.
-
CHP in Redwood City wanted an appointment weeks out but happened to go by the San Jose CHP near my office and they said just come in the next day with any info I had on where the parts came from. Had the basic wrecking yard receipts and it had already been registered in Washington so went smooth as silk. They even asked me to pick out where I wanted the new decal and pop-riveted on IOD numbers to go. One of the officers said he wished his getting a "test drive" was part of the process. ;-).
-
heim joints on wcm ultralite /xr7 and other 7s
jimrankin replied to RGTorque's topic in General Tech
I finished fabrication and welding my braces but having second thoughts now that I see what you have done. will be lighter and really about as strong by upping the metal thickness a bit. Love this forum for the inventive and generous people on it. -
Beautiful car! I've always loved the MGA's and was lucky enough to have had three (back in the late 60's to 70's when they were not "collectible" and still in good original shape) over the span of about a decade. 1500, 1600, 1600Mk2. Got rid of the Mk2 when I was looking to up-size to an Austin Healey 3000. Ended up with the XK150 Jaguar I still have but really miss the MGAs. One of the most forgiving cars to drive hard, always lets you know when your getting in over your head and low enough on power that it makes you drive it "smart", kind of like a Miata. Also, so simple and almost no plastic parts so almost nothing you can't either make yourself or restore from what you have. Have fun!!
-
heim joints on wcm ultralite /xr7 and other 7s
jimrankin replied to RGTorque's topic in General Tech
I actually read your whole post with great interest when you first put it on line. Almost thought you would have been better off starting with the outer body panels and a bare pile of material than a whole kit with the number of mods you ended up doing. Extremely good fab work, especially the steering and the inboard rear brakes. To answer a couple of questions; The brackets were welded to the bolt heads and there were no indications that they were ever over stressed. In the photo I posted it may look like the weld was a fillet around the bolt shaft but it actually was what remained after I cut the bracket from the remains of the bolt with a carborundum saw. I didn't want to damage the bracket so left a bit of the bolt head on it then ground off the remaining weld slowly till the head popped off. While your solution to the shear of the long bolt is impressive, deals with more than a single plane of stress and works well with your inboard brake and anti-roll bar add it's a bit more complicated than I'm planning on dealing with at the moment. After I replaced the first failed bolt I did quite a bit of thinking about just what made it shear so easily. I jacked the car up till the rear tires were off the ground and slowly let it down (dropped it a couple of times hard too) and watched the suspension travel several times. It appeared that all of the stress on that particular bolt were at 0 &180 degrees to the control arms long axis as it swung through its limited arc. Fore, aft and rotational forces from braking and acceleration were all controlled by other links. Vertical loads by the shock and spring. Since I hadn't heard of the problem being a common failure I put it down to repetitive stress and just planned on replacing both bolts every year or two. Didn't get that long till the next failure so now going to do the "quickie" brace in my drawing as a hopefully permanent solution. I will still have a limited shift to "off angle" of a few degrees as the suspension travels from compressed to extended but I will set it at 0/180 for normal ride height and think it will remain close enough that it takes up the stress the bolt alone can't handle when using the long spacer. -
heim joints on wcm ultralite /xr7 and other 7s
jimrankin replied to RGTorque's topic in General Tech
I'm planning on making it down to one of two large metal supplier in the next day or so and will print this out. One keeps everything on computer and the other is cheaper but it's a "bring your own measuring devices" type place. I have a drill press and 5/8" drill bits so will go tight and ream it out. -
heim joints on wcm ultralite /xr7 and other 7s
jimrankin replied to RGTorque's topic in General Tech
I was using the 1/8" wall because that was about all the "flat" at the boss but going heavier will not really add much weight and will add more strength. I could probably shorten up the "floating" tube side a little bit also as the 5/8" bolt is captured by the two bosses so no stress problem there. -
heim joints on wcm ultralite /xr7 and other 7s
jimrankin replied to RGTorque's topic in General Tech
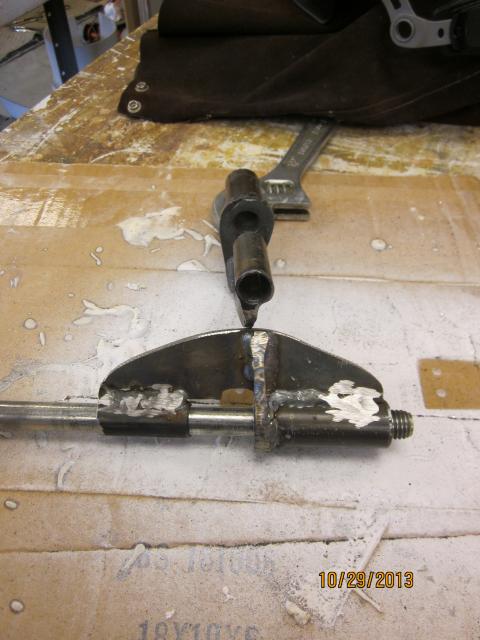
The boss is only between 1/4" - 5/16" past the outer edge of the bolt hole, one of the reasons just using a tapered cone wasn't possible. With a 1/8" wall tube the "notch" will be only about 3/16" deep at that point. I was going to fab it "straight" and then die grind it to as close a fit as possible to maintain the max cross section. That was also why I decided to put the widest section of the brace, and the added vertical brace, at that point. -
heim joints on wcm ultralite /xr7 and other 7s
jimrankin replied to RGTorque's topic in General Tech
see if this is understandable.
-
heim joints on wcm ultralite /xr7 and other 7s
jimrankin replied to RGTorque's topic in General Tech
Excuse the bad drawing, done on a table top since I no longer have an actual drawing table, retired ;-). Didn't quite know how to show a fillet weld so the ,,,,,,,, is it. Basically it's the two tubes joined by a flat steel plate with a horizontal brace at the widest, most stressed place to limit the chance it will bend there. Once I fit it up I'll add a "stop" of some kind to keep the flat plate at horizontal so it stays in line with the load. I'm better at fabricating than at drawing (lets hope anyway) so I'll post a finished picture and some of the fab if I remember my camera. -
heim joints on wcm ultralite /xr7 and other 7s
jimrankin replied to RGTorque's topic in General Tech
Hi MHK, I am building something like that but the flat metal brace needs to be horizontal, not vertical, as the lower control arm mainly only sees "side loads". I did a rough sketch just to see what, how much and of what thickness I need to purchase to complete it. Being a bit old school (read computer retard) I do my drawings by hand so will do a better sketch just to post. The finished product is a while away as I have a couple of other projects in the works right now and no scheduled track days pressing me. Probably going to do the whole Teflon/shoulder bolt replacement now since I'll need a realignment anyway and have one side of the rear suspension all off already. -
heim joints on wcm ultralite /xr7 and other 7s
jimrankin replied to RGTorque's topic in General Tech
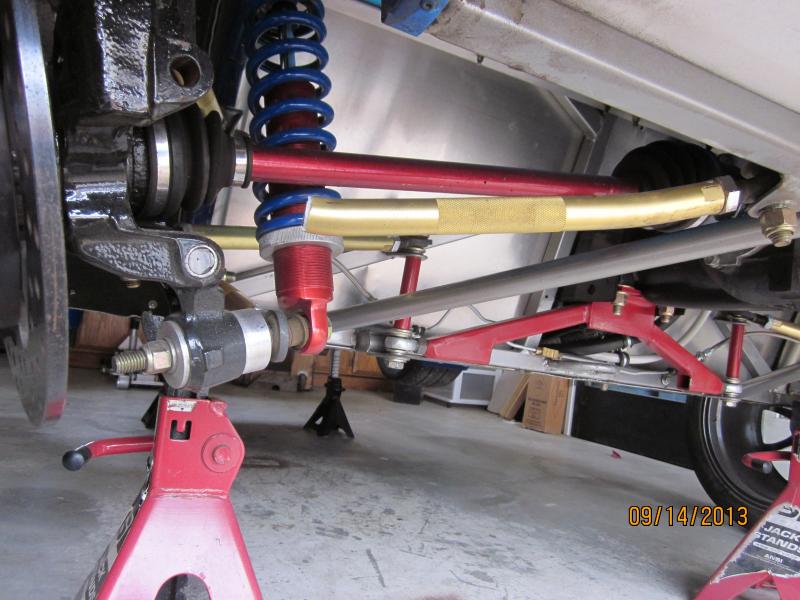
HI Loren, The LH side bolt itself broke just at the point where it leaves the back of the hub. I previously had the RH side bolt break at exactly the same spot. The welded on bracket has not been a problem as there is almost no leverage and it's a very strong joint since it is welded 360degrees around the bolt head. I think that my bolt failures have something to do with the long spacers that are in place. The leverage produced is proving too much for the tensile strength of the bolt and it is failing right at the point it exits the hub casting. My spacers are about 2 13/16" long and they seem to be longer than most, probably the cause for the failure. Will shorten them up about 1/4" and fabricate the brace I've designed and that should do the trick. -
heim joints on wcm ultralite /xr7 and other 7s
jimrankin replied to RGTorque's topic in General Tech
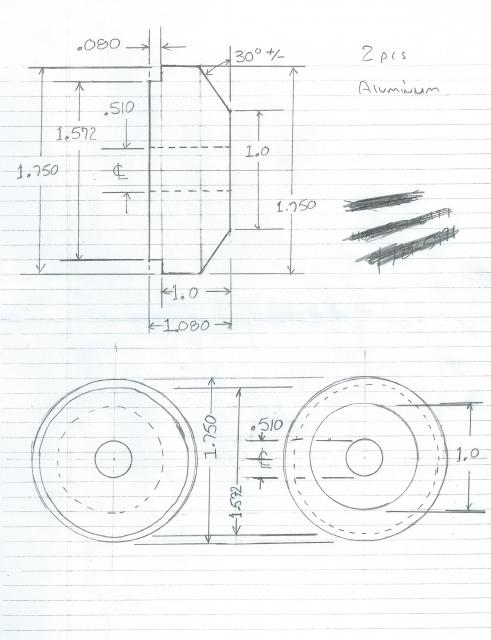
Loren, Thanks for the info, saves me some time. I did an aluminum tapered spacer/brace for the shock bolt bend problem about 3 years ago and has been good since. It's the long bolt running fore and aft through the hub I have had fail twice. Think that's what we are addressing now and looks like either leave in the short spacer if you are running that, as it seems plenty strong enough, or work up a brace like I'm doing to leave the longer spacer and suspension geometry in place. -
heim joints on wcm ultralite /xr7 and other 7s
jimrankin replied to RGTorque's topic in General Tech
The bolts are 5/8" and even with a 1/8" wall spacer flat and torqued it's a 7/8" platform at best (and about the max flat on the casting) with about 3 1/4" leverage to the centerline of the heim joint, still a pretty good mathematical advantage even with the thick spacer. I think that for most street driven 7's it has not been a problem. Lots of track time and wide high grip tires might be what it takes to stress the bolt back and fourth too many times. I was also getting all four wheels well in the air as the 5 bypass at TH in the backwards direction is prone to it at speed. Was a lot of fun but probably not all that smart ;-)! -
heim joints on wcm ultralite /xr7 and other 7s
jimrankin replied to RGTorque's topic in General Tech
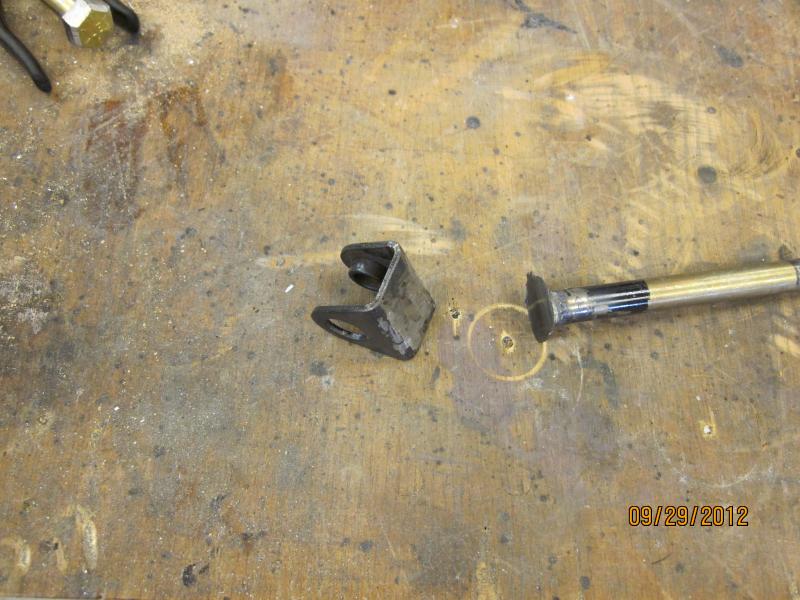
Hi Loren, Where did you source the "U" shaped brackets the Heims bolt through? Instead of cutting off the old one and re-welding it to the new bolt I'd prefer just welding on a new one. See attached photo Also, do you have the name of the fabricator/supplier for the aluminum threaded control arm tubes?
-
heim joints on wcm ultralite /xr7 and other 7s
jimrankin replied to RGTorque's topic in General Tech
I purchased two extra bolts and made two extra spacers as a planned "change them every two years" type of item when I did the first repair. Since the first original bolt failed late last year I probably should have changed them both instead of just one as they had about four years of track time on them then. Hopefully the brace will eliminate the design weakness and be a "one time" fix. Don't want to shorten up the overall bolt length as I think the extended length is a "good suspension geometry" improvement over some of the earlier shorter builds. -
heim joints on wcm ultralite /xr7 and other 7s
jimrankin replied to RGTorque's topic in General Tech
The problem is the casting at the meeting with the spacer. It is rounded off so you do not get a good "base" for the spacer to mate with. Machining this off will allow only slightly more as the casting itself is narrow at this point. Your right about the design being a "lesser strength as you lengthen the fulcrum" so going shorted will be stronger but will put the lower control rod at more of an angle so you give up suspension geometry. Will be a few days as I'm working on something else right now but have a pretty good fix in mind. Slightly heavier wall sleeve with a flat metal brace that spans the hub and spacer, captured under the "front" of the bolt at the forward part of the hub so it takes the leverage off the spacer at the back of the hub. -
heim joints on wcm ultralite /xr7 and other 7s
jimrankin replied to RGTorque's topic in General Tech
The spacers on my car are 2 13/16" long and thin wall steel. As the face of the hub where the spacer mates to it are not machined flat for more than 1/8" a thicker spacer would not have an advantage. If the face of the hub mating surface were machined smooth for a wider mating surface a tapered spacer would work. I think the longer spacer has something to do with keeping the lower control arm in a flat arc to reduce bump steer. I have designed a brace that I'm going to fab up later this week after I get some stock to work with. Should be fairly light and since the bolt only seems to stress under "side load" only needs to address shear from one angle. Once I actually get moving on this I'll post some assembly pictures. -
heim joints on wcm ultralite /xr7 and other 7s
jimrankin replied to RGTorque's topic in General Tech
Hope this is readable.
-
heim joints on wcm ultralite /xr7 and other 7s
jimrankin replied to RGTorque's topic in General Tech
Bolts are grade 8, hardest that should be used because a grade 8 is supposed to bend before it brakes, harder will be stronger but will shear, like this one seemed to. I replaced the bent shock mount bolts when I first got the car and made a spacer to prevent it happening again. Going to try to think of a solution to this one that doesn't add too much weight. There are a few other post about the shock mount spacer but mine was dead simple and cheap and the bolts are now 3-4 years old and not a hint of a problem. I'll find the drawings for it and post it when I get a chance. you can see it in the photo. -
heim joints on wcm ultralite /xr7 and other 7s
jimrankin replied to RGTorque's topic in General Tech
The parts that are not there are what went into the tire and were snapped off.
-
heim joints on wcm ultralite /xr7 and other 7s
jimrankin replied to RGTorque's topic in General Tech
Last year I had an off that was compounded by the failure of the long bolt that holds the lower rear control arm. Off was fairly minor but I was sliding sideways and the bolt sheared at the hub carrier making the wheel just kind of flop around and rub quite a bit. Did the repair(right side)myself and while I was at it I pulled the left side and it was perfectly straight. This past Thursday I was at Thunder Hill running the course "backwards" and very late in the day (open track all day and a lot of laps) had the left side bolt fail while on track. Have the whole thing on GoPro video and it is pretty weird. Late in the day, not even pushing hard as was catching some traffic, just completed turn 3 and on the short straight into turn 2 let off on the gas (no brake) and the left rear tire just went sideways. You can hear it fail with the car dead straight and into an immediate spin. Locked it down and when the car went spinning backwards the tire went from "out" to "in" and the end of the broken bolt, the spacer,the heim joint and the end of the aluminum control arm jammed into the tire and sheared the whole thing off. The car has a lot of track miles but this was the first time I had run slicks. I do take a lot of passengers on track (some pretty heavy) but don't use the berms all that much as it upsets the car so don't quite know why the failure happened. I haven't seen anything about this as a regular failure point and RNR is running an older S2K with lots of track time and his seem to be OK. I'll get a couple of pictures and post them. Not an expensive fix car parts wise but I did just have to spend over $300 to replace the brand new slick :-(. I'll be looking at what I can do to beef up this part of the suspension as it will be in my head whenever I'm on track from this point forward. Anyone else have this problem before?