Mike Rohaley
-
Posts
219 -
Joined
Content Type
Profiles
Forums
Store
Articles
Gallery
Events
Library
Everything posted by Mike Rohaley
-
Skip, Sure, why not. Modify the dimensions on the sketch and I will do it. MichaelD, Yes, I was just testing the waters to see if there was a need for these niche items. If you are the only one interested I can get some material and make a solo one too. I will take some photos to better show what I am offering first. Price to follow too since I need to figure out how much they cost to build. Note for you guys taking sump dimensions: The drawing uses the line developed from the bottom of the chassis tubes, this line is not perpendicular to the ground (it tips up about 2 degrees towards the front of the car) Since the chassis tubes are the base for the guard, dimensions are based from this.
-
Alaskossie, Yes, it was designed for the wet sump but if you needed one (and since I do not have a car so equiped), if you changed the dimensions on the sketch above I could fab one up as required.
-
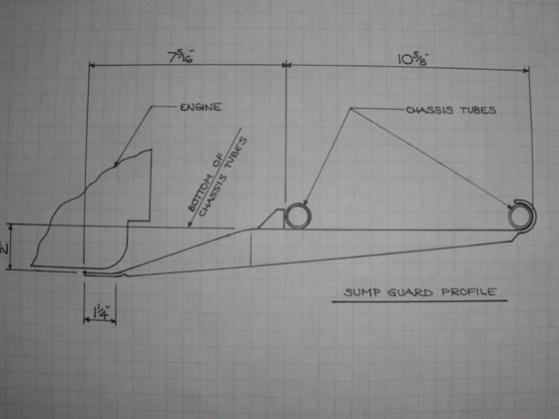
Skip, Here is the sketch as discussed:

-
Skip (scannon), I attempted to scan my sketch but cannot get the file size small enough to fit here. To describe the dimensions; The out/out dimension of the chassis tubes are 10 5/8". The rear of the guard protrudes 7 5/16" beyond the rear face of the rearmost chassis tube. The upper surface of the rearmost part of the guard sits 2" below the line drawn by the bottom of the chassis tubes. The level part of the guard at the bottom is 1 1/4" long brfore it tapers up to the diagonal portion of the guard. I can e-mail you (or anyone else interested) the sketch if you would like. Otherwise I will take a digital photo and post it on Monday.
-
If however you were going faster as you say the sump guard would have to be formed in a way that would allow it to support the weight of the car without transfering the load to the sump itself (a channel maybe). The problem there is that we only have about 2 3/4" of ground clearance to put this in and the guard will likely be touching the ground which poses more problems than solutions. Maybe someone out there has a solution...............or I'm just incorrect in my opinion. Anyway, that's the reason behind the current design.
-
Good question. In my opinion at least, if I were to extend the guard to the rear of the engine I don't think it would add any real protection if I were to drive over something (not to mention the additional weight penalty). The obstruction would just deform the guard into the sump and if the force was enough it would just crack the cast sump the same as if the guard were not there. Imagine this experiment: Jack the car up from the center of the sump, at some point it will cause the cast aluminum to fail and the jack would just break through. Now add a flat piece of 12ga. steel between the jack and the sump and lift it. the sump will fail at nearly the same loading because the steel is not able to be shaped in a way to keep the force from reaching the sump. It (in my opinion again) would provide negligable protection and add significant weight and mounting issues. The main purpose of the guard is to protect against a frontal impact where the sump bolts would be stressed in sheer and cause the sump to crack. The guard running just underneath is to protect that vulnerable front edge from damage. Also, the front wheel centerline is ahead of the engine which means that over bumps the car re-settles before the guard comes into play giving some warning of the reduced clearance. And if I get the guard caught up enough to start to deform it I would be very glad that those stresses are being put into it and not the sump itself.
-
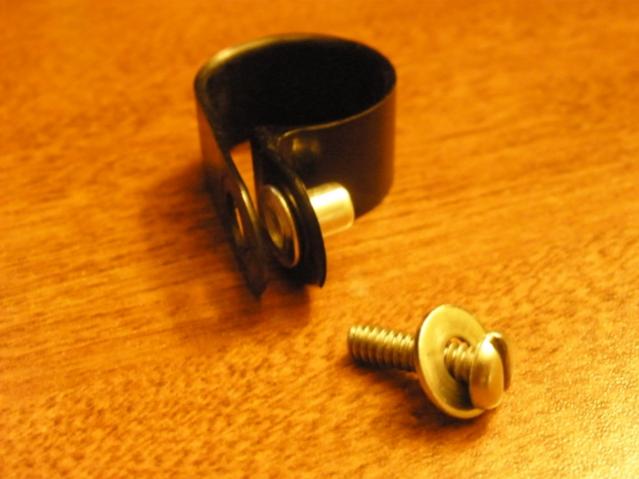
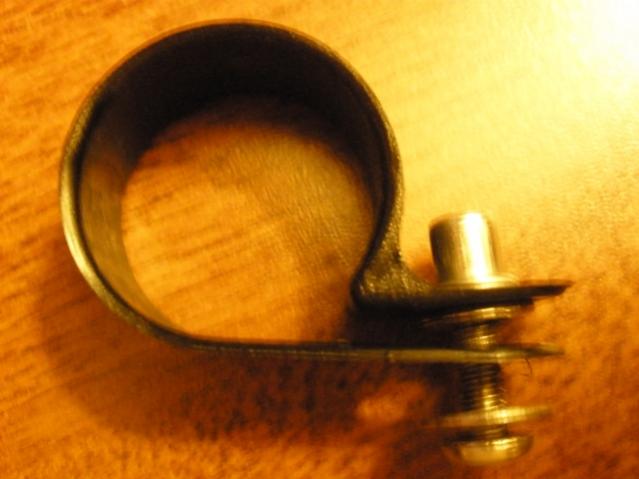
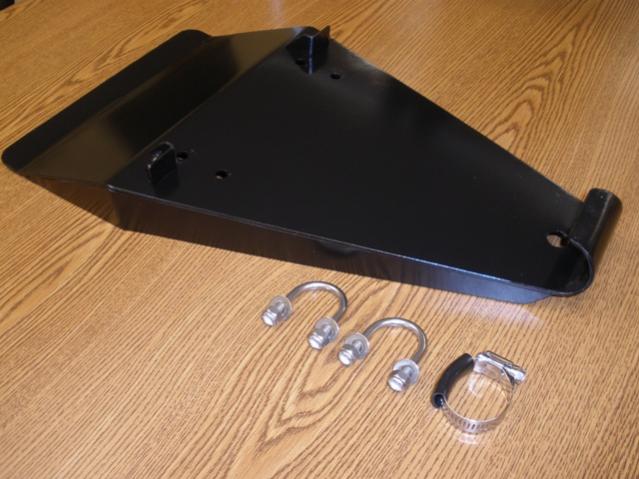
Scannon: Here are a couple photos of the clips for the bellypan. The rivnut is aluminum and the bolt and washer are stainless 8-32 (if I remember correctly).
-
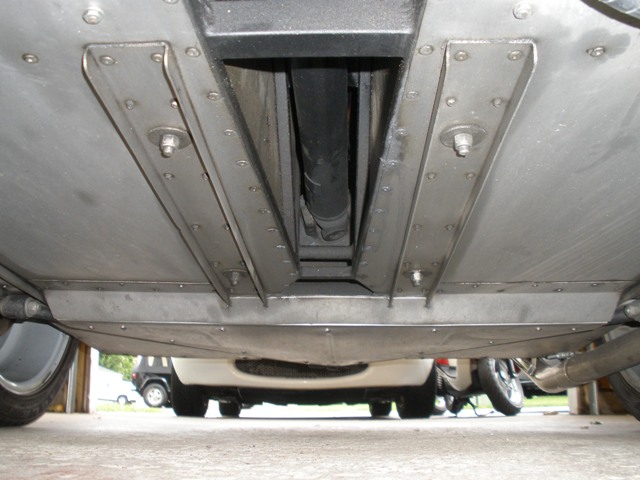
I forgot to mention that the forward deflector on the bellypan is riveted into the floorpan. Everything would come pre-drilled to simplify assembly. everything else is easily unbolted.
-
The sump sits about 1 3/4" below the plane of the front chassis tubes used to mount the guard (I will post a sketch tomorrow that better explains it). It is built for a standard extended cockpit S3 but should mount to any chassis where the out/out dimension of the tubes are 10 5/8" (also in the sketch). The belly pan is formed aluminum and is mounted using a modified nylon conduit style clip with an aluminum rivnut to simplify assembly and disassembly (versus holding tiny washers and nylocs from above). I will take a photo of this too to better explain it. Generally for servicing the diff I would just unbolt the center A-frame and drop it out of the way or remove the wood plate from the boot.
-
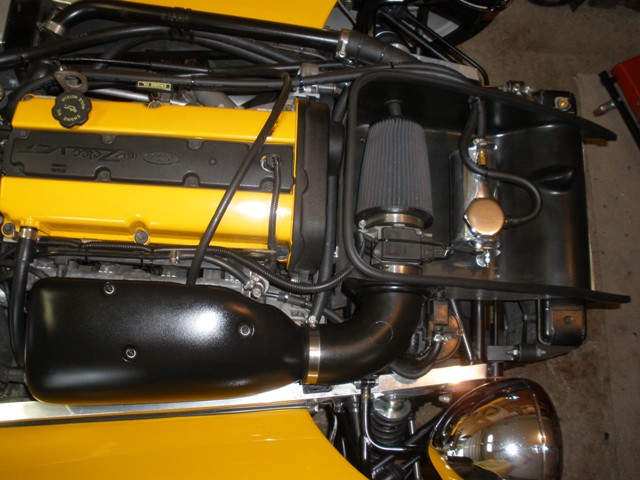
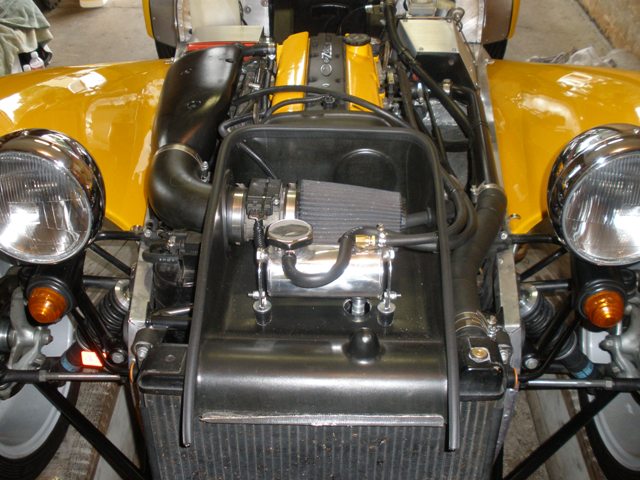
I also have some other potential products if there is a positive response. A rear belly pan for DeDion equipped cars and a (true) cold air intake system that pulls air from the nosecone with no external modifications or welding needed. I get intake air temperatures only about 10 degrees higher than ambient with this setup (per my ScanGuageII). Every 10 degrees you can reduce your IAT is like adding 1.5 HP and 1.5 lb./ft. torque.
-
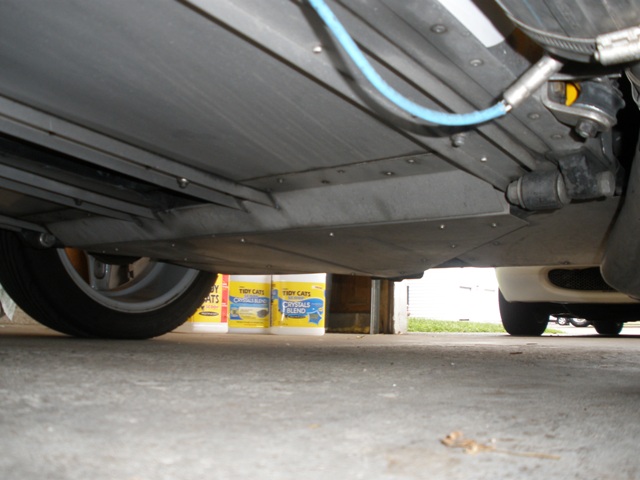
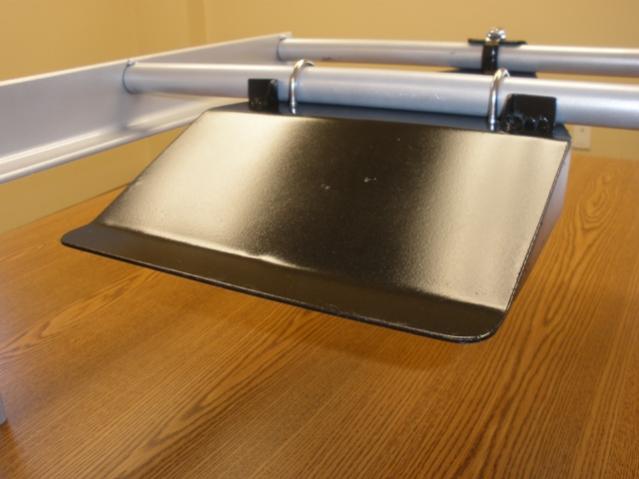
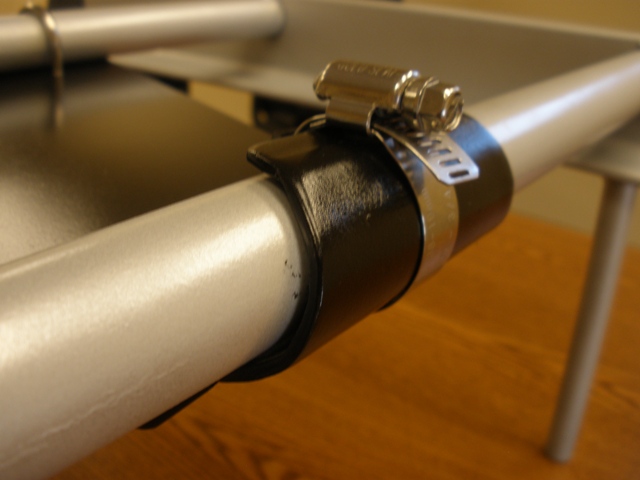
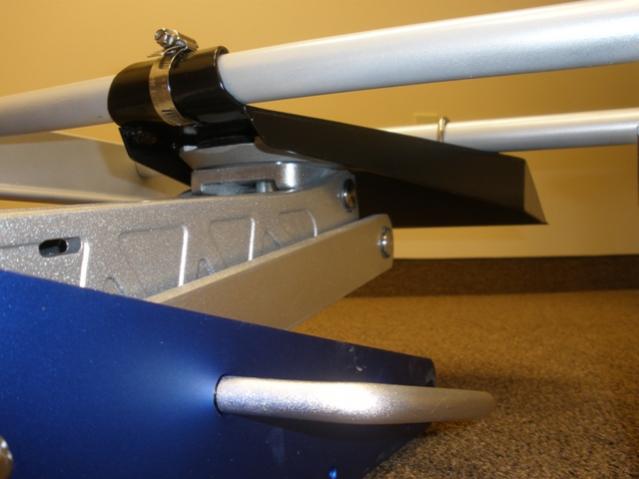
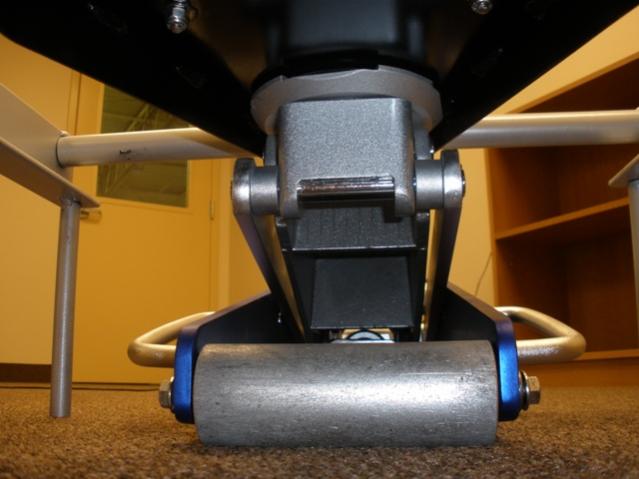
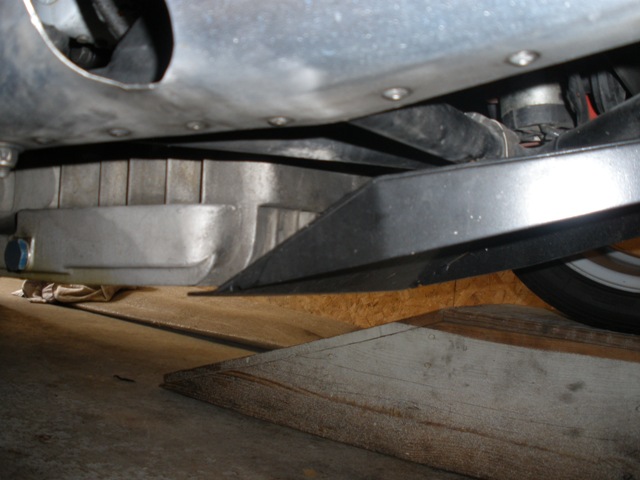
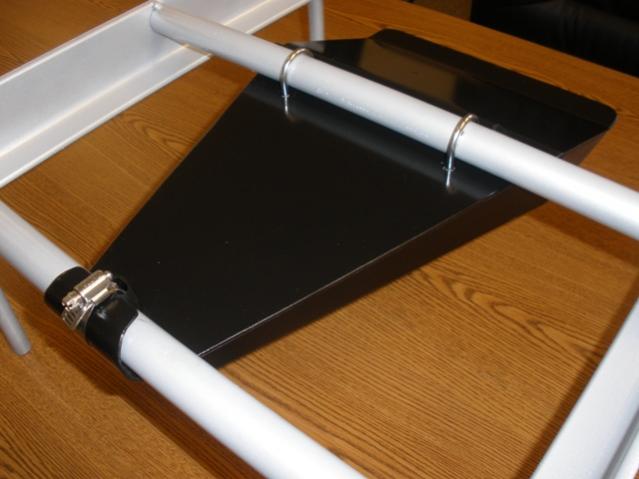
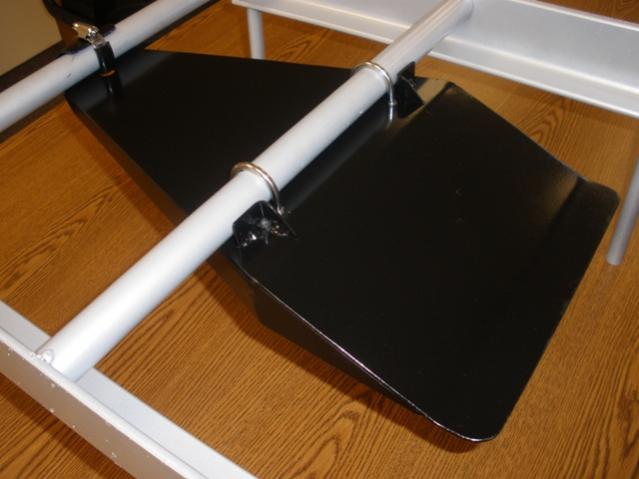
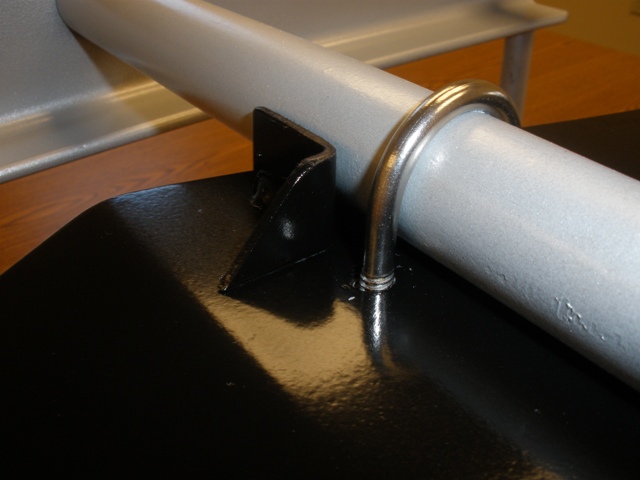
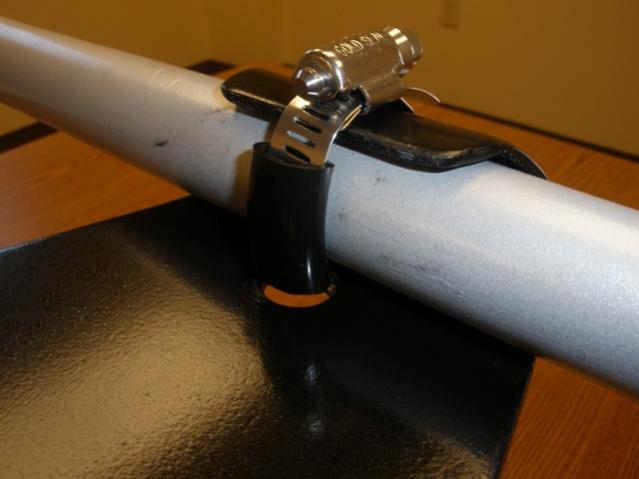
The U-bolts support the rear of the unit and the front hose clamp with nylon buffer are to eliminate vibration only. If the sump guard takes a hit the hammer-formed front transfers the load to the chassis and at the rear there are tabs to hold the guard captive should you hit it while backing over something (like leaving the track backwards over the rumble strips for instance). The bottom photo shows how it tucks nicely under the sump without touching, reducing ground clearance minimally. It also provides a safe and easy lifting point for your floor jack and the tapered design will hold the jack pad captive instead of letting the car slide off.
-
FOR SALE: CATERHAM SUMP GUARDS I have been using this sump guard for about 5 years on my Zetec equipped Caterham (MY2001) and have made a few to see if there is a need out there for a well designed unit to protect those pricey Raceline sumps. I have 3 units for sale which includes all stainless steel mounting hardware. They are made from 12ga. steel and are primed and painted black. The photos below show how they are designed to work. They are priced at $100.00 each (minus actual shipping cost) presently and if there is a demand I will make up a larger batch (probably not at this price though, there is a lot of time involved to produce these buggers).
-
I would guess that there is a higher percentage of riders on this forum than the general population. I ride casually with my dad on one of his cruisers but I have an vintage 2 stroke Suzuki GT250 street bike that I ride solo. We have Honda Metropolitan scooters for when my wife and I go out together, they are in many ways more fun than the 'real' bikes (4.5 HP and 43MPH top speed with aftermarket variators and roller weights, watch out Hyabusa owners). I really enjoy the act of riding well even though I do it well below the limits of the vehicle in question. Focusing on smooth shifting and controled weight transitions is the most enjoyable part of riding for me. After a day on the bikes the 7 feels as safe as a Mercedes in traffic.
-
It looks capital BEA....utiful! Very nice workmanship. Painting the wheels huh? What color? We may not recognize it without the eX-D logos.
-
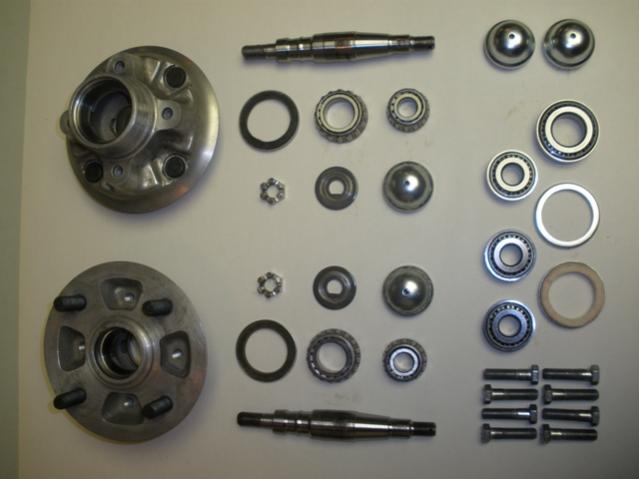
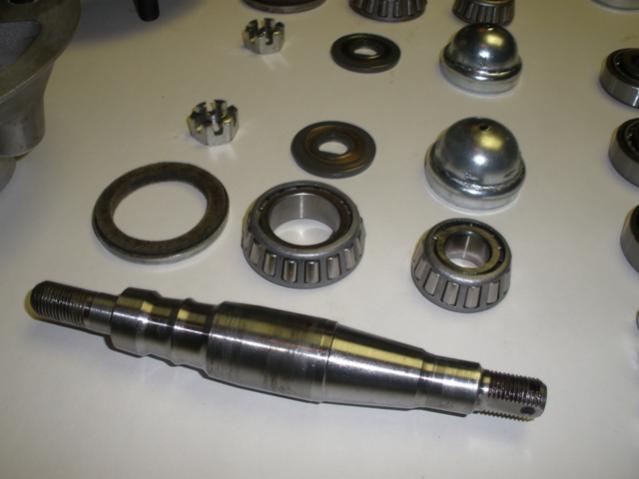
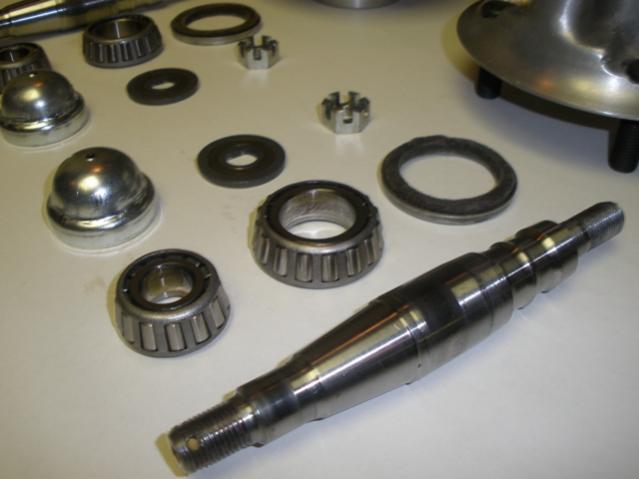
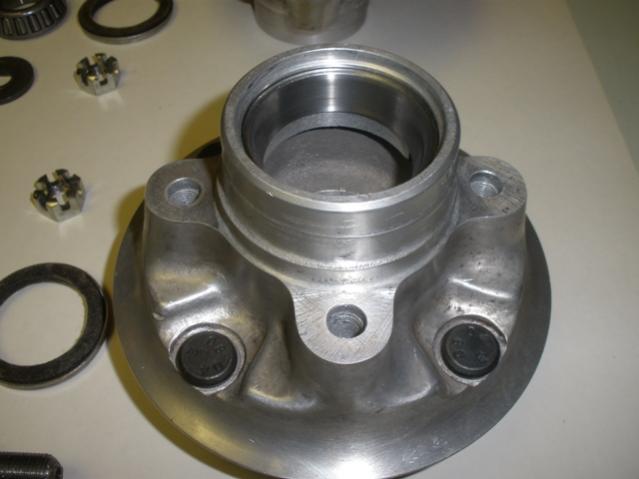
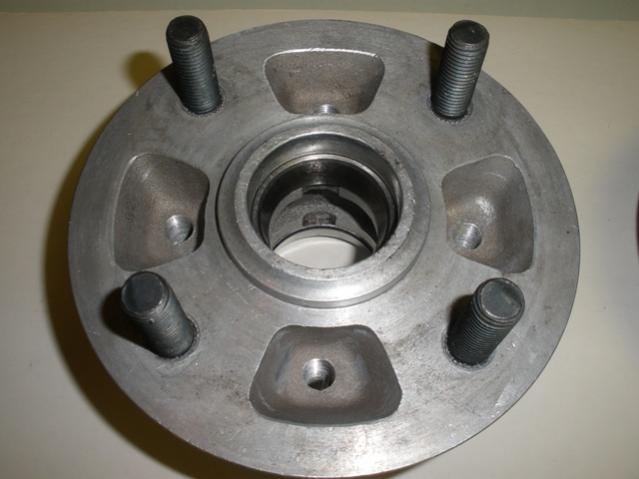
Caterham front hubs, stub axles and spares
Mike Rohaley replied to Mike Rohaley's topic in Parts For Sale / Wanted
Photos:
-
Having purchased the front hub upgrade kit for my 2001 model year car, I have the original cast aluminum hubs with all associated components for sale. Used for 52,000 miles, bearings replaced once at about 30,000. Used components consist of: (2) front hubs with existing races installed (new cost $171.72 ea.) (2) stub axles (new cost $72.38 ea.) (2) bearing kits (new cost $57.19 ea.) (2) D-washers (2) castle nuts (2) dust caps (8) rotor bolts New spares consisting of: (3) outer bearing and race (cost $19.95 ea.) (1) inner bearing and race (cost $17.95) (8) wheel studs (installed onto old hubs) (1) sealing ring (2) dust caps Used components 'would' add up to $620.94 and new components add up to $136.11 for a total of $757.05 (per RMSCI and Victoria British catalog). $250.00 for all plus actual shipping within the 50 states. THANKS
-
You Know You Always Wanted a V-8 - Quick Engine Conversion
Mike Rohaley replied to scannon's topic in Off Topic
I think I found our holiday presents for my minivan driving friends. -
I really like the center mirror. Was that sectioned tubing or was it made from sheet? Either way, it looks perfect!
-
The mirror itself is exactly 2" tall x 5" wide and stands 3 5/8" from the mounting base. The mounting base is 2 5/16" x 1/2" with 1 5/8" bolt centers. Note that the mirror would only work if scuttle mounted because the mirror surface cannot be rotated far enough if you mounted it to the top of the windscreen frame (not to mention problems with trying to run bolts safely through without hitting glass or fouling the top when fitted).
-
My center mirror is apparently a Spitfire/GT6 part. I was browsing a Victoria British catalog and recognized it (part #9-1816 $26.95 http://www.victoriabritish.com/icatalog/sg/full.aspx?Page=17). It is one of those flat British jobbies as you say and is surely not aerodynamic but it does fit snugly between the screens and is not an account-breaker like the carbon fiber items (which reduce weight mainly by emptying the wallet). Also, The fender and door mirrors (on the same page) might be a good cost-effective option at only 10 bucks a piece.
-
It looks like you nailed it Bob and it looks great so far. I noticed you have since welded in a tab for a rear-view mirror, be sure to post your progress (I wouldn't want to wait till May to see the final product).
-
Sounds good. The frame looks great too!
-
This Saturday would work just fine, what time (you name it)?
-
I am available whenever. After shop hours, generally after 4:00 on weekdays, after noon on Saturday and any time Sunday would work best though. The drag strip was actually very fun , much more than I thought it would be due to the plethora of information provided after your runs on the timeslip. Granted, with bikes doing 8 second runs and some cars in the 10's we would never be big dogs in this enviroment but the fish-out-of-water element gives us a pass to just have some fun with it. I got 9 runs in and left early the one and only time I went, the best 12 bucks I spent that evening for sure. And yes, I like the idea of getting the club together for grudge racing night (I will mention it to Rod next time we talk.....giving you proper credit of course).
-
Thanks Mike, that is great information. That 6 mph difference is huge and now I am really looking forward to the spring (as if I wasn't before).