jimmylukeii
-
Posts
78 -
Joined
Content Type
Profiles
Forums
Store
Articles
Gallery
Events
Library
Everything posted by jimmylukeii
-
Austin David (near Charleston) and I (near Atlanta) have recently completed our builds. We are chomping at the bit to get a good group drive together. Please PM me or respond to the thread if you are interested in a group drive around the Western North Carolina area in mid-October 2022. That is during the dry season, just before the crowds arrive for the changing leaves. It's also the time of year for glorious weather - not too hot, not too cold. We could make this as grand or as simple as the group wants. Between Austin, me, and hopefully some of you, we should have a good familiarity with the area.
-
I did not weigh it with acid, but it cannot be more than 20 pounds. Very light. Battery seems to be working well so far (15 miles or so around the neighborhood). Of course, time will tell. Even if it lasts a year, I don't care too much given that it is relatively inexpensive. The battery is Banner #53034. Specs are here: https://batteryfactory.co.uk/products/53034-banner-caterham-car-battery-12v-30ah.
-
Good point. Thanks you!
-
I think it was wet rather than AGM - I had to add battery acid. Volts were presumably 0 when I started - it came to be bone dry, I added the battery acid per Banner instructions, and then put it on the trickle charger overnight.
-
I am at the end of the build (hopefully( and am charging the 30 ah Banner wet battery with a 1 amp trickle charger. Being a complete novice, I turned to Google, who tells me that it should take 30 hours to charge (1 amp charger and 30 ah capacity). I put it on the charger last night around 7 pm. Wake up this morning, disconnect the charger, and check around 8am. My multimeter reads 13.3 volts. Again, Google tells me I want to be in the 12's for a fully charged battery. What is going on here? Is the battery fully charged?
-
Count me as lucky. Zero bending, really. They fit right under the dash. I did not try to line up the holes on the knee plates to the holes in the interior. I marked rubber with a punch, then punched out the holes, then installed the knee plates and drilled through them using the interior holes and punched out rubber as a guide. I'm impressed with your knowledge by the way. It's quite daunting to see how you are fixing little issues here and there.
-
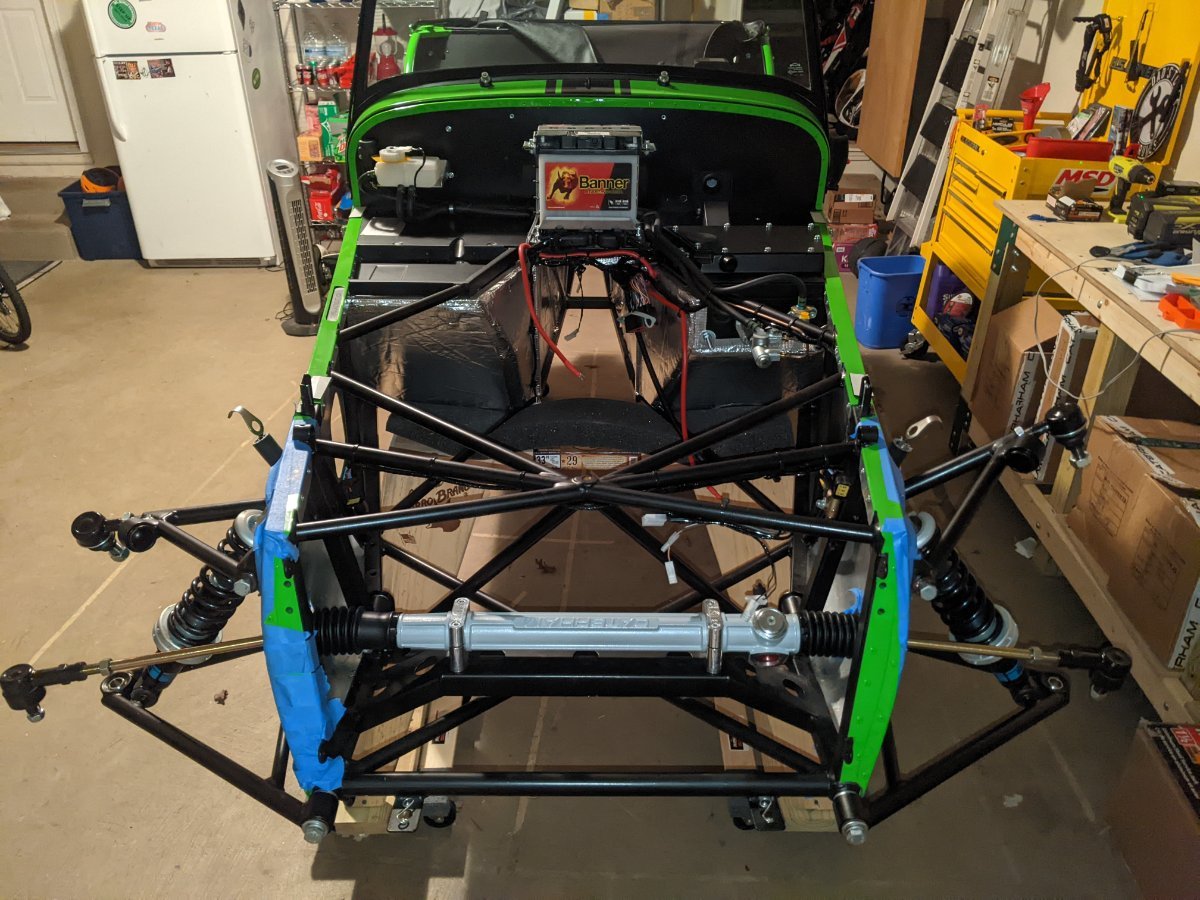
Seventh big build category: interior. This part has been fun. I ordered full carpets and have installed carpets on the tunnel, below the seats, and behind the seats. Carpet tape instead of spray adhesive was a good call (per advice of Josh Robbins with Rocky Mountain Caterham). Tunnel top fits as you would expect. Same with the gear shifter. I expected the knee plates to be hard. But they were not bad at all. I punched holes in the rubber, inserted the knee plates with a little firm pushing and bending, drilled as indicated in the manual (the holes on the knee plates don't line up at all as delivered), and screwed/riveted per the Ikea manual. I may have gotten lucky. The 12v lighter attaches to a wire in the passenger side, but there is still a stray wire that does not seem to attach to anything. I'll add it to my list of questions for Josh. There seem to be several of these orphaned wires. The one trick is for those with lowered floors and an adjustable driver's seat. You must bend the L shaped adjuster down before installation. Otherwise, the cross member will not allow you to move the seat backwards and forwards. Another question for the group: are the S3 tillets the same size as the SV tillets? I ask because mine seem very tight and the packaging label identifies them as S3.

-
Sixth big build category: plumbing part 1. This was a dead end. Caterham shipped duplicates of some and then missed others. In keeping with his help all along, Josh Robbins with Rocky Mountain Caterham is shipping me the missing pipes. Should arrive this week. Apparently, the plumbing in the Ikea manual is out dated. Again, how does this happen without an official update from Caterham?
-
Fifth big build category: bulk of the drivetrain. In retrospect, this part of the build was the most fun and rewarding. In the moment, it seemed like a massive undertaking. My general advice to other newbies: it sounds like a broken record, but visualize and plan what you are going to do and then take your time. It will fit! The biggest issue was removal of the starter motor for the bell housing / transmission mating. There is one bolt that seems impossible to remove. You'll know which one. I finally removed it after buying several socket extensions and taking a LOT of time. Of course, reinstalling the starter motor took about 5 minutes! I sprayed waterproofing in the bottom parts of the interior body and other crevices. I read that these can trap water and cause premature rust. I intend to (essentially) daily drive the car, so I figured this would not hurt. You will see below that I had lots of "help." Really, just one friend to help manhandle the engine/transmission. More specific advice largely echoes the blogs: - buy or rent a load leveler to go along with the engine lift - keep the plastic on the transmission (thin, easy to remove, and protective of transmission tunnel walls) - keep a very steep angle until the transmission is just in the tunnel, then level it out and keep the transmission high - I thankfully did not have any issues with lining up engine mounts or rubbers, but be sure to keep them loose at first to give yourself room to mate them to the engine block - I did not remove anything from the engine block except the tensioner and belt; I did not like the idea of re-installing the starter, alternator, or anything else in the cramped engine bay - take lots of pictures before disassembling anything: it is much easier to reassemble
-
Fourth big build category: more rear end and drivetrain part 1. The rest of the rear end was thankfully more cooperative. Radius arms, rear brake hose connection, brake assembly, and rear drive shaft were not terribly difficult despite the large number of small pieces. As with the entire build, I took my time, dry fitted everything, and then installed. One item for the group: my passenger side rear brake assembly is extremely tight on the rotor. As if brakes were lightly applied. I disassembled everything and re-torqued to make sure that everything was by the book (including torque settings). I also bought a brake piston push back kit and tried to push the piston back as far as it would go. Maybe having fluid in the lines will resolve things? Any clue on this?
-
Third big build category: rear end. This is where things first went south! The de dion prep was easy, but that did not last long. I did not have a brake line bender, but a large socket did the trick fine. It seems odd to me that some of the brake fittings do not screw in all the way (too tall), but I confirmed with several blogs that this is just the way it is. Still seems odd. I took this time to apply several coats of varnish to the wood trunk floor. LSD was a bear. I think this requires a second set of strong hands and arms. I sat for hours on several nights trying to get everything to line up. One of the pics below is my unsuccessful attempt at propping up the LSD so I could insert the bolts. Finally, my buddy came over late one night and, with the help of the BFH, we made it work. LSD is solidly in and has no play, despite my build's having a few fewer washers than I have seen on other blogs. When installing the diff, don't forget to route the brake lines beforehand! Looking back, I am very glad to have put the chassis on the sawhorses. It gave much more room than I would have had otherwise, and I needed it! After all of the above and installing the wheels/tires, I got it down with help from 2 friends - this thing is super light! Lots of copper grease in the pics - since been tidied up.
-
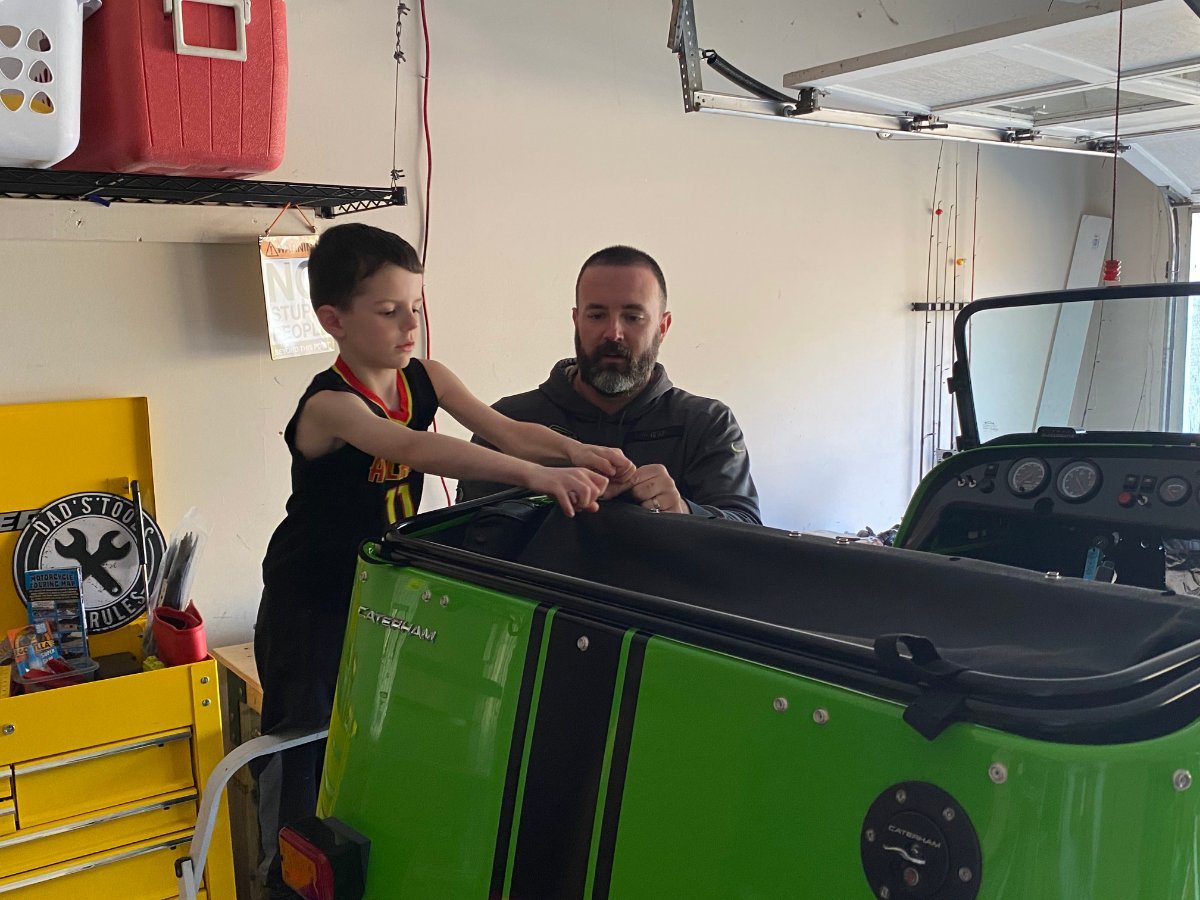
Second big build category: shoulder harnesses, rollover bar, handbrake, and heater. Shoulder harness and rollover bar came at the advice of several blogs. The suggestion is to install the shoulder harnesses before the rollover bar and the rollover bar before the rear dampers. This is where the manual puts you in the wrong order if followed page by page. The shoulder harness came with cardboard washers. I installed them and then read suggestions that the cardboard washers are not needed. Too late now, and I would not imagine it matters much either way. The rollover bar took a little persuasion by my new best friend: the BFH (big f***ing hammer). But my youngest was able to help with a few of the bolts. Handbrake was more difficult. Access is very tight, and I got frustrated. But it eventually went in and is ready for the differential installation.
-
First big build category: uprights and lights. Once i figured out how to put upward pressure/load on the suspension, the uprights went in without too much trouble. But I did take my time given that I have no clue (call it 8 hours). I need to go back and swap out the brake line washers for the ones that various blogs recommend (copper ones if I recall correctly). Lights were relatively easy thanks to Daniel French's blog: http://www.caterhamr500.co.uk/2014/02/build-day-four-headlight-and-indicator.html?m=1.
-
Overall thoughts so far: - The best blog I have found is www.310buildcom. It is a 310 (check) and relatively recent (check). Some items in that blog are now out of date, but it still has great visuals and descriptions. - Josh Robbins with Rocky Mountain Caterham is a fantastic resource. Between his quickly answering silly questions and assisting with missing parts, the build would have gone much less smoothly. - Caterham's instruction manuals (both the Ikea and written form) leave a lot to be desired. They have provided about 85% of what I need. That figure sounds like a lot, but (in my opinion) is very lacking given the kit's price tag. How hard can it be to have detailed manual with regular updates on Caterham's website?
-
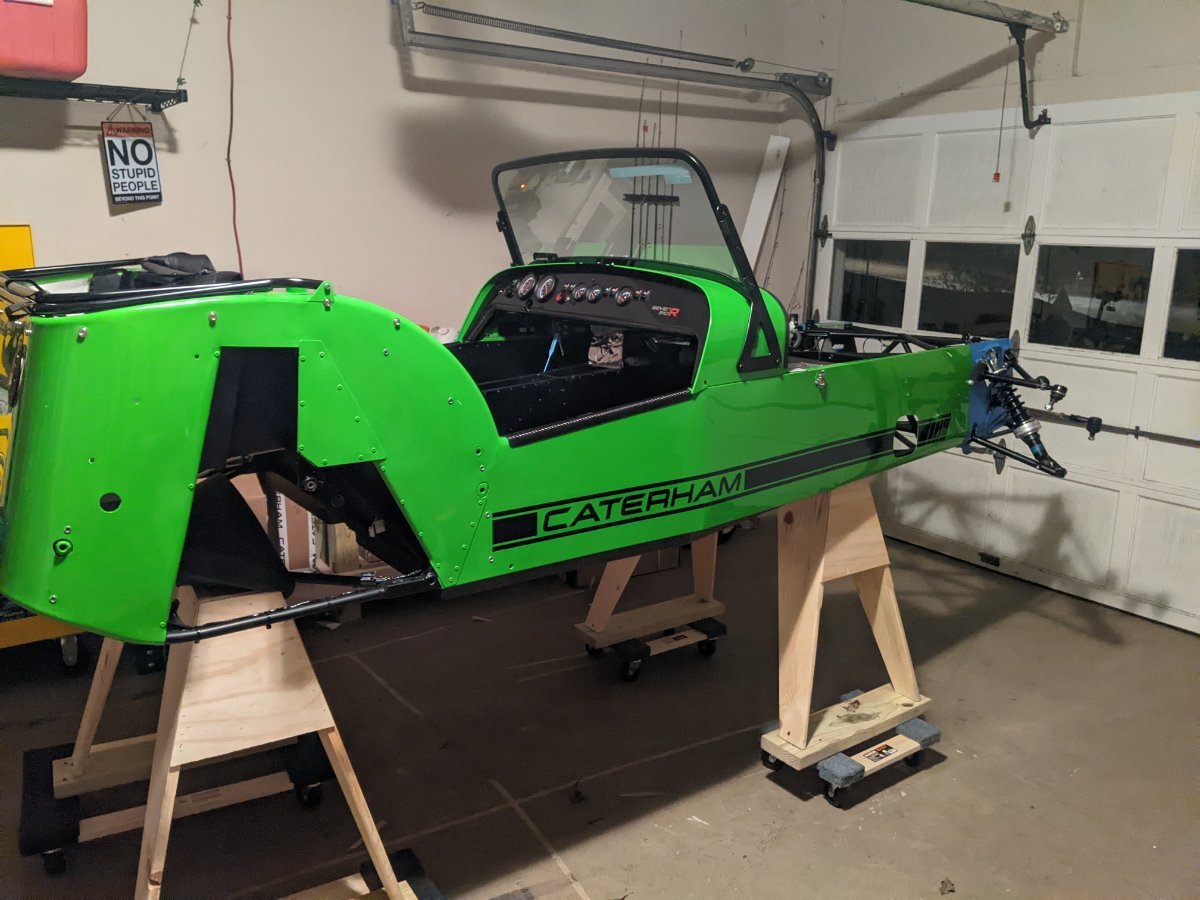
I have completely neglected this build thread. Between coaching my boys' flag football teams, working at my day job, and the rest of life's responsibilities, I have fallen behind! I will catch up on the posts to follow. @UglyFast - thanks! I initially went with black all around, but I had a very close call in my Cobra replica because (I think) it sat so low. I figured green would give me a little more visibility to others. We'll see!
-
Track days are great! They are what got me hooked a few years ago. But I'd like the chance to compete a bit more if possible. I suspect that you are correct on the regulations. In my simple mind, I was romanticizing about the days of folks showing up and racing what they had. Those days may have long passed!
-
Just completed 4 days at Radford Racing School. Fantastic program, and I learned a tremendous amount. I am assembling a Caterham 310R with the intent of tracking it. But now I want to consider joining my friends and actually racing. For SCCA, it looks like I would need a full roll cage unless I wanted to autocross only. Is that accurate? Any work arounds? This will be a semi-daily, so the roll cage is not very desireable. For SVRA, it looks like a modern Caterham would need to be retrofitted to original 1960s era specifications. Is that also accurate? Any other groups that I am not considering? I am in Atlanta if helpful.
-
One stupid question already: the steering rack has zip ties as shown in the pic below. Do these stay or come out?
-
After a long wait ($&#! COVID and supply chain issues), I now have my 310R SV kit as of Thursday. Thanks to Josh with Rocky Mountain Caterham for his great help so far. I have limited mechanical skills, so this build may be a good push for those on the fence to assemble their own (assuming all goes relatively well). I have made good progress so far between kids' basketball games and piano recitals. Built a unique looking stand per the advice of Josh's father (Ross Robbins, thank you), wishbones (upper wishbone washers were as frustrating as advertised), dampers, and steering rack are in. Next up are wingstays, front brakes, and front lights. Hope to accomplish all of those this week before a 1 week break for Radford driving school in Arizona with friends/clients! I look forward to any advice, critical eyes, and help you can offer.
-
My guess is that the buyer of the Tesla Roadster is a collector versus someone that will use the car. In other words, the auction price is not indicative of a healthy market yearning for an electric sports car. Just my opinion, but I am a little sad at the prospect of lumpy V8s and screaming I4s disappearing.
-
I am a few months behind you in Marietta. My 310 kit will arrive sometime this fall. To get prepared, I spoke with a Cobb County tag office clerk. She gave me the same information you seem to have tracked down. Interestingly, one of the requirements in the process is apparently obtaining a rebuilder's license. That seemed odd to me. As you indicated, the downside to the process is that your car is registered as a 2021 and subject to emissions unless you get a waiver from the Georgia Clean Air Force. However, I have heard from Cobra replica builders that you can avoid the emissions issue by going to the tag office with a bill of sale and Form T-22B. Maybe your importer/dealer/seller can help with the bill of sale. On the T-22B, you would insert 1957 Lotus Seven as the year/make/model and the serial/chassis number instead of the VIN. If 1957 Lotus Seven is not in the tag office's system, maybe 1958 Lotus Super Seven or 1959 Lotus 7 is, and so on. I followed that same process for my Cobra replica (bought used and assembled). It is registered as a 1965 and exempt from emissions. And ad valorem taxes are something like $20 a year. My plan is to go to the Cobb County tag office in person and confirm this alternative process sometime in the next few weeks. If you beat me to it, I would greatly appreciate any insight.
-
First, I strongly suspect you can't go wrong. You'll have a stupid grin no matter what. I don't know how helpful this will be, but here is the analysis I ran through when making my choice last month. First, I am coming from a high hp Cobra, so my main fear was having too little grunt via the Sigma. But talking with a few folks and reading a lot made me think the Duratec may not get me what I wanted: more pedal to the floor, high rev fun. At least not on the mountain runs I love. So then the choice was 270 vs 310. My fear was that I would yearn for more power quickly, and I understand that bumping up cams, new mapping, etc. after the fact would be more than the initial $2k difference. And I don't know how many shops would be willing or qualified to do the work. I also wanted the ability to slide the back end, and that seems more attainable with the 310. Also, on the forums, the people who had a 270 and did the upgrade seem to really enjoy the difference. Lots of blathering, so I will end with this article on a group that did the upgrade: https://www.autoexpress.co.uk/caterham/7/93537/long-term-test-review-caterham-seven-310s Good luck!
-
new 310r on order - color change?
jimmylukeii replied to jimmylukeii's topic in General Sevens Discussion
That's funny / awesome Sean. Great advice from all. Thanks for your thoughts. -
Yoram, I am in Atlanta and may be a few weeks ahead of you in the process. I have had a great experience with Josh Robbins at Rocky Mountain Caterham so far. He has a 310r himself and gave me great perspective on questions I had. I look forward to seeing what you do. And I'm happy to share my experience as I go along. Very exciting!
-
Longtime lurker and, thanks to a few Atlanta locals and Rocky Mountain Catherham, current allocation holder for a 310R. I'll test my wife's patience by building the car at home, hopefully next fall/winter. To make room, I am selling my Factory Five MK4 Cobra replica if anyone wants to scratch that itch . . . . Question for folks that have darker colored Caterhams or that switched from a dark color to something bright: is the "buy bright so people see you" something that you personally can attest to? My order is for a Black Grey with Marigold triple stripes and a Graphite pinstripe. However, my second choice is Riviera Blue with Marigold/orange stripe. This is coming up now because I had a close call yesterday in my Cobra.


.jpg.239400990caa78932871eb58aa82e0e7.jpg)