Yoram
-
Posts
283 -
Joined
Content Type
Profiles
Forums
Store
Articles
Gallery
Events
Library
Everything posted by Yoram
-
Anyone participated or spectated last Saturday? @mrmustang? @UglyFast? @SENC?
-
Latest update of today: https://www.euroautofestival.com/?mc_cid=a019f69631&mc_eid=371dbb1f9b
-
That's exactly why I ordered mine with this colo(u)r. But I had to have the bare aluminum body to "add lightness"... 🤪
-
Ahh, now I see it. Wasn't looking closely at the bottom. Not being familiar with it I was expecting a bracket in the middle of the rear panel (obviously obscured by the wheel) with a couple/three studs, like in Jeeps etc. Funny what a can of worms @IamScotticus opened with his nonsensical line... I was pondering a spare wheel carrier when speccing my kit but Josh Robbins talked me out of it. Looks cool though, and serves a purpose.
-
I am unable to spot the colour of the spare wheel carrier, however I must cheer your exquisite taste in choosing Firecracker Yellow wings!
-
No, I am!! I insist!! 👹
-
Thank you, I know. Just being a smart aleck, sorry.
-
What is a tyre carrier?? I don't know if I have one.
-
Scott, I think you meant colours.
-
Back last September I put together a photo book with few annotations to have on the coffee table and for occasions like the Euro Auto Festival (which BTW got postponed and now rescheduled). I used Mixbook.com and highly recommend them. As I was mindlessly leafing through it the other day I discovered a serious error: The reported final camber angles were missing the minus signs! Had the car been aligned to those values (1.5 and 1.6 deg) it would have resembled a flattened MG TA with loose wheel bearings. I wasn't going to have the book reprinted so I just added the minus signs with a fine black pen/marker and a ruler. Came out OK... But... what about my other documentation? To my horror, the error was propagated consistently in my build journal, my (manual) alignment data sheet, and in this thread! It's all fixed now (phew...), including in my edited post from Sep 7 2023. Quite surprised that no hawk-eyed member, not even @mrmustang or @IamScotticus, caught this. Or maybe you did but decided to be nice for a change and let it go... Cheers!

-
New Dates and Location: April 11-12 Hotel Hartness, 120 Halston Ave, Greenville, SC 29615. https://www.euroautofestival.com/ It's a bummer - we will not be able to participate due to planned travel. Hopefully a few 7's will be present. Cheers.
-
J, we cannot wait that long. I don't know nothing about PPF, but I second Bill: how about hold off with PPF and let's regroup as soon as y'all find a couple hours. I will disrupt my hectic retirement schedule if needed...
-
Bill, maybe try Josh Robbins at Rocky Mountain Caterham -- josh.robbins@rockymountaincaterham.com. You may know him already. He is ultra knowledgeable and helpful.
-
Congrats, Bill!! Excited to regroup somewhere around GVL as soon as time and weather allow! Great to see the New Year seems to have started Happy for you!
-
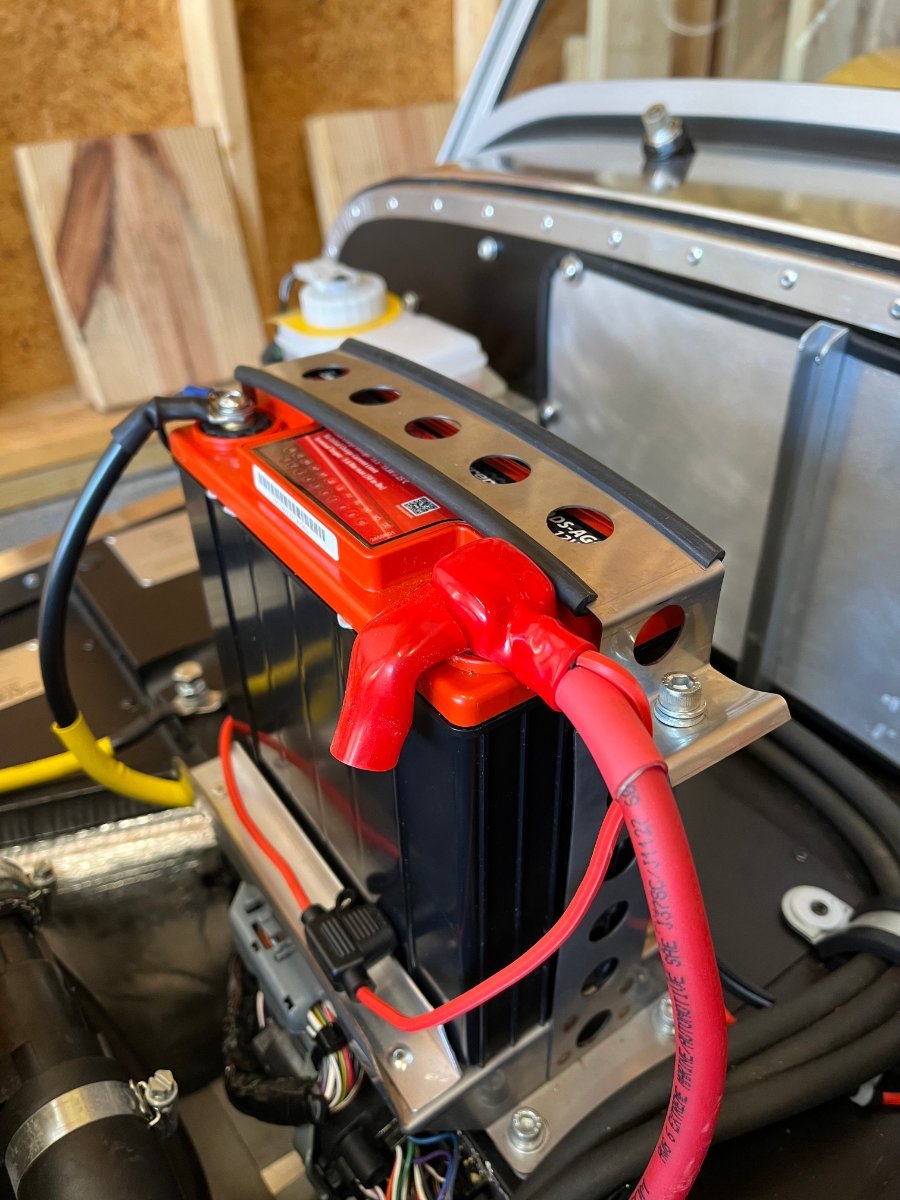
Don't know almost nothing regarding batteries... googling (or duckduckgoing in my case) like most of us... From the little I read, AGM batteries cannot tolerate high charging voltage levels at the level of regular ("flooded") batteries and risk popping their safety valve and losing capacity. To my understanding this is because the internal resistance of AGM batteries is lower and therefore the charging current at a given voltage would be higher, which may create overheating and popping of the safety valve. Also to my (limited!) understanding, trickle/maintenance charging is not the main risk. Deep charging under high current of a deeply discharged battery is mainly where one needs to be careful and use an AGM charger or an AGM setting. Since I switched to an AGM battery and needed to do both (deep and trickle charging) I decided to invest in a charger with "regular" and AGM settings. These are very common and affordable nowadays. But I plead the Fifth...
-
Yes, my trickle charger has an AGM setting which I'm careful to select. Wanted to see how long the little PC680 will last without it... not very long I'm afraid. At least now it's quick to jump it with standard cables as any other regular car.
-
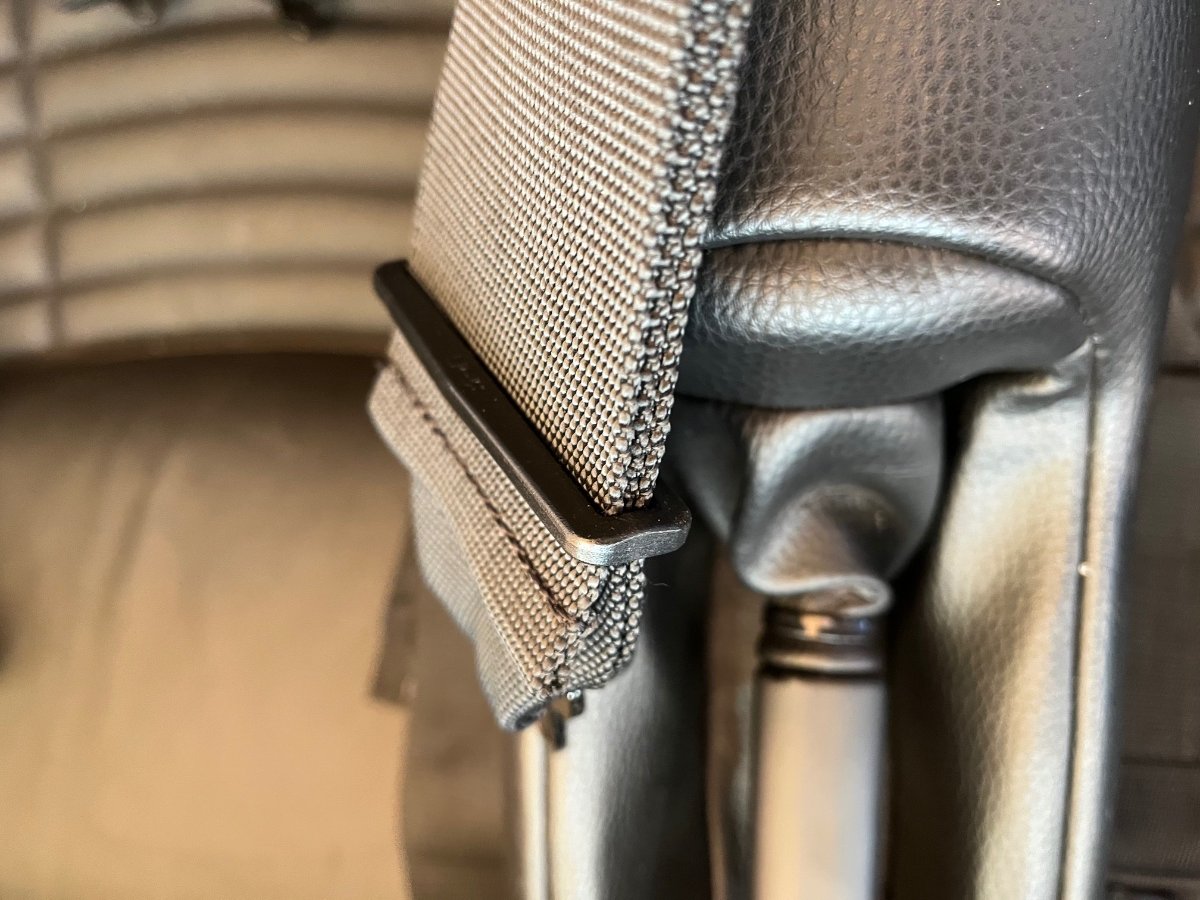
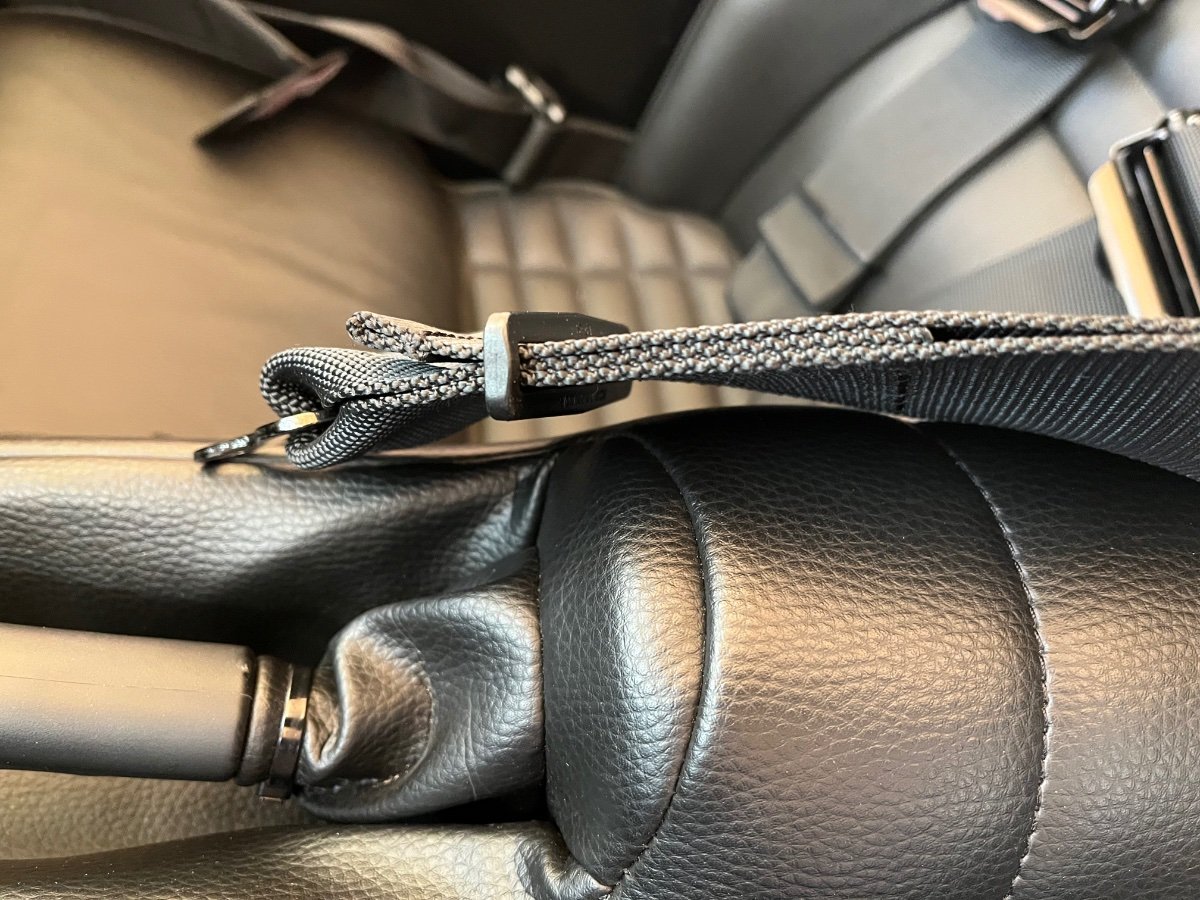
Small updates and Happy Holidays! Battery and charging Left car for a test case without trickle charging for over a month while we were in Michigan. Upon return it cranked barely and then died. Started right away with jumping. Two lessons: 1. My fully charged Odyssey PC680 AGM battery does not last a month feeding the immobilizer -- need to trickle charge whenever leaving the car for more than ~2 weeks. 2. My terminal modifications to facilitate jumping with standard cables (see posts above from Oct 7 and 18) work as intended. Shoulder belt ends flapping As some others with 4 or 5 point harnesses have reported, we also have experienced the shoulder belt loose ends flapping at our faces at speed. I tried to solve this with zip-tie loops but they would not stay in position. I tried 3-prong metal buckles over the loose ends (from Summit Racing I believe) but they severely restricted adjustability. After quite a bit more searching I decided to try 3" plastic loops from Strapworks: https://www.strapworks.com/3-inch-plastic-loop-black These did the trick. They work fine and do not get in the way of easily adjusting the length. Last but not least: Wishing everyone here Happy Holidays and a Great New Year! Drive'em like Sir Colin is watching! (he is!) Cheers, -Yoram
-
Bill, no worries and same from my side! Looking forward to it.
-
The silicone hose (see my post above from 10/14) did the trick. It was not too hard to push around the corner to cover the entire length of the exposed bracket. Before: After: Seems quite tight. And please no one suggest this reminds them of Peyronie's disease. Cheers.
-
I ended up ordering a pair of these jumpers, primarily because they are much smaller and lighter (shorter and smaller gauge) than the sets I have in the other cars, so more fitting for the 7... I will keep my terminal mods for now (belt and suspenders approach) and report about the success or otherwise of my contraceptive solution.
-
Thanks! Will try this next if the silicone hose does not work.
-
Love the benefits of a creative community! Always a new angle you haven't thought about. Thanks, John! Having invested already a bit of time and "emotional buy-in" into the conventional jumpers solution, will try for now to see it through. Just ordered on Amazon 10' of red 3/8" ID x 5/8" OD silicone hose for $5. https://www.amazon.com/dp/B0BXSQN2XV?smid=A132D7PL1YID8X&ref_=chk_typ_imgToDp&th=1 We'll see if/how a short length will fit on my little bracket. (oooops, haven't caught at first the visual one can get reading this, but will leave it there... )
-
Talked to the StockCap sales person today after browsing through their website. She told me that they do not carry stock of any of the options I identified and that this would be a production order with a minimum quantity. Routed me to leave a voice message for another person who is supposed to know what they may have lying on the shelf, which I did. Hoping to hear back. Very impressive company for production/industrial business from what I've seen, not geared for retail walk-ins. Will report further progress. Thanks for the lead!
-
Thanks, Bill. Beat me to it - I did get the email. I will plan on being at C&C too, if I get up in time... It's 8 to 11 am, huh? I'm not a morning person... Cheers.
-
Great find, @CBuff ! They even have rectangular section sizes. Not sure yet how/whether can order one or a few, but will look into it. Will report. Thanks!