
Legs
-
Posts
33 -
Joined
-
Last visited
-
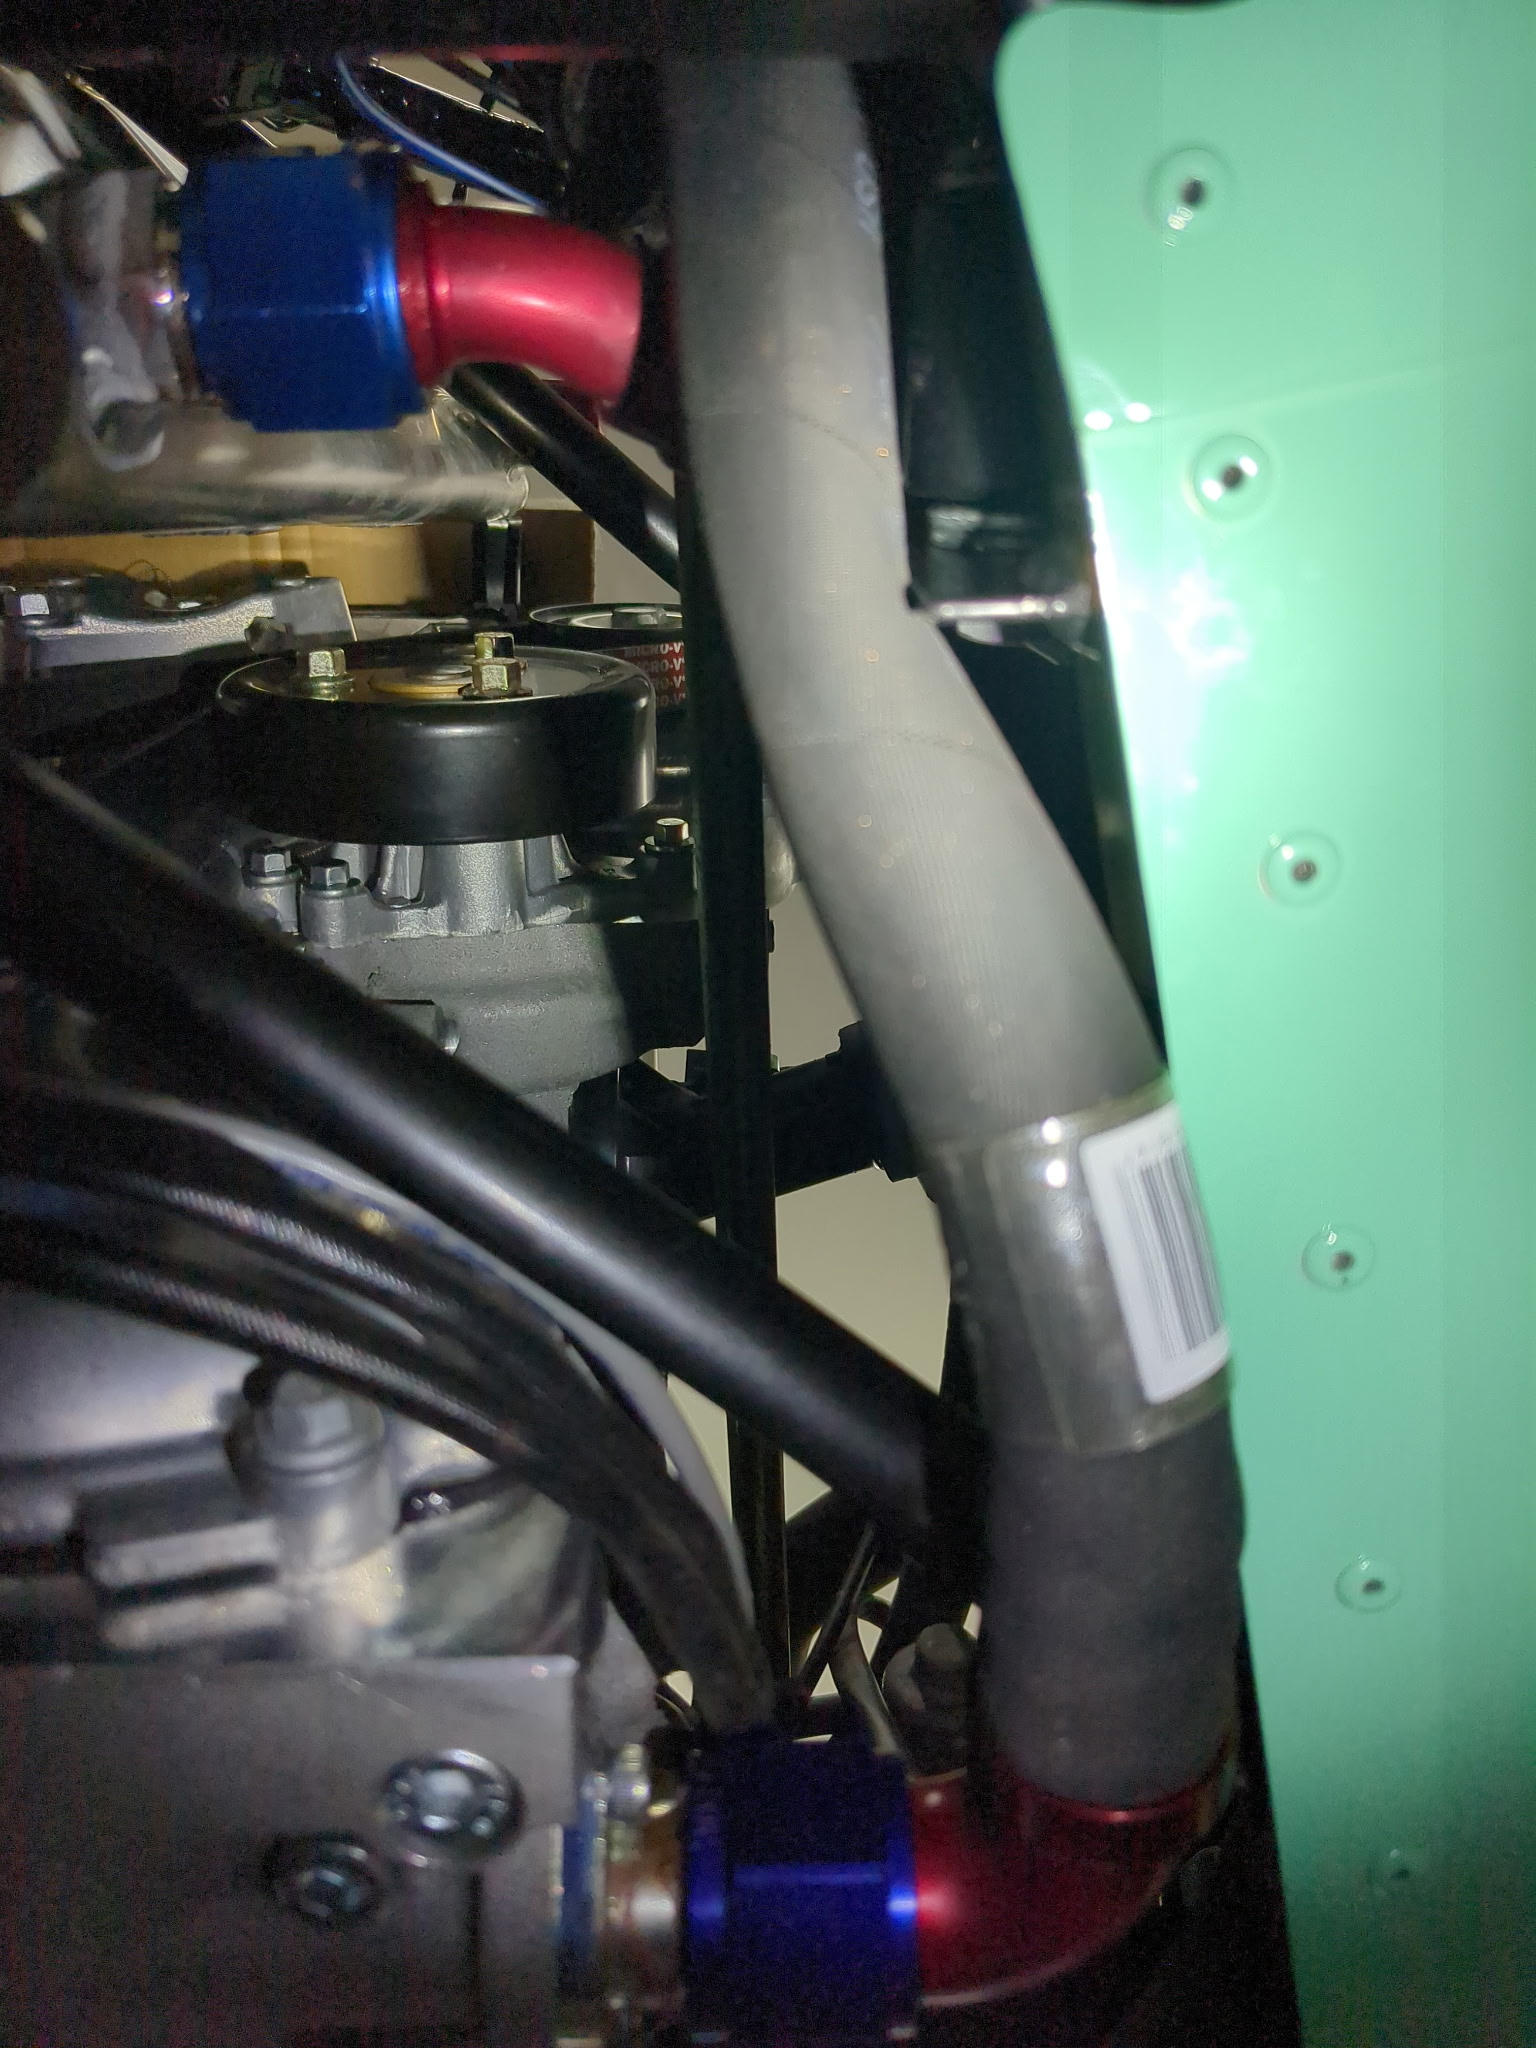
Still waiting on a new water block and temp sender 😭 but made plenty of progress still without being able to try and fire her up. Rear fenders on, started installing the seats but stopped after one to await delivery of some crutch straps, carpet, tunnel, mirrors are on! Plumbing is done except for the water block, but I've a lingering question about one of the oil hoses: Does anyone have recommendations on how to route the dry sump to radiator hose? It seems to be getting kinked slightly by the frame, but as far as I can tell it's in the right place. One of the build blogs actually cuts the bracket edge off to remove the piece that is pinching the hose, but seeking why other advice before breaking out the Dremel again.. I can run the hose below the bracket but then it's hanging below the car which seems unwise

-
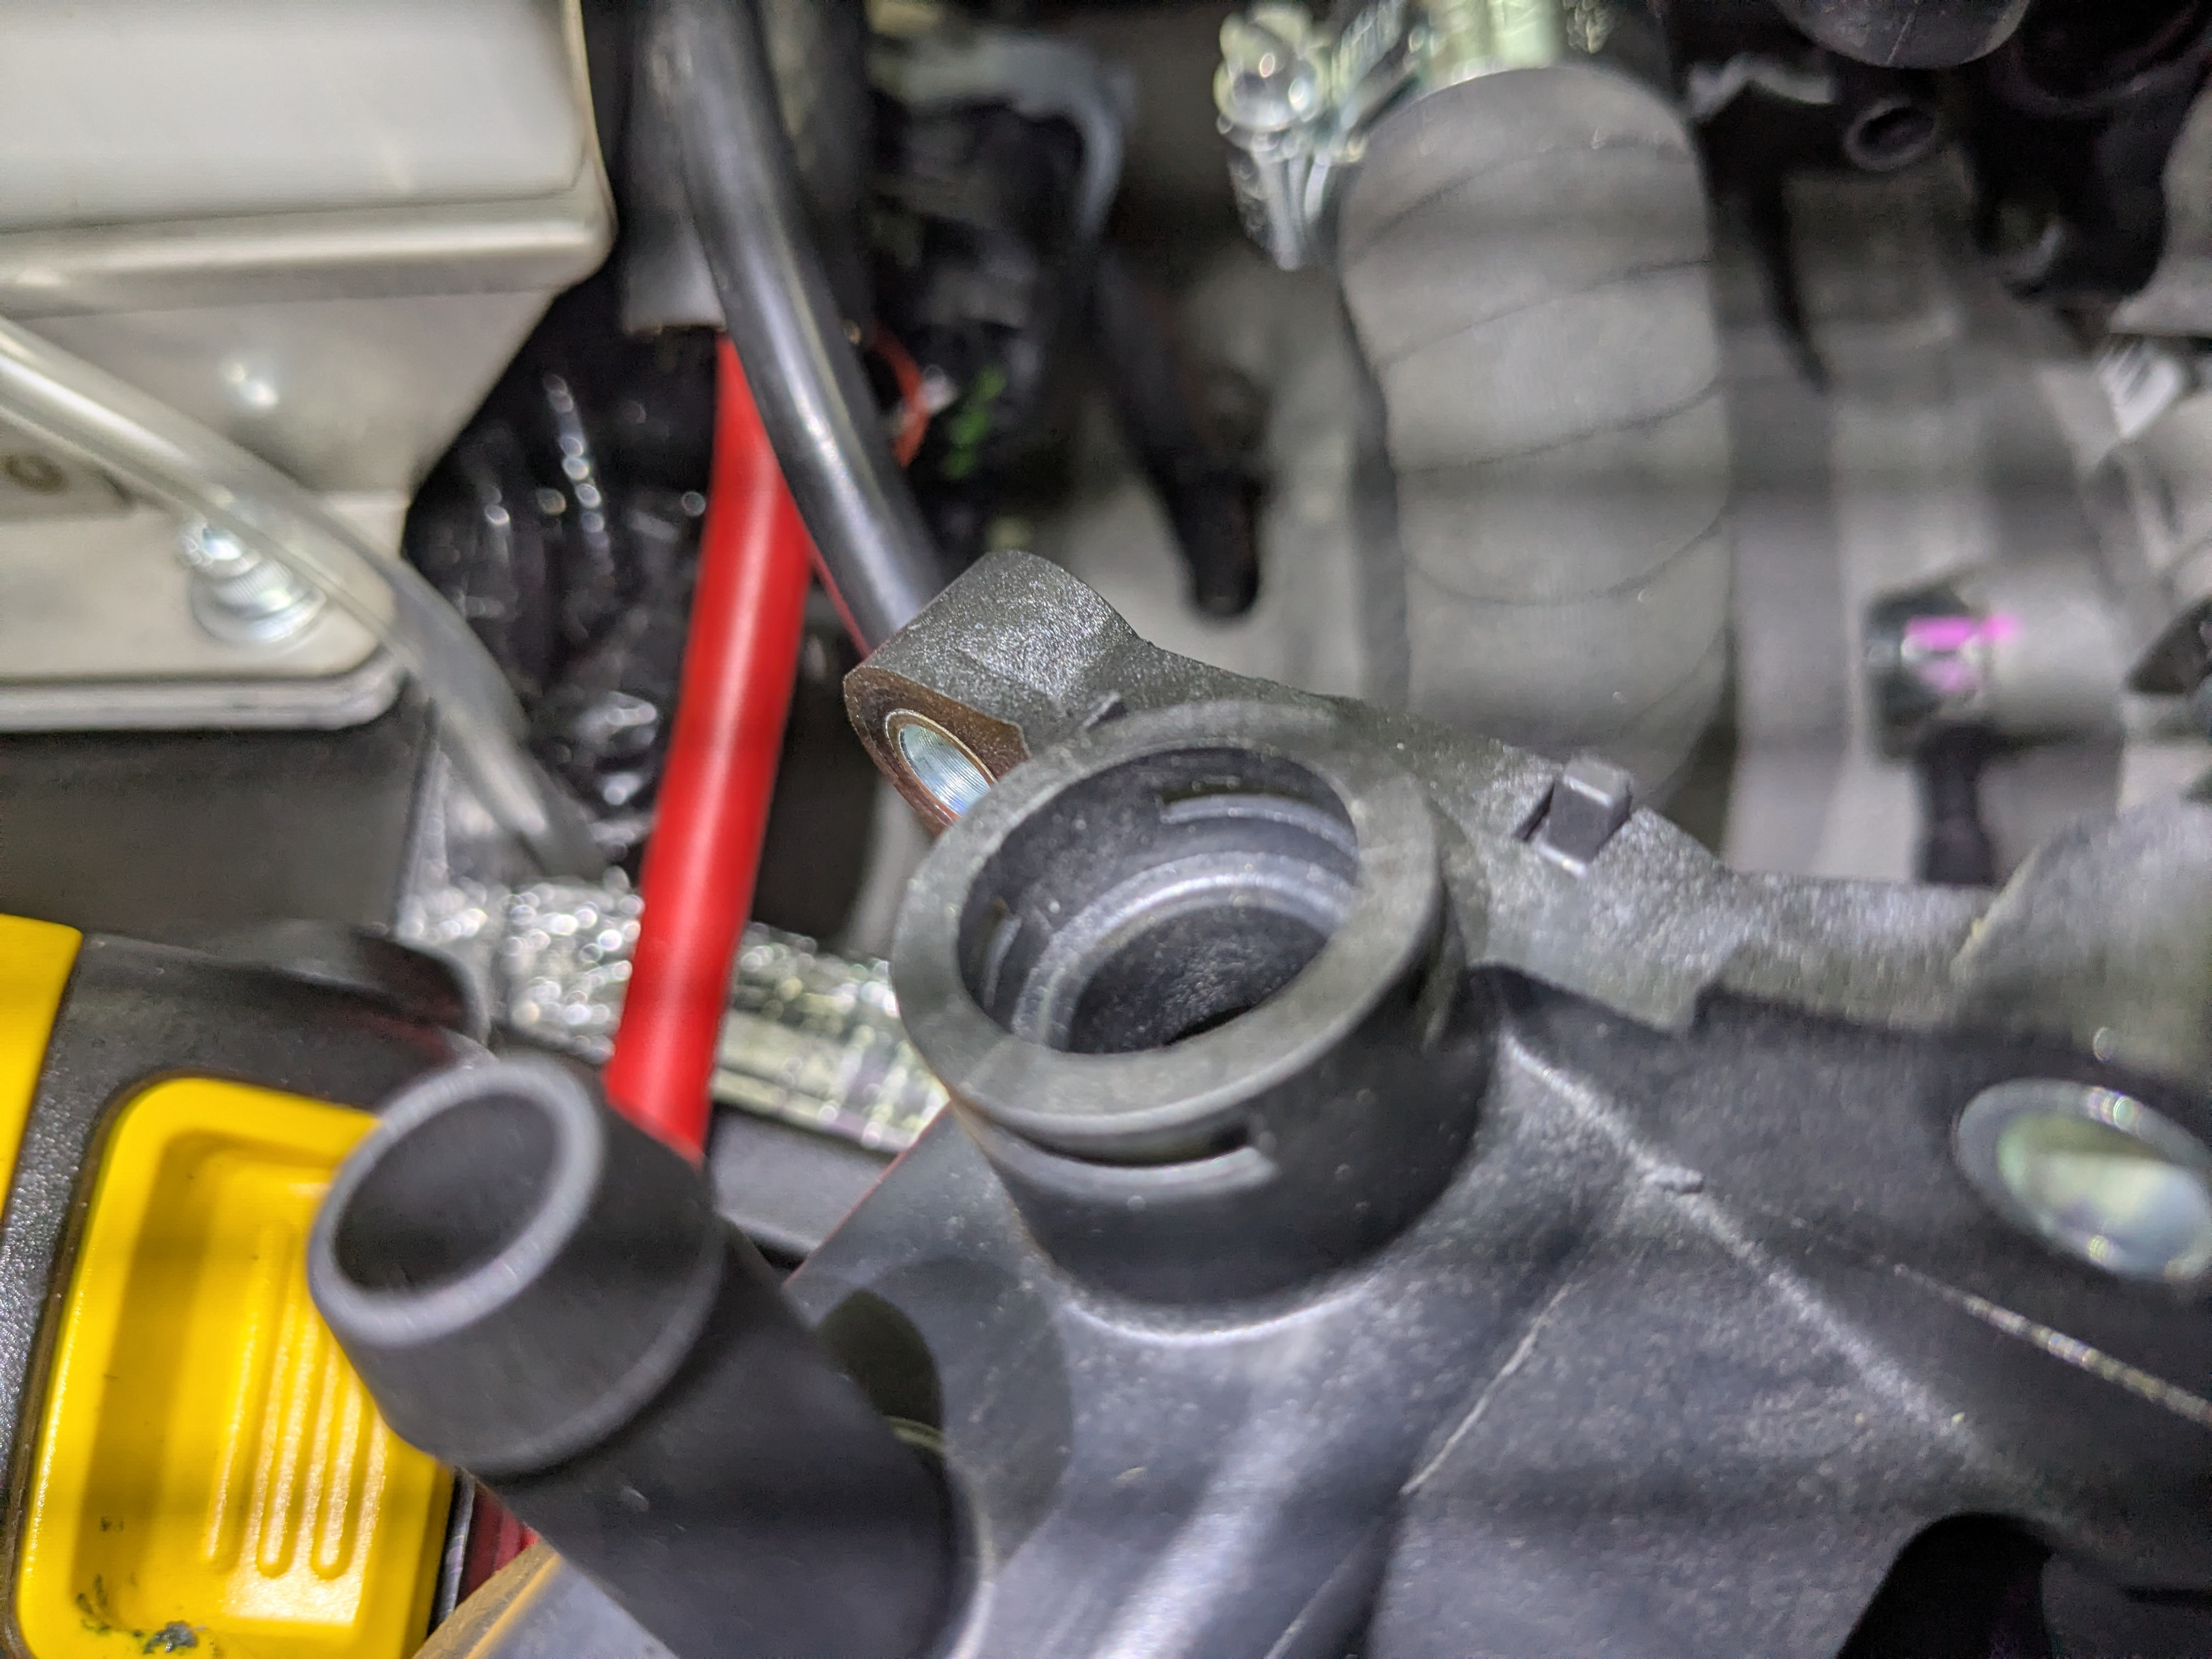
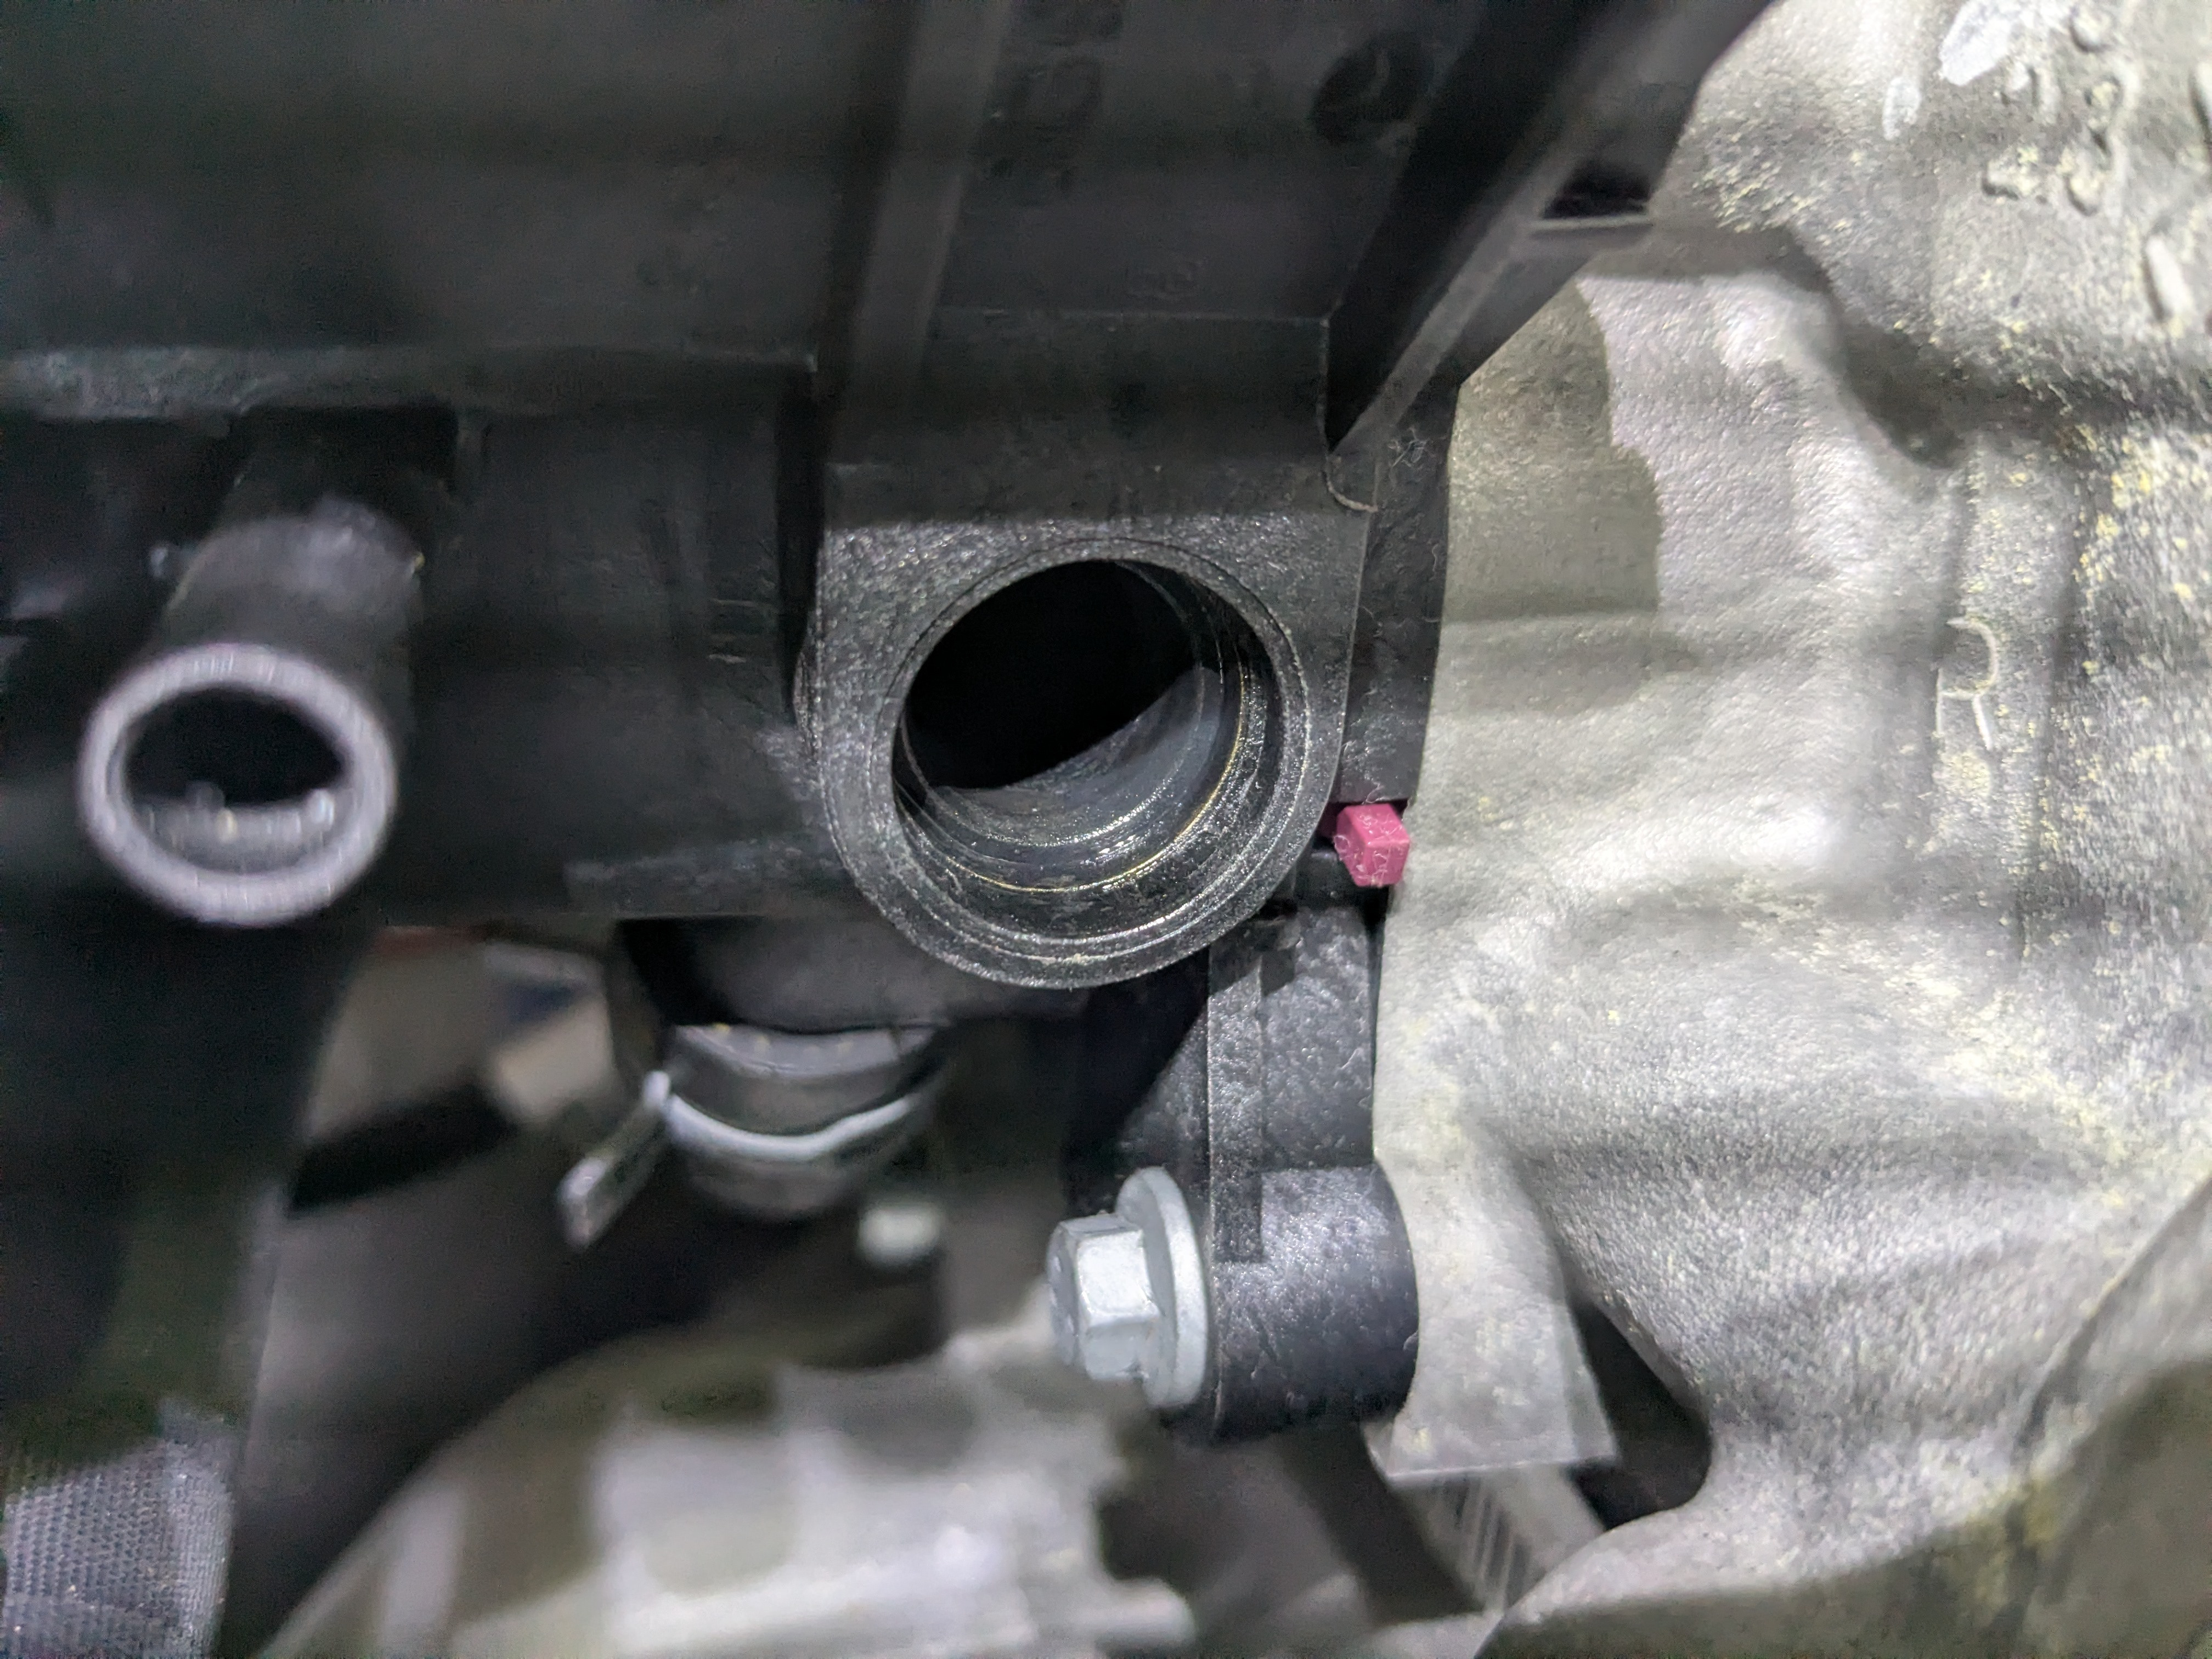
Winter happened and we're back to it in full swing; getting excited with how little there is left to do! Electrical is almost done, primaries are fitted, front wings attached, successfully drilled out the nosecone because the factory forgot to create the ARB channels; A bit scary drilling and cutting through painted fiberglass, but it came out really well! All the plumbing is JUST about done.. One ongoing issue with the cooling still - the engine was sent with the wrong water block attached.. what made it problematic was the extension bottle connection was more than double the expected 5/16" and no amount of heat or silicone was going to get a 5/16" or 3/8" hose over the 1/2" connection, so I reached out to Josh at RMC and the correct water block was promptly sent. Problem solved, or so I thought. Undid the old block, connected the new block and hoses, and lastly the temperature sender.. it won't seat far enough for the oring to seal nor for the cotter pin to attach. Upon inspection, there is a visible diameter decrease, albeit small, on the 'correct' water block that is not present in the original. It's not a molding seam as the diameter is consistent until the expected big neck down for the oring portion, so I don't think it can simply be removed with a razor blade. Similarly, I don't think I can cleanly sand it down without impacting the actual neck down portion? My question to you all is there a different temp sensor for this waterblock or is the connection port just due for an RMA or something else that I'm missing? The first image is the 'French' waterblock which you can see is a smooth single diameter from the opening back to the neck-down. The second image is the correct one which matches all of the build blogs (at least from the exterior) but you can see the gold ring a couple of mm from the neck-down where there is a small diameter change; the gold is rub-off from me trying to push, twist, insert the brass temperature sensor. Please don't say use a hammer 😄 I understand in many cases throughout the build, that is what's warranted. Thanks in advance for the input!
-
No worries, I appreciate the help. Thank you!
-
Thank you @KnifeySpoony - any idea what size pclip worked for you?
-
Yea, no dice. But I was able to get some from McMaster. Onwards and upwards.. to the next road block: oil tank P-clips. I'm told 'the P-clips that come in the kit are not quite right." WTF! If that's a known thing, why is it still a thing 😭 I understand if the car cost a small amount, but it's way expensive imo to have faults like this. *Sigh* Ok rant over, I do need to secure this oil tank down. Several of the go-to build blogs have no mention of needing to bend the pclips, nor did they have any issues installing them, their pictures look like a correct pclip. So am I being gaslit!? 😄 The kit comes m6x20 bolts. This picture is with M6x30 bolts that I purchased, and I'm not comfortable with how it is. I don't think longer bolts will make any difference because the nut will always cause the pclip tab to bend. The issue is the pclip size. I did try to purchase some larger ones online, but they turned out to be too big, which causes a separate issue. Local hardware store only has p clips that are too small or far too large. My micrometer decided to malfunction in the move, so I'm awaiting on a new one. Might anyone know the correct size clip needed?
-
Thanks @11Budlite! They're definitely not in my kit 😕 the hub was in tissue paper wrapped up, I don't even recall where it was because it was odd and seemed out of place (not in a zpack or anything) so I set it aside early on. Have some M6x10 which was enough to confirm that they're M6x20, thank you for that
-
Does anyone recall where the steering wheel Allen bolts usually reside? I have a 3-hole Momo wheel and the fixed wheel boss. There are no bolts in the Momo box, interior box, misc box, and there only other places are the z-packs, of which none seemed to mention them. If they are in fact missing, does anyone know what size they are? Neither the new or 2012 manuals say anything about them and haven't seen anything in the 4 build blogs I've been using..
-
Thanks for the added insight, @Nocturnal005! I think I will do just that, when it's able to turn over 🙃
-
Wound the piston back, did 2 more rounds of pressure bleeding and then a manual 2-person bleed and didn't seem to make any bit of difference, so it is what it is for now. Question to anyone reading - we're going to be moving soon - too soon to possibly get the build finished, so I've been focusing on the drivetrain so it can at least be rolled. That's all done, the last bit is the steering column. Will I be asking for major pains if we install the steering column now so we can use the wheel to steer when loading/unloading? We have a fixed wheel (not QD) so I know the column must be fed from the dash, with the column spacer installed because it's not possible to feed from below due to the collar on the fixed wheel shaft. Its possible I was misled about that and installed the spacer before the shaft as you can with the QD shaft, and had to use a Dremel to cut the spacer out as I couldn't remove it with vice grips or trying to use a hammer and a dowel from the engine side.. So I know once the spacer (and thus column) is in, it's not really being removed, hence my question about premature installation:-) None of the cooling (oil, air, and exhaust) have been installed. I know if this was a RHD, the exhaust manifold probably wouldn't be able to fit without removing the column, but fortunately we're LHD, and the only thing I can determine that's in the possible area is the flexible radiator hose, which I expect will be ok. AFAIK, the plenum is well above the shaft so think that will be ok. Any other reason why I shouldn't install the column and spacer now?
-
Well I got the front weeping sorted by flushing the system, undoing the adapter, heating the washer with a hair drier, then retorquing the adapter. So that's a win! Back to the brake travel, since I flushed the system, I filled it back up and also got an adapter for our power bleeder, so hooked that up and did two rounds of full bleeds. Brake pedal feels the same, very soft until it walls, still seems to be about 5cm. So, I put wheels on the front and lowered that down, undid the slide pins on the rears and tilted the caliper while I bled it, also giving some taps with a mallet. I can't get one of the rear calipers back on, it seems I may need a wide back tool, so I have yet to test if it's made any bit of difference, but there was only a small amount of air I got from the left rear. Right rear didn't yield any. Tomorrow's another day!
-
Thanks @KnifeySpoony. I'll try to get the front calipers weeping sorted and then get back to bleeding. The correct adapter for my power bleeder just came in and have some other excellent suggestions on here to try. Thanks all!
-
Works from my phone and desktop on Chrome, what browser are you using? It takes a little to load up. Were you getting an error or just seemed to not load, if so give it a minute
-
Yea pumping definitely does nothing! 🤷♂️ He's a clip showing the travel PXL_20250607_213432403.TS.mp4
-
Thanks all! Yes, they are the 4 pot calipers, fairly certain the adapters and washers are the correct ones, and I have bled both inside and outside on each round. Though my order was slightly different than Josh at RMC, so I'll follow his order once I get the leaking sorted.I also ordered an adapter for the power bleeder we have so I can try using that on the 7 as well once the leaking stops. I will give loosening and tightening a go, that's something I haven't tried and is worth a shot!
-
Thanks @KnifeySpoony, would I be bottoming out the MC even though I can see the piston on the rears moving?