Legs
-
Posts
32 -
Joined
-
Last visited
Content Type
Profiles
Forums
Store
Articles
Gallery
Events
Library
Everything posted by Legs
-
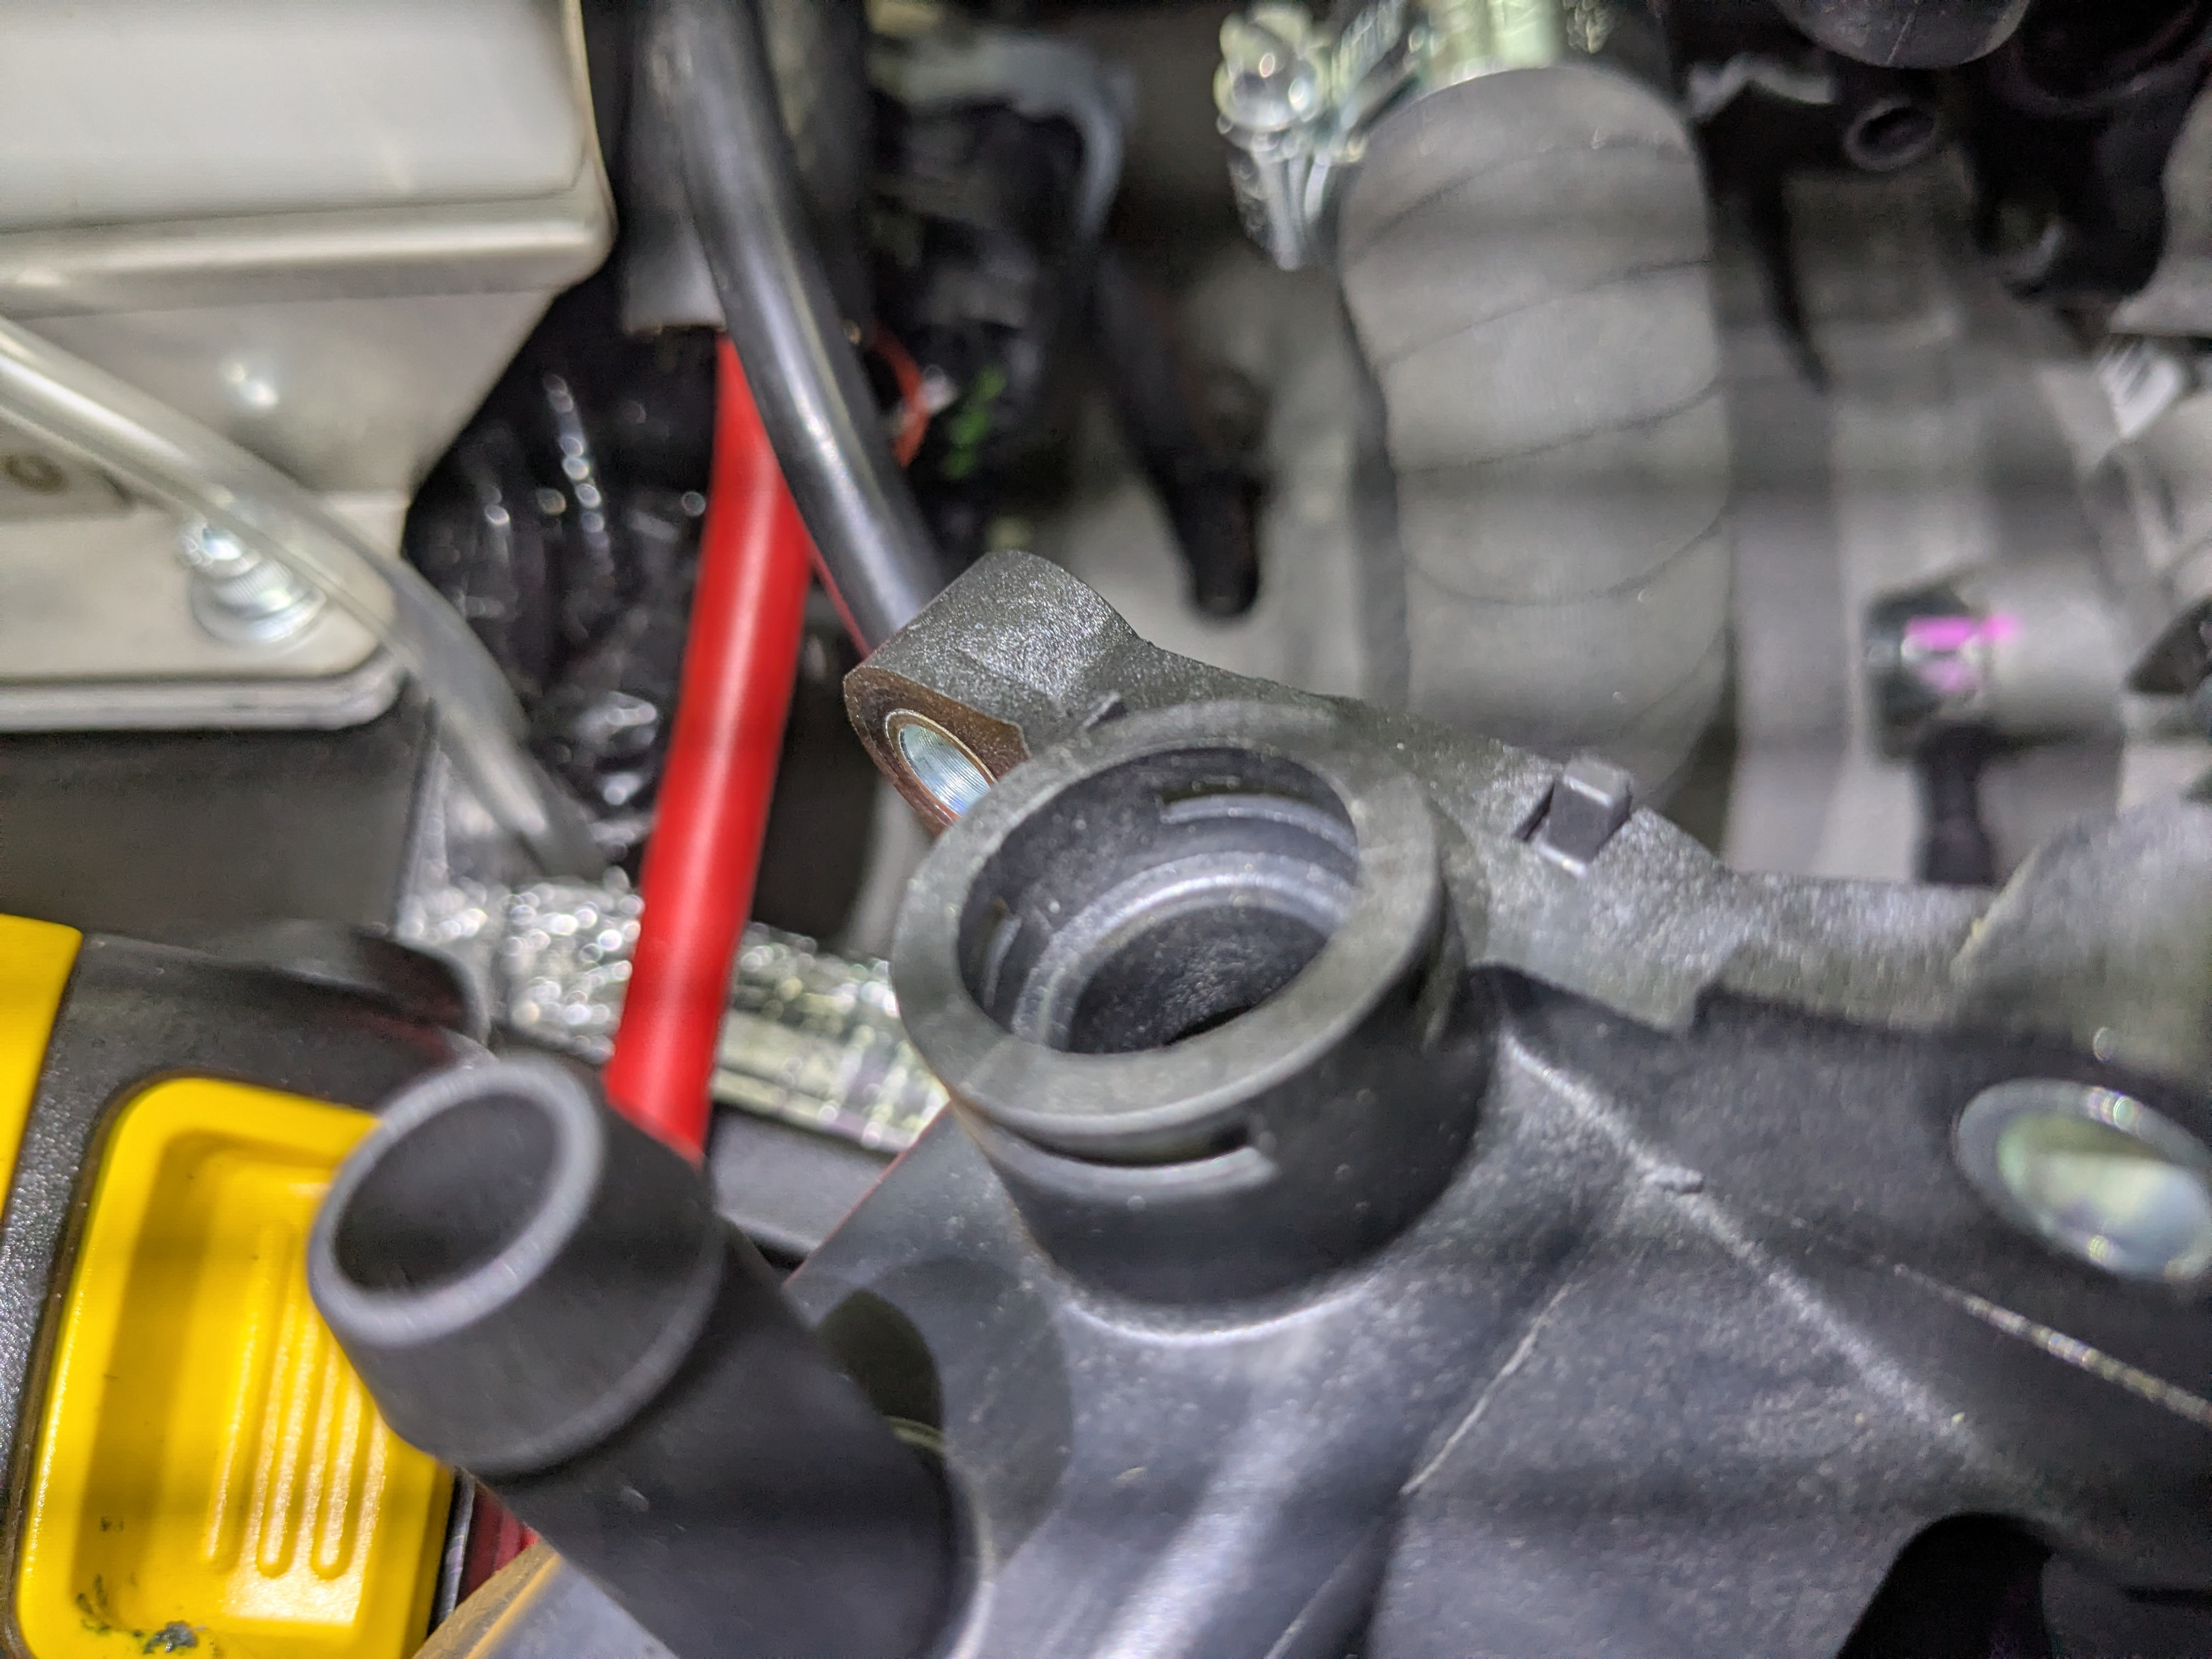
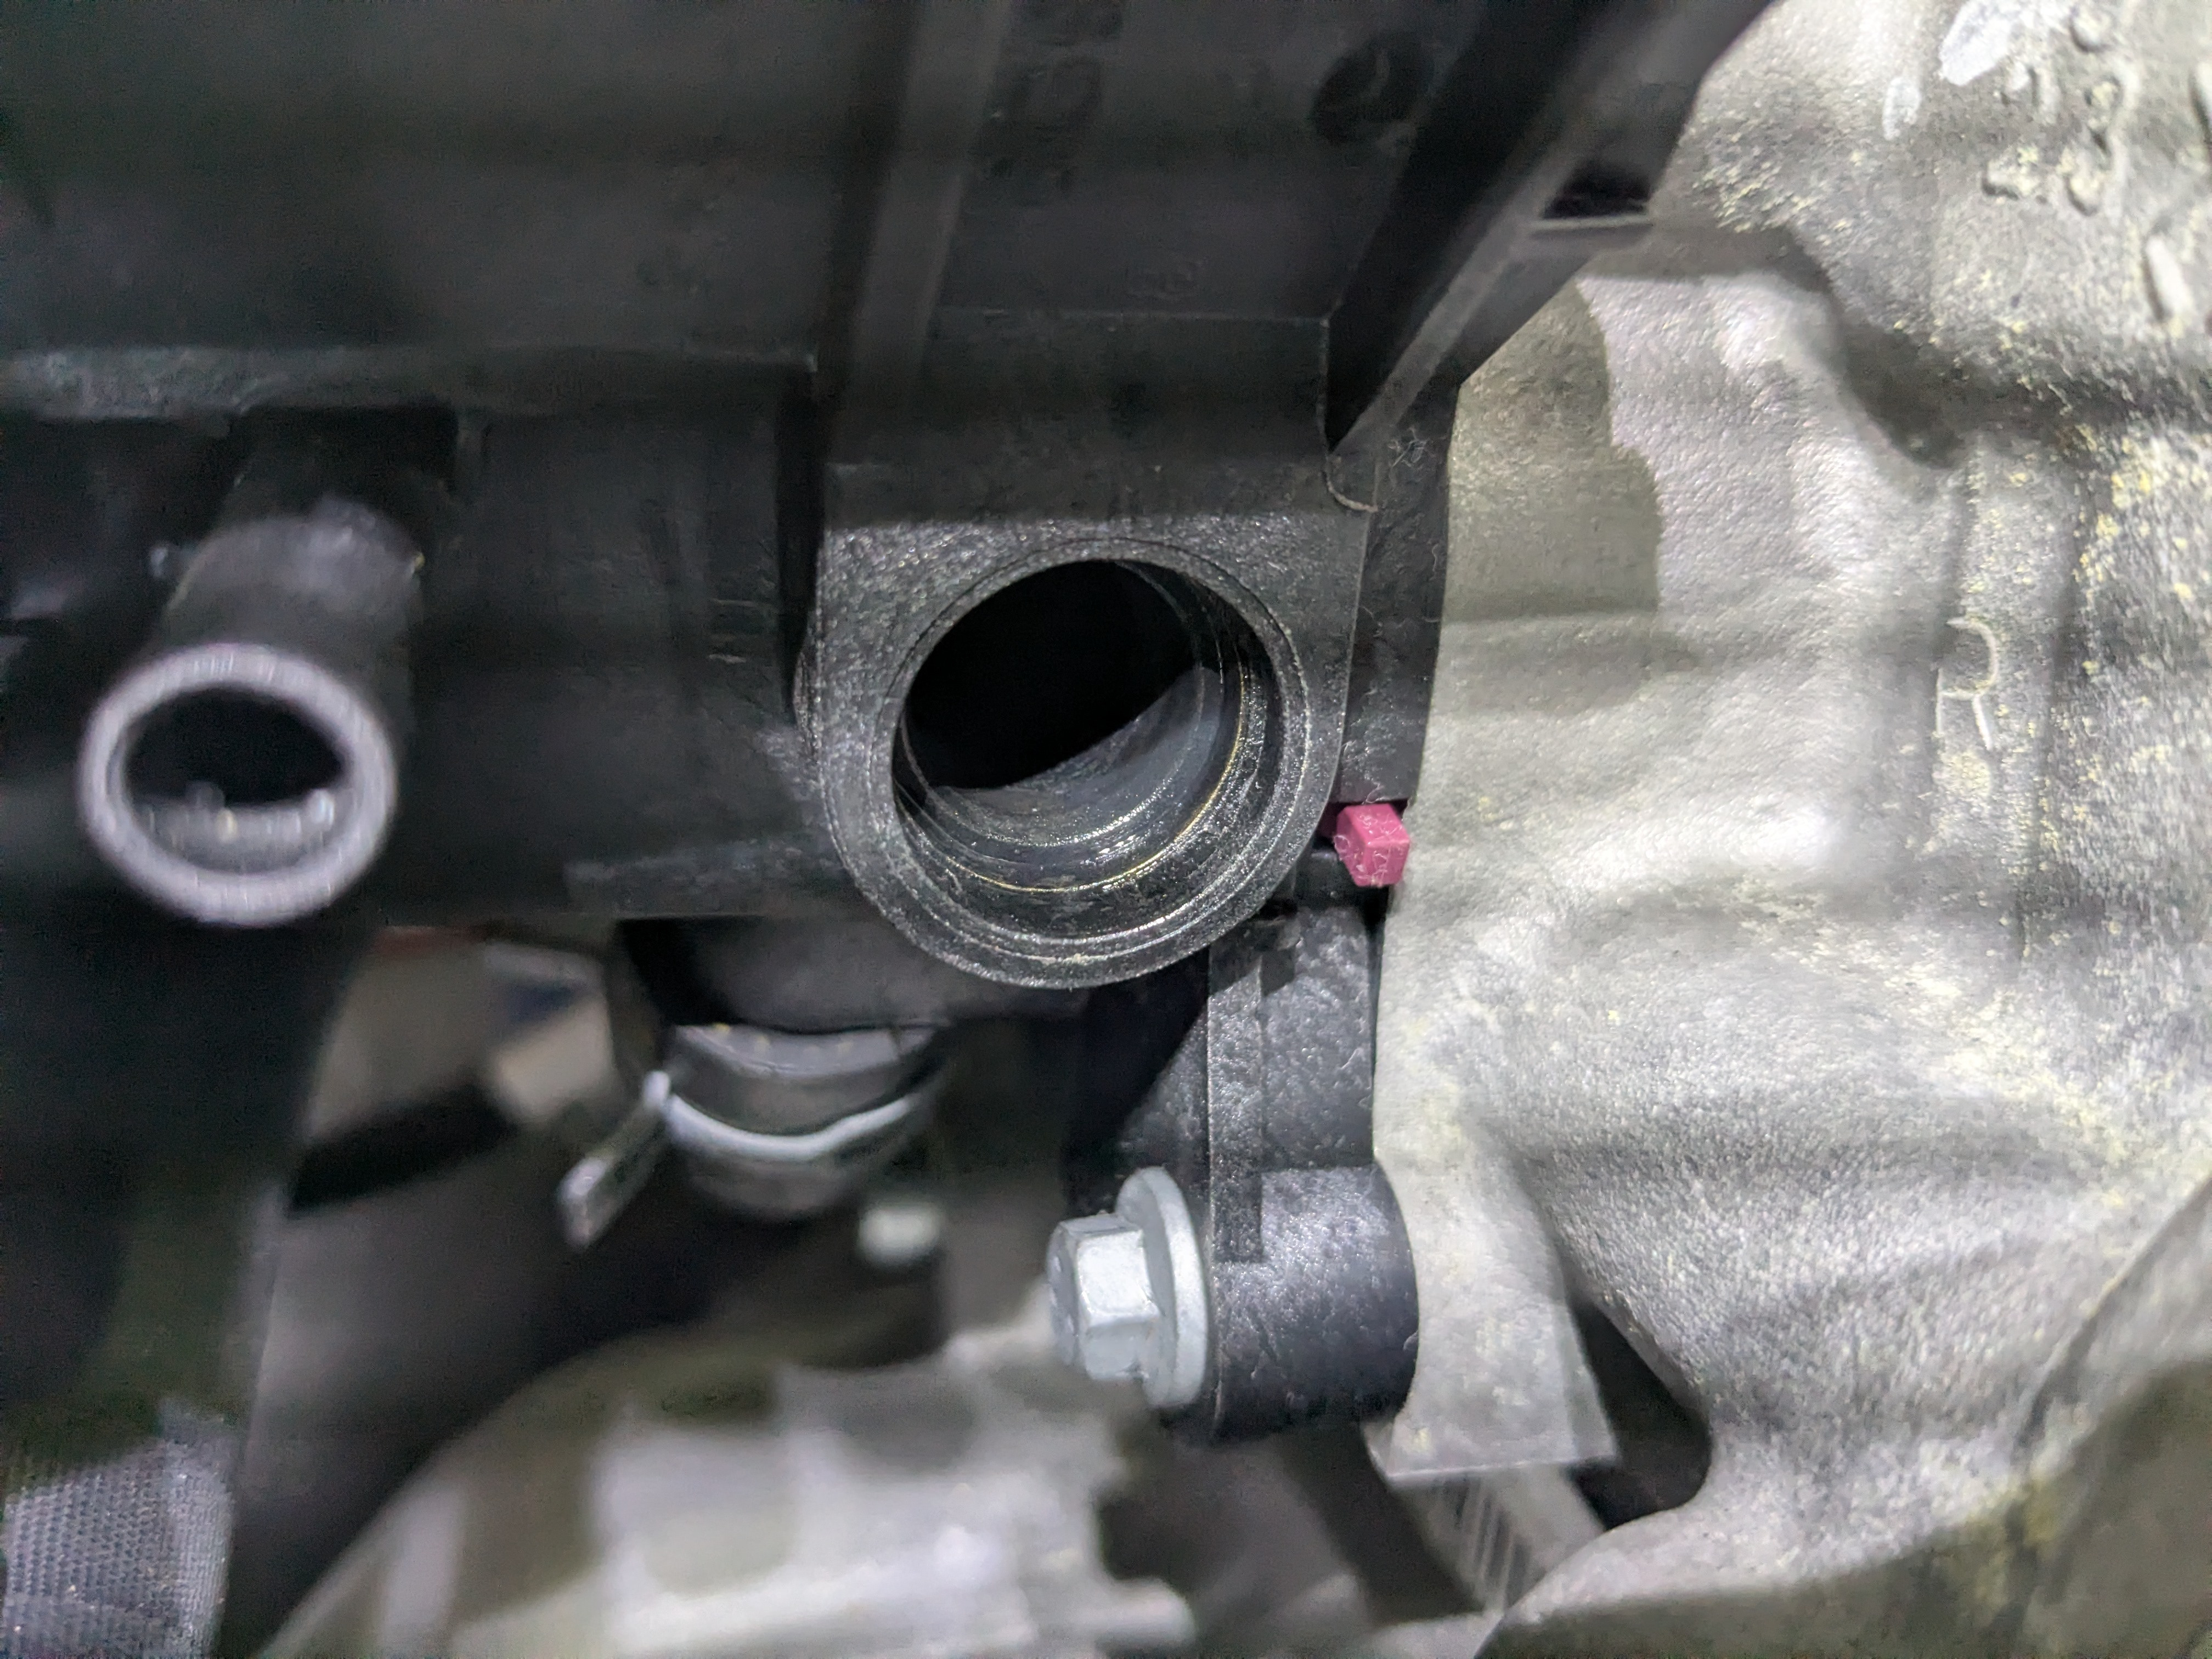
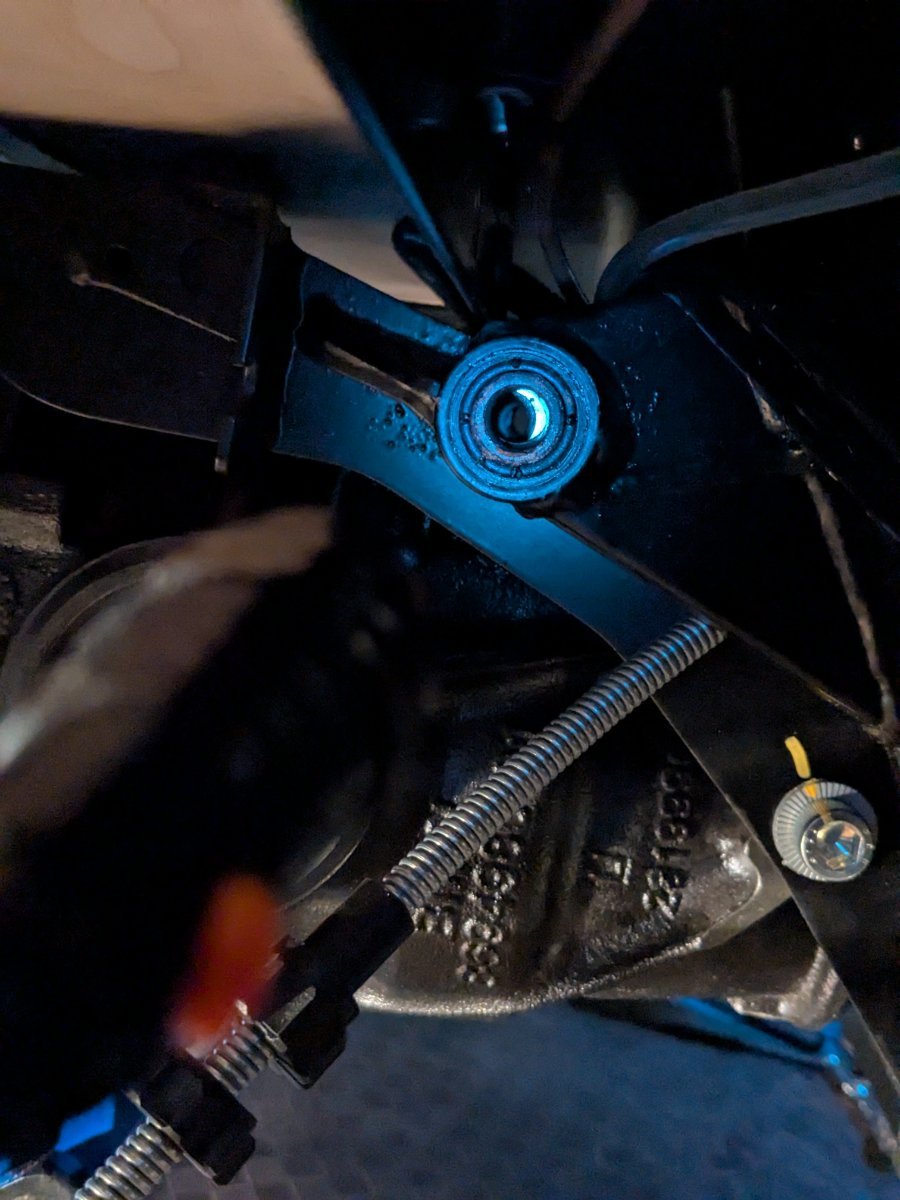
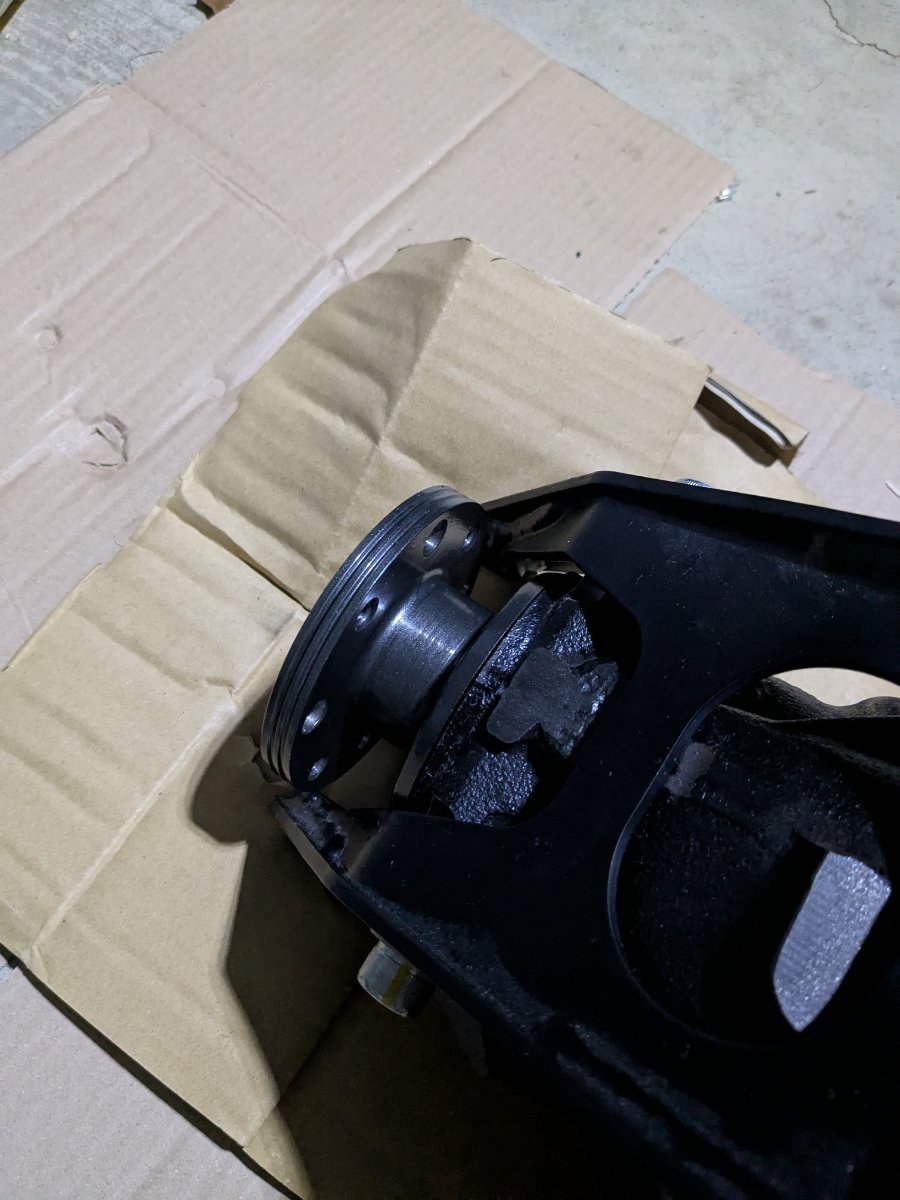
Winter happened and we're back to it in full swing; getting excited with how little there is left to do! Electrical is almost done, primaries are fitted, front wings attached, successfully drilled out the nosecone because the factory forgot to create the ARB channels; A bit scary drilling and cutting through painted fiberglass, but it came out really well! All the plumbing is JUST about done.. One ongoing issue with the cooling still - the engine was sent with the wrong water block attached.. what made it problematic was the extension bottle connection was more than double the expected 5/16" and no amount of heat or silicone was going to get a 5/16" or 3/8" hose over the 1/2" connection, so I reached out to Josh at RMC and the correct water block was promptly sent. Problem solved, or so I thought. Undid the old block, connected the new block and hoses, and lastly the temperature sender.. it won't seat far enough for the oring to seal nor for the cotter pin to attach. Upon inspection, there is a visible diameter decrease, albeit small, on the 'correct' water block that is not present in the original. It's not a molding seam as the diameter is consistent until the expected big neck down for the oring portion, so I don't think it can simply be removed with a razor blade. Similarly, I don't think I can cleanly sand it down without impacting the actual neck down portion? My question to you all is there a different temp sensor for this waterblock or is the connection port just due for an RMA or something else that I'm missing? The first image is the 'French' waterblock which you can see is a smooth single diameter from the opening back to the neck-down. The second image is the correct one which matches all of the build blogs (at least from the exterior) but you can see the gold ring a couple of mm from the neck-down where there is a small diameter change; the gold is rub-off from me trying to push, twist, insert the brass temperature sensor. Please don't say use a hammer 😄 I understand in many cases throughout the build, that is what's warranted. Thanks in advance for the input!

-
No worries, I appreciate the help. Thank you!
-
Thank you @KnifeySpoony - any idea what size pclip worked for you?
-
Yea, no dice. But I was able to get some from McMaster. Onwards and upwards.. to the next road block: oil tank P-clips. I'm told 'the P-clips that come in the kit are not quite right." WTF! If that's a known thing, why is it still a thing 😭 I understand if the car cost a small amount, but it's way expensive imo to have faults like this. *Sigh* Ok rant over, I do need to secure this oil tank down. Several of the go-to build blogs have no mention of needing to bend the pclips, nor did they have any issues installing them, their pictures look like a correct pclip. So am I being gaslit!? 😄 The kit comes m6x20 bolts. This picture is with M6x30 bolts that I purchased, and I'm not comfortable with how it is. I don't think longer bolts will make any difference because the nut will always cause the pclip tab to bend. The issue is the pclip size. I did try to purchase some larger ones online, but they turned out to be too big, which causes a separate issue. Local hardware store only has p clips that are too small or far too large. My micrometer decided to malfunction in the move, so I'm awaiting on a new one. Might anyone know the correct size clip needed?
-
Thanks @11Budlite! They're definitely not in my kit 😕 the hub was in tissue paper wrapped up, I don't even recall where it was because it was odd and seemed out of place (not in a zpack or anything) so I set it aside early on. Have some M6x10 which was enough to confirm that they're M6x20, thank you for that
-
Does anyone recall where the steering wheel Allen bolts usually reside? I have a 3-hole Momo wheel and the fixed wheel boss. There are no bolts in the Momo box, interior box, misc box, and there only other places are the z-packs, of which none seemed to mention them. If they are in fact missing, does anyone know what size they are? Neither the new or 2012 manuals say anything about them and haven't seen anything in the 4 build blogs I've been using..
-
Thanks for the added insight, @Nocturnal005! I think I will do just that, when it's able to turn over 🙃
-
Wound the piston back, did 2 more rounds of pressure bleeding and then a manual 2-person bleed and didn't seem to make any bit of difference, so it is what it is for now. Question to anyone reading - we're going to be moving soon - too soon to possibly get the build finished, so I've been focusing on the drivetrain so it can at least be rolled. That's all done, the last bit is the steering column. Will I be asking for major pains if we install the steering column now so we can use the wheel to steer when loading/unloading? We have a fixed wheel (not QD) so I know the column must be fed from the dash, with the column spacer installed because it's not possible to feed from below due to the collar on the fixed wheel shaft. Its possible I was misled about that and installed the spacer before the shaft as you can with the QD shaft, and had to use a Dremel to cut the spacer out as I couldn't remove it with vice grips or trying to use a hammer and a dowel from the engine side.. So I know once the spacer (and thus column) is in, it's not really being removed, hence my question about premature installation:-) None of the cooling (oil, air, and exhaust) have been installed. I know if this was a RHD, the exhaust manifold probably wouldn't be able to fit without removing the column, but fortunately we're LHD, and the only thing I can determine that's in the possible area is the flexible radiator hose, which I expect will be ok. AFAIK, the plenum is well above the shaft so think that will be ok. Any other reason why I shouldn't install the column and spacer now?
-
Well I got the front weeping sorted by flushing the system, undoing the adapter, heating the washer with a hair drier, then retorquing the adapter. So that's a win! Back to the brake travel, since I flushed the system, I filled it back up and also got an adapter for our power bleeder, so hooked that up and did two rounds of full bleeds. Brake pedal feels the same, very soft until it walls, still seems to be about 5cm. So, I put wheels on the front and lowered that down, undid the slide pins on the rears and tilted the caliper while I bled it, also giving some taps with a mallet. I can't get one of the rear calipers back on, it seems I may need a wide back tool, so I have yet to test if it's made any bit of difference, but there was only a small amount of air I got from the left rear. Right rear didn't yield any. Tomorrow's another day!
-
Thanks @KnifeySpoony. I'll try to get the front calipers weeping sorted and then get back to bleeding. The correct adapter for my power bleeder just came in and have some other excellent suggestions on here to try. Thanks all!
-
Works from my phone and desktop on Chrome, what browser are you using? It takes a little to load up. Were you getting an error or just seemed to not load, if so give it a minute
-
Yea pumping definitely does nothing! 🤷♂️ He's a clip showing the travel PXL_20250607_213432403.TS.mp4
-
Thanks all! Yes, they are the 4 pot calipers, fairly certain the adapters and washers are the correct ones, and I have bled both inside and outside on each round. Though my order was slightly different than Josh at RMC, so I'll follow his order once I get the leaking sorted.I also ordered an adapter for the power bleeder we have so I can try using that on the 7 as well once the leaking stops. I will give loosening and tightening a go, that's something I haven't tried and is worth a shot!
-
Thanks @KnifeySpoony, would I be bottoming out the MC even though I can see the piston on the rears moving?
-
April was a wash because we were away, but I've been busy the past couple of weeks. Drivetrain is nearly complete, but brake bleeding has been far more challenging than expected and I'm in need of some help. I've bled them the traditional way 6 times now, but there is still about 5cm of free pedal travel before it stops from resistance. It's not squishy and doesn't pump up, it's consistent nothing until very hard, but seems like a lot of travel from what I've read and was expecting. I haven't touched the handbrake yet - the cable is backed off all the way and attached to the calipers. Research tells me it's possibly air in the rears still? The bleed nipples not being vertical tends to lead to some residual air? I dunno. I've been convinced to let it be for now until taking it out for a drive and seeing how things go, but that won't be for some time still. So I am seeking any and all advice on that matter, but the more pressing one is the front brake connection is leaking a tiny amount. I've triple checked that the correct, grey adapter is used, as is the larger copper washer. I've tried tightening up the adapter a little more but I can't do it any more without rounding of the corners due to it being half height. The only way to get it any tighter would be bleed the system so I could put a socket on it, but have been told that likely won't make any bit of difference if it's already tight enough that a spanner will round it, so I'm at a loss of how to proceed. The only bit of info on the matter is from https://caterham420detailedbuildblog.co.uk/2019/12/16/front-caliper-brake-hose/ where he says installing the washers whilst cold was problematic and he had to purchase new ones and warmed them up before installing. It was late May when I installed them, I don't think it was cold, but I don't know what else 😞
-
2025 Annual HPDE Hosted by NJMP Drivers Club - June 13/14, 2025
Legs replied to Croc's topic in National Events
😬😬 She's still up on jacks! Drivetrain is nearly complete, hopefully just 2x more brake bleed sessions. Then what's left is cooling and exhaust. Life happened, I had been targeting this event but it's not going to happen 😞 family is coming to visit on the 13/14, but if they leave early enough on Saturday, I will drop over to say hi to everyone! -
Diff Day 3: It's done. I honestly still didn't think it was going to happen today - spent another 2 hours moving, jiggling, hammering, with no change. Another hour passed with my wife maneuvering the crobar been the diff and the jack. At some point, she got it just right and a few knocks with the 5lb hammer, the bolt started to go in and it just kept going. Lathered it up with more copper grease and sent it home. We promptly went out for a deserved beer 😆 I'm glad that's done with. Thanks for the words of encouragement! PS. If anyone sees this who hasn't installed their diff, remove the plywood boot floor and it makes getting access to the top washers very easy. You can get a full view of them and easily use a flat head to push on them 👍
-
Diff Day Two Diff's up 2-0. I reshimmed the bottom bolts to get the diff frame to rear ARB frame tube as close to even on both sides as possible. Can't say it's down to the mil, but it is definitely closer than it was. Getting the second set of washers in took way longer this time around 🥵 I also removed the makeshift cradle so the jack can push on the diff from further back to better utilize the front bolt pivot point. I was hopeful the top holes would be better aligned now, but it seems to not have made any bit of difference. The holes are pretty close to aligned vertically, but the diff's are still 1/8" too far to the rear. I don't understand how any bit of pushing and shoving can make up that amount, on both sides. A bit discouraged for the moment, but tomorrow is another day.
-
Thank you @JohnCh, from the eyeball it does seem like it's not centered on the bottom bolts, but because it's implied and I split the washers I thought, it must just be shadows or bigger welding on one side skewing the appearance. But this makes me think it really might not be centered. I was trying to measure between the case and the inside, not easy. Measuring to the outside of the frame should be much better and accurate 👌
-
Diff Day 1: diff wins Bottoms weren't too bad. I put one in to pull the diff to one side to them determine the total washers/shims needed in total. Split those in half and have an equal amount for each side, back the bolt out, then add washers and bolts. Top bolt, as expected, is going to need some finagling. Top left has a small gap, I can get one thick and one medium washer in while jostling the diff to make space, so that's tight. Top right has enough space for two thick and probably can squeeze a smaller one in. The bigger issue is simple getting the diff in line with the holes, it seems like it needs to go another 1/8" further into the car, but the front bolts naturally won't allow that. Possibly swinging the rear towards the right wheel well is what's needed, given the left side is tighter than the right, but again, the front bolts will keep it from moving off it's current line AFAIK. Not sure!
-
It's one of the best! Something I've found immensely helpful is https://www.tiggercaterham.co.uk/tiggers420rbuildmanual who actually took the time to go through several of the detailed build blogs and pull our the helpful tidbits and not only list them out at the start of each section, but also provide the link to turn! It's a gold mine haha
-
Well that should make things easier, thanks for the solution @JohnCh, any excuse to use more tools is always a good one 😊 @Timberline I like the sound of taking the frame off when it comes time to mounting.. do you happen to know the torque numbers on those bolts? Being that we'll be raising it up intact to at a minimum determine the shims, we'll see what it's looking like to get the bolts in. Great back pocket play to remove the frame if needed.
-
It's starting to warm up again which means we're FINALLY able to get back at it!! It's been a productive few days, got our front assemblies completed without a hitch. One of the brake lines needed a little bending to mate up, but nothing serious. So on to horn and headlights! I only had to look for the horn spacer for 35 minutes, only to realize there's no bolt to be found. No biggie! Moved on to the headlights but also stalled out looking for the hardware pack. I triple checked everywhere and no dice. The parts list says 12 z-packs, of which where are, so I guess there's supposed to be 13 including the height pack C 😆 Alright, let's keep moving! Tidied up the engine bay electrical before starting on the plumbing! I got everything laid out, but then decided to hold back because I think it will only make getting the headlight wiring in and torquing the wishbones down a lot more difficult with the hoses in place.. so next up was the handbrake! After reading through some of the immensely through and helpful build blogs, I came to the conclusion that it's probably better to wait until the prop shaft and diff are in. The diff looks to be difficult, so no need to make it any harder restricting space and views. So we put the handbrake cable in and moved onto the prop shaft. Prop shaft was very simple! It took much longer to track down some moly spline paste than it did to install. Is it necessary? Probably not as it's not mentioned in the manual, but I like to be safe and it will only be beneficial. Thanks again helpful build blogs! On the same note, when I topped up the prop shaft grease joints, I was only ever getting spew from one of the junctions, same on both ends. So was I simply not supplying enough? In other scenarios, the train of thought was keep going until you get fresh grease from everywhere, but it didn't seem to be the case here? Caterham seems to have addressed a complication with prop shaft install in the joints being slightly wider than the frame uprights, but my frame had some fancy curves to it, just the right amount for the shaft to smoothly drop in. Kudos! Now on to the differential. It doesn't look like a one man job, it's got some heft! My wife is a bit under the weather, so it wasn't going to happen this weekend. I took the opportunity to follow some other's suggestions to paint the machined connection with some engine enamel. The install will have to wait. Any and all tips and pointers are welcome! We have two jacks, but no engine crane. Seems that people have done both, but the crane does seem nice to keep things steady. I can probably convince our friend with a crane who helped us with the engine install to come help in exchange for a beer or two. Happy to be back in the garage and seeing things take some shape! ✌️
-
Haha aww man, sorry for your loss. There is surely still time!! Thanks for the update
-
@TwedleJoe or @Cranky do you happen to have any updates on how your lights are still performing?