SK400
-
Posts
210 -
Joined
Content Type
Profiles
Forums
Store
Articles
Gallery
Events
Library
Everything posted by SK400
-
Alright! I finally received the ECU back from the UK, completed a few checks, and finally took her for a spin today. OMG.. felt strong, perhaps more torque than previously but probably the biggest difference is the sound! unreal.. roller barrels with cat bypass changed the RPM tune completely. Pretty decent and "civil" at 3000 RPM but past 5000 RPM, it is a screamer. Plus lots of backfire when I let go of the pedal rapidly. My only concern right now is if i'll be allowed at LimeRock ( able to meet the decibels rules?). I have the r500 carbon fiber airbox which helps... but i guess we will see. Next will be to dyno the car to see what this upgrade really did. Will keep you posted.
-
 I now have the ZZR 185/55/13 in front and 215/55/13 in the rear, on caterham apollo rims 13x6,5 and 13x8.5 i think. Looking for a bit more tire in front potentially. And yes, i do have a dry sump, so we are all good for north of 70 - 75 mph in the bowl.
 -
Agree! Just missing my ECU stuck somewhere between the UK and the US. Probably victim of the new travel ban as well. Hope to receive it before July 1st but i may have to apply for special ECU visa. As an aside, looking for used set of 13" r500 or BBS rims for slicks. Determined to get in the low 1:12 or mid 1:11 s at lightning. Any idea? Lastly, Blake, any chance you ll be ready with your car by then? if you work day and night, could be a great milestone for you.. Would be fun to drive together - caravan style - from CT.
-
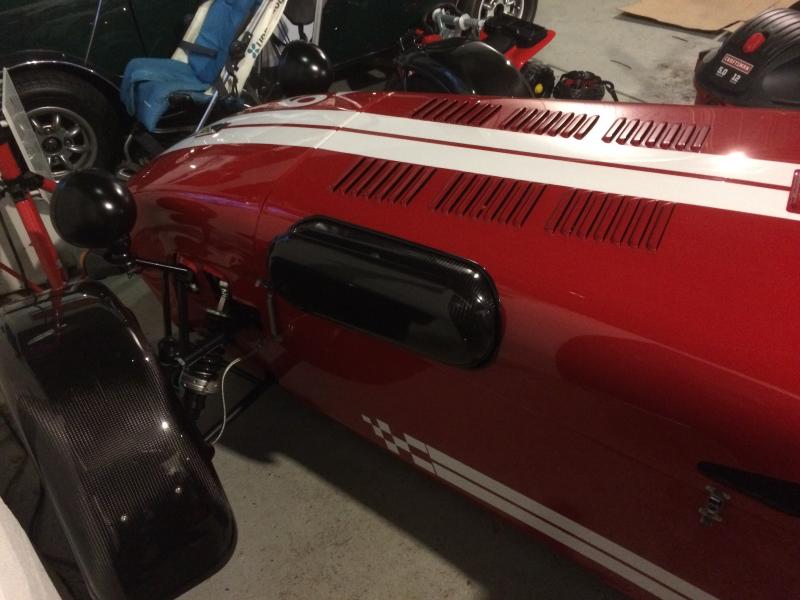
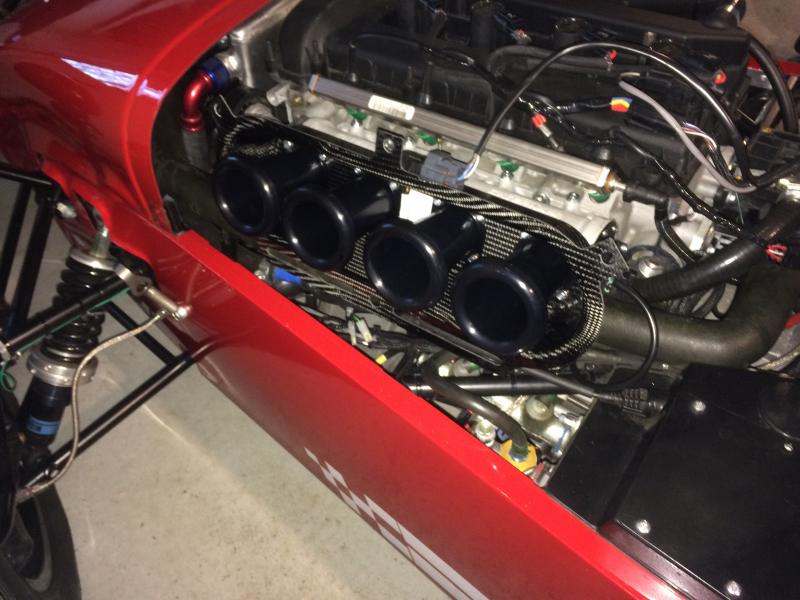
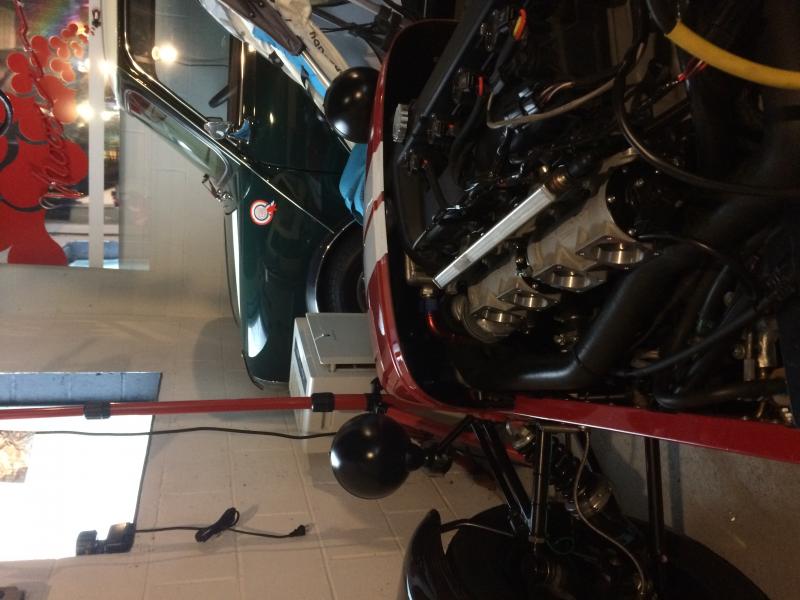
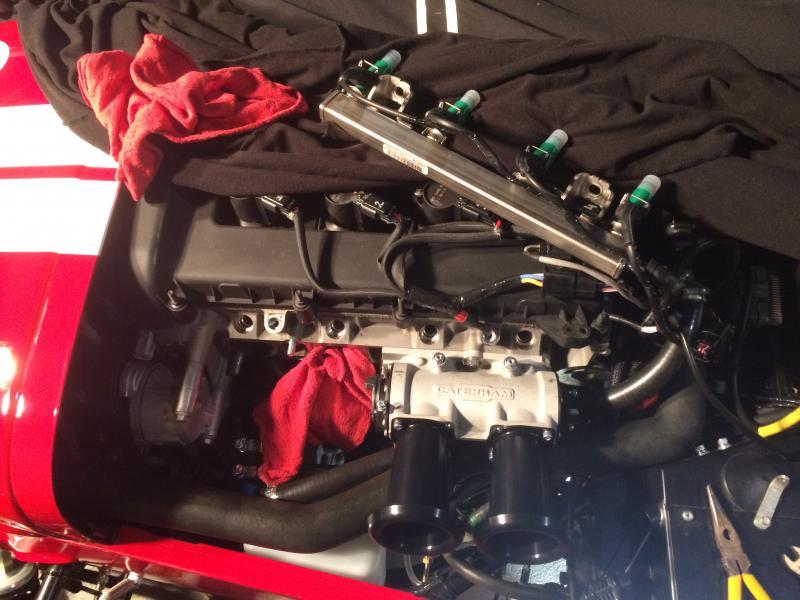
Friends, After a nice 2 days with family skiing in Vermont, I took a few hrs late Monday night to complete, mostly, the throttle assembly. I say mostly because there are still a few things to iron out including re(re)flashing the ECU. Here are a few tips for those attempting to install the kit. 1/ Installation of the Carbon Airbox and pressure sensor: when I installed the pressure sensor on the carbon airbox, I used a bit of RTV to ensure a good seal between the sensor and the surface of the airbox. There was a very thin opening between the airbox sensor hole and the back of the sensor body that needed to be sealed. What’s more, I layered a very thin layer of RTV on the front machined surface of the throttle bodies to ensure a good seal with the airbox and avoid any leaks. Lastly, I made sure that the carbon aribox air openings (the holes) did not obstruct, even partly, air flow when installing the box. I had to shave off a bit of the diameter with sand paper. 2/ TP sensor: I started the engine and with the alternator powering the system, recalibrated the TP sensor to 4.62V for an idle opening of 6 mm. There was indeed a small 0.05v or so difference when calibrating the TP sensor using the battery only versus when the engine was running. The voltage output went up with the alternator running. 3/ Tachometer: now that the engine was running (nice throaty sound ), I noticed that the tachometer did not move much as I was revving the engine up. It showed about a 4th of what it should indicate. Discussing with Mark Rider from Caterham (very very helpful BTW), we realized that the ECU needed to be reflashed for separate coils configuration (need to pick up 4 pulses versus 1). So I ll have to send the ECU back to the UK. No biggie.. Here’s the finished product with and without the full race carbon cover. The opening is a bit big for the foam filter only but not as bad as I thought it would be. Looks awesome and perfectly matched for the Carbon Cover though. Quite happy with the finish and look. Can’t wait to drive the car this spring and “feel” the difference. Oh yes, still have to install the cat bypass which should help for sound as well. http://www.usa7s.net/vb/attachment.php?attachmentid=12263&stc=1 http://www.usa7s.net/vb/attachment.php?attachmentid=12264&stc=1 http://www.usa7s.net/vb/attachment.php?attachmentid=12265&stc=1 http://www.usa7s.net/vb/attachment.php?attachmentid=12266&stc=1

-
Yes. mostly through throttle.. feathering in helps a ton.
-
I have the ZZR 185/55R-13 and 255/55R-13 setup on my 210 HP R400 and it works well although you may have to get a bit of toe-out to increase front end corner entry grip or stiffen very slightly the rear sway bar to get the car turning when really pushing it. With this setup, and tire selection, you should be in very good shape.
-
LOL! I agree. I really wanted to go to Mars with that degree but obviously this did not pan out..... I guess it will be for another life. But not before I finally learn how to install a set of throttle bodies with no drama, in this life or next.
-
Hooray! The engine started without hesitations ! I guess i got lucky. Here are my lessons learned on this step for those who will attempt this on your own: 1/ Setting the TPS sensor: after setting the throttle body openings to 6 mm using the shaft of a 6 mm drill bit and playing with the idle and throttle balance setscrews to get there, I rotated carefully the TPS sensor until the voltage read 4.62V on the nose. Please note that you should a) ensure that you have a fully charged battery (if not it will give you false readings) b) turn the car on (but not the engine of course), and use a multi-meter, inserting the probes into the back of the TPS connector and take the voltage between ground and middle sensor wire. Have the TPS sensor screws snug to allow rotation but not too much play. Once set, remove one TPS sensor screw at a time and add some blue loctite to the threads just in case and rescrew. Repeat for the other screw. When complete recheck the idle TPS voltage and ensure that it still reads 4.62V. -(still need to check TPS voltage when engine is running... wondering if it changes because input voltage may change a bit as the alternator helps the battery - actually this is a question for the pros, Bruce, others, any advice on this later point?) 2/ engine belt tensioner bolt clearance: I took my time but with the help of a large 9/16 drill, a dremmel tool, files and sand paper, i manage to counterbore nicely the casting and removed about 1/2 inch (a bit less) in length. I bought a new M8x1.25 bolt at the local hardware store with about 1/2" less in length than the original bolt.. et voila. It creates enough clearance for the carbon airbox the be installed. See below the voltage of the TPS sensor at idle. Also a short video of the engine running. Idle RPMs were pretty low (500- 600 ROM ish) - but perhaps it is because the temperature was cold (32 degrees in the unheated garage). I may have to simply adjust the idle this spring after taking the car for a little ride and with the air filter etc installed. Next step is to install the carbon airbox, air trumpets, filter etc. and see it completely assembled. cheers to all http://www.usa7s.net/vb/attachment.php?attachmentid=12201&stc=1 http://www.usa7s.net/vb/attachment.php?attachmentid=12202&stc=1
-
Tom I thought you you were going to say " KitKat is really just an obstacle on the track otherwise" .. but i guess you were kind with him this time around..
-
Ditto. Gorgeous. I hope your car is wrapped with 3M film or equivalent (and I mean the whole thing wrapped). Would hate to have you drive behind Kitkat this summer and have you and your car age 1 yr per lap because of all the rocks he throws back at you. Just something he does to all of us.
-
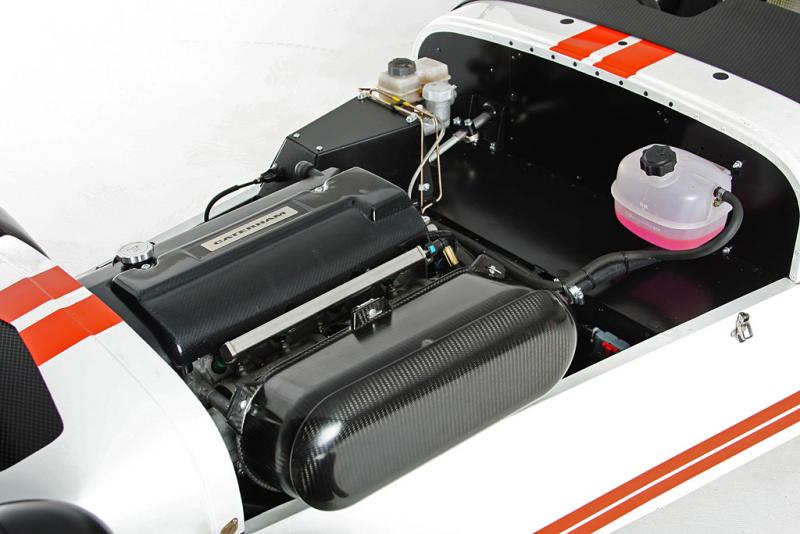
Slowly making progress in the assembly. Last weekend, I spent some time adjusting the idle opening of the barrels to make sure that the right and left hand sides were set to 6 mm opening. I also got very lucky.. i snatched a rare R500 Carbon Airbox directly from Caterham which acts as a cover for the sausage filter and fills the opening i had cut in the bonnet beautifully. I'm really happy about this (looks great.. as good as factory). I hope to dyno the car this spring and try with and without the cover to understand the difference in performance. I also think that the cover will help me be "sound legal" at LimeRock, which is a good thing. I'm not yet done with the belt tensioner modification. Looking for the right fastener (may have to look at McMaster Carr as suggested Dave) before modifying of course. That said, i think i can at least try to start the engine. I received my ECU reflsahed from Caterham. I will have to set my TPS sensor.. and then.. turn the key. Suspense.. Will let you know.
-
Nice! love the list building up. Welcoming a 620R to the track and event will be fantastic. Can't wait to see everyone again soon.
-
Same here. My wife drives a 1275 '78 mini in the summer. Two days in a row, bought the Caterham and Mini shirts for the whole family including my two kids. Tapped out of Blipshift budget this month.
-
Super helpful Mike. thanks a ton for the links. Where the folks at Caterham talking you down from installing the race air box? or the track day one?
-
Mike I was thinking that could be the case unfortunately. That said, my main reason was for esthetics honestly, hiding the sausage filter that comes with the roller barrel kit. Unsure if the setup I now have will be sound restrictive at lime rock yet. I guess we will see this summer. I let you know if I'm black flagged. Mike, do you have another recommendations in place of the sausage filter? Thanks Mike.
-
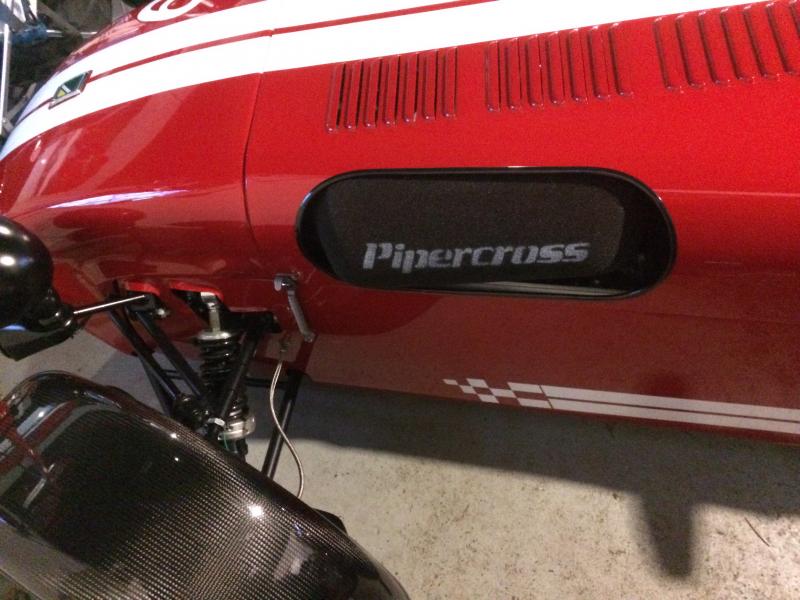
Greetings fellow 7 fans i'm installing a set of new roller barrels on my r400 and am looking for an R500 carbon airbox as shown in this photo. Please let me know if you have one for sale or know of anyone that may have one. Thank you very much in advance Seb http://www.usa7s.net/vb/attachment.php?attachmentid=12156&stc=1
-
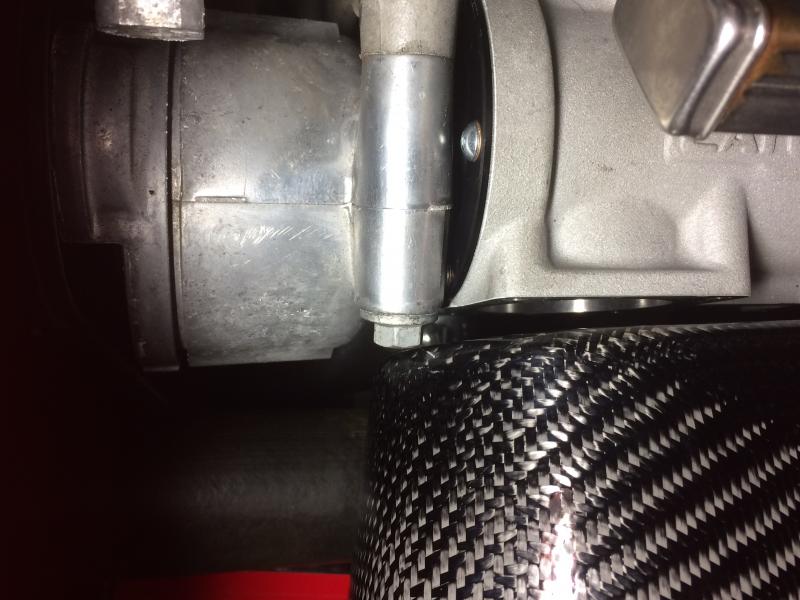
Yep.. so we need a modified tensioner Caterham number YD0159. It's currently out of stock, but I'll see if i can modify the tensioner i have myself. I don't think it should be that complicated, (hope i won't be putting my foot in my mouth soon). Before I forget, Caterham did indeed receive my ECU and they were super helpful taking care of business. They've reflashed the ECU and should be on its way back to the US. Should be plug and play .. but let's see! Next is the tensioner modification, install of the carbon airbox, adjustment of roller barrel openings & throttle cable setting and adjustment of the TPS sensor.
-
Got any speeding tickets in your Seven?
SK400 replied to Road Ready's topic in General Sevens Discussion
Niiice.. I was about to say that there are other dangers on the track, especially in NJ in July... some throw rocks at you to make sure you keep your distance, others lose parts in front of you when you least expect it to add to the suspense, and there is wayyy to much fun in the paddock -
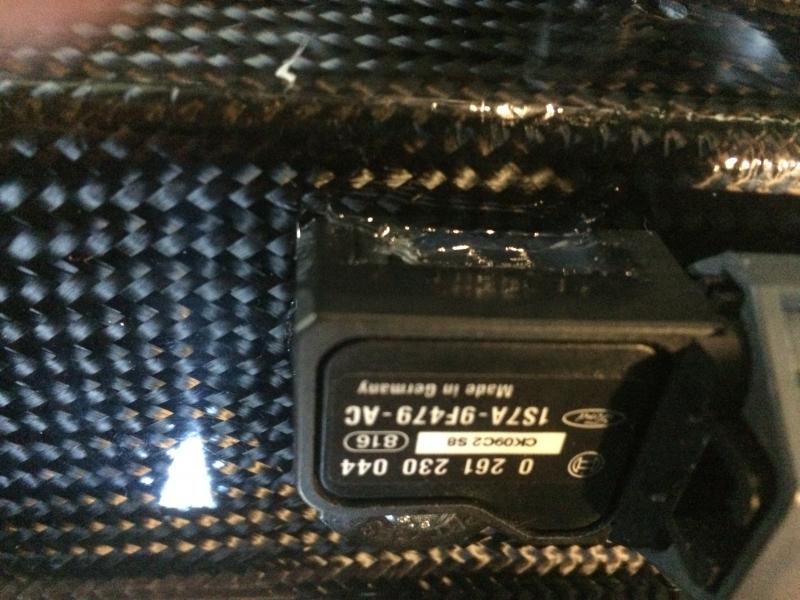
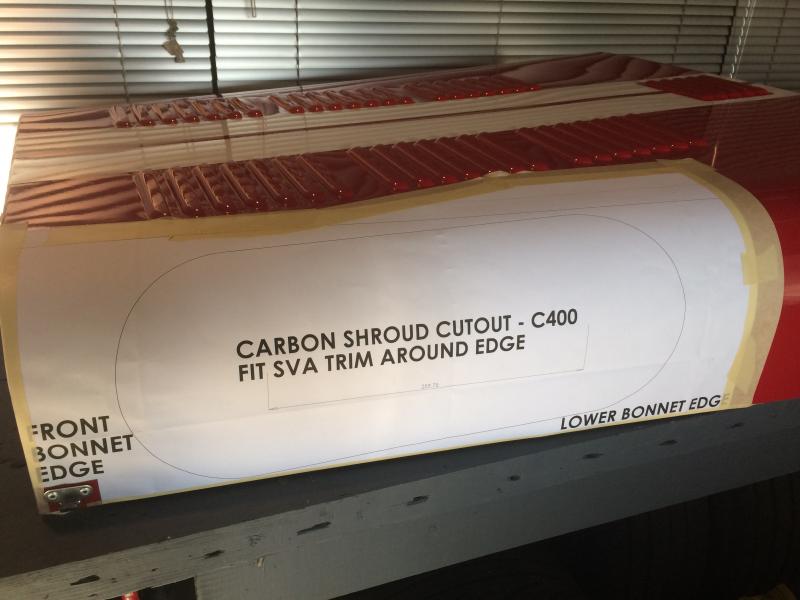
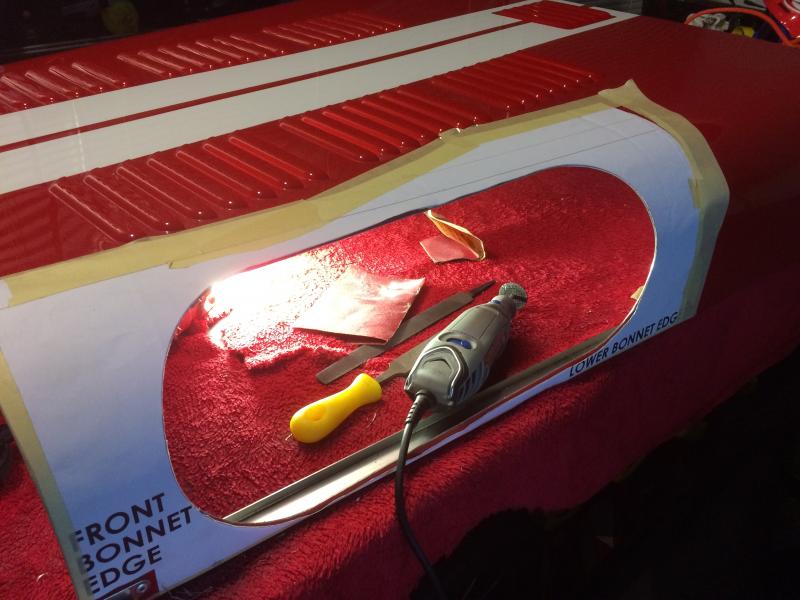
Bruce I think you are right.. the head of the bolt interferes with the carbon fiber airbox (see picture below). Interesting that they dd not provide the bolt you recommend in the roller barrel kit. I'll be reaching out to Caterham and see what they have to say. On a different note, i took the bull by the horns and decided to cut my bonnet following a template provided by Caterham. Took a few times to get a usable template but got somewhere finally after multiple requests.. . I printed on a plotter, positioned it on the hood and went at it carefully with a Dremmel tool. Overall it worked pretty well. a bit of filling and sand paper and it looks pretty good. I will be covering the newly cut edge with a rubber trim and .. voila! it will look like a million $$, no damage to the hood at all, a clean cut. The hole is a bit larger, especially longer, compared to the sausage pipercross filter but to be expected. I think the template provided is designed to accommodate the full R500 carbon airbox, which takes a bit more room. Not a big deal, it still looks sharp and i wont have to re-cut in the future when i can get my hands on the full R500 carbon airbox (in backorder). Still no news from the ECU i sent .. brrr. Let's see. One step closer to 10-20 more HP and better sound! See below (interference between bolt and carbon airbox) http://www.usa7s.net/vb/attachment.php?attachmentid=12151&stc=1 Hood before cutting with printed template http://www.usa7s.net/vb/attachment.php?attachmentid=12152&stc=1 Bonnet cut using dremmel tool http://www.usa7s.net/vb/attachment.php?attachmentid=12153&stc=1
-
Bruce. Thanks for your comments. Why do you say I will need a new bet tensioner? Is there something I should have done ahead of installing the roller barrels??
-
Mike - no worries. That's the price we pay following you and learning your quick lines. We love you just like that, rough, inconsiderate and rock thrower. Don't change. As for the incognito person who plans to surprise us with tons of HP... well bring it on!!! I can't wait. I just hope it's not Simon. I will have to work extra hard to keep up.
-
I think I make this assembly more of a big deal than it really is... jusst feels good to vent and share the pain and lessons learned a bit for other novices like me out there. It's therapeutic. As for what I expect to get out of it , well Caterham claims 10 hp increase but people on several blogs who have installed the kit claim more. Some observed a 20 hp increase at the flywheel comparing pre and post dyno test outputs, which sounds logical (bigger injectors, etc). I don't think the top line rpm increases (same cams) so it's all torque increase, which is really nice. Net net I expect to see about 200 hp at the wheels or 230 hp at the flywheel, or a 10 percent increase ish from a 210 hp base. Bonkers. But will see .. I intend to dyno the car this spring when all set and done. Also, look forward to flames at the exhaust and overall better sound. As for the rocks on the track, I'm unfortunately not confused Mike. I have chip or two on my nose cone, that wear your finger prints. Clearly, you deserve the award.
-
You guys are a riot. For starters, we all look like a bunch of clowns, idiots, and goofballs driving these cars around the track at 130mph+. can't get more comical than this. But tadahhh! success last weekend. I managed to install the roller barrels on the engine, together as a pair (pfuuuii). Had to play a bit with the throttle cable and top end of the pedal (cable was too short.. i panicked for a few seconds) and still have to set the idle opening to precisely 6 mm using the shaft of a 6 mm drill bit and adjust the left and right throttle bodies to get the same opening using the black sets crew in between the bodies. I then tried to install the TPS sensor.. and attempted to figure out what direction to install it, with the electrical connection towards the engine or towards the filter. I think i figured it out .. the electrical connection should be pointing towards the filter ( I think and not like the picture I’m including here). It looks like it works the opposite way as it is on the R400 butterfly setup, in other words, starting at high voltage (4.62 V at idle) and with decreasing voltage as one opens the throttle. I will let you know if this works when I put a voltmeter to it. Oh and by the way, i just sent my ECU to Caterham (Gatwick UK location) be reprogrammed for the throttle bodies and bigger injectors . I hope everything goes well. Wish me luck! I wrote my name on the ECU so please return to sender if you happen to see it in your new kits. http://www.usa7s.net/vb/attachment.php?attachmentid=12139&stc=1
-
So there is nothing like a snowy weekend on the East Coast to get started with the Roller Barrel conversion. One kid was sleeping, the other one in front of a hilarious Peanut movie, the time was right to excuse myself discretely for a few hours. I love them all but you know.. I managed to put in 4 hrs of work over the weekend but unfortunately nothing much to show for but if it is for lessons learned of what NOT to do along with bloody fingers and lots of swearing in both French and English. So for the novices like me out there, here are a few tips of what to watch out for when you install the Titan Roller kit yourself: 1/ Injector / fuel rail: after changing the injectors, avoid reinstalling the rail immediately like i did. It gets in the way of installing the roller barrels and torquing some of the nuts. 2/ engine roller barrel threaded studs: beware! not all the threaded stubs that come with the kit are created equal! they all look very similar but the diameters of the unthreaded collars are slightly different. What's more, the kit comes with 5 threaded studs to mount the roller to the engine but there are 7 holes in the roller bodies.. of course. i chose not to use some of the bottom center holes. I will probably look for appropriate bolts at the hardware shop at a later stage. 3/ rubber seals: i suggest using a bit of clear RTV to keep the rubber seal where they belong in the groove on the back plate of the rollers. This will help not to lose the rubber seals in the engine bay abyss as you are trying to install the rollers 4/ roller barrel assembly install: they have to be installed simultaneously on the engine ... forget about installing one at a time, you wont have the clearance to install one and then the other. I lost a lost of time right there. 5/ make sure to use blue goo: loctite blue is advised on all threaded nuts and bolts. 6/ main cooling hose on r400: what a pain and in the middle of everything. i you are willing to make a mess, suggest you remove the hose, it will saves you several hrs of swearing trying to torque a few nuts on the assembly. Well that's it for now. I will try again next weekend if i find a few hrs. http://www.usa7s.net/vb/attachment.php?attachmentid=12133&stc=1
-
Lol. That's so true. Perhaps we should have a few brand new Cats ready to go and for sale at the track that day. Perhaps even a 620r ? What the heck, I may just buy myself a second cat I like it so much. (But don't tell my wife and the 401k) Can't wait for The event and as always thanks Mike and Tom for being such good hosts. Now working on winter preps ... roller barrels, slick tires, a few cosmetic touch ups. Need to shine if not in lap times, at least in style! Happy holidays all.