Joe Petty
-
Posts
67 -
Joined
Content Type
Profiles
Forums
Store
Articles
Gallery
Events
Library
Everything posted by Joe Petty
-
Traditional places were the frame square section near the clutch and brake master cylinders and on the floor cross member for Universal Radiator frames. It would not surprise me that owners would stamp ID numbers in obscure places, I have several on my frame. Check any Lucas items for date stamps. I have found month/year codes on the starter and generator. also the voltage regulator and turn signal flasher! Good Luck!
-
I got the boot from Moss and measured it and trimmed the hole to fit. Looks like it is around 3" I think you want to get the boot, slide it over the shifter and mark the circle, then cut the hole inside the marks. I did this 6 or 7 years ago and the boot shows no signs of age or cracking. Good Luck - Joe
-
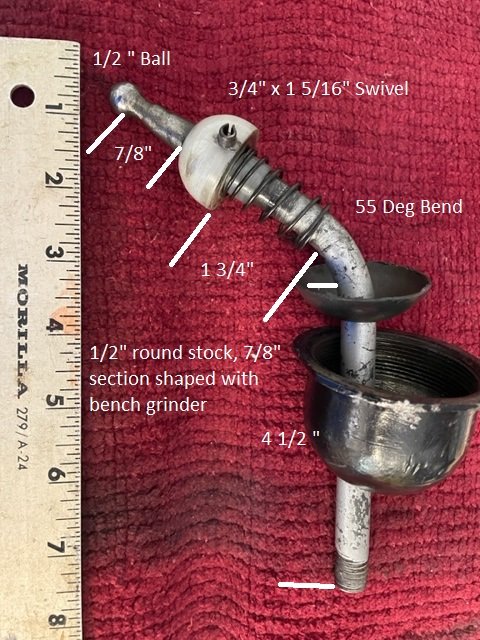
I realized that I didn't have any pictures of the shifter I built, so I figured I would take a few minutes and get some. You may only have one chance to cut and bend, so best to take your time and get the best measurements you can! I used a socket on an extension as a shifter so that I could get a measurement of the receiving cup in the shift rod. Tried a number of sockets and finally settled on 1/2", which was very convenient. I got a 1' length of 1/2" round stock from the home supply store and set about tapering the lower section like the flat ball shifter. Fortunately. my transmission was on the floor which allowed me to test the "shiftability" as I shaped the 7/8" section. Once I was satisfied that there was little play and all gears were selected, I drilled the hole for the swivel pin and bent the shaft like the other shifter. Seems like I got the plastic swivel in a kit from Kelvedon in the UK, Burton has some of the shifter parts also. I am using an MGA shift boot (gaiter). I suggest you get maybe some 1/2" aluminum or steel tubing and mock-up the shaft so you can be sure of clearance. There is not a lot of room under the dash and you want to be sure there is no interference, particularly with the handbrake. Sit in the car and reach for where the gear knob will be. Beware that the seat is surprisingly low and the tunnel/armrest position should be comfortable. Good Luck - Joe

-
Looks like it may be a shifter from a Cortina or Escort. Interesting that you have that, but when you get into these old collections of parts, all sort of things show up. You want to install the shifter as-is and see if it feels tight end will engage all the gears. Unfortunately, this may require having the transmission out of the car if the dashboard interferes with the shifter movement. If that goes well, then cut and thread for the shifter ball. Ah Lotus! Nothing is ever easy! Good Luck - Joe
-
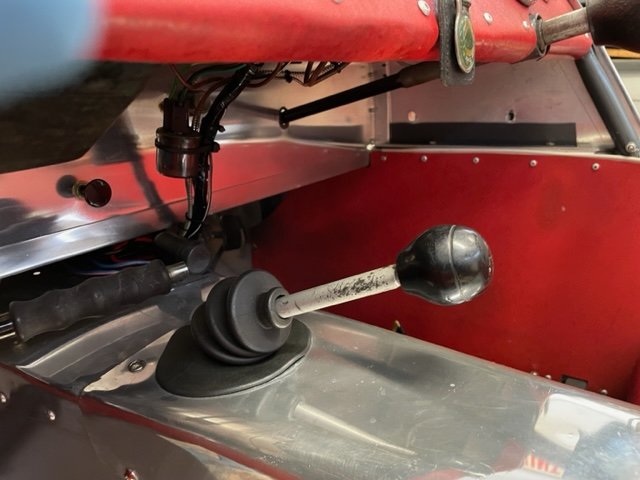
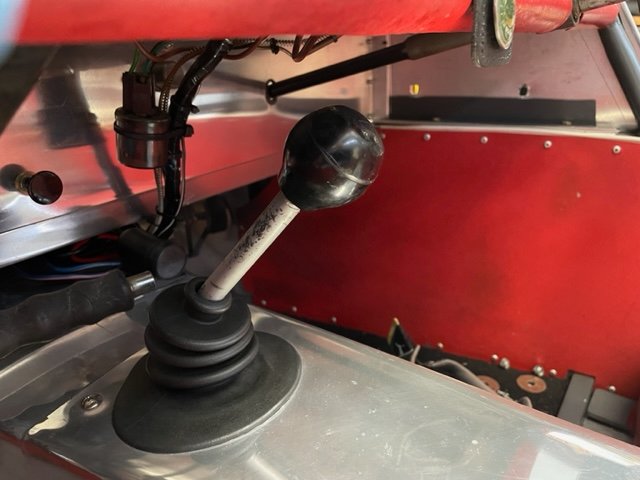
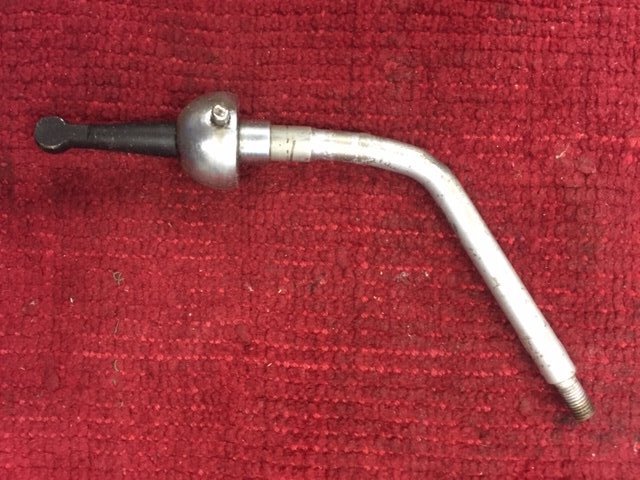
Yes, it is referred to as the "Internal Remote" and is very hard to find. When I got my 7 in 2016, mine had been replaced by a modified Cortina (?) shift rod with the flat sided ball. When I got it all installed I discovered that I could only select 3rd and 4th so I set about looking at some of the parts drawings to figure out what was wrong. You may notice that the correct shifter has a round ball and that fits a "plastic" sleeve and spring that are in the remote shaft (7325). As mentioned, all this stuff is very rare! My solution was to measure very carefully, then grind and bend a piece of 1/2" round steel stock and build my own shifter. I did not attempt to fabricate the plastic sleeve or spring, so my ball is probably bigger than the correct size, but I am able to select all gears and no problems so far (5K miles). It is nice and tight, allows "wrist" shifting and is low enough to clear the dash so no knuckle interference. The attached picture is the shifter with flat sided ball that would only select 3rd and 4th. The shifter I fabricated was the same except for a rounded ball. I think all the other pieces (swivel saddle, spring, collar...) are available. Good Luck - Joe
-
Here is a picture of the crossbar I had installed for the seat belt anchors and a seat cushion. I got the covers for the seats and back from Tony Ingram in Santa Barbara. At the time, I did not know the seat cushions would come with the notches for the seat belt anchors. I guess this crossbar is a common improvement! Good Luck - Joe
-
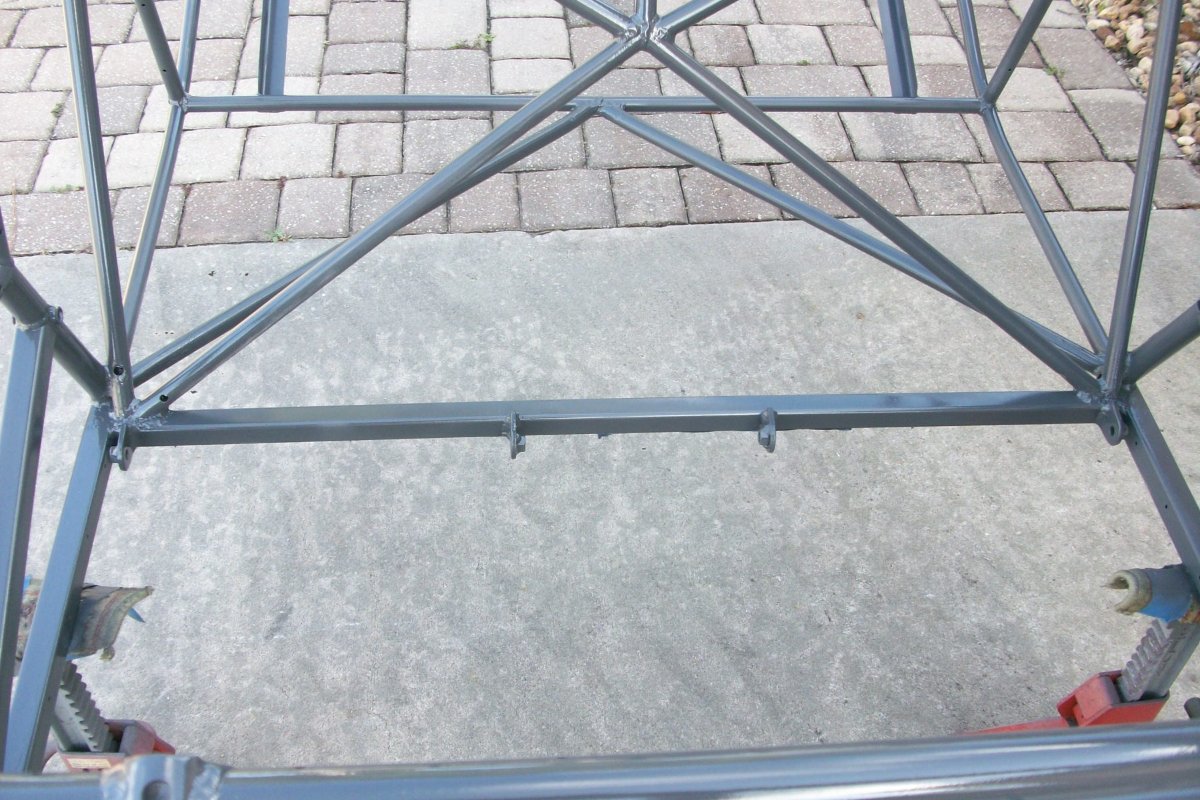
Looks like you are getting down to business! I had a new windshield cut and fitted 4-5 years ago and the shop just used a rubberized sealant. Seems to be working fine, but I don't go out in the rain. Come home in the rain sometimes, but I just duck down and maintain 45MPH! The frame looks to be the correct shade of grey, except for some of the local repairs, so you are probably the first person to do a complete refurbish. Not sure how much history you have, but always interesting to figure out why repairs were needed. Figure most of these cars were inexpensive racers used by amateurs and those that weren't written off probably have many bruises and stories! The triangular gusset plates are a racing add-on and look to be well done. Not sure what is going on with the front fender pinch bracket. Looks the quality of my welding, but not sure why it would have been replaced. My roll bar rear braces are 3/4", which apparently was legal back then, but like most they anchor to the rear frame vertical bars. Keep us posted and Good Luck!
-
Just noticed your project yesterday, might look like a lot to do but remember it is a small car! I had my local window guy cut and seal my windshield, and I think he just used some type of black liquid sealer. You may try Fairchild Industries, they have all kinds of automotive weatherstrip. I don't remember where I got the windshield to body seal, but I think that is fairly available. Good Luck! Joe
-
 Congratulations AZFast1, this looks like a very nice project! According to numbers I have seen, there were around 1300 7-S2 cars produced and in spite of the age and low numbers, most parts are available if you don't mind spending some time searching the Internet. This is mainly due to Lotus design, where they were masters of "Outsourcing". I would suggest Doug Fraser's Internet log "The Saga of LSB 2072" as a good read tracking a very well documented rebuild. As for the bonnet, get all the measurements you can; both edges, and the front and back "hoops". Lotus and Caterham have made slight adjustments to body and chassis specs over the years and finding parts that fit correctly can be a challenge. Of course these cars were not that tight to begin with and then they got twanged racing... One fellow built his own bonnet using a telephone pole to form the sides, I used a 3" exhaust pipe to form my air scoop, so lots of room for creativity! Good Luck! Joe
 -
Mating Transmission to Engine, need tips and tricks
Joe Petty replied to TexasDreamer's topic in General Tech
I recently changed the clutch in my 7 and cut the heads off some 6" bolts to use as alignment guides. Cheap solution and worked very well! Good Luck! -
For my '62 I went with Bumblebee wire and Rajay clips. Just keep your hands clear of the naked tops of the spark plugs! Good Luck!
-
I get used towels from a local hotel for polishing. They do a good job, they are big and I throw them away when they get all black.
-
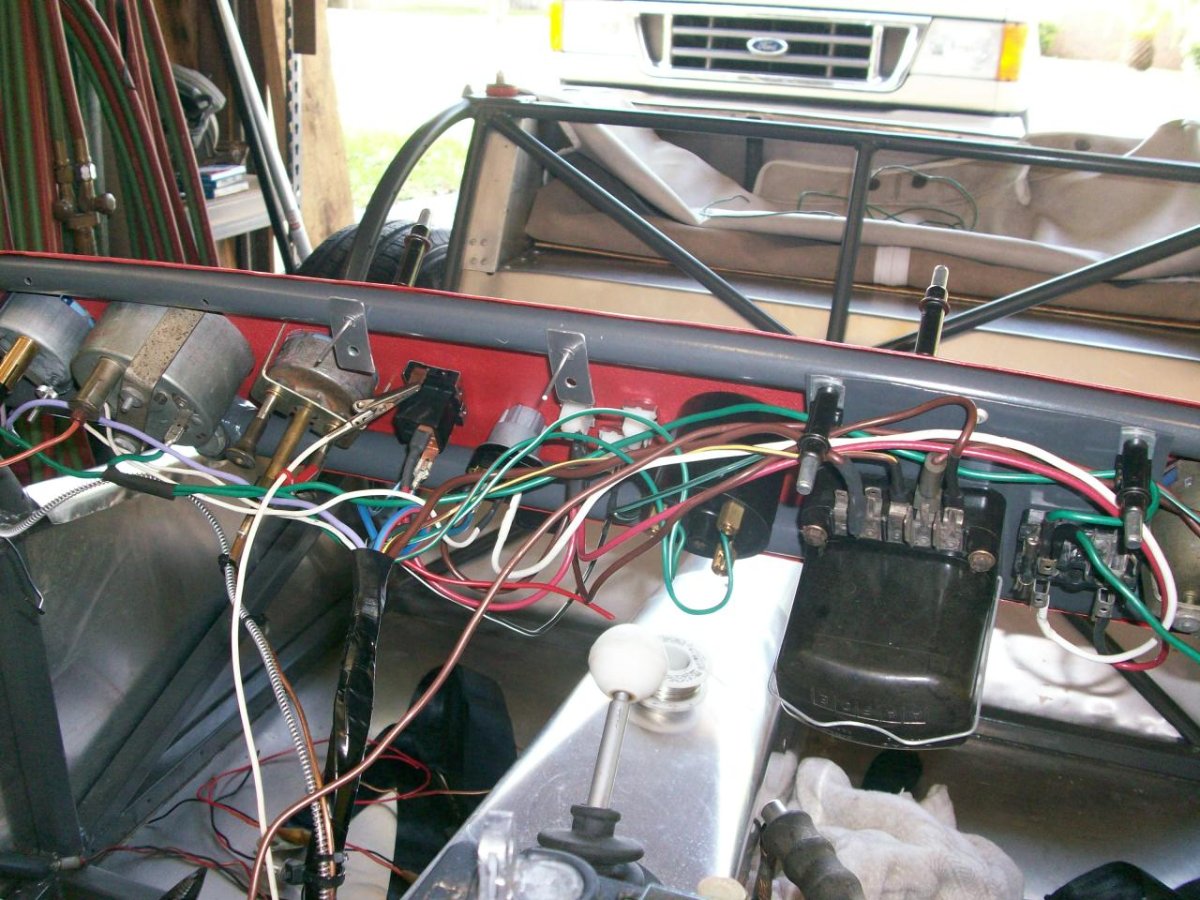
I had a similar situation with my 1962 S2 Seven, ex-racer with minimal wiring (all in red and black). The good news is that there are very few wires and scant accessories! I searched eBay for a late model MGB harness, stripped it and cleaned all the wires and built my own using the color guide and the above diagram as a guide. Fortunately, my voltage regulator, fuse box and switches were still in their original places, so I had some idea what the end result should look like. My harness is in 2 parts: underdash + forward and rear lights. The rear harness connects to the forward harness near the front of the transmission tunnel. I added fused relays for the headlights since I did not like the idea of all that amperage going through multiple dashboard switches. Since you have done a Bugeye, you will have no problem once you set your mind to this! Good Luck - Joe
-
I always thought it was more of a marketing ploy than anything else. This was the era of the Humber Super Snipe, Chevrolet Impala Super Sport... Most of these had larger engines and upgraded trim packages. For the 7 it meant a wood-rim steering wheel! :deadhorse:
-
Wanted - 3 rail "Bullet 2000E" shift lever assembly
Joe Petty replied to Chris D's topic in Parts For Sale / Wanted
Are you going to use this with the 3 bolt adapter at the end of the tailhousing (Integral Remote) or the 4 bolt adapter near the front of the tailhousing? My experience is that this one will only work with the 4 bolt adapter setup. -
Europa Spares in the UK
-
The Regular Summary of Classified Ads of Se7ens Found For Sale
Joe Petty replied to Croc's topic in Cars For Sale
Assuming that you will be racing this, make sure it will be accepted by the organization you want to run with and classified properly. Get all the documentation you can! Good Luck! -
The Regular Summary of Classified Ads of Se7ens Found For Sale
Joe Petty replied to Croc's topic in Cars For Sale
Graham Chapman? -
Good advice: check the spec but verify to be sure! There are lots of slight differences and interchangeability between Herald/Spitfire/GT6 and over the years owners upgrade for safety and availability, so log serial numbers and measurement to be sure what you have. You may also look back through your records and receipts and see what may have been installed. This also applies to the Ford engine and transmission. If you don't have Dave Bean's "English Ford Racers Catalog" I would highly recommend you find one. It's out of print for years, but they do show up. Great looking car and certainly looks like it has been well cared for, GOOD LUCK!!
-
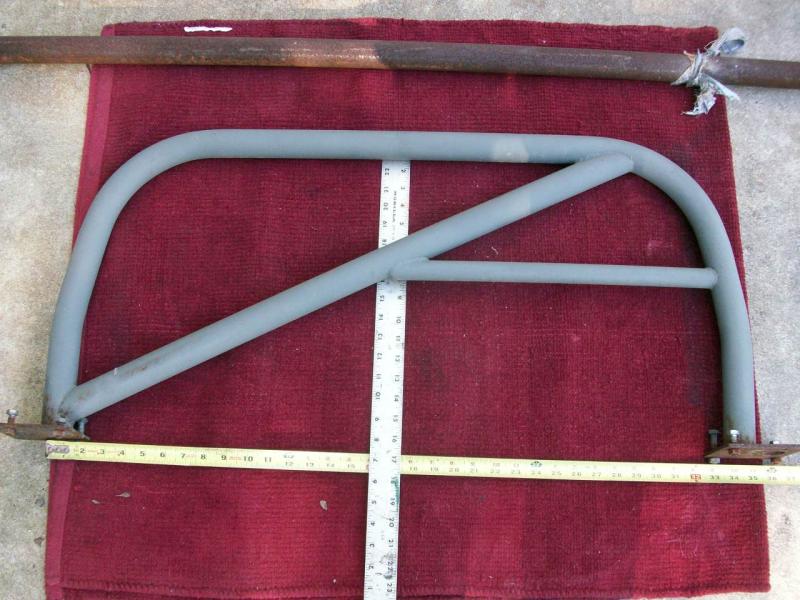
"Starter Kit" for $100 This was a start of a rollbar for my 7 1 1/2" bar. 1/8" wall, the hoop is 16 3/4" high and 34 1/2" wide (outside to outside). There is also an 8' length for the brace. I can deliver to the Mitty this weekend. http://www.usa7s.net/vb/attachment.php?attachmentid=15276&stc=1 Joe 904-524-9717
-
need to source a few things, and some other questions..
Joe Petty replied to Jaeggernaut's topic in General Sevens Discussion
My old 7 has the original 2x6 suction cup mounted rear view mirror and it is quite inadequate, especially for a right-hand drive car. I tried a 4 panel wink that is just as wide as the windshield and was not happy. The view was kind of "jagged" and I found the mirror annoying when I had to view a traffic light. Seemed like I was craning my neck to look over or under the mirror! Now I am using a Yamaha golf cart convex mirror and it seems to be working pretty well. I fabricated mounts that use the roof snap studs, so no modification to the windshield frame was needed. Joe -
1989 CS3 with Kent / 4-speed - shifter bushing source?
Joe Petty replied to achova's topic in General Tech
Europa Spares in the UK has a good reproduction latch as well as an assortment of alternatives. If the latch is loose, you can elongate the upper bolt holes, raise the upper clip slightly and the flange will still cover the bolt holes. This will work on the upper part of the latch where the holes are in the bonnet, not so for the lower part which usually goes into the frame bar. If you want to add a strip of insulation, "Scott" makes some really thick (1"x.065") insulation tape. Good luck and measure carefully! Joe -
Needless to say, it has been a stressful and exhausting month or so. Let me make a few notes on some of the things that I have learned or at least the way I experienced them. - Dial 911 to call the Police immediately If you see the theft in progress - Do not approach - Set off your car alarm with your clicker - Take pictures with your phone - Stay out of harm's way When the police arrive, have your drivers license and all your license numbers or VINs ready. I did not have the license number for my van and the police would not report that as "Stolen" until I got it. Eventually I got the VIN from my insurance co, but having that ready would have made things a lot smoother. My wife's solution is to take pictures of all the plates and registrations with your phone, then email them to yourself. Fortunately, my vehicles were recovered and I did not suffer a huge loss. The wrecker yard will require your drivers license and registration/title and cash. I did not have insurance on the trailer and that was a mistake! It is certainly reasonable ($16/6 months) and would have covered the towing/storage fees. Florida has a $250 cap on vehicle contents, so try not to leave a lot in the vehicle, particularly anything that is irreplaceable. It will take 4-5 days for the police report to be available. The only way to get an Incident report is to appear in person at the police station. You can get a Collision report mailed to you, but not an Incident report. There is a per page charge for the report and they may redact parts of it. Be mindful that they are conducting an investigation and how they go about it is their business. I have thought a lot about how to prevent or discourage theft, but I think that is a different topic and I will look for an appropriate thread or create one. Thanks to all - Joe
-
As Gabriel Heatter would say - "There's good news tonight!" My car was recovered in Doraville, Ga, probably within 10 miles of where it was stolen and a suspect arrested. I'll know more once I get up there, but right now hurricane Michael is making it difficult. Thanks to all and I will update as more comes clear. :hurray: Joe
-
Yes, please feel free to grab anything you see posted here and copy to SimpleSevens. I have Chris T. (Sevens and Elans) and Tom Bungay (Legacy Motorcars) both local and with personal knowledge of my car for valuation/appraisal. Thanks for your help and interest - Joe