TEM
-
Posts
222 -
Joined
-
Last visited
Content Type
Profiles
Forums
Store
Articles
Gallery
Events
Library
Everything posted by TEM
-
I'll take some measurements tomorrow to see if a standard washer will work. Grinding a relief in the pistons would provide a permanent fix with no future risk but it also sounds like a dangerous proposition. I have a new head gasket on order but it will be two days until it arrives so, I have some time to measure the head and ponder the next disaster.
-
Wouldn't a simpler solution be to just add a washer to the plugs? The old head gasket measures 0.02". The new one I bought measures was referenced at 0.04". Not sure how much the new gasket will crush down.
-
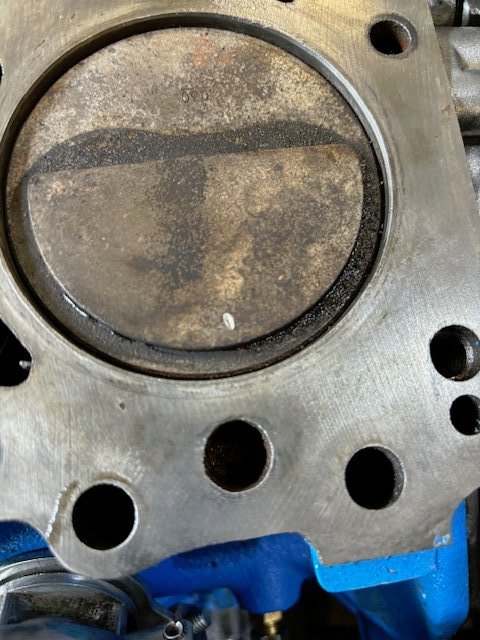
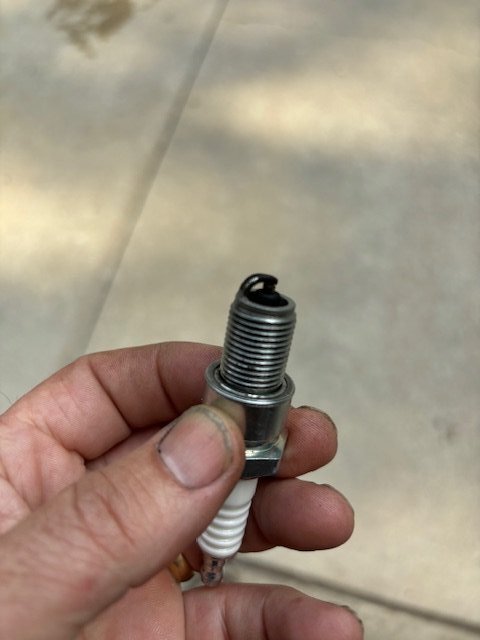
Also noticed a strike mark on the #1 and #2 cylinders. the #1 spark plug is also shinny in one spot. It appears the piston is hitting the spark plug. I'm using NGKBP6ES plugs which I understood to be correct. Are these not the correct plugs?

-
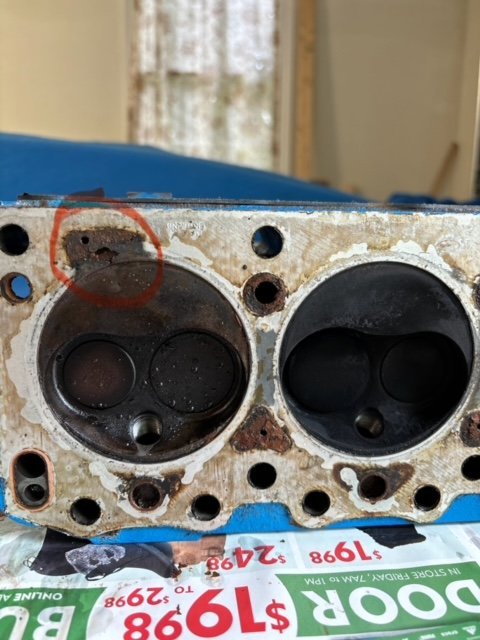
There is some pitting where the gasket blew through.
-
Definitely a blown head gasket! Oil has the tell-tail mayonnaise on the rockers and the dip stick. Coolant had a small sheen to it but that could be due to the container that I used which is also used for oil drips. #1 spark plug is wet with water/coolant. Head is off and there is a clear sign the head gasket rusted through between the water passage and the #1 cylinder. When changing head gaskets, I plan to do the following; - Replace cam cover gasket - Clean all water ports - Set the valve clearances - Perform compression test Is there other recommended maintenance to be performed? such as replace head bolts, etc?
-
Thanks. I'll reach out to both. This car really doesn't want to see the road again! So I take it you all think it's a head gasket as well?
-
Second drive today (around the block) and was hearing some noise from the valve train. Also noticed some pinging when starting off in first gear. And then finally noticed white smoke from the exhaust. Sounds to me like a head gasket but I'm open to other ideas/opinions. If it is a head gasket who are the US suppliers? I already reached out to DBE, hope they have one in stock. IMG_0213.MOV
-
Engine and transmission are back in the car and the first drive was successful, no issues shifting even after a prolonged run. The sticky substance on the clutch disc was the cause of the shifting issues. Thanks everyone for your input.
-
Wow, how easily it all goes together when everything is aligned. Thank you all for the suggestions. I tried a couple of them. What worked best for me was using a 7/16" (3/8" drive) socket on a short, non-wobble extension inserted into the pilot hole. Other sockets had a tighter fit but this one allowed just the right of slop so that if it hit the disc splines on one side but not the other then a quick tap until it didn't touch on either side. Did that all the way around and the transmission slid on smoothly and easily.
-
Bushing appears correct and I can see tell tales of the spline shaft hitting off center so I pretty sure it's just an alignment issue. I'm trying a couple of different ideas including jb's.
-
OK, all parts have arrived and I'm now putting everything back together. New clutch plate feels like brake pads, dry and rough. My old plate feels smooth and waxy (not oily, not sticky, fingers just don't slide smoothly over the surface). What ever was on there must have permeated into the compound. Glad I bought a new disc. I'm having trouble mating the transmission to the engine. With the PP bolts loose, I can get the transmission to mate nicely to the engine so I know everything fits and there is no obstruction. But when I tighten the PP bolts, I can get the transmission splines to mate with the clutch disc but just can't get the shaft in the hole. I don't have an alignment tool so I have been trying to align by eye. This is obviously not working. I don't have a rod the correct diameter and I have already tried everything that I have that's close. Not having this rotten $2 tool has wasted hours of my time. Does any one know the Dorman part number for the alignment tool for our engines? I see dozens advertised but very few show dimensions. Or if anyone has any tricks, I'm all ears.
-
Yup, that looks like the same engine color. But my engine bay will never look that nice. I also tried the Duplicolor 1601. The color was nearly identical to the Rustoleum Old Ford Blue but a little more glossy. So, I went with the Rustoleum. When removing the headers, I found a large crack in one set of pipes. Had to strip back the paint to weld the crack. So I decided to remove all of the white from the exhaust and paint it with high temp black (because that's what I had on hand). Of course shipwright disease took over and I had to paint the alternator bracket, speedo bracket, water pump pulley, and crank pulley the same black. Mostly because they were also rusting but also because the new engine paint made them look really ugly. The cam cover will look a little worse but it's not rusting so I will leave it alone (for now). The outside of the muffler was in surprisingly good shape once stripped. That white paint/coating did a great job protecting the bare metal underneath. However, the inside is rusting badly. That will be the next big item to replace. I like the one Joe put on his so will need to find out what muffler that is and how loud.
-
Thanks Joe7. I'll reach out to SJ and get confirmation on fit and quote. Did you use this kit on your car?
-
Hi Joe, Do you have an SJ part number or link to the kit?
-
Indeed but, not in the footwell
-
Thanks SENC, I take a closer look at the seal and yoke later today. I have not reported an oil leak in that area because I could not identify it if I had one. The inside of the tunnel was god awful! There was greasy black sludge all over the tunnel, front to back. This same black sludge was everywhere in the car; tunnel, engine bay, foot wells, etc. First pic is the tunnel. the very front part of the tunnel, in front of the trans mount was cleaned. The second picture is the drivers foot well. The cleaning has started in the large area, the small area under the pedals is the original black sludge.
-
Well, not good news from Burton. "Im sorry we are unable to supply a replacement kit that is a very early deep kit which we dont supply my advice would be to talk to either kelvedon lotus or QED motorsport or contact the owners club they may have the parts or may of had them re made possibly."
-
Thanks SENC, great color reference. Now I have to decide if I should go with a color combination from the factory or keep it period correct to its early racing days. I'm thinking the latter as the former would require a lot of other changes. Although, I do like your Burgundy and green combination. Thanks Slowdude, I'll look for some pictures of the Cortina engines.
-
After removing the engine from the car, I can see a fair amount of rust forming on the engine block. Much of the "original" paint is missing from both the Engine and transmission. With the engine and trans out, I thought it would be a good time to refresh the paint on both. Both are painted the same light blue color. I purchased a can of Rustoleum Engine Enamel paint in light blue (old Ford Blue) and shot paint on a test area of the transmission. This paint is far brighter than the color that's on there. So I did a little digging and found Ford painted all of their engines black prior to 1966. Did Lotus paint the engines and transmissions or did a previous owner add the blue? The poor paint job leads me to the latter. Is there a right color for these engines or a just-do-whatever-you-want kind of thing?
-
SENC, how do I check the seal in this area? Is this something that can be inspected from the outside or do you need to remove the tail shaft? I do have oil slowly dripping from the tail shaft as it sits horizontally on my garage floor (slightly tail down). Is this an indication of a leaking seal or is this normal?
-
Pics of the Trans cover removed. I don't see signs of any wear. Let me know if you see something that I didn't.
-
I did contact Ken at DBE but no joy on the PP, clutch disc, and trans mount. I did find some FF1600 clutch parts but they are intended for racing so most (all?) are heavy duty with no-spring clutch discs. And also, they are extremely expensive, $1300 - $2500 for a set. I'll take a look for AP parts. The kit I found from Burton is: https://www.burtonpower.com/luk-std-clutch-kit-ford-x-flow-ohv-kent-escort-mk2-619001506.html But this link is shy on details so I gave them a call. They seem to have a solution with a bearing adapter to account for the difference in height between the B&B and finger type PP but I need to send pictures of my hydraulic setup. I'm not sure why. They said their solution will work with some hydraulic setups and not with others. The gentlemen did not offer details when asked. I will share Burtons response once I get it next week.
-
Thanks guys. Having cross reference cars is a big help. Has anyone replaced a Borg & Beck diaphragm type PP with a finger type? Burton has a kit that looks like it will work but the finger type PP's don't look as tall as the B&B. Are any modifications, spacers, etc. required?
-
Looks like clutches and transmission mounts are more difficult to find. Where you your guys buying these parts?
-
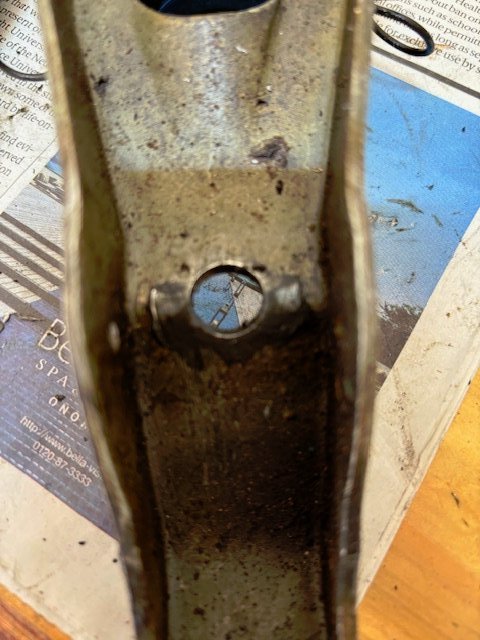
I pulled the release arm out with pictures below. Does the pivot hole look OK? I don't see any wear but the hole is oblong. Also, the bearing assembly is rather weak. When I turned the arm over to take a picture of the back side, all the components just fell apart (bearing, clips, half moon spacer). the clips don't seem to hold it all together very well. Is this normal? I have a new bearing and clips coming just in case.