jevs
-
Posts
316 -
Joined
Content Type
Profiles
Forums
Store
Articles
Gallery
Events
Library
Everything posted by jevs
-
Stalker 23 is no longer for sale. I took deposit on it this morning. Thanks everyone.
-
Sent you an email. Feel free to call, text, or email.
-
If anyone is interested, my house is selling and they only gave us two weeks to close. We have to move into a temporary living situation which means the Stalker has to go into storage. If anyone wants to make a reasonable offer, now is the time. I would also consider trades or partial trades if it is something that is ready to resell without needing work. I have to put my entire shop and tools into storage for a bit, so no projects other than building a new house are going to get done any time soon.
-
Unfinished Brunton Stalker M-Spec XL Classic for sale. This is a new construction with new parts only! Power plant is a brand new LS376 crate motor mated to a brand new Tremec T56 Magnum close ratio 6-speed and uses a Cadillac CTS-V LSD rear differential. This will be a very fast and very agile machine! This car comes with about everything I could think of to complete it. It cannot be bought new or built any cheaper (unless you put used or inferior parts in it)! This is probably the fastest Lotus 7 type car out there that you can build starting with a kit! It should make near or over 500HP once tuned and I believe it should weigh around ~1700lbs. Since this is the XL, it is ideal for Road Racing and/or larger framed drivers. It has a stance near that of a Corvette I believe. The XL has enough room to even add AC if you wanted. This comes with a Manufacturers Certificate of Origin only that states “Replica / Facsimile Of circa 1962 Lotus 7” and is intended to be street legal by following the normal kit car or special construction rules of your state. I will also be providing all the documentation and receipts for parts. I will let the build write up speak for itself as far as the time, care, planning, and fabrication work that has been done so far. I am still working on the car as time permits, but not much time is being permitted because I have several more important projects going that are taking all my time. The good majority of the hardest work and fabrication is already done. http://www.usa7s.net/vb/showthread.php?9794-Brunton-StalkerXL-23-Build You will be getting all of my time, parts research, ordering, engineering, machining, planning, fabrication, etc. for free basically. I am really just trying to sell for cost of parts or best offer. This is not a desperation sale, so if I cannot get a fair price I will be keeping it and finishing when I can. I may also consider trades or partial trades to help a potential buyer. There is no wait time for a kit with this one or a huge amount of precious time to waste researching and gathering up parts to complete it. This car can be complete pretty quick at this point for racing or street fun. This is ready to finish with pretty much everything to finish it down to the license plate frame. This is not a cheap or low budget build using sub-par or used parts. It is a high level build with all brand new parts and drivetrain! There are a lot of custom fabricated parts and extra work done to this car that you won't likely get on any other or be able to buy as new options if you have one built. I have about 1200 high res photos of every part of the build so far. Every single nut, bolt, and part is completely documented in an Excel spreadsheet with part numbers, date of purchase, vendor, the date of installation for parts that have been fitted etc. I will also be supplying another 800+ files of parts data, instruction manuals, all the build files and videos, CAD files of parts I designed and machined, CAM files, parts data, electrical information, data sheets and instruction manuals for parts, pictures of other builds, etc. This is over 13 gigs in total! I would be glad to share more info with any prospective buyers so you know exactly what you are getting. You will know every single part, part number, and where it came from. I have a huge stack of paperwork and receipts as well as the electronic files. This car can't be done any cheaper without going used parts or sacrificing on the build quality. I shopped hard, used every discount code, dealer cost, etc. to get the best pricing on everything. I would say the prices have only gone up! This will be a great deal for anyone looking at buying a new kit or that was considering buying a finished car. This one can still have the finishing touches done to your desires. You will also be avoiding a lot of machining, fabricating, and welding that you may or may not have the tools and machines to do. Summary of some of the features: T Bar full cage upgrade Electric in column power steering upgrade Brunton aluminum fuel cell The entire fuel system is upgraded beyond the makers suggestions Aluminum shock upgrade RFID ignition setup (no key needed) Self-cancelling turn signal system LED headlights All other lighting LED, Upgraded fasteners Custom parking brake setup with custom machined mounting that will work like it is supposed to! Custom modified surge tank Custom radiator mounting with vibration isolation Custom catch can setup Custom mounting for exhaust with proper isolation Modified hood for rod cover "bumps" and better fitment Reworked cowl for nice hood mating and to use rubber weather stripping for an excellent gap and full support Custom hood clamp mounts welded to frame with extras added up front Hood and clamps, etc are laid out in way that will make adding side body panels later around the engine bay easy if ever wanted Custom light weight NASCAR style hood prop setup Custom throttle pedal setup tuned to proper weight, travel for this car, and stock GM smooth movement feel Custom hand brake mounting and placement Custom dash mounting to actually use hidden fasteners and capture the bottom to the tunnel Real carbon fiber race mirrors Welded on tow hitch with receiver Rerouted brake lines for easier replacement of differential Custom welded in protection for brake lines in case of an off track/road incident There is much more than that and more goodies for you to complete, but a lot is shown in the linked build. I will be glad to answer emails or take calls to assist with the rest of the build if questions need answered after you purchase it. This car could be finished fairly quickly given your amount of free time and depending on how much more you want to deviate from the original kit. Attached is a pdf of the parts list so far. This will give you an idea of what it really takes to build this and what you will be getting. You won't be shelling out a bunch more money on parts to finish it and you will be doing way less work than starting from scratch. I have started with mounting the seats, but I have not posted pics yet to the build log. I have just under 40k in materials only. Parts list.pdf
-
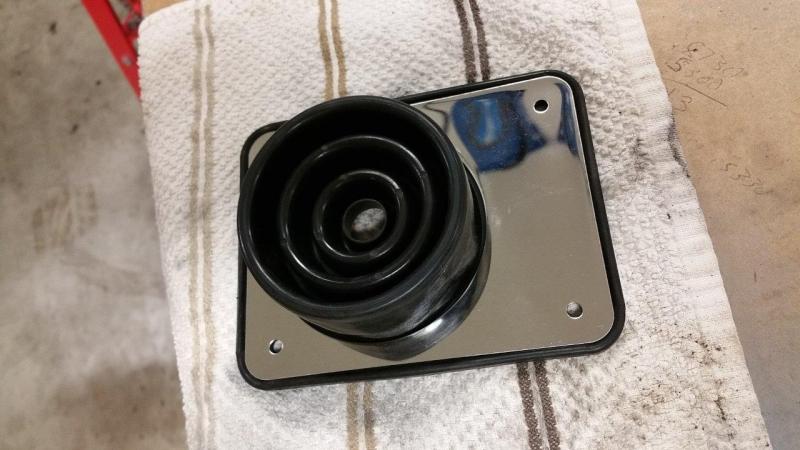
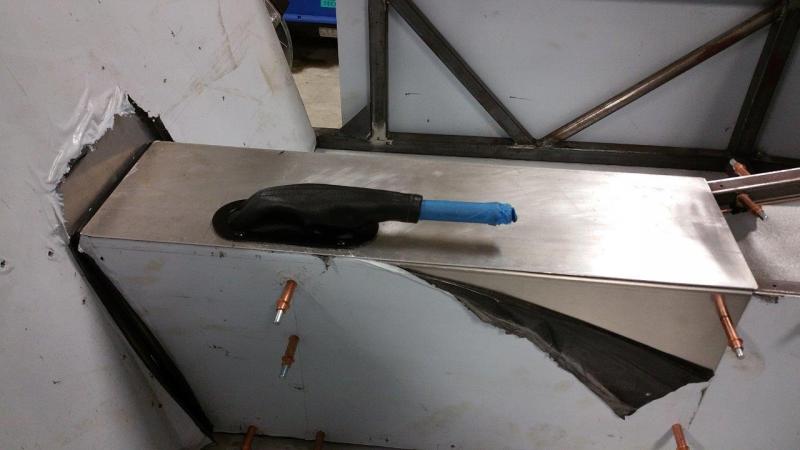
Installed the shift boot into the tunnel plate. I did not like the look of the polished stainless panel because the bottom side of the punched part is the side they polished. This looks a bit cheep because the edges curve up. I flipped it over and made a brushed finish on the other other side which I prefer. The back edge of the plate and the rubber boot had to be trimmed to get the boot centered on the shifter. This allows it to kind of tuck under the lip of the arm rest a bit. The screws that the shift boot comes with are pretty cheap looking screws that would likely rust if they got wet. I replaced them with stainless button heads and used stainless nylock nuts on the other side. Removing the shift boot would not give you access to much, so anytime access is needed you would most likely just pop the whole panel off instead. The rubber of this boot is super flexible and not real thick. Some stock rubber boots I have seen in OEM car shift setups can actually cause pop outs in cold weather, this one has very little resistance to movement.

-
The shifter seems to work very well. This is definitely the least expensive method to relocate the shifter and it seems to work just as good as the more expensive methods I have seen. I looked pretty hard for awhile, because this assembly was not available, but did not find any other aftermarket ones that put it in the same location as this one and they were all very expensive. Brunton came through eventually and because I waited so long they sent it at no charge which was nice of them. I will need to seal the shift plate on final assembly after everything gets coated. I am replacing the bolts with longer ones where the plate goes. I only had two, so I have to pick up a couple more.
-
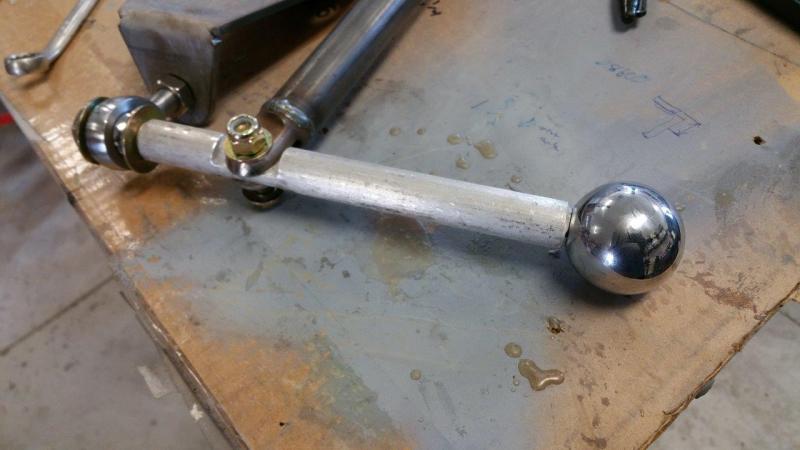
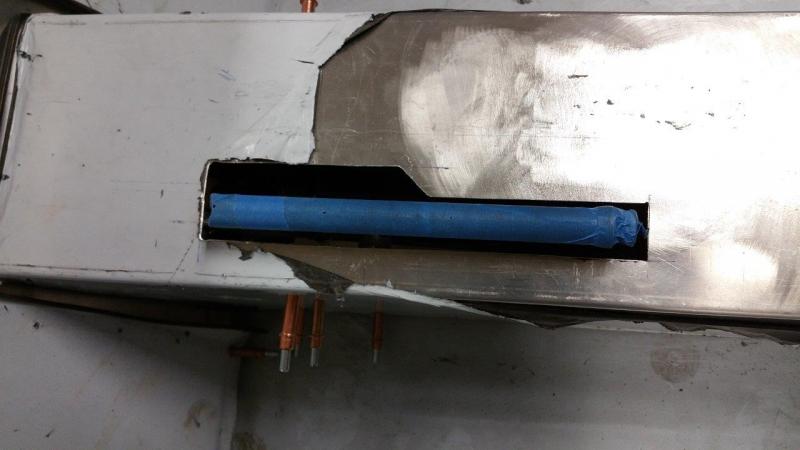
The shift rod needs to end up with about .260 thickness to fit perfect in the shift rod adapter clasp with no slop. I actually went a couple thousandths more for mine. I believe the spec is 1/4", but you want this as close as possible. Squeezing it with the bolt will take up slop, but the more you pull, the less of the surfaces are in actual contact. I used a ball mill to do this, but that turned out to be a waste of time. The rod needs more room and the radius gets in the way. I ended up grinding and filing more off by hand to get adequate clearance. I did not want to measure and clamp everything back up in the mill. I would advise just using a regular end mill with a tiny radius on the edge instead. It is tricky that you do not take too much off because you need the rubber boot to stay lower than your cut. The hole is drilled 3/8". I sanded the top off just to the point that the original lower bolt hole threads disappeared. I sanded the weld on the bottom of the linkage rod so that it is gently on the rubber boot if it makes contact on the top.
-
I removed the shifter plate because it has to be flipped and the shifter rod has to be modified. The Tremec emblem was sanded off so the shifter plate can set flat. I considered using washers to space it up, but I thought this was slightly better than fiddling with spacers between and it gives more contact area for rigidity. The sealant was cleaned off the transmission and the shifter plate. The shifter rod assembly was removed because it needs to be cut down, milled, and a new hole drilled. It was cut off just at the bottom of the lower hole.
-
Started on the shifter. The Brunton shifter stick has a 1/2"-13 threaded hole for the shift knob, but the knob on the parts list when I purchased has a smaller threaded hole. So, the first thing I had to do is make an adapter. I just cut a bolt down on the lathe and cut some threads the old fashioned way. Works perfect.
-
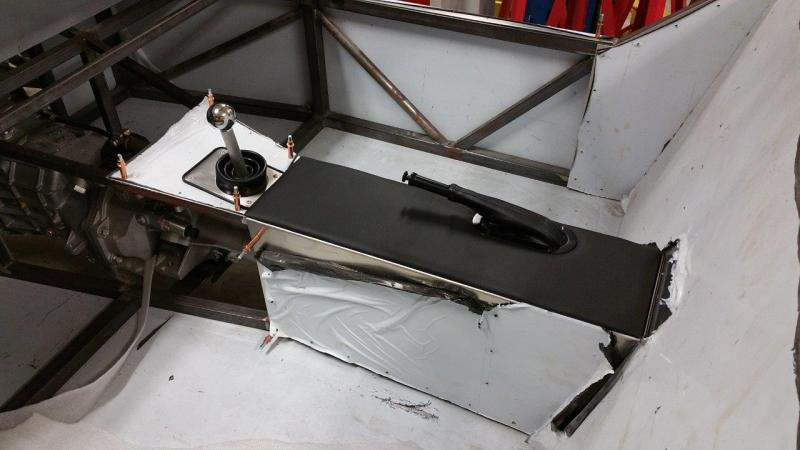
Finished the arm rest panel.
-
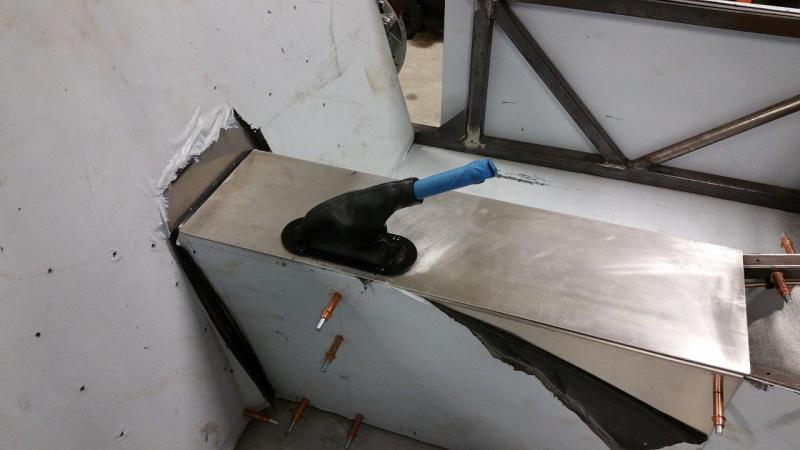
Finished the tunnel armrest panel except for the upholstery part. The magnets work perfect. I sanded off the excess epoxy that flowed through the countersunk holes and added a little more epoxy around the magnets for extra strength and to encapsulate the spacers and look cleaner. Now this can easily be removed with only two screws (the right side boot bezel screws). There will be no other visible fasteners or anything to irritate your arm. I made it a little longer in the front to also hide the panel joint between the tunnel panel and the shifter panel. I fit my parking brake cables but discovered they made the exposed portion of the cable too short. I will post pictures of those once I get the corrected cables. I did have to drill out the tapped hole on the caliper bracket. Since the cables use a double nut so you can adjust it in and out, this did not need to be threaded. It should have just been a 1/2" clearance hole. Easy fix to just drill it out with a 1/2" bit. I needed to put a rear wheel on to check clearance for the cables. I thought I would snap a couple shots with the wheels on one side just for the heck of it.
-
It would have been done tonight except for some reason the exposed portion of the cable is 1-1/8" too short. I suspect someone made a mistake, because I sent a diagram of exactly what was needed. I have to get that rectified tomorrow, but it appears the setup is going to work well. These cables are heavy duty.
-
I cut the clearance holes in the tunnel panel for the magnets today. The magnets are from K&J Magnetics, Inc. D92-N52 N52 Rare Earth Neodymium Magnet 9/16" Dia. x 1/8" Thick Nickel Plated I marked all the locations on the tunnel panel and the arm rest plate. The tunnel panel clearance holes are drilled to the 5/8" step of a step bit. I drilled countersunk holes into the arm rest plate so that the epoxy could flow up through and also create a mechanical bond. The "nub" can be sanded off when everything hardens. Everything was sanded where the epoxy is going to connect including the spacers. Spacers had to be made for the magnets because the spacing was larger towards the rear. The magnets were sanded on the sides and top and then stuck to the frame centered in the clearance holes. Slivers of the material I am using to cover the panel were taped to the top of the tunnel panel to create the proper spacing for when the material is wrapped around the arm rest panel. Everything was epoxied and then held down lightly with some boards. I want to make sure the magnets can reach when I am all done. Hopefully not too much worked its way down and it doesn't get stuck to the frame.
-
Unless someone makes me a realistic offer, I am going to try to squeeze it in. It is really a bad time with our house being for sale currently and trying to prep land and plan out a new house among our other life duties. We will see how it goes.
-
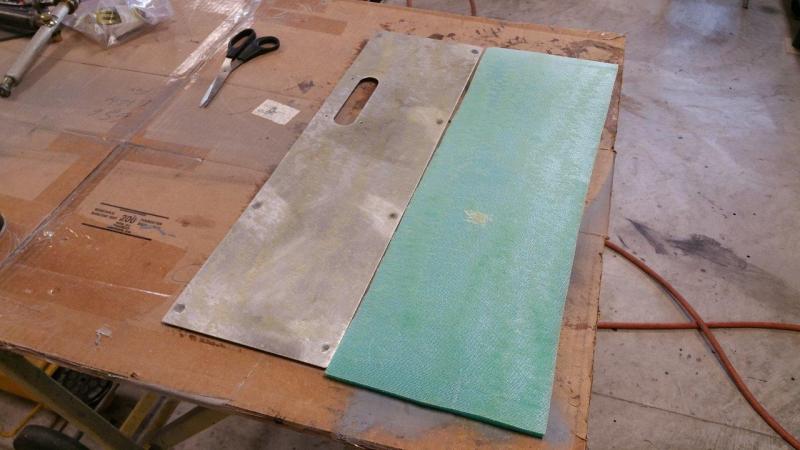
Made the panel for the parking brake boot and padded arm rest. This gets held to the frame with the passenger side boot trim ring screws. The plan for fastening the rest of the panel will be N52 neodymium magnets. Once I get the scrim backed foam on it and the covering, I will drill holes in the tunnel panel and epoxy magnets where needed to the arm rest panel. The magnets will stick directly to the frame. The hole in the top of the tunnel panel was cut so that it can be raised straight up and off without doing anything with the parking brake handle. The arm rest panel slides over easily. At first I looked into mounting the boot to the tunnel panel, but it was harder to maneuver the tunnel panel over the parking brake. This will be much easier.
-
Current pic
-
deleted
-
Still for sale, but I am starting to work on it again.
-
$39,900 OBO! We bought some acreage and have listed our house for sale. I need to start building a new house. This car is basically a roller with everything to complete it. So, if anyone is interested in buying an unfinished but well built Stalker XL at cost, here is your chance. You will be getting all of my time, parts research, ordering, engineering, machining, planning, fabrication, etc. for free. There is also no wait time for a kit or gathering up parts. This is ready to go with everything to finish it. This is high level build with many improvements and upgrades. As far as I know there are no complete XL's for sale and only a few out there. There are a lot of custom fabricated parts and extra work done to this car that you won't likely get on others. All the parts are new for this build. It is not considered a budget build. There has been no scrimping on parts or quality of work to save money. I have pretty much everything to completely finish the car. I will let the build write up so far speak for itself. http://www.usa7s.net/vb/showthread.php?9794-Brunton-StalkerXL-23-Build I have 1115 high res photos of every part of the build so far. Every single nut, bolt, and part is completely documented in an Excel spreadsheet with cost and date of installation for parts that have been fitted etc. I will also be supplying another 800+ files of parts data, instruction manuals, all the build files and videos, cad files of my parts designed, CAM files, parts data, electrical information, data sheets and instruction manuals for parts, pictures of other builds, etc. Nearly 10 gigs in total. I would be glad to share more info and my spreadsheets with any prospective buyers so you know exactly what your getting. You will know every single part and cost. It can't be done any cheaper without going used parts or sacrificing on the build quality. I shopped hard, used every discount code, my business, etc. to get the best pricing on everything. I would say the prices have only gone up. T Bar full cage upgrade Electric in column power steering upgrade Brunton fuel cell The entire fuel system is upgraded Aluminum shock upgrade RFID ignition setup (no key needed) Self cancelling turn signals LED headlights All other lighting LED, upgraded fasteners custom parking brake setup with custom machined mounting that will work well custom modified surge tank custom radiator mounting with vibration isolation custom catch can setup custom mounting for exhaust with proper isolation modified hood for rod cover "bumps" and better fitment Reworked cowl for nice hood mating and to use rubber weather stripping for an excellent gap and full suppprt custom hood clamp mounts welded to frame with extras added up front Hood and clamps, etc are laid out in way that will make adding side body panels later around the engine bay easy if ever wanted custom light weight hood prop setup custom throttle pedal setup tuned to proper weight, travel for this car, and stock GM smooth movement feel custom hand brake mounting and placement custom dash mounting to actually use hidden fasteners and capture the bottom to tunnel real carbon fiber race mirrors welded on tow hitch with receiver rerouted brake lines for easier replacement of differential custom welded in protection for brake lines in case of an off track/road incident http://illiweb.com/fa/i/smiles/icon_smile.gif Anyway there is much more than that and more goodies for you to complete, but a lot is shown in the linked build. I will be glad to answer emails or take calls to assist with the rest of the build if questions need answered after you purchase it. This car could be finished fairly quickly given your amount of free time at this point and depending on how much more you want to deviate from the original kit. I am basically trying to recover cost of parts only, so if this interests you please contact me via email and I can give you my phone number if needed. Thanks, John jevs656@gmail.com Here is my listing on the Brunton Stalker forum that also gives a list of the parts included: http://stalkercars.forumotion.com/t160-brunton-stalker-xl-for-sale#322 I cannot post in the cars for sale section. I figure since it is not complete and still "parts" I would post here. If anyone wants to link it in there for me, that would be great.
-
I have not worked on it much lately because I am building a Jeep that is taking longer than I initially thought. Can you send me some picture of the damaged bracket? I will PM you my email. It would be easy to modify now rather than later if needed. I can't imagine it would take much.
-
Anyone done a pad on the center console of a Brunton Stalker?
jevs replied to jevs's topic in General Sevens Discussion
I have all the materials to make mine. I just have another project to get done first.....the car is on hold for a few weeks. -
Not much happened on the car this weekend because I am putting together a Jeep. I did put the parking brake stuff back together with the offset clevis I made. Here is the off road project if anyone has time to kill and likes Jeeps. Something most of the family can ride in. I am anxious to take it to an off road park soon. http://www.wranglerforum.com/f322/jevs-1998-tj-4-0-sport-manual-chili-pepper-red-lcog-build-1291865.html
-
Congrats! That was quick. I think our process is a little more drawn out unless you want to drive to the Capital. So..... Where in the heck are these fully assembled pics?
-
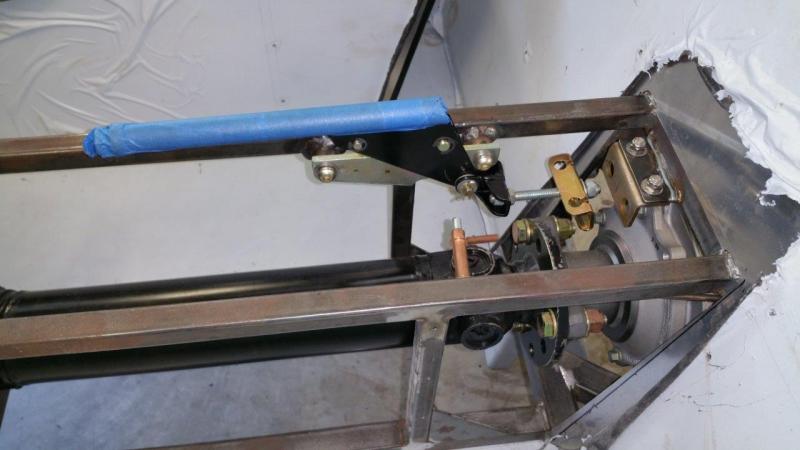
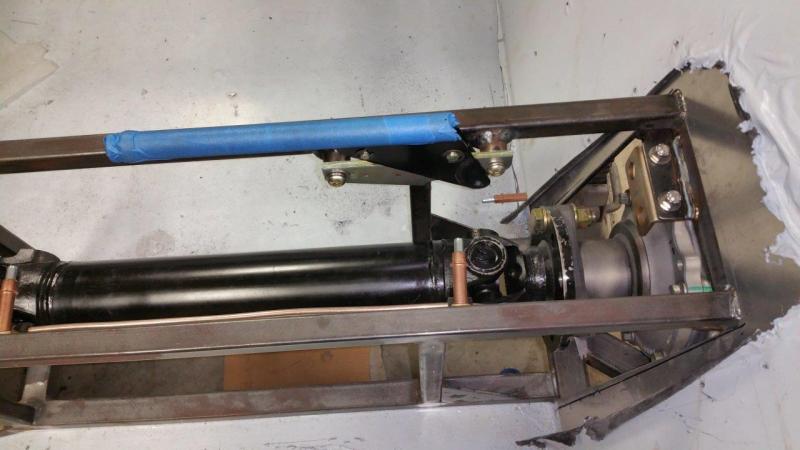
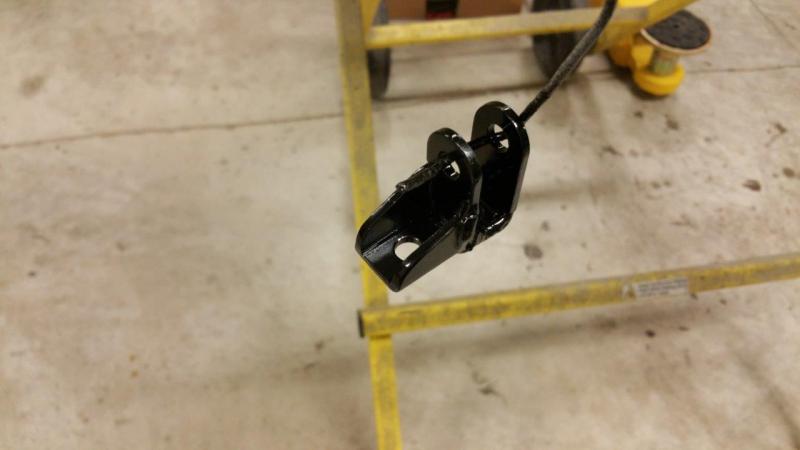
After sitting in the car with the seat about where I wanted it, I decided to scoot the parking brake handle over more. I actually had the handle mounted closer to the driver than when I first test fit it in order for the cable bracket in the back to have plenty of room for the cables without touching anything. I could tell my arm was going to touch at times while shifting which would be annoying. Now there is plenty of room so my arm should never touch it. I also wanted two of the bolts for the boot ring to hit the frame tube. This way when I make my padded cover plate those screws will hold it in place. I am thinking of using some slide tabs in conjunction so maybe no other fasters will be needed. I still have to think about that more. The spacers ended up being 5/8". I just cut them off and tapped them deeper. I switched to the button head bolts that came with the handle since the others I had were a little too long now. I welded up the original hole in the clevis, beefed it up a little with a weld bead across the top and bottom and welded some steel to it making a bracket that offsets the mounting hole 7/8" from where it was. This also captures the bolt the same as the clevis did. The piece in the back for the cable mounting cannot be moved or the cables won't clear everything nicely. This takes care of that. I had to paint it since it is no longer zinc plated, so I could not install it yet. This gives even greater clearance to remove the driveshaft from the top if wanted also.
-
I am thinking of adding a thin padded piece on top of the tunnel that will be removable separate from the tunnel. It would also have the boot and trim ring for the hand brake. This will allow me to open up the area of the tunnel that slides over the hand brake more and also provide a little comfort cushion for the arm. Curious if anyone else has done this and if there are pictures? I would like to do it in a way that there are no screws or fasteners on top, but I have a couple ideas for that. I may also let it go just a little over the edge of the tunnel panel to hide the seem where the tunnel and shifter panel meet.