DanM
-
Posts
348 -
Joined
-
Last visited
Content Type
Profiles
Forums
Store
Articles
Gallery
Events
Library
Everything posted by DanM
-
I cranked it over and checked the timing last night and the timing is exactly where it should be, 10 degrees retarded Advanced.
-
So I'm moving this discussion from my build thread to tech talk to help anyone who may experience similar issues in the future. Background I am using Megasquirt MSPNP2 as my chosen ECU for my 1990/93 1.6 MX-5 engine. The engine is basically stock, but I have removed the Air Flow Meter and replaced with an Intake Air Temperature Sensor (IAT) and installed an Innovate MTX-L O2 sensor (wideband). I have loaded the base ECU map for 9093 mx-5 and adjusted the configuration for the IAT and O2 (basic drop down settings). Problem The engine will crank over but will not fire up on the base map (and it should). Checks I have the following data from the checks that I have performed. Fuel Pump - Working Intake - Clear Spark - Confirmed Battery - Delivering >12V Starter - Working Injector harness - Noid light test fail (12V Confirmed but no signal ground) ECU tuner shows RPM ECU tuner shows AFR (O2 sensor) ECU tuner not showing Throttle position (not sure if it supposed to) Engine light remains on when keyed to "On" position Why is the ECU is not sending signal ground to the injector? Any ideas for the pot?
-
So, at the end of another head scratching evening (again between kids activities, etc.). Here's what I think the status is: Fuel Pump - Working Intake - Clear Battery - Delivering Power Starter - Working Spark - Present Injectors - Have voltage, but need to test further. Cam Angle Sensor - Not tested yet. Enough for tonight. Next, I will either buy a Noid light for the injector harness or perhaps remove the fuel rail and test the spray on some cardboard. More learning tomorrow.
-
So I started going through the list: Fuel Pump - Disconnected (and got blasted in the face with pressurized fuel- yuck!) and tested. All good. Intake - Disconnected and checked for blockage. All good Battery - Checked with multimeter - All Good Starter - Engine turns over - Assume good. Injectors - Disconnected injectors and connected a light bulb to the harness. First I tested the against engine ground and the light came on. Then, I connected the signal ground from the harness and cranked over the engine....No light. Looks like I have no signal ground from the ECU. Time to retrace my engine harness to see where the issue may be.
-
Checklist for this afternoon. Not necessarily in this order!
-
I installed a fuel pump toggle switch so I could isolate the fuel pump if needed and I'm sure the pump was switched off. I'll check it out just in case...
-
Todays attempt to start the engine was full of thrills, disappointments and a lot of frustration... My RS232/USB adapter arrived last night so the first thing I did this afternoon was connect the Tuner studio software to the ECU and load the base map for the 1990/93 Mx5. The FDTI adapter Tuner studio connected to the ECU While I plan to use the base map until I get a proper tune, I did have to make some minor configuration changes to account for the AFM delete (replaced by a GM IAT) and Wideband O2. Once loaded my daughter helped me push the car outside to see its first bit of sunlight in nearly 2 years. What then followed was approx. 2 hours of pure frustration while my laptop died, and I somehow lost connection to the ECU. By the time I eventually got everything back to where it was, it was time to collect my son from his summer activities and make dinner. Back in the garage it went. 😑 Keen to make progress after dinner, the kids helped me push the car back out this evening and I got straight on to seeing if I could turn the car over without any fuel in it......Click! ****!!!! Nothing! After what seemed like a few minutes of scratching my head, I remembered that I had installed a clutch safety switch. Well, good news Mr Safety Inspector, it works!! I engaged the clutch, turned the key and the engine turned over. Yay!! Happy Days!! With that major milestone achieved (for me at least), I added some fuel to the tank. Thankfully, the first hose clamp was a little loose and started to leak after a a few drops of fuel were poured. This was enough of a reminder to go around all the hose clamps and give them a bit of a tighten before putting anymore fuel in. Finally at 21:30, I was ready to go. I hopped in the car and turned the key a couple of times to allow the fuel pump to push fuel into the system. Then I cranked it over. No change. It sounded exactly the same as it did without fuel. After doing some basic checks I tried two or three more times, without any change. Too exhausted to do anymore problem solving this evening, I pushed the car back in and packed up for the night. Tomorrow is another day of learning!
-
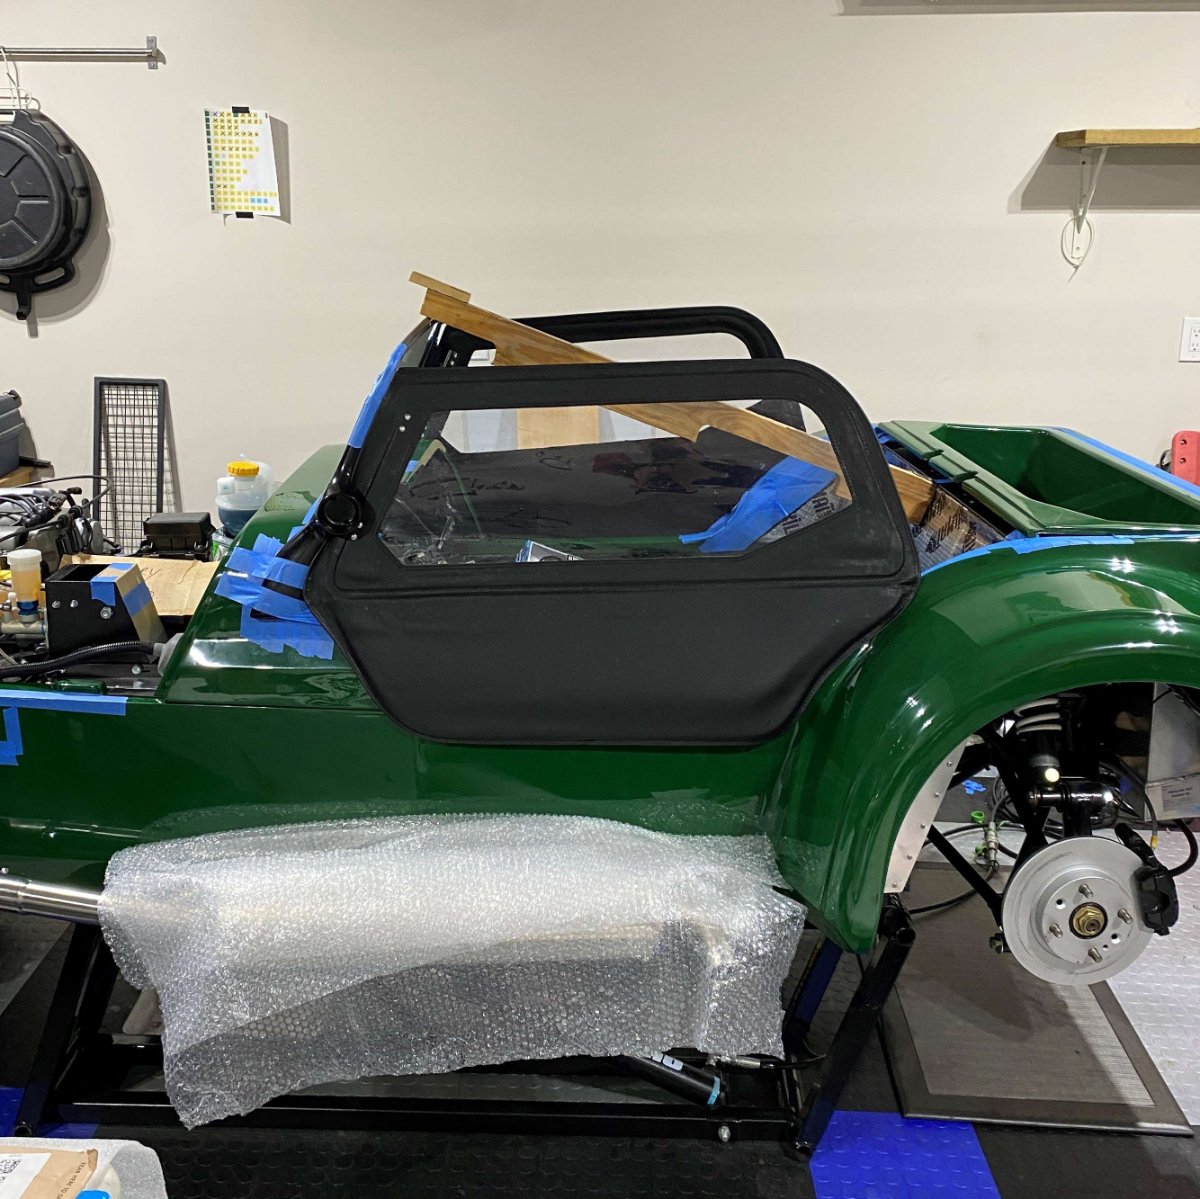
While waiting for my ECU cable adapter, I decided to continue with other stuff. Next on my list was to position my windscreen. I still have to figure out how I'm going to get them more "chromey" but in the mean time I wanted to get everything test fitted and the holes drilled. First, I secured the scuttle and made myself a windscreen support out of an old pallet I had laying around. I noticed that I had a bit of difficulty getting the 6mm bolts through the layers of fiberglass (Scuttle and tub) so I think I'll get some longer ones for the final fit. Once everything was secured I positioned the windscreen and side pillars. Looking closely I noticed that although the windscreen positioned itself in the channel, only the edges were actually touching. Has anyone else experienced this? Is this a problem? Next, I assembled the side screens so I could adjust the windscreen rake. There are no obvious marks identifying where to position the hinges so I carefully put pressure on the frame with my fingertips and once I felt something that seemed like a hole I gently marked it with the end of a pen (Nib in). Then I punched the bolts through the holes and secured the hinges. For me the set up position (1007mm - screen to back chassis rail) was a little too long and the doors did not sit on the side of the tub. After tilting the screen back a little on both sides the sidescreens lined up pretty well. Once I was happy, I removed everything, drilled the holes and then test fit everything again. Finally, in preparation for receiving my ECU cable adapter (hopefully) tomorrow I put the wheels back on, lowered the car and then rotated it so I could easily push it out of the garage for my second attempts at a first start.

-
With a couple more garage hours allocated today I decided to press on with some other tasks. One of which was filling up the brake system. I made myself a rudimentary break bleeder just to make sure the pipes were filled. I'll bleed them properly when I have someone here to help. Now time for a shower, dinner and beer! 🍺
-
Thanks Graham, So things have sadly ground to a halt today....... To get things start off I took out the plugs and poured some oil into the cylinder, left it a short while and then cranked over the engine by hand. I'm very glad I did, because a lot of burr and chaff came out from my accessory belts and pulleys. Must have got stuck in there after I drilled some holes for the loom or body work. After blowing it out with compressed air and gently brushing the belt with a nylon brush all was cleaned up. The engine cranked over well. 😀 Next, I got my Wideband sensor set (I took it out of the dash panel and held it in place with a cardboard box) up by heating it up and calibrating it to the atmosphere. Good to see my wiring was working so far!! Finally, I loaded up the Megasquirt Tuner Studio to my laptop. This is where things ground to a halt..... Unfortunately, the cable provided does not fit my laptop and so I'm not able to download the base tune to the ECU until I get one ordered. Close but no cigar!!! Now I have to wait for the new cable to be delivered before I can continue.
-
So yesterday I spent the afternoon and evening filling the car up with fluids. Engine, Transmission, Differential and Coolant. Due to the lack of access to the transmission and differential filler holes I bought some 1/2inch vinyl tube and drip fed the fluid from above. Made a mess at first but slow got into it. Differential (Much easier than the transmission) I filled the coolant in steps while it slowly seeped into the system. I left it overnight and then topped it up again this morning. I also installed new spark plugs, HT leads and finally the air filter. Today I will focus on the megasquirt set up and hopefully turn over the engine to get the fluids pumped around. Does anyone have any start up tips for me? I'm feeling quite nervous, considering I assembled the engine myself!
-
Thanks Graham, I hadn't even thought of that!!!
-
Productivity seems to be high at the moment and so I'm trying to maximize my time in the garage. Yesterday I attached the exhaust pipe to the chassis. First I located the mounting point on the chassis and drilled a pilot hole from the inside-out through the fiberglass. Then I masked off the area, inserted the bolt and sleeve and marked around them as a template. Slowly I worked from the outside-in filing out the hole until the sleeve passed through. I wasn't sure how the rest of the mounting brackets were oriented, so with some help from members of the UK forum I was able to assemble the other parts. To ensure I was able to get my spanners in there, I first attached the mounting bracket. Then I assembled the rubber mount and exhaust cradle to the silencer using loctite on the cradle bolts. Again thanks for the advice! Doing it in this order made it easy for me to offer up and secure the exhaust to the chassis will minimal fuss. With the exhaust now in place, its time to prepare the Megasquirt and begin planning for a first start!
-
More bodywork tasks this weekend. Rear lights. As you can see I still love the blue painters tape. Unfortunately the nuts and bolts needed for the indicator units were missing from my stash, so I will need to buy them tomorrow when the stores open after the long weekend. I think I will also take the time to spray some rubberized protection in the wheel arches before I finally attach them. I also positioned the nose cone, drilled through the fiberglass and installed the top bolts to secure it. Unfortunately I was missing the bolts for the lower mount so I used my workshop chair to hold it in place temporarily. With the nose cone lined up I positioned and drilled the underside of the body to the chassis, using Clecos to keep it all in place while I rivetted. I dabbed a bit of silicone sealant on each rivet before squeezing them in.
-
More little tasks yesterday. First I attached the rear body work, trying to keep the wheels hub. centralized in the rear arches. The RHS was spot on so could be rivetted immediately, however the LHS needed a bit more fettling. I think I managed to get it within about 5-10mm of the target. Then I installed the fuel filler neck and cap assembly. First I masked the inside, temporarily attached the hose and used it to identify the centre of the 65mm circle cutout. After drilling a pilot hole from the inside I then moved outside used a hole cutter to do finish the job. Finally I marked and drilled the gas cap screw holes before fitting the cap and clamping everything secure.
-
I managed to complete a few smaller jobs in the last few days. All progress is good progress. First I fitted my Revotec self sealing hose connector to the air intake for the crank case ventilation. This was the second one I had to order as I messed up the part number on my first try. Anyway its now fitted so the intake is now buttoned up. Then I moved on to the fog light switch, the only stand alone Miata switch that I decided to reuse. It took a few tries to get the position and orientation correct, but I think it came out ok. I then had to re-install the dash panel to see how everything would look when its done. Its not perfect, but its tidy and a bit more interesting to look at. Next I made up a new wideband O2 sensor input connect for the megasquirt. I decided to make a separate input instead of splicing into the existing harness just incase I have to put the stock ECU back in for safety inspection. The set up was very flimsy with just one pin being used in the connector so I ran the wire through a pvc cable jacket that I had laying around and wrapped it secure with cable tape. Lastly, I fitted the rear arches. I have used the M6 hardware provided for now, but plan to swap it out for plastic bolts (or it is Nylon I can never remember).
-
I have three buttons (Haz, Demist, Horn) and have managed to get the following functionality: Button on/off - Pass Button Illumination w/ sidelights on - Pass Button Illumination when button on - Fail I am now exploring an Arduino set up to get the illumination I need. Do you have experience with that?
-
I am about to start wiring my new Caterham (eao) switches and need help understanding the connections points (13, 14, X1, X2 etc.) at the back. Anyone able to help?
-
With my intake tube and exhaust back from the welder, I can start to assemble the Megasquirt infrastructure. I opted for the MSPNP2 with the 1990 miata map, so just need to install a Intake Air Temperature sensor in the intake and a run a hose from the intake manifold to ECU to measure the Mass Air Pressure. New IAT with K&N filter (RU-5174) To hold it all together I fabricated and painted a small hanger to secure the intake with a hose clamp.
-
Thank you!
-
Quick question regarding the use of a plug connector for gauge wiring. I am wiring an AFR gauge and am wondering if there will be a noticeable signal degradation if I use a quick release plug connector for the power, ground, headlight, etc.. or should I just hardwire everything?
-
All the button switches are from Caterham. :-)
-
Gauge and Switch plate While the SDV has an interesting curved dashboard, I find that there is a lot of empty space in the centre that needs some design features to make it pop a bit. Early on in the build I was playing around with some designs and finally landed on this. Now was the time to see if I could make something. First of all I made a cardboard template to match the curves of the cluster bubble and the passenger side curves. I then traced the design on to a piece of acrylic that I bought from the local arts and crafts shop. I wanted the surface to be a carbon fibre effect, so I searched the web and found some cf effect vinyl wrap. Its not perfect, but looks good from sitting distance. I trial fitted my gauges and switches. Not too shabby, if I do say so myself.
-
Here are some more photos of what I've been up to this last month. Grounding points I think I went OTT with the wire harness grounding points but my worst fear on this project is electrical fire. Horn Lighting I also connected the battery and went through the wiring from front to back, connected/tested the various lighting circuits. Everything seems to work, just a broken indicator pod bulb and faulty Daytime Running Light (DRL) relay (it was working when I started, but suddenly died). New one ordered. I used the indicator pod light to test other circuits, including the brake lights, plate light and rear fog light. Sensor bungs I decided that I would go all in and install the Megasquirt with wideband AFR from the get-go. This meant that I needed to install a new wideband O2 sensor in the exhaust and delete the Mazda Air Flow Meter (AFM) and install a new GM Intake Air Temp (IAT) on the intake (As per Megasquirt instructions). The parts have been dropped off at the welder.
-
@panamericano Thank You. Hopefully they will pass inspection. If not I have kept the old ones.