DanM
-
Posts
348 -
Joined
-
Last visited
Content Type
Profiles
Forums
Store
Articles
Gallery
Events
Library
Everything posted by DanM
-
The last couple of days have been a real mixed back. I feel like I accomplished a lot in a short period of time, but amongst all that progress I had a few set backs, made a few mistakes and lost my patience a few times. After this I think I need a break from the build for a short while... Differential Install With my new differential bushings pressed in I moved on to installing the diff. First things first, trim off the metalastic buffer tabs. My buffers were in terrible condition when I pulled them off the car and after cleaning them up they had each separated in to three parts. I put the three part sandwich together and draw a line around the rubber parts to use as a stencil for cutting. Then I clamped the metal part to my work bench and used my dremel cut off wheel to remove the tabs. Finally I ran the part through the belt sander to smooth the edges. Next I put a load of cardboard strips around the chassis to protect it from bumps and scratches when I first put the diff in. Unfortunately, there was no-one around when I wanted to lift the diff in so I put on my big boy pants and went for it. I'd like to say that I lowered it in, in a controlled methodical fashion, but that wasn't to be. I think I basically threw it in there on to the cardboard and then figured it out from there... Not particularly elegant I'm afraid. After getting it in position I seemed to enter missing hardware hell. Every time I wanted to move forward with the install the advertised bolt was missing. First the repair washers for the diff mount, then the M12 120mm bolts for the diff hanger and went from there. Total waste of an afternoon making trip after trip to the store. Once I had what I needed I pulled out my pry bar and went to work lining everything up and securing the parts. With my buffer in three parts the bottom part had nothing to secure it in place. Any ideas if I actually need it? If so I'll somehow glue it together. Edit: Thanks @MV8 for pointing out that the bush is upside down. It should look like this.
-
Painting the Valve Cover So, I'm following Stu Falkner's Turbo thread which gave me an idea to paint my valve cover. With a bit of Iron paint left over from painting my block I decided I'd spend the morning giving it a few coats to see what it would look like. As always I started with a good prep. sanding and cleaning. Then, I blocked off the Mazda 16 Valve writing with some Vaseline so that it wasn't covered up with paint. Prior to laying down my first coat of primer, I wiped off the Vaseline residue from the main surface with some brake clean and shop towel. After 3 coats of primer and 3 coats of Dupli-Color engine enamel, it looked like this. Next thing was to see see if the Vaseline trick had worked. I scraped it out with a Q-Tip. It's not show quality, but looks good at 5 feet away! Good enough for me! 🤪
-
Differential mount bushings Another one of my other issues back in May was that the factory had installed my differential mounting bushings on the wrong side of the chassis. After a call out on the UK forum a member kindly sent me some spares that he had, and after they were reamed out to M12 by a friend of mine at his shop they were finally ready to be installed. I wasn't sure of the best way to go about pressing them in because of the limited access, so I made myself a simple compression jig out of some M12 bolts and a selection of washers. The biggest washer was sized so that it fit around the outside of the center hole and the others gradually reduced in size to M12. I also had 2 lengths of bolt which I swapped half way through to get the bush was seated where it needed to be. After soaking the inside of the chassis hole with dish soap I assembled the jig and went to work with a spanner and socket wrench. After about 15 mins I had both of them in place! Very happy with the result which finally opens me up to making more progress at the back!
-
Thanks for the update Graham! Appreciated.
-
Trimming the inner tie rods Knowing that I had some length to play with I started trimming the inner tie rod on the steering rack. Luckily enough, my painters tape was about 25mm wide so I taped up the ends as a guide, put my safety glasses on and used my dremel with a cutting blade to slice through it. Although the dremel worked, it did take some time to cut through the hardened material and I thought the thin blade was going to shatter. for the rest of the cutting I used my angle grinder. Finally, I got to a length that I was happy with for now. I have left a little to play with and my need to take off a bit more later so that the outer tie rod can adjust in and out.
-
With a bit more time to spare before I had to go out, I decided to check the headlight bracket position. positioning a straight edge between the brackets I used a standard ruler to check that they were equidistant from the the frame.
-
@fastg Thanks for the Tip Graham. Do you know what people are typically doing instead?
-
Front shocks After reading other build threads I knew that installing the front shocks was not covered in the manual. I assumed that the front install would be similar to the rear shocks so I found the boxes on my shelf and went for it. The box labelling had me doubting myself at first, "Front Bike Rear!?". What did that mean? Was it front? was it Rear? Was it for a bike? I did some searching and found out that they were Gaz shocks supplied to Westfield, and the part numbers matched. I made the assumption that since it had the word "Front" on it and the other box didn't, that's where they went. I applied a little anti-seize on the threads to help with adjustment down the road and installed the coils. After opening the brackets a little I installed them with the same 7/16 bolt and 4 washer sandwich as the rear. The only difference was that I decided to use a shorter 2.5" bolt. Finally I added my refurbed and painted rotors that I salvaged from the donor.
-
Wishbone Assembly...take 2 🎬! So if you cast you minds back to May...you know, the days before Westfield went into administration, you might remember that I had some issues with my upper wishbones. Well it turned out they had threaded them the opposite direction and so I couldn't install the tie rod ends. Well thanks to some members and a bit of detective work I managed to find a LH threaded equivalent of the standard part and could finally restart assembling the knuckles. Steering Rack In the Westfield Miata brochure, it says that you need to use the steering rack from the Donor, so last summer I spent a day disassembling it and making it a manual rack. As you can imagine I was pretty surprised when I saw a brand new one in the kit! To be honest fitting the new rack was not as straight forward as I thought and took a bit of fettling and taking some material from the red spacers with the belt sander so it would fit. Once in position on the chassis I then needed to clamp it down so I could get enough of the bolts through to install a washer and get the nut to bite. I followed the manuals instructions to tighten but not torque, but it took a couple of tries to get a nut to hold without it deciding to shoot off elsewhere in the garage! 💨 With the rack in place, next on the list are the mazda thread adaptors and tie rod ends. My donor tie rod ends were shot, so I bought some new ones from Rock Auto. The manual says to cut 25mm off the inner tie rods to fit the thread adaptor. However, after consulting the WSCC UK forum, I opted to assemble all the parts first to see how much I actually had to play with. Turns out I have plenty, so I will take it slow and carefully trim them down in two or three step.
-
I feel the same with the Sport Turbo seats from Westfield!
-
This is my final "catch up" installment. Coil Pack The coil pack and bracket were a greasy mess so took some extra elbow grease to clean it up and paint. Once it was all done it looked quite tidy installed on the back of the head. Intake Manifold The last thing that I did was to assemble the intake manifold assembly and install it on the engine. Thankfully most of the hoses were still supple and in good shape so I was able to reuse the ones that I needed. Assembled on the bench. New gasket Finished (For now). Once I receive the Air Valve seal I will install that on the manifold and that's all I want to do for now. Just FYI, the tiny Air Valve seal was no longer available from the Mazda part department, so I sourced mine from Rock Auto in the US. It cost me about USD$1.00 for the part and then about 20 times as much for shipping and tax! That's how out of proportion things can get for us here! I took a lot of photos throughout my engine dismantle and reassembly so if anyone needs to reference something down the line do feel free to private message me and I'll see what I can dig out! Now back to the build.....
-
Head studs I ordered some ARP studs to replace the dodgy cylinder head bolts. As soon as they arrived I screwed them into the block and reinstalled the head. This time I torqued down with confidence! A few more seals For those interested in the part numbers, here are some more seals and gaskets I replaced. Cam position sensor O-Ring Throttle body gasket Dip Stick O-Ring
-
Thanks, Lots of time spent scrubbing and painting! It came out better than I had ever hoped.
-
Injector cleaning Last summer a 1990 Miata ended up in a local salvage yard, which is not very common here. The high demand for used parts on these early cars means that a lot of good stuff is sold off without even being advertised. I was one of the first on site so took a bunch of stuff off it including spare injectors. With bunch of cruddy injectors in hand, I decided to have a bit of fun and try out one of these wacky injector cleaning tricks that I saw on Youtube. My Macgyver cleaning rig consisted of: Safety glasses 9V battery Multimeter cables and Croc clips Vise grips Short hose with jubilee clip Carburettor cleaner with straw In summary, you add power to the injector to open it up, then shoot carb cleaner through it. It's simple if you have 3 hands! lol Spray!! (Action shot courtesy of my 11 year old son.) Half way through. Once tested I cleaned up the outside of the injector. Installed.
-
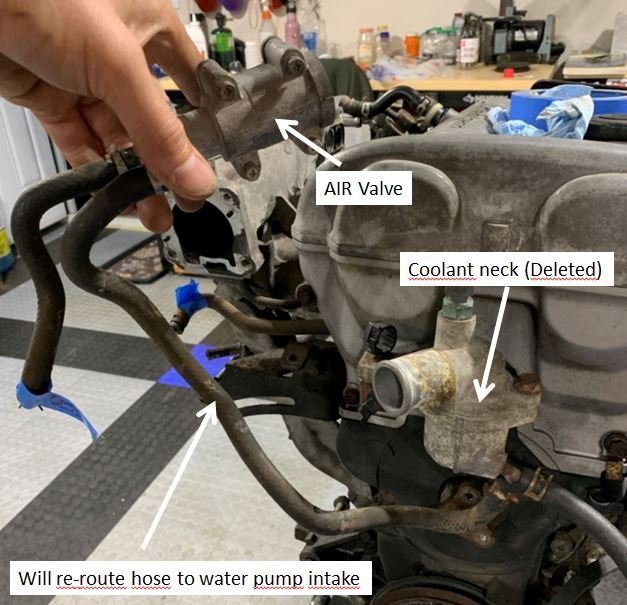
You can see the location of the water pump inlet clearer here, as well as the orange block off plate for the coolant neck.

-
@Austin DavidYes, The water pump inlet is on the LHS of the motor. The air valve unit is located on the 1990 Miata Air intake manifold (It has just been removed in the picture below but hoses are still attached). Because I have deleted the coolant neck, I need to reroute the coolant return hose and will use the water pump inlet as my destination point.
-
More bolt ons.... Before turning my attention to the intake manifold and injectors, I installed a couple of my aftermarket bolts-ons. The coolant reroute kit from supermiata comes with billet parts, high flow thermostat, bleed valve, heater fittings and blanks. You just re-use your OEM sensor. Installed on the cylinder head. For those with good observational skills, you will notice that the hose will run around the intake side of the engine. As this is a LHD car, I am trying to keep as much away from the exhaust side as possible. This area will get crowded very quickly with the steering shaft. The Water Pump Intake is from G19 engineering in the uk. Its a bit pricey (especially when you earn Canadian dollars), but I like it because it it takes up minimal space and can take a fitting...ideal for rerouting my Air Valve coolant. Installed.
-
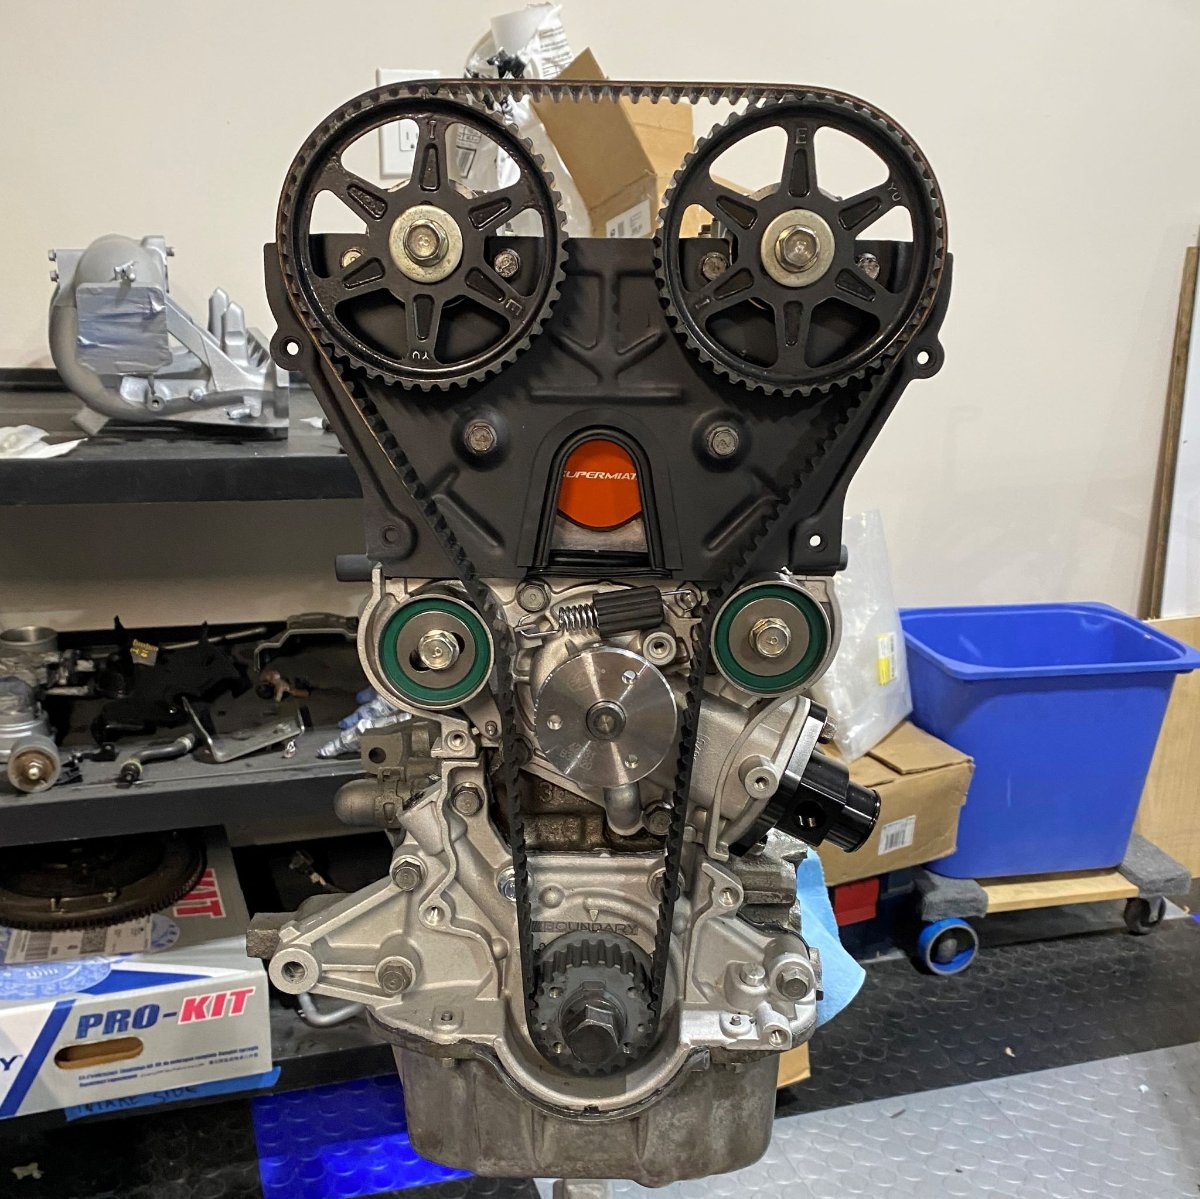
While I was waiting for my new head studs to arrive a pressed ahead with the crank pully. To prepare for this I took my time to do 3 three things: 1. Make a tool to stop the crank from rotating while I torqued the bolt. 2. Cleaned out the crank bolt thread with a tap 3. Checked , checked and checked again the crank bolt torque spec. The Tool You can buy a tools from places like Flyin' Miata or Miata Mecca in the states and they will set me back at least $45 Canadian plus tax and shipping. Instead I bought myself some 3/16 steel bar from the hardware store $13 plus tax and thought I'd try to make one myself. Making a template from a paint stirrer. Drilling out the basic shape Then hogging out the rest before smoothing it out in the belt sander. Once I was happy with the shape and fit, I gave it a quick coat of paint. Why? you might ask, well, the rattle can was on the bench within arms length so I thought, Why not?! lol All ready to go with a new pulley, woodruff key, crank bolt and balancer bolts. Cleaning the thread. Well call me paranoid, but I really wanted to give this engine a good rebirth and hopefully another lifetime of use out of it. With so many forum comments about the short nose crank I wanted to ensure that everything was spotless before installing the woodruff key and bolt. Short Nose Crank Bolt Torque So hear is where I needed to check, check and check again, because getting it wrong has caused the dreaded short nose crank issue. As with a lot of information you read these days, you have to really find a solid credible source to differentiate fact vs opinion. I decided to go with the Flyin' Miata recommendation. Red loctite and 80-87 ft/lb. Flyin' Miata - short nose crank bolt No turning back! Now that I was happy with my source, I installed the crank pulley, woodruff key (the right side up) and installed the bolt. Fingers crossed that's the last time I need to touch it for a long long time!
-
So, I just had a week off work with the family to go camping on the shores of lake Ontario. Unfortunately, the weather forecast for the week showed rain and very high temperatures so we had to cancel at the last minute. Staycation!!! With the weather not much better in Ottawa, we decided to spend time around the house and do some day trips instead. What did that mean for me.......Garage Time!!!! In fact 9 days of quality garage time that enabled me to finish my engine and still have fun with the family. As a result, I'm a bit behind on photos, so bare with me over the next couple of days while I bring you up to speed. One thing's for sure. I'm very happy with the aesthetic result...only time with tell on the mechanical quality!! 😅
-
Finishing the bottom end yesterday really gave me a boost, so I pushed on with the top end assemble this evening. I set myself the goal of installing the head, water pump, and camshaft cranks. Reaching into my shelf of parts I found the gates water pump that I bought from Treasure Coast Miata last year. It didn't come with new hardware so I dove into my box of refurbed bolts and pulled out the water pump bag. All the hard work I put in last summer stripping, de-rusting and painting parts is really starting to pay off and I feel like I'm using new(ish) parts. Assembly is becoming a real joy! Next is the head gasket and the head. The head gasket came as part of my full gasket and seal set, but the head bolts were original. Looking in the Miata service manual it says you can re-use them so I gave them an inspection, oiled them up and cracked on. Initially the install went well, the gasket looked good, the head positioned well and the bolts slid in like butter.... As normal, I began to torque the bolts down in 2 or 3 stages. As I started the 2nd round something didn't quite feel right. As I was approaching the mid torque setting the wrench slipped and the bolt head started to round......sh*t! Having already stretched or snapped bolts, and experienced the pain of having to get them out, I decided to back off completely. I really don't want to mess things up this late in the game after all the time and money I have put in. I decided to order a new set of bolts and will patiently wait to do it properly. Not to be deterred, I continued with the plan and opened up my coolant re-route kit from Supermiata to find the thermostat neck block off plate. The kit comes with everything you need including gasket sealant so I smeared a generous amount over the block off plate and installed it on the head. Followed by the timing belt sealing plate (de-rusted with a fresh coat of pain and new seal) ...and finally the camshaft cranks went on. I'm really happy with the progress today, even with the head bolt scare. Tomorrow I will install the idler and tensioner pulleys and maybe the water pump pulley and then take a pause to do a bit more research and spend some time with the family over the weekend. I'm getting close to installing the crank pulley bolt and woodruff key, the part I've been dreading. I want to triple check everything so I don't fall foul of the short nose crank issue!
-
I finally got around to finishing the bottom end of the engine today. This involved installing the new rear crank seal, the windage tray, oil pump pick up with new gasket and finally the oil pan. I had a bit of a discussion on tech talk about whether or not to install an aftermarket oil pan baffle and ultimately decided against it. Thanks to everyone who gave their thoughts and feedback. New rear crank seal. Windage tray and oil pump pick up Now for the oil pan. Can you guess which side I did first? 🤣 Sparkly clean... All buttoned up and torqued to spec.
-
@MV8 Yes, it does, but some are installing a larger one like this, especially if they shorten the sump. https://supermiata.com/oil-pan-baffle-miata.aspx I have no plans to shorten the sump at this time, so was curious if I would get any benefit.
-
I'm in the process of assembling my NA MX5 1.6 and wondering if I should install an oil pan baffle. The car is going to be primarily autocross and street. Will I benefit from having one, considering the usage? Now is the time to do it while the engine is apart. Thanks Dan
-
They were the originals from my donor. I am now trying to source a full set incase the others are now weak.
-
Thanks @MV8. I used Inch/Ibs with my small Husky torque wrench, but it just kept spinning. I think there may have been some wet gasket material on the thread and it just wouldn't bite.