.jpg.53511fa583dc4e7ee82da3496ab6ffdb.jpg)
hahuang65
-
Posts
221 -
Joined
-
Last visited
Content Type
Profiles
Forums
Store
Articles
Gallery
Events
Library
Everything posted by hahuang65
-
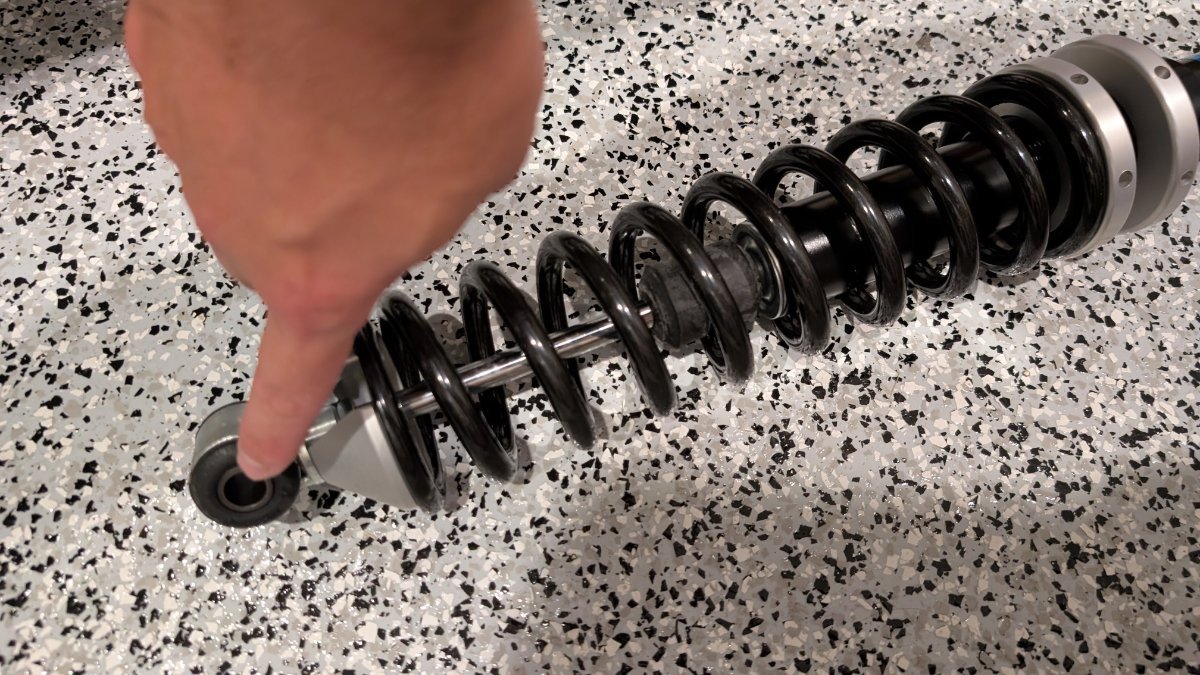
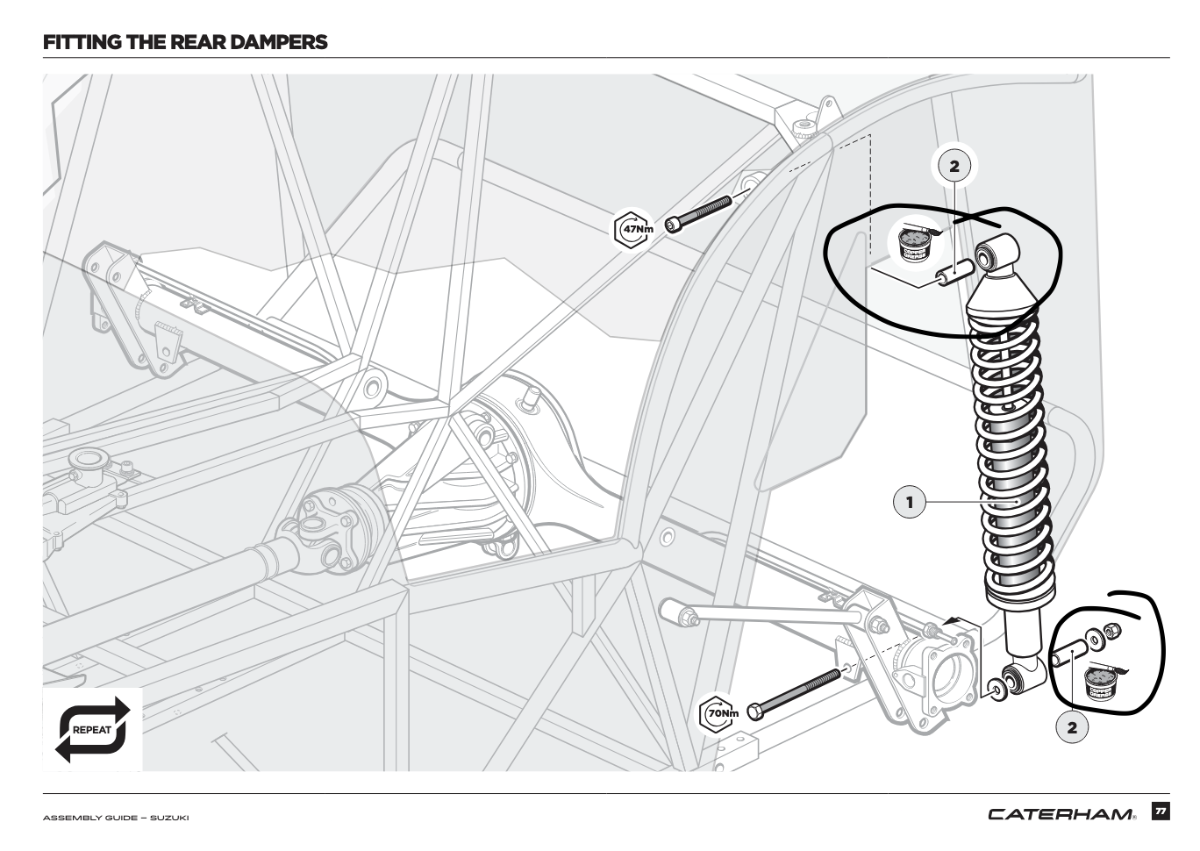
The manual refers to these as damper sleeves, but they're the metal sleeves that go into the hole of the damper so that the bolt is snug inside. See the attached pictures. I've got 1, out of a necessary 4, and I'm trying to source more.

-
Thanks guys!
-
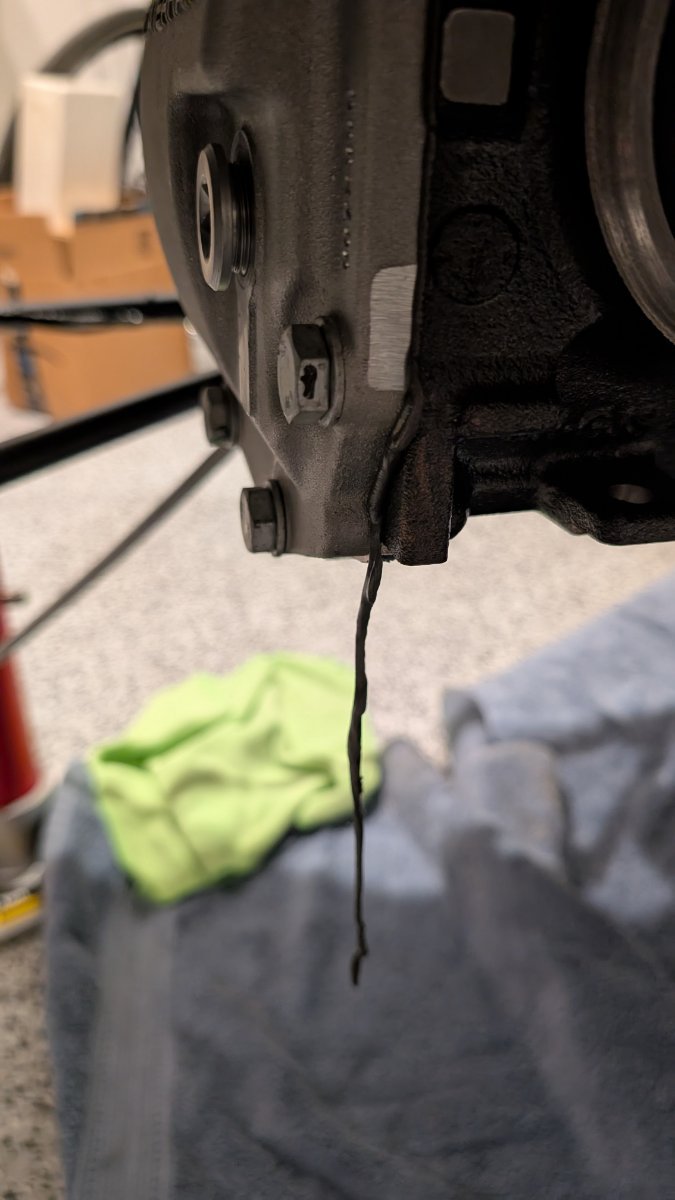
Quick question...the sealer on my differential has basically come off during installation. What should I use to re-apply a new seal?
-
Got it! I had a friend come over to help. We started out by loosening the bottom two bolts. Then removing the top bolt. It was stuck at the end of the last session, but with my friend wiggling the diff, I was able to punch it back out. We inspected the bolt and it looked fine. I re-greased it with copper grease and inserted it back in. This time, with his help wiggling the diff, I didn't need to use a power driver. I was able to bop the bolt all the way through to the other chassis mount with a mallet. We got to basically where I was stuck on last session quite quickly. We found a spot where we could lever the diff downwards. This was basically pushing the diff down, against the chassis mount. We used anything that worked, from a prybar, screwdriver, or a pair of pliers. We got it to a spot where it looked like the bolt should make it all the way through. We bopped it more with the mallet, but it wasn't budging. We must have just been mis-aligned by a tiny fraction of a millimeter. We kept trying, and we bopped the bushing out! However, this made it a bit easier. This let us push the bolt all the way through with no resistance. We simply fit the washers back onto the bolt, and then the bushing onto the bolt. We had to lever/pry the diff again to get the bushing aligned, and we eventually get it on by hitting it with a mallet. The rest is just malleting it fully in, then torquing all the bolts back to spec. Thanks for all the help and suggestions guys!
-
Full agree. I think it's common sense to work your way up from the simplest/easiest/least possibility of damage solutions up to BFH, cuz sometimes that's just how it is. Yeah tightening the bottom bolts is on me. Got overzealous after I got that lower right bolt in successfully. Gonna unwind this and try to get the top in. Unfortunately, I can't seem to back the top bolt out, so it's in for how far it already is in now.
-
correct, this is an initial install. Also, the tolerance issues ring true. I've seen many blogs all say the same thing... and I've personally experienced a very similar tolerance issue with the front wishbones to chassis mount.
-
Nothing is wrong with this. I actually attempted this initially, albeit with steel rods that were NOT to size. I tested that the bolts go through the holes in the chassis, particularly the long one, and that was fine. I should have tapped the threads and cleaned the bolts, as the bottom right one didn't go through initially, so I had to drop the diff and tap the thread and clean the bolt. However, once all of that was done, the bottom right hole STILL didn't go through without an abnormal amount of resistance, no matter if the diff was free to move with no bolts attached otherwise. I ended up with the assumption that the threads in the diff where just slightly angled, maybe a quarter of a degree or something. I just drove the bolt in with a ratchet by hand, powering through the resistance. A couple of turns, then it threaded with a normal amount of resistance. When the bolt popped out the other end, there were a couple of metal shavings that came off the bolt, but I was able to torque it to 81Nm. The left bottom bolt went in with no issue, just like the first time I put it through. I may be jumping to conclusions, but I think the top long bolt has the same issue as that bottom right bolt. It may just be a quarter of a degree misaligned or something. I also had to drive that one hard through, until I got to where I'm stuck at right now. Now, maybe the issue was that I used an undersized steel rod to align everything, but the correct size one (or a dowel) is surprisingly difficult to source. None of my alignment or pin punches fit well either. I'm a little less worried about the top bolt, the diff seems quite stout, as well as the mount holes in the chassis for that bolt... and since the bolt passes fully through and just nuts up with a nyloc at the end... I can re-thread that bolt if there's a small amount of damage on it. That said, I think I will loosen the bottom bolts and give it a shot first, before resorting to brute force. Better safe than sorry. Will report back here either way :D Thanks again to everyone for their tips/advice.
-
Thanks for the tips guys, I'm gonna try again on Thursday. Will likely take out the bottom bolts. Will post back with any results.
-
Thanks for the tip. I had used a driver as well. I guess I just need to find some leverage or bop it with a hammer. Don't want to damage anything...
-
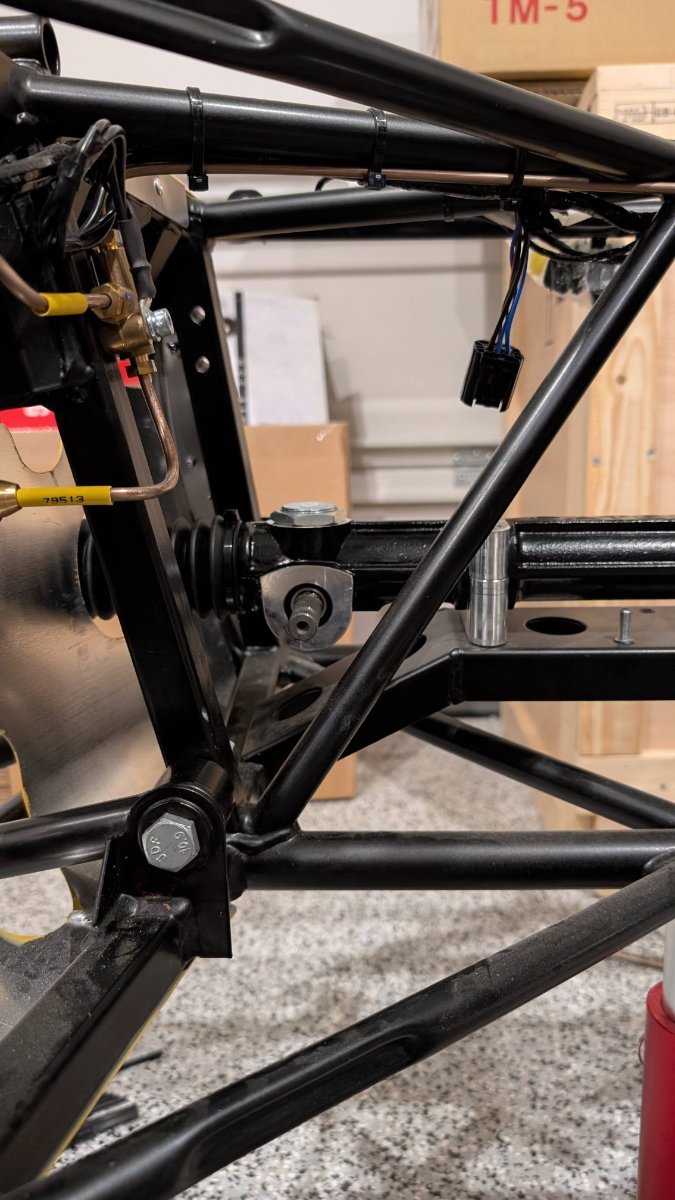
Hello all, Building my 420R and I got stuck on a bit here. Working on installing the diff. I've got the bottom two bolts in, and am installing the top bolt. I chamfered the tip of the bolt a little to get it to align more easily. I started from the passenger side and got it thru into the diff just a tiny bit bit couldn't get it to budge in. I knew it was in the diff because if I let go of the diff, it didn't drop. But from there it wouldn't go in. I started using a ratchet to get it further and I got it all the way thru to the driver side chassis mount. It's not aligned. See attachment. I can't seem to push it back out, or unscrew it out anymore. I tried both unscrewing and hitting it out with a punch and hammer. I don't see a great spot to lever the diff down just a bit to put the bolt through. What should I do?
-
@KnifeySpoony thanks!
-
Would love to see the list of parts! Thank you!
-
I've been considering the antigravity vs the AGM... how could i get one of these? I'd be happy to pay. Unfortunately I no longer live in San Jose, so I couldn't just meet you... UNLESS I can have a co-worker (in San Mateo) pick it up before the end of April, as I'm meeting him for work late April in SoCal.
-
Anyone have LED turn signals that replace the traditional bulbs? Also when do I need to do the relay for the headlights? I've just got the wires loose inside the chassis right now.
-
Ah yeah. I didn't know then. I installed it in the 2nd or 3rd video.
-
Yup I've got them installed. Wonder what made @fotsyrsay what he said...
-
What makes you say that? I believe I have them installed...
-
Where is the relay set up? Do I need to worry about this now, when I'm assembling and mounting the headlights, or will this just be a future task, and I just need to label the wires coming out of the headlight assembly for now? Where would I get such a relay?
-
They're another brand: https://www.amazon.com/gp/product/B07TFJCLR9 Thanks for the explain on sidelights vs parking lights. If I'm understanding you correctly, you've wired your DRLs to the parking light, but that needs to be switched on/off manually? I'm assuming that since they're parking lights, they're on an always-on fuse... so I'll have to remember to flip them on and off every time? Sounds like you've also got it wired so that they flip off when headlights are on? Is there any detriment to keeping them on while headlights are on? Trying to way the balance between extra wiring complexity and operation. Finally, since I no longer have a tail off the new LEDs that require ground... I should be able to just re-purpose the wire to ground in the headlights for the turn signal (provided it's even long enough). I know it's not best practices regarding wire coloring and stuff, but I'm unlikely to take the headlights apart anytime soon. Thanks again for the feedback!
-
New question... for those of you who retro-fitted new LED headlights. I've opened up the bowl and have the 3 prong, as well as two extra wires: black going to ground, and red for supposedly parking light (I pulled it off the bulb for the parking light). The new LED plugs directly into the 3 prong, but have an extra green and yellow wire. According to the manual, the yellow is for turn signal, and the green is to power the DRLs. I don't care as much about the turning, but would LOVE DRLs. The questions are 1) Can I wire the green wire to the red wire in the bowl, and tie that red wire to something else (instead of parking) to power the DRL? I read somewhere about a side light, but not sure what that means, and whether there's a better place. 2) Can I wire the yellow and just tie into the wire at the turn signal light, or would that be ill-advised?
-
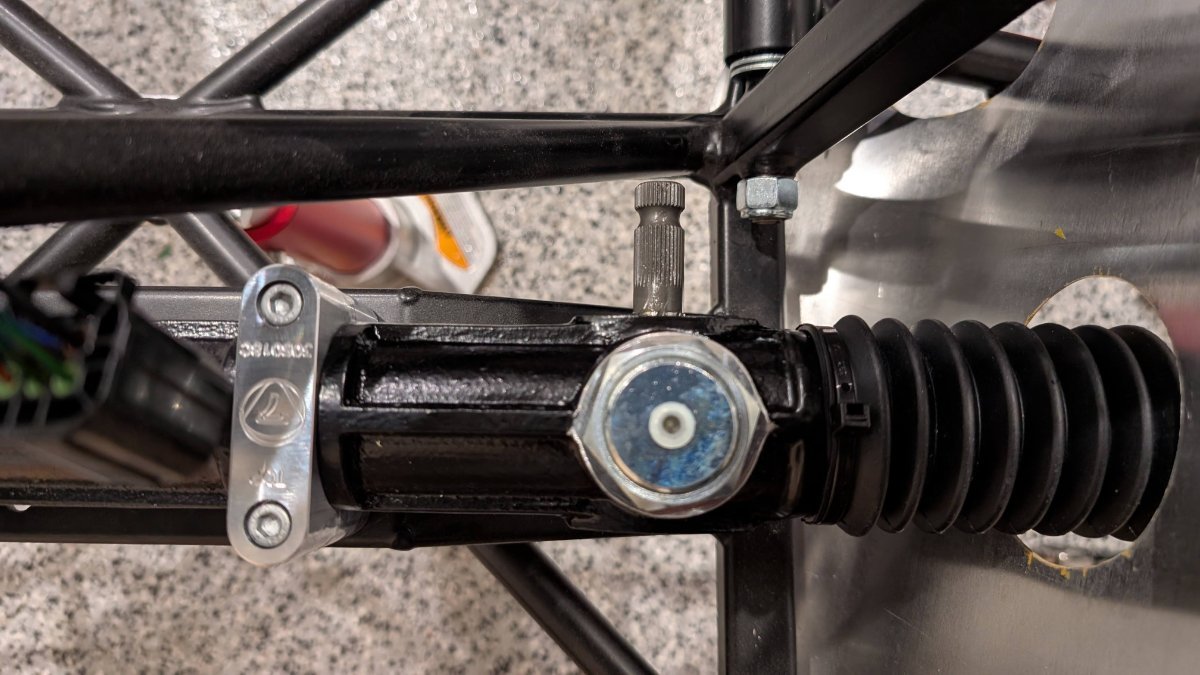
I've started a timelapse playlist over on Youtube. It's got 2 versions, original length (as recorded by GoPro) and a post-process shortened length one. Here they are. Feel free to follow as desired. I'm also going to post my build questions here. I am asking Rich Kamp for help, and he's been enormously helpful and gracious with his time and energy, but I feel guilty pestering him about everything and so I'm hoping the 7 hive mind will help me... as you guys always have. Thank you so much in advance! Here's the first question... I'm installing the steering rack. I'm assuming the pinion shaft should be on the driver side (in the manual, it's on the right hand side, but I'm guessing that's because UK is RHD). I've got mine on the left hand side, with the Caterham letter facing the back. Correct? Second, should that shaft be angled upwards at all? Right now it's parallel to the Earth, as is the Caterham lettering. Seems like it should be angled, as the manual pictures it that way. I've attached pictures.
-
Turns out, I do. I have to move some stuff, like the mower, and the trash cans, but I can have 13 feet when I need to.
-
Are you saying the Seven ain't a "real car"?! :P
-
.thumb.jpg.9ffdd2cf708d472aae35e80097bfc46d.jpg)
Taking Delivery Soon, Questions about unloading
hahuang65 replied to hahuang65's topic in General Sevens Discussion
I ended up hiring Craters and Freighters. They're going to deliver it with 2 trucks with liftgates. Paying more to do that than do it myself, but it'll be worth the peace of mind I think. -
I'm definitely planning on getting something. Just trying to figure out if I need it NOW. If I don't I'll put it off, and want to get the QuickJack at some point...but if I do need it to start the build, then I'll probably have to pick something else up for now.