EdWills
-
Posts
244 -
Joined
Content Type
Profiles
Forums
Store
Articles
Gallery
Events
Library
Everything posted by EdWills
-
Curtis Unlimited went out of business a few years ago due to the death of Mr. Curtis. Mrs Curtis loaned all the molds to a fellow in the U.S. who wanted to build his own 'locost' type cars. He may have the molds for the front and rear fenders for a Series 2 see: kineticvehicles.com
-
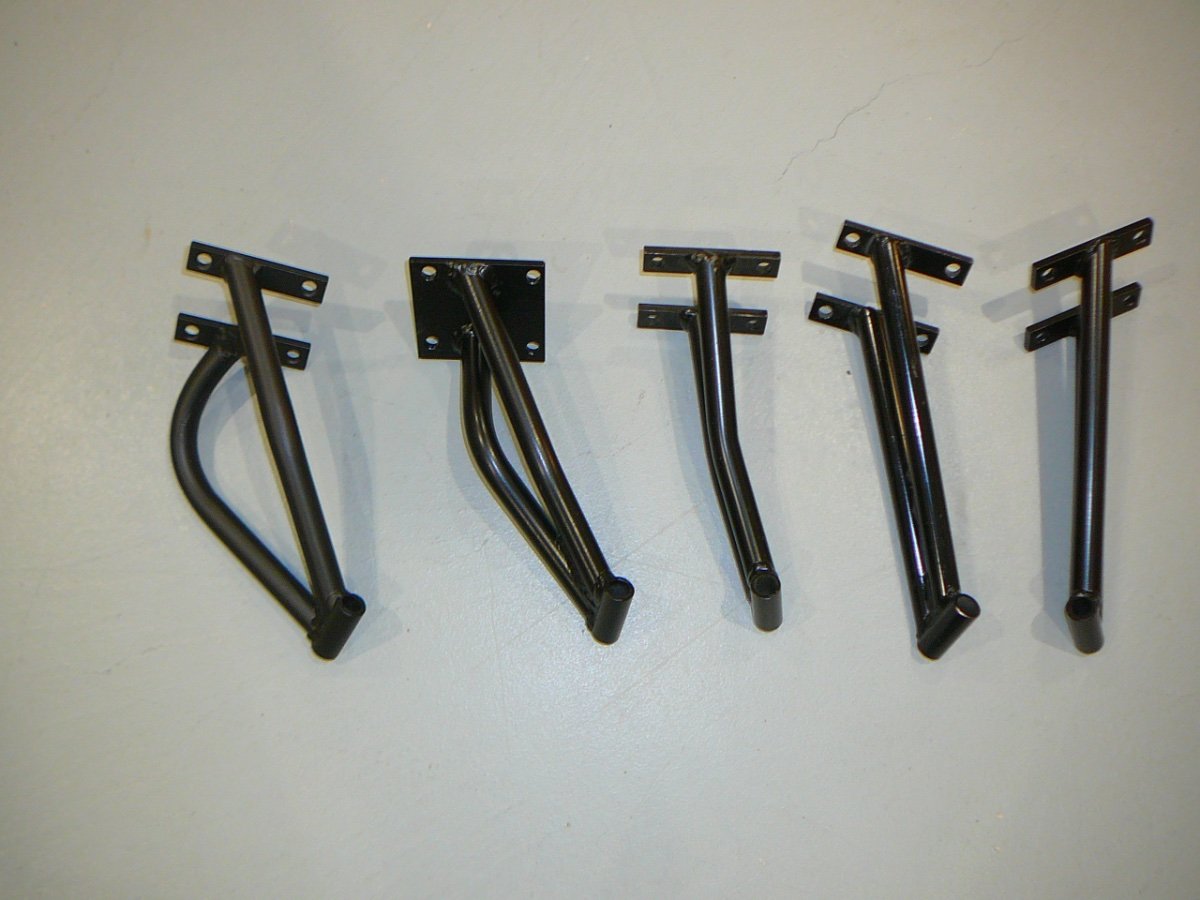
Hi wdb. Caterham contracted Arch Motors to produce a couple of alternative engine brackets for the Crossflow engine cars fitted with a dry sump pump. As Caterham sponsored a racing series for 7s using the various tuned Crossflow engines, no doubt the cars required different brackets depending on whether the oil filter was attached to the pump or remote or perhaps still wet sump? When Caterham - under the original Graham Nearn/David Wakefield ownership - were using the Ford Crossflow engine in various stages of tune, and with a variety of chassis upgrades, Arch was their constructor. Caterham has been under new ownership possibly two times since, and later went to a different chassis builder (Cages), changed the chassis accordingly, and sourced a variety of different engines - Ford and non-Ford based. If you require a modified bracket for your Lotus Seven or Caterham 7 car fitted with a Crossflow or any Kent based engine, I am guessing that a call or email to Arch would be fruitful, as they would have the jigs for all the Kent based configurations of brackets If you provide your chassis/build number (CBU# or vin#) they could make a bracket to your design. Arch are against producing parts for non Lotus Seven or Caterham 7 cars according to the owner Bruce Robinson, so a line to them will advise how they confirm this. Xtra Special Sevens owner Mick was also a great fabricator, but he has since closed his shop. Mike Brotherwood may be a possibility?. Arch will sell any brackets and chassis parts direct from their factory. You do not have to go through Redline if you choose not to (again according to Bruce Robinson). Photo of bracket options attached. The first in line is no longer shown on the Caterham Cars web site. Not sure wdb if your engine bracket is #1 or #2, as in one photo your right hand side bracket looks like #2, but in another it may have a curve as in #1? All brackets manufactured by Arch Motors. #3 is a bracket is designed for dry sump, but with less of a curve. The last #4 and #5 bracket are standard for the uprated Crossflow with standard Ford pump and wet sump (R.H. and L.H.). As the pre-uprated 2737E Crossflow engine was 1/4 inch narrower than the uprated 711 M block, it used a shorter bracket on the left hand side if memory serves. I may stand corrected on this, and apologies if it is misinformation, but Arch will confirm. I do know for sure that the pre uprated block was narrower. Original left hand side engine brackets from Lotus had a tab welded on to support the car horn. Many horns fell off due to vibration (as on my car) and were accidentally run over. Cheers WF

-
My friend added the extra parts suppliers from @anduril3019 and @SENC to the list of parts supply businesses that I had previously listed on anglocanadianlotus7.ca. A couple of them I had not heard of before, but their parts for sale for a Seven are very interesting and worth me taking a look. Thank you both for the lists, and I'll add more if you can think of other companies who have been helpful. Cheers W.
-
7 series 4 the fuel tank needs to be replace.
EdWills replied to Dan Pantages's topic in General Tech
Hi Dan. Diagrams at erareplicas.com. Choose 'Smiths fuel gauge troubleshooting'. see: smiths-intruments.co.uk. (Caerbont of Wales). This site lists all of the sender part numbers and the resistance of each. From memory, Smiths use a 3 wire set-up from the sender, but one site also mentions 2 wire units. Era replicas has wiring for the Smiths gauge and also Nisonger. Google 'Smiths fuel sending wiring', and a lot of diagrams come up. Good luck with sorting out the problem. Will -
Does my 1700 Super Sprint really need an oil cooler?
EdWills replied to pethier's topic in General Tech
Hi. I purchased a used dry sump oil tank from BAT in the U.S. a few years ago. It was from a Crossle Formula Ford, is tall enough and rectangular in shape, and looks like the type that Lotus used in their sports racing cars. Last I heard Crossle was still manufacturing cars in Northern Ireland (Belfast area), and may have spare tanks for sale. All the fittings are BSP, and the tank will mount nicely in front of the passenger firewall ally sheet with the Crossle brackets and mounting rubbers. W. -
Does my 1700 Super Sprint really need an oil cooler?
EdWills replied to pethier's topic in General Tech
Caterham through Arch, produced a special engine bracket that curved around the pump, and looked like half a pretzel. It is really heavy gauge tubing in order to take the weight of the engine due to the sharp curve. I have one, and I'm hoping that I don't have to use it. I didn't check the total cost of a dry sump system, but I figure 7Westfield is right on the money. W. -
Does my 1700 Super Sprint really need an oil cooler?
EdWills replied to pethier's topic in General Tech
A dry sump set-up is quite expensive - naturally requiring a correctly shaped sump with the necessary fittings, then the tank which has to fit in the engine bay of a Seven, all the fittings and plumbing whether BSP, AN or perhaps metric? The pump - 5 port seems to be the recommended option - is not cheap. If fitting an oil cooler, a thermostat is highly recommended to allow the oil to get up to temperature, but then prevent it from becoming too cooled, and then perhaps a remote oil filter adapter (I forgot to add that this was installed by Lotus on my original car). An extra fine mesh in-line filter is also highly recommended to prevent damage to the expensive oil pump. In the 1960/early 1970s flyers originally distributed by Lotus, a dry sump system was an extra 30 U.K. Pounds for a Seven. I haven't tallied the cost in today's money, but if you check the Burton Performance site for prices, I'm guessing that it's going to be an eye opener. Dave Bean developed a very clever device to allow oil pick-up in the Ford wet sump using a swinging arm type of pick-up. Dave came up with a couple of cleverly designed gadgets suitable for a Seven to save going on a more expensive route. An added benefit of a dry sump on a Seven is a bit more ground clearance, and no oil starvation to the bearings when hard cornering. WF -
Does my 1700 Super Sprint really need an oil cooler?
EdWills replied to pethier's topic in General Tech
Hi Pethier. I wondered about this same question, and I found some good responses on the Caterham and Lotus Seven Club forum (U.K.). Some prefer the cooler to be behind the water radiator, some say it's o.k. in front, others that you do not really require one as modern oils have much better quality and ability to withstand heat more than those available some years ago. Great advice again from MV8 above.. Peter Wallage in his Kent Crossflow book, as well as Tony Weale in his Lotus Seven book (why hasn't it been reprinted?) mention that an oil cooler is only really worthwhile for racing. It appears that if you do race your car, the engine fan - whether electric or attached to the water pump - could reasonably be removed from the car, and placed back later for road use. If you check some of the cars that are offered/were offered for sale on Simple Sevens, as well as some of the Sevens offered for sale on-line, some of them have no cooler in front, and may have the electric fan and brackets completely removed - presumably to be used only as full-on race cars. Iamscotticus noted that the Mocal (U.K.) catalogue writer advised that the oil cooler is best situated almost immediately in front of the water rad. to avoid air turbulence. On my original (now long gone!) Series 3 chassis, Lotus fitted a couple of small angle brackets on the front lower frame tube and installed a Mocal 7 row oil cooler. Lotus adapted the oil pump filter holder by machining it shorter, and placing an oil cooler take-off between the pump and the cut down filter holder. I am the 3rd owner, so do not know if the original owner intended to race the car, or actually raced it (in Saskatchewan). The second owner (Edmonton) did race and slalom the car, so probably made good use of the cooler. Just a note: the wet oil sump on my car was never baffled or modified to prevent oil surge. Years ago, the 'Accusump' was suggested as a preventative measure to help avoid bearing damage without going to dry sump when racing or for fast road work, and Mocal still sells this item (maybe Dave Bean also?). Best. Will F -
Hi All. If it helps, I can have the list of parts suppliers updated and placed on anglocanadianlotus7.ca. Senc and Anduril have posted a few of the companies that I have previously listed on the site, and more are always welcome when it comes to reliable parts suppliers. Unfortunately, I had to (hopefully temporarily) remove one excellent supplier as he had to close his business due to illness. All of the suppliers I listed have been very helpful to me. I noticed that Senc has not included Arch Motors, but this company is now willing to sell direct when before you had to go through Redline. I recently checked the Caterham Cars website for parts, and there are not many items that would suit an original Lotus Seven of either Series 1, 2, 3, or 4. The Caterham and Lotus Seven Club U.K. now caters almost entirely to those cars produced by Caterham with not much original Lotus Seven info on their site anymore (their older back issues however, contained a lot of valuable Lotus Seven information if you can find them (ebay?)). This club site is another excellent resource for information on the Caterham built cars, but for some questions, membership to the club is required in order to check the site. Like JohnCh, Croc, John Donohoe of Simple Sevens, John Watson of the Lotus Seven Register, The Se7ens Mailing list, and many other sites, I do not get any financial benefit from my site. I pay a very knowledgeable young lad in the U.K. (an ex neighbour from Canada) to do the heavy lifting for me, and he is very amenable to my additions and alterations as necessary. In my 70s, I can just about handle my Mac computer, but trying to reload Britbox last night on my t.v. (where previously it had worked fine), it led to a frustrating late night trying to sort it all out (and yes, my subscription is fully up-to-date). I am very grateful to John Donohoe of Simple Sevens - a site that I really enjoy checking every day - as he allowed me to be added to his site. John originally published all of the information that I sent to him, set up the photos and script, and placed it on his site. Various people involved with the 'original' Seven car had provided so much information that I was interested in, that it seemed only fair that I should be responsible for the work to add to the site. He was working, I was retired, so it was a no brainer for me to take care of my own info. I truly appreciate the technical information supplied on this site by forum members such as MV8 and others. I am not an engineer just a hobby mechanic (the newer 'technician' job title definitely does not apply. Analog rules!). I learn a lot about these fascinating little cars from the various sources noted above. I have attempted previously to just 'set the record straight' with some information that is placed on this forum (e.g. in the 'library'). If it's not wanted, I get it, but surely the quote above "Pointing things out that are wrong or bad just makes you another liability bullet point on the to do list instead of being an asset" misses the entire reason for a forum such as this. Shouldn't the aim be to provide as much accurate information as possible, hopefully with the information confirmed by a reliable source? Cheers all. WF
-
Hi TEM. Glad to hear that your bellhousing/gearbox unit was fitted to the engine successfully. I still remember a local tuning shop in my city working on a Lotus 23C. I had popped in to pick up some parts, and I was permitted to watch the gearbox and bellhousing being fitted on to the rear of the car. I think that the mechanic lacked some experience doing the work (the shop owner on the other hand was very fastidious, but not present unfortunately!). The car owner - who was assisting - was mortified when the mechanic produced a large hammer (Birmingham screwdriver) to slot the very expensive Hewland gearbox and bellhousing into the twin-cam engine.. The mechanic had misaligned the clutch plate after securing the clutch cover, and thought that the hammer would solve the problem. At the same time, the car owner and I raised our voices in harmony to stop the mechanic from damaging the end of the Hewland case. How the 'mechanic' got the job is unknown, but he didn't last long at the shop unfortunately for him. For anyone contemplating a clutch refit on a Series 2 or 3, Pegasus U.S. sells a clutch alignment tool to fit a 7/8" x 20 tooth clutch plate (common size for Seven clutches back then) for $9.99 U.S. Well worth it if you need to change the clutch. Cheers W.
-
Hi Jim. If Holden doesn't have the Lucas headlamp rim, you could try Stafford Vehicle Components in the U.K. see: s-v-c.co.uk They sell a number of Lucas parts, and have a long list of headlamp spare parts and complete assemblies for sale. Search for 'Stoneguards and rims' or just 'Lucas headlamps'. I have no connection to the firm, just a very satisfied customer after they provided many 'original' (identical) electrical parts for my Seven.. Cheers W.
-
Hi Tem. On my Lotus factory built 1969 Lotus Seven Series 3 (originally painted in the really great looking metallic blue as on your car), the 2737E pre-uprated head, block, bell-housing and rear axle were all semi gloss or flat black. The 116E gearbox case and tail shaft were what may be described as 'Brunswick Green'. In a Lotus Seven Portfolio booklet that I have, a gent in the U.K. rebuilt a 1965 Series 2 Seven, and in his research he found that the engine block and head were originally 'Lotus Grey', the bell-housing was black, and the gearbox and tail shaft were Brunswick Green. Cheers, W.
-
Also in the USA7s library file, the author has listed the car serial numbers (V.I.N.s) for the Lotus Seven Series 3 1300/1600 as having 'SC' on the chassis plate for vehicles 2311 to 2649. This is incorrect, as all of these cars had either 'SB' or 'LSB' (if left hand drive) followed by the number. These are of course different (unrelated) to the chassis frame manufacturer build number (BLXXXX - manufactured by Universal Radiator, Arch - AMXXXX) found on the front angled frame piece under the master cylinders. I have only seen this car identification error in Jeremy Coulter's book on the Lotus Seven and Caterham 7. The 13 or so twin cam SS Sevens were the only cars to have the 'SC' vin designation. Information from John Watson of the Lotus Seven Register, advises that one of the cars designated as a twin cam with an SC vin - a left hand drive car - had a Ford Crossflow as original fitting to overcome build problems at the time. He further advised that one other SC vin car (R.H.D.) had the twin cam later removed and replaced with a Crossflow. W.
-
I found some information on this car in the library section under "Lotus 7 model specification 1.0.0". I had been searching for details regarding the car among my books on Lotus and Caterham, and today found some details in Chris Rees's book 'Caterham Sevens' whereby he provides some info. on the engine. In the USA7s library it notes that it is called the R120 engine, but this is incorrect. I have detailed what I found out about the engine in another post titled 'UNC and UNF Bolt specs for a Ford Crossflow engine', but it probably should have been in a new post. I believe that the information on the list in the library came from the Colin Chapman Museum web site. It is listed under 'Engine Series - Lotus Holbay', but it seems that the museum researcher/author has mixed up 2 entirely different Caterham car productions that are described in Rees's book. Unfortunately, there are few errors that have crept into the museum site regarding the Lotus Seven. It is a good resource, with other options available for verification purposes. Will.
-
UNC and UNF Bolt specs. for a Ford Crossflow engine
EdWills replied to EdWills's topic in General Tech
Should read "one-off" for the Lotus Seven 'S', my error W. -
UNC and UNF Bolt specs. for a Ford Crossflow engine
EdWills replied to EdWills's topic in General Tech
Hi SENC. That would be excellent, thank you. The Autobooks manual for the 1500 Pre Crossflow, 1600 Crossflow and the Lotus Cortina engine does show all the necessary bolts (with lengths) for the Lotus Twin Cam front timing cover, but nothing for the rest of the engines in the book. Cheers Will. -
UNC and UNF Bolt specs. for a Ford Crossflow engine
EdWills replied to EdWills's topic in General Tech
Hello John. I went to the library section, but it notes that I need to send a PM to post anything to both @Croc and you @JohnCh. If you prefer, I can send the list to you for perusal? I had also looked at the library section a while ago regarding the very detailed list of Lotus and Caterham Sevens produced (Lotus 7 Stats 2?). I noticed the listing for the 1982 to 1984 Caterham 7 Holbay 1700, but could not find any technical reference to these Holbay engined cars in any of the Lotus or Caterham books that I have. I had an unrelated inquiry for Paul Dunnell (Paul's father Roger Dunnell and John Read - Paul's uncle - owned Holbay until 1992), and asked him about the 1700 Holbay listed in the USA7s library stats. The stats show it described as an 'R120'. Note: The R120 was the camshaft fitted to the on-off 1600 cc Lotus Seven S, plus a few other Series 3 and 4 cars. Paul advised on the following: "You're nearly right about the Caterham builds, and yes, it was me that built them! They were 1700cc, (ok, 1698cc) and had the K3A fitted, not the R120. The impression I got was that they wanted to offer an up-rated X flow, as per the engines we supplied to Lotus, and that we were to supply them. I think, as you say, this was just a ploy to get them off the hook until they could sort out their own builds, as the 'production' came to, from memory, 3 engines!" "I remember an issue as to the clutch spec we supplied, which was not what they wanted. Certainly sold more engines into Caterhams as Dunnell Engines than as Holbay!" For anyone who has an original Holbay 1700 Caterham the following may be of interest. It is from a 1990s Holbay parts list and brochure: Type K3A A high torque race camshaft. Widely used for 1.6/1.8 litre rally engines and in almost universal use by Formula 1300 and Formula 4 engine builders. K3A specifications relating to use in a 1600 cc Crossflow: Power operating range (RPM) 3200/8000; Torque Peak (RPM) 5900 BHP Peak (RPM) 7400 (this relates to a 1.6 litre engine) Achievable BHP per litre = 90.6 (Holbay calculation is 90.6 x 1.6 for a 1600 engine = 144.96 BHP or 90.6 x 1.7 for a 1698/1700 engine = 154.02 BHP). Timing Degrees 58/88 inlet, 74/50 exhaust. Valve lift (inches) Inlet and Exhaust 0.411 Period @ crankshaft degrees (inlet/exhaust) 326/304 Cheers, W. -
Not sure if there is any interest in this as there are a few different engine options for the Seven, but I have compiled a list of the size, thread type and especially the length of the various bolts used on the Crossflow (and possibly other Kent) engines. A number of years ago, I purchased a spare 711M engine at an auction of bankrupt oil company stock. The engine - with a 711M block and 1100 cylinder head (with small valves), was used as a pump engine (shades of Coventry-Climax?). Everything was sound (block, crank, and rods later magnafluxed and all o.k.). It came with packets of nuts and bolts, and did not include some parts that were non-essential for a pump engine. Also at that time, a local Ford dealership was disposing of 1600 engine stock which provided extra bolts, gasket sets, and numerous engine parts to last a lifetime which I gratefully purchased. None of the workshop manuals that I own have provided the correct lengths for the UNC and UNF bolts fitted to these engines, so it's a matter of trial and error. Neither Haynes, Autobooks, Wallage's book, or the Ford Cortina Factory Workshop Manual for 1970 provide any indication of the appropriate bolt length for any part. Bolt thread type, bolt diameter and torque requirements are provided in many cases, but not correct length. A publication produced by Shankle Engineering originally of Van Nuys, California, provided quite a few answers. John Shankle was mainly involved in Alfa Romeo parts and tuning, but he branched out to include Formula Ford preparation at least into the late 1970s (his booklet is dated 1978). He went to the trouble of identifying many of the bolts used in the 2737E and 711M blocks and heads. As a F.F. car does not use accessories such as a dynamo or alternator, and excludes maybe a few other road car parts, not every bolt length has been identified. Fo a couple of unknowns, I still have to unwrap my spare block, try different bolt lengths and allow them to 'bottom', then use an electronic micrometer to determine a safe length for correct part installation. If anyone requires a mostly complete list, please let me know, or perhaps it can go in the library? Cheers, Will
-
Hi Scott. Just an aside. According to Carroll Smith in his book "Prepare to Win", if you have been using a jet fluxer on an oxy/acetylene set-up (where the liquid flux stored in a pressure bottle is picked up in the acetylene gas and carried in the acetylene hose line to the torch), if you then wish to weld aluminum, it may be easier to change the acetylene hose to a different one as it takes some time/use to clear the hose line of flux. The flux from the jet fluxer is not compatible with aluminum welding. Mr. Smith advises that the torch and fittings will clear themselves of the jet flux fairly quickly. Will
-
Hi Lotus Repair. The part number, as you have found, is listed for the Series IV rear suspension small 'A' arm (page II, part no.12). It is described as a 'half bush'. Unfortunately, Redline, many years ago, while under the original ownership, dropped using all of the Lotus part numbers in favour of a photo, an old identical part, or a good description of the part. Caterham on their parts page (just enter 'bushes' in the search box), show some smaller bushes that may do, or contact Arch Motors, as they sometimes sell replacement parts with bushes installed, so probably have some bushes in their spares boxes. Good luck. Will
-
Hi Scott. I apologize if I am reading this incorrectly, but it appears that you may be referring to the alloy (aluminum) bodywork, and sorry if I am getting this wrong, but you cannot nickel bronze this material. It has to be welded with similar aluminum rod. Arch do it (according to the various pics in Lotus Seven books) by joining the alloy at the top by the damper/shock tower, and Tig welding the material together on the outside of the frame, then carefully grinding it down to make it smooth. My knowledge of frame construction engineered by Caterham is iffy. The new owners of Caterham some years ago, stopped using Arch to construct the chassis and instead turned it over to a company called 'Cages'. Cages turned to Mig welding to construct the chassis (there is/was a Youtube video by Caterham showing the construction stages of their newer version of the 7). I do not know of course if your chassis was made this way, or before by Arch? I took a couple of revision welding courses before I even attempted to touch my chassis to attach some brackets that Arch had for some unknown reason omitted. The instructor allowed me to just practice nickel bronze braze welding instead of arc welding - which I wasn't really interested in. I do have a gas fluxer, but these are now very expensive, and the flux is likewise. I would not call myself a competent braze welder, but my nickel bronze brazed joints don't look too messy. Practice a lot on scrap tubes, but make sure that they are very clean, and get all the oil or grease off using MEK. You can use already fluxed rods (try Allstate), but my instructor told me that you can scrape off some of the flux, as they plaster it on, and not all of it is required thus making clean up easier. I can send you the article, but maybe a competent local welder who is familiar with braze/bronze welding could do the job for you. I would certainly take my chassis to a local shop where a gent around my age - with tons of experience in braze welding - could do the job for me, but I already had the equipment from long ago, and I save money doing it myself without having to lug the chassis back and forth every time (I don't own a truck). Let me know if you meant something different re the chassis and body joining methods. Will
-
Hi Scott. I was under the impression that your Caterham body was still in one piece, but I see from your pics that you have at least one non-welded join in the bodywork. I also should have clarified that the 'original' Series 2 and 3 chassis did not have extra triangulation that Caterham/Arch later added in the rear of the car to add some strength. They also riveted some extra paneling to the bracing (just behind the seat back) that would require rivet removal and 'uncurling' .. I do not know how much extra triangulation, and therefore riveted body panel(s) your chassis has. I see that you were just asking for the benefit of future readers, but of course there have been many chassis variations over the years, and perhaps removing a body in one piece may not be practical? I also removed a set of body panels from a Caterham/Arch chassis, and it was much easier to cut the panels either side at the weld just below the bracket that holds the hood sticks (by the shock tower). A tad easier to hide this join if you do not intend to have it welded back as it was in the first place. Will
-
Hi Scott. I was able to accomplish this on my original Lotus Seven Series 3 many years ago when the car suffered damage after I was forced to drive over a very raised up manhole cover (I was boxed in, and unfortunately too late to see it!). The bottom floor skin, among other items on the car, was badly damaged (torn), but the chassis was not bent. I stripped the car completely, turned the bare chassis upside down, and drilled out all of the rivets on the bottom of the chassis. I then turned it right way up, and removed the rest of the rivets from the panels. I was able to carefully pry up the side panels starting at the bottom, along with the rear panel by gently uncurling it starting at the bottom. With help, I was then able to peal the complete body - consisting of both sides and rear still attached - by lifting it upwards from the tubular chassis. I braced the entire body work using 1" x 2" pieces of wood (using screws in the rivet holes) to completely brace the structure so that it would not buckle or crease whenever I moved it. I was able to drill 1/2 inch dia. holes at the very front of the top and bottom 1 inch square side tubes to release most of the drilled out rivets from the chassis. I lifted the chassis up high at the rear and shook it from side to side a bit to release most of the rivets trapped inside the tubes. Arch and Universal Radiator did not tend to block off any of the main tubes when constructing their chassis. A vacuum cleaner also helped suck out any loose debris and the rest of the rivets. The holes drilled at the front to release the drilled out rivets can be (braze or fusion) welded closed when rebuilding. To replace the bodywork when all of the repairs have been completed, Cleco skin pins are ideal for 5/32" holes. If you drill a rivet out and the hole becomes too large, you may have to go to a 3/16" rivet for replacement. When drilling out 5/32 inch dia. rivets, use a slightly smaller drill bit than 5/32 if possible, by using a numbered drill bit. This may help prevent the rivet hole from becoming larger than 5/32 inches. It seems that Monel replacement rivets in 3 lengths may be harder to obtain these days. Try Hanson Rivet in the U.S. or Rivetwise in the U.K. Hope this helps if you are still considering removing the ally body completely. Good luck. Will
-
Replacing the bushings on a Lotus Seven Series 3 front suspension.
EdWills replied to EdWills's topic in General Tech
Hi. Unfortunately, a typing error occurred regarding the measurement of the complete bushing kit assembly installed on the trunnion. It should have read 1.578 inches.My apologies. Will. -
I decided to replace the nylon bushes, dished washers and spacing tubes in the trunnions on my Lotus Seven Series 3 lower front suspension. I had a spare service kit from Rimmer Bros, and followed the diagram included in with the kit. I assembled the unit as shown in the diagram, but it would not fit in between the lugs of my lower 'A' arm/wishbone. The measurement was reading as 1.78 inches total width with the trunnion and assembled kit on my digital caliper. The inside measurement between the outermost lugs on the wishbone should be 1.5 inches according to a diagram kindly posted on the web, and also as per my wishbone (Arch/Caterham manufactured, and fusion welded, not braze welded, as my Lotus originals were. Note: Braze welded suspension components are illegal in my Province in Canada, and possibly others. My Lotus braze welded originals had been 'butchered' by the second owner to attach lugs for towing the car in case of breakdown at the race track). I checked my Standard Triumph Spitfire Mk.1 and Mk.2 parts book, and way back when these were manufactured alongside the Triumph Herald that Lotus used parts from for the front suspension on the Series 2 and 3 (and very early Caterham 7s), the outside cupped spacer/washer was never used. Tony Weale in his book 'Lotus Seven' also shows that the outermost cupped washer was not used. On very early Triumph Herald cars, the cupped washers (inside and outside) were not an included part as shown in a very early Triumph Herald manual that I also have. It would seem that the outer cupped washer was for addition to later Spitfires, Vitesses etc., to perhaps better protect the square section rubber ring placed onto the nylon bush. The Series 4 had 2-part wishbones (on both upper and lower) so fitting the entire kit is not a problem. The only way to fit the 'newest' kit with the 4 cupped washers, the nylon bushes, and the spacing tubes, would be to open up the space between the lugs on your lower wishbone. These are heavy gauge steel, and some bending force would be required. If you do it wrong, the bolt may not fit correctly. It's not very much to open up the gap, but you takes your chance as they say, and it isn't original..... So, if you need to replace the trunnion bushing set-up, just leave off the outer cupped washer, and it should fit nicely. Cheers Will. Lot7Susp.pdf