NSXguy
-
Posts
216 -
Joined
Content Type
Profiles
Forums
Store
Articles
Gallery
Events
Library
Everything posted by NSXguy
-

'89 Caterham electrical gremlins - indicators and flasher problems
NSXguy replied to truckin-on's topic in General Tech
I just went through the entire harness on my 84 Cat- undoing 40yrs of wiring hacks and mods in the process. Got a pretty good understanding of it now. Feel free to PM me and we can connect offline via phone to troubleshoot live. -
How late can one register for this? just completed reassembly of my Cat and should finish dialing carbs this week. Some shakedown thereafter on the whole setup and i "MAY" be able to make it... if it's too tight of a schedule, i'll just shoot for next year but i'm feeling optimistic!
-
Caterham doesn't make any of its parts
NSXguy replied to Vovchandr's topic in General Sevens Discussion
Thanks! looking into this and other stateside options. -
This is the brake master on my 84 cat. Got a rebuilt kit from the UK and just now realized it’s still leaking a little. Very much interested in replacement at this point…

-
I have an AEM wideband i'll be using and likely permanently installing in my dash. Helps with dialing/verifying carbs tuning and also keeping an eye on things.
-
What have you done with parts taken out of service?
NSXguy replied to SENC's topic in General Sevens Discussion
i hoard my old stuff in boxes, then ever few years i'll purge. Partly because often, i will change for preventative maintenance (while you're in there) not really because they failed, so they could be of use to me or someone else in the future who might be in a bind. If a part is failed, i'll typically bin it. -
I just got a set from Chris from Lotus&Elans. Hey may have some in stock.
-
this is the one i use. simple to install and setup and has logging function. fits in place one one of the standard dash gauges if you wanted to leave mounted. Wideband o2 https://www.amazon.com/dp/B0184TSI84?ref_=pe_386300_442746000_DDT_E_DDE_dt_1 o2 bung kit with plugs https://www.amazon.com/Mounting-Stainless-Notched-Exhaust-Gaskets/dp/B098Q6VQTF/ref=sr_1_6?crid=19N53WXPFMJEL&keywords=wideband+bung+stainless+aem&qid=1651269225&s=automotive&sprefix=wideband+bung+stainless+aem%2Cautomotive%2C169&sr=1-6
-
@DSKIt's really great to have you chime in here. I will be contacting you in case you have any additional info on mine. All the documentation i received on my car (from around Aug 1981) from the archivist was undersigned by Clayton Seitz, as DSK president. Des.
-
I found out from Martin Phipps at Caterham that my chassis was originally spec'ed and ordered by DSK Cars, Inc. He was able to share correspondence and invoices but i couldn't find much about them on the net. This is good info.
-
Good call John. I noticed the same and wondered if others were aware that the information posted was public. Des.
-
I can confirm that at least for the T-9s on the merkurs (i suspect similar to the V-6)- the forward boss is for the neutral safety switch and rear is reverse light. I got my T-9 from a buddy of mine who has been a longtime ford/merkur enthusiast and the box came with those bits still attached. Also- the reverse switch also fits on my Type-2 which for some reason didn't have one ( there was a yellow plug in the bung)
-
I have a North American Auto Equipment 2 post lift in my garage for some years. Pretty happy with it and the flexibility it provides but I have never used it on my seven, because... other projects. They have a website and fairly well priced but they are more of a Northeast US outfit, so i can't say it would make sense shipping to you but worth looking into. -Des.
-
4 INTO 1 HEADER AND COLLECTOR FOR A CROSSFLOW
NSXguy replied to fotsyr's topic in Parts For Sale / Wanted
Title says it's for a crossflow so likely exiting on the left side (Driver's side on LHD car / Passenger side on RHD car). -
Well Mike, since i don't see the cossie on the list, you can sell that to me! lol
-
 Thanks Jim- . This piece is pretty straight forward and i like that it's a removable bolted connection. Could you post closer shots of the mounting points? I can see your points are different than on the green car.
 -
The top two bolts don't fit, but the side ones do. I have some options, but also considering a different bellhousing depending on how much i want to simplify my life.
-
My car already has a hydraulic setup with a girlin MC, so i spoke to Anthony (from Burton) yesterday and plan to get the concentric hydraulic setup for the T-9 as well as other bits. I have been looking to find a 7.5" 23 Spline clutch disc to use with my current AP pressure plate but so far been unsuccessful. So will likely get that from Burton as well. As far as consumables for the refresh, planning to get all that from Chris at Redline. Have ordered lots of bits from him and he always sorts me out. Will also get the upgraded aluminum rad/fan kit from him, unless there is a source stateside. Des.
-
Thanks for sharing that. Much better angle to appreciate the installation. Seems like something fairly straightforward to fabricate as well.
-
I've had a few weird exchanges on this at a gas station: Them: Hey, that's a cool car. What is it? Me: Thanks, It's a Caterham; UK car. Them: "Oh Nice, a 'Catermaran' ? I've never seen one before. Me: , Ok. As far as price, i usually provide a broad range and typically that's the end of it.
-
Is this user on the forum? I'd like to inquire and see more on the diagonal brace from rollbar to passenger chassis area.
-
 Is it me, or are most of the cars at the event running wide track fronts?
 -
I would agree with that, Jon. The assembly manual made it seem that the chassis was delivered with the option to install either lap belts or harnesses.
-
Nice Scott! Looking forward to the updates!
-
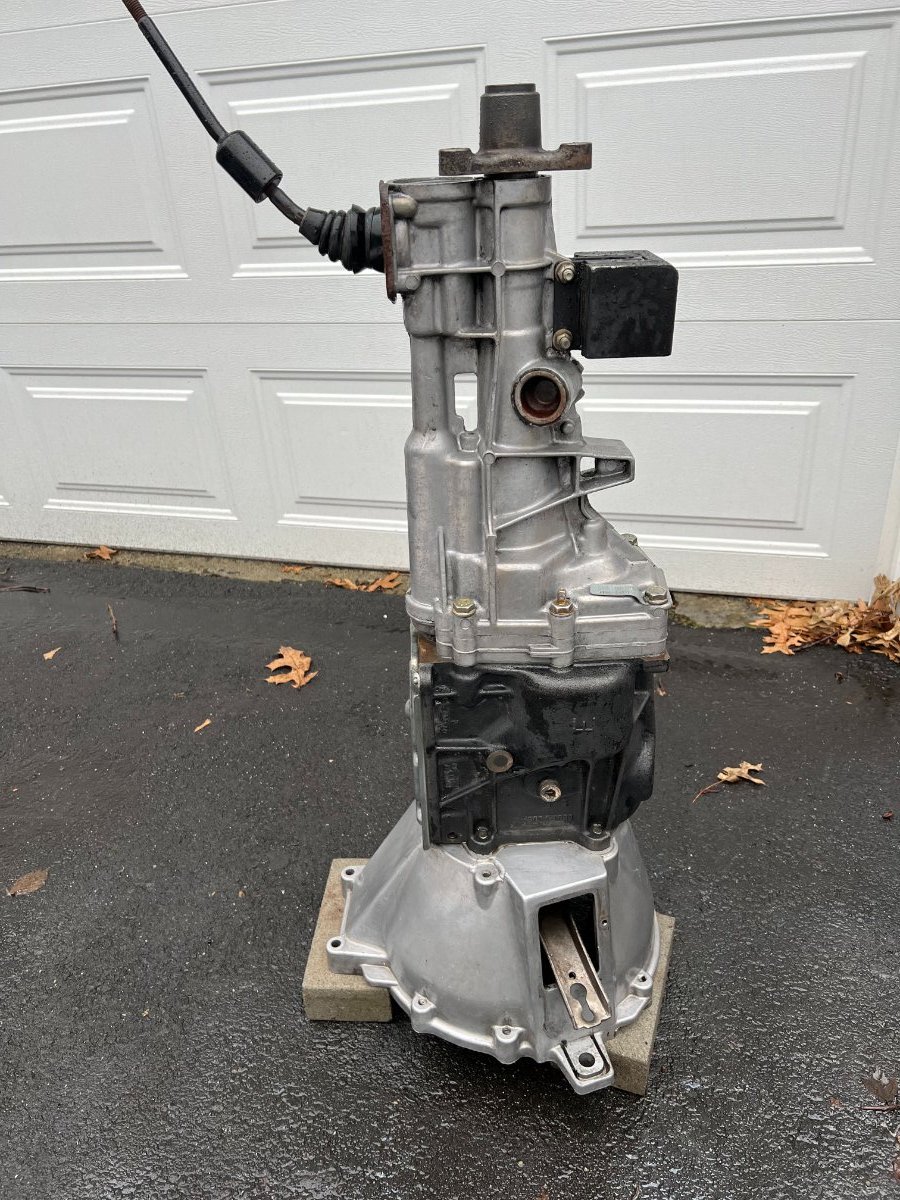
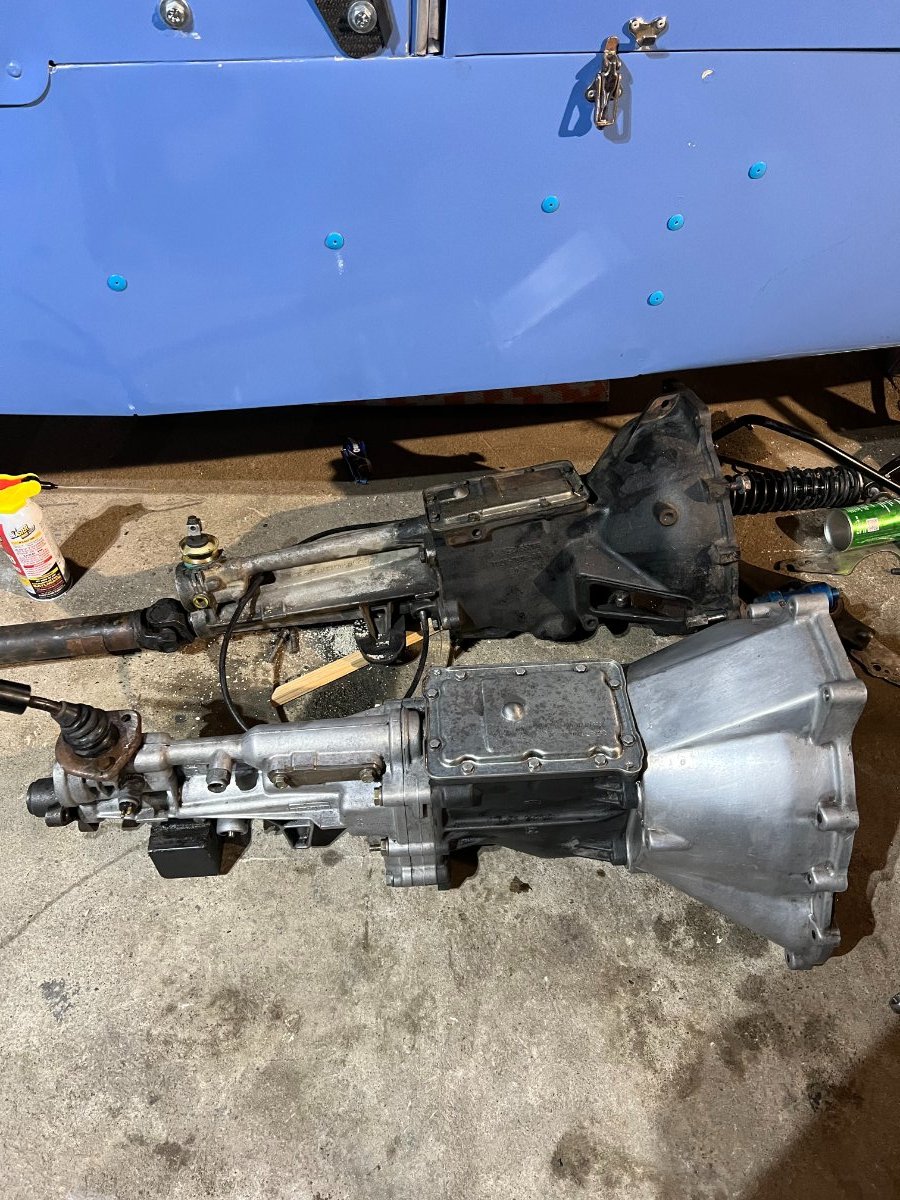
@toldfield your photo is not coming through. Project Update : So today, I temporarily switched gears (PUN very much intended ) from the wiring work i had been doing ! Took a short ride up north to meet up with my buddy...another self confessed parts hoarder like me to inspect the three (3) Merkur Xr4ti Type-9 gearboxes he had. After shooting the breeze for a bit, we got down to business, opened the top lid on each, inspecting the gear teeth, smoothness/actuation, excessive play in the shafts and other gremlins. I found one that was in pretty good shape overall. With some fresh seals and oil, i'm sure she'll provide many happy miles. Really grateful and lucky he let have one of them to help with the conversion. Once i got the box home and the weather was a little decent for winter, i figured i'd give the box a bath (nobody wants to be a grease monkey if it can be avoided): Pre Bath: Post Bath: . Type-9 box back in the bay next to the Type-2 for comparison: While i had both boxes side by side, i figured it is a good time to capture some comparison data and measurements between the Type 9 (T9) and Type 2 , as i couldn't find anything like this out there- Hopefully it helps something out in the future: Gear ratios on this Type -9 Gearbox: First gear - 3.36:1 second gear - 1.81:1 Third gear - 1.26:1 Fourth gear - 1.0:1 Fifth gear - 0.83:1 Cheers, Des