Slonie
-
Posts
221 -
Joined
Content Type
Profiles
Forums
Store
Articles
Gallery
Events
Library
Everything posted by Slonie
-
You could always get the matching Spa center mirror...
-
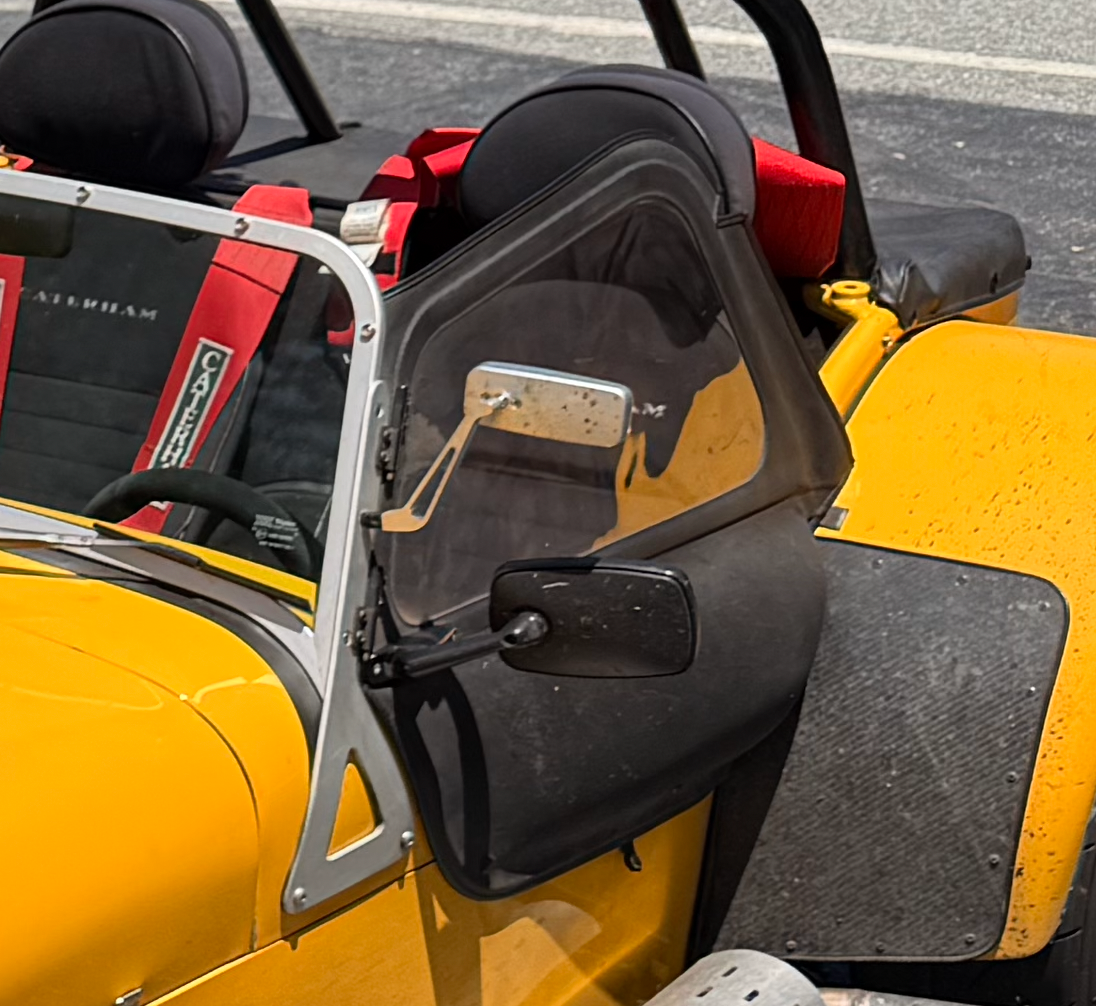
Oh nice, this is literally the Spa mirror with an adaptation by DPR to mount to the windshield frame instead of an aeroscreen/rollbar. Seems like a great part.
-

On-track incident - Help with damage assessment
Slonie replied to KnifeySpoony's topic in General Sevens Discussion
You know I just stumbled on this old thread @KnifeySpoony, but now I'm curious — What did your investigation reveal afterwards? -
I feel like these SPA Design mirrors are probably popular for a reason – they come in both flat and convex versions (I'd get the convex ones after my experience with the Pitkings, which despite all the annoyances mentioned I still don't regret getting) https://www.pegasusautoracing.com/group.asp?GroupID=MIRRORSPAF1
-
Assuming we're talking about side/rear view mirrors, I have the Pitking ones (purchased at Deemon Tweeks) https://www.demon-tweeks.com/us/pitking-products-universal-alloy-race-mirrors-pair-1097933/ I would say I'm happy enough with them, especially for the price, however they are not convex and I would suggest looking into convex mirrors for better coverage. Attachment to the windshield frame was easy with the included hardware as there was already a threaded hole to use. That said, it does look very silly when I have my doors on and I have a double mirror (photo included for ridicule). Also the big OEM mirror is a lot more useful. They prevent the doors from opening all the way as I have them installed, which is annoying too, but doesn't make it impossible to get in and out. Given then I swap between doors/no doors/wind deflectors fairly often I think I'm just going to have to live with it. I've also occasionally had the one on the left side of my car loosen and then flop over as it unthreads by a half turn (never at risk of actually falling off, but kind of annoying)

-
Interested as wall art, of course I was really curious about the price and shipping costs before getting too interested...
-
Sunday blat with five other Seven owners!
-
My car actually has two temperature senders, one for the gauge and one for the ECU. The ECU one is on top (with the square connector and braided cable in the image). YMMV of course. This photo shows the small "bleeder" port which is plumbed to the top of the expansion tank. There is also a small bleed hole in the thermostat plate itself (I've read about people drilling their own but mine came equipped as such already).
-
EDIT: I just realized this thread started off talking about Duratec installations and at some point shifted to talking about a Zetec installation. The following information is about a Zetec car. I don't see why you couldn't cap off the heater port on the thermostat housing. And also, I think the answer to your question of whether the heater and bypass ports will have the same temperature coolant coming out, I think the is also probably yes. That being said, on my car the one that comes out on the same side as the upper hose is used for bypass and the one on the "back" is used for the heater. I should redraw my diagram to make it more clear which side of the thermostat the various ports on the thermostat housing are. The heater and bypass hoses (5/8" or similar molded) both come out of the chamber on the thermostat housing before the thermostat itself (this is why it makes a big curve around from one side of the housing to the other). The upper (small) "bleed" line and the main hose to the top of your radiator come from the after the thermostat. The idea being that when the thermostat is closed, all the coolant goes to the bypass and heater (if present) until the temperature gets high enough to start the thermostat opening, at which point the majority of flow will go through the upper big hose. This video I found when I was working on my car shows what the housing looks like inside. Unlike for SVT Focus owners, my car has the gauge temperature sensor installed on that lower port that they're capping off in the video so the actual point of this video isn't relevant, but I still found it handy!
-
The Regular Summary of Classified Ads of Se7ens Found For Sale
Slonie replied to Croc's topic in Cars For Sale
It does seem optimistic, but I'd imagine a Facebook Marketplace (or Craigslist) listing has to be priced to deal with the inevitable haggling that will occur. I don't judge someone for that, even though a sufficiently high asking price would keep me from even messaging to ask if there's any room for negotiation. I think BaT did some sellers dirty by listing so many Sevens at the same time, but congratulations to the new owners of the Westfield and Birkin at bargain prices! -
'Tis the (upgrade) season! What are you doing?
Slonie replied to JohnCh's topic in General Sevens Discussion
Well, it took me for freaking ever but I finally did it retrofitted the dual return springs from Borla for my TWM throttle bodies Before, single spring hooked around a small bolt in the throttle arm: The replacement parts from Borla, they knew exactly* what to send when I described my issue and what I wanted to do. The old rusty bolt and the P-shaped fitting were replaced by the bolt with two grooves on it and a locknut that installed above the hole it was threaded into (additional security!) They also sold me a little pin to replace the bolt that previously held one spring in the first photo. It didn't actually fit through that hole though... So since the pin didn't fit, I hooked the two replacement springs on either hold in the throttle arm. I don't believe this is any less secure than going around a pin, probably more secure (it was a little fiddly to get installed) Initial impressions are that it did indeed fix the throttle hang symptom, even though it surely isn't solving for the root cause (I believe the root cause may be related to be play in the butterfly pivot in the #1 throttle, which I don't think I can fix myself without sending in for a rebuild, and as @Vovchandr pointed out costs a lot). This probably deserves its own thread in any case as I'm probably not the first or last person to experience it. After significant overthinking of the catalog and inability to find a matching NOS Ford dipstick (they are discontinued), I settled on a Dorman 917-312 for "2000-2004 Focus" and it seems to be an exact match for the length of the dipstick that came with Zetec/Raceline sump. Hopefully it stays in one piece this time!
-
Wow this car looks and sounds great! And from the descriptions, also has also been very well taken care of and exercised. Good luck with the sale!
-
I think this post applies here:
-
The Regular Summary of Classified Ads of Se7ens Found For Sale
Slonie replied to Croc's topic in Cars For Sale
I don't know about the provenance on this one (as one BaT commenter pointed out, that chassis number also corresponds to another car that was sold on the Internet, and according to another friend of mine, neither one really corresponds to what that chassis number "should" look like) ...but I'll overlook that for 4A-GE power! Also that Birkin went for a real nice deal for somebody... -
I closed my heater valve for the first time since bleeding the system and blew not-as-hot air at my feet. Helped, for a while anyway. (We’re experiencing 90ish temperatures right now here)
-
Here's the guy who installed a fan on the top of the pedal box (video on Facebook, sorry) https://www.facebook.com/groups/2039770472972788/posts/4091715377778277/ He reports that it's been installed for four summers and makes a big difference. He added the perspex cover to keep cold air from flowing back in over the winter (though I don't know how much of a problem that would really be). Another edit: The thread linked by CBuff above has some interesting ideas and testing, too bad all the pictures and links are dead. Seems like several people had the same (lowest effort) idea of a funnel scoop and dryer hose, it's just a matter of doing it in a way that maintains some semblance of dignity in the install...
-
I've definitely seen some inventive strategies around the internet, from a 4" or 5" PC-style fan (and a hole cut/drilled in the top of the pedal box) to pull air out of the footwell (and into the engine bay), to just sticking a fan in front of the driver's seat to circulate air in the area. I've not been totally convinced to do either of those but I was thinking a little duct installed on the sill might be able to direct some ram air into the footwell. Seems to be an ongoing battle for 7 drivers though. I've actually had my heater valve open since bleeding the cooling system last year, maybe it's finally time to close it to get some relief now that temperatures are up.
-
Changing to a removable track steering wheel
Slonie replied to Xhilr8n's topic in General Sevens Discussion
it’s got splines, if you put it in a vise and re-attach the steering wheel you should be able to pull-and-wiggle it off, I didn’t think of that at the time and instead got a jaw puller to take it off (which worked!) The second time I did the job (after my first botched install) it came right off without using a jaw puller or anything. You might get lucky and be able to pull the boss off without any help… -
Changing to a removable track steering wheel
Slonie replied to Xhilr8n's topic in General Sevens Discussion
Yup, you’ve discovered the infamous column lock, which you will be rid of after swapping columns! Don’t worry, the old one will come out with a bang given enough encouragement. But again, make sure your key is in the unlocked position first or the lock itself will be preventing removal (or so I’ve read). The second stop is when the collar hits the bushing. At that point you’re gonna need to apply force or push and then yank. -
Changing to a removable track steering wheel
Slonie replied to Xhilr8n's topic in General Sevens Discussion
As for the assembly manual, it's easy to find if you google it (or probably look in the files section here) but for this procedure I referenced the modern "Ikea" manual: https://caterhamcars.com/assets/Documents/Assembly Guides/Assembly-Guide_SUZUKI_Edition-1.2.pdf As well as the older one which I think is quite useful to read through (section 3—pages 3, 4, and 5) https://s7abe6bda7f063e33.jimcontent.com/download/version/1670148388/module/13252701749/name/Caterham Seven Service Assembly Guide.pdf The other thing to note since you're planning on changing the upper column from a non-removable to a removable one: The removable wheel column doesn't include a steering lock, so you can install the bushing with the column removed. You don't have that option with the steering lock as the collar welded to the column cannot pass through the bushing (in either direction). As a corollary, you can't use the removable-wheel column as a slide hammer for bushing removal (probably a good thing) so you'll have to find other ways. Given the "rubber nubs" on the bushing (see the linked thread) may shear off when you remove the column, you might want to have a replacement on hand. -
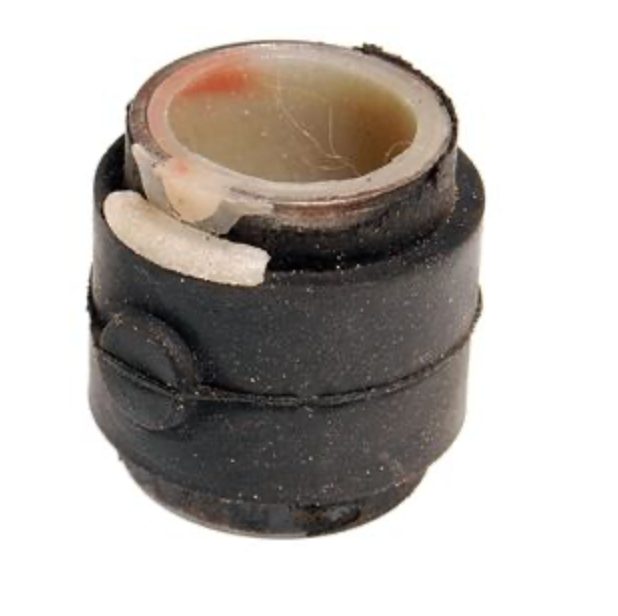
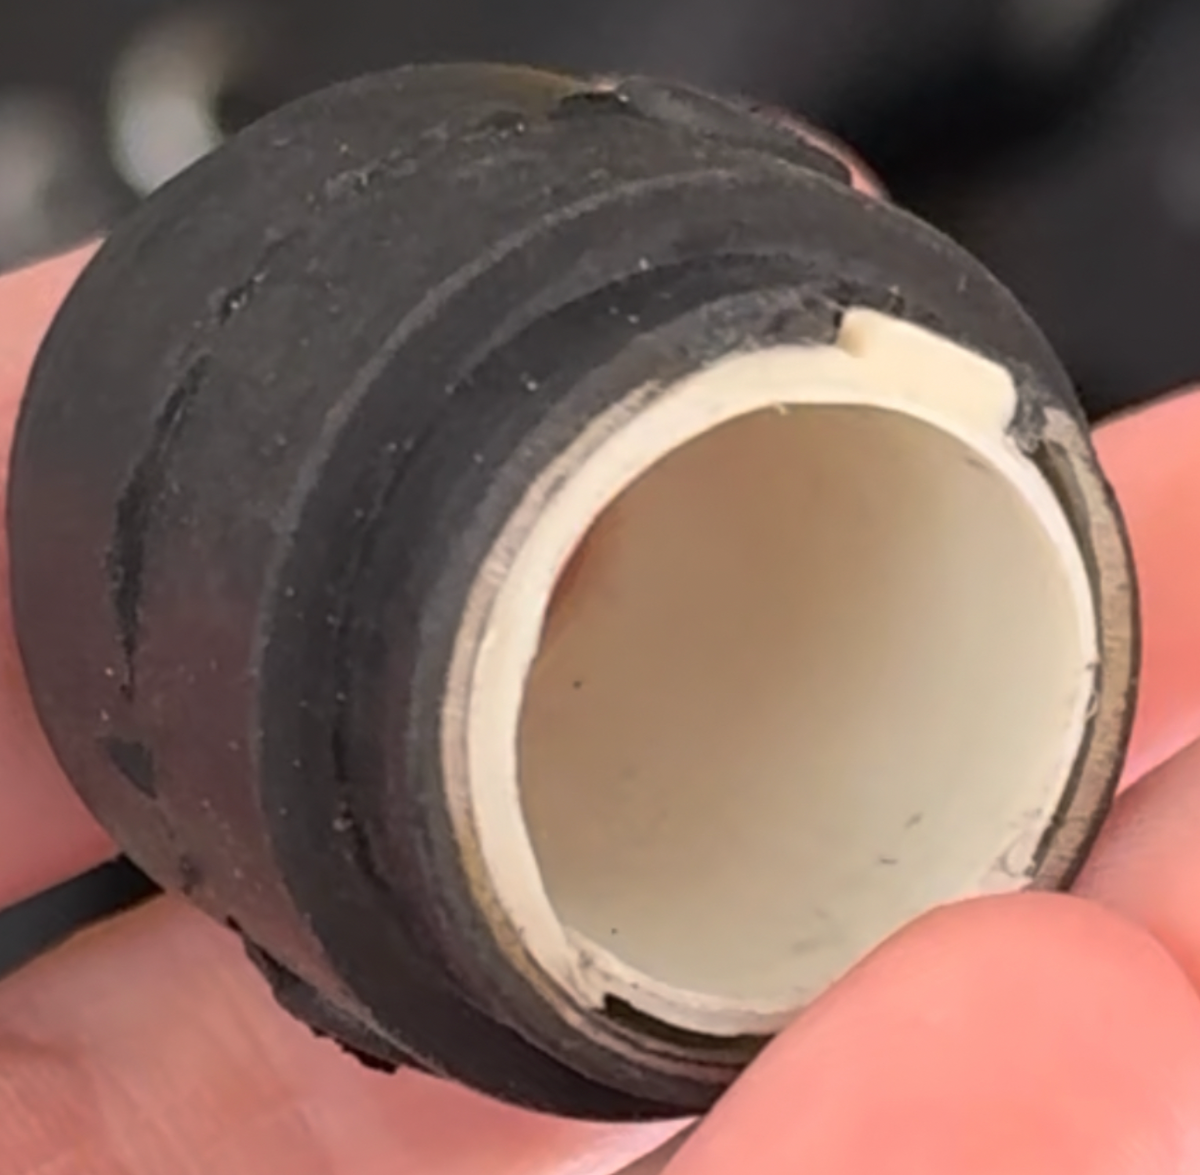
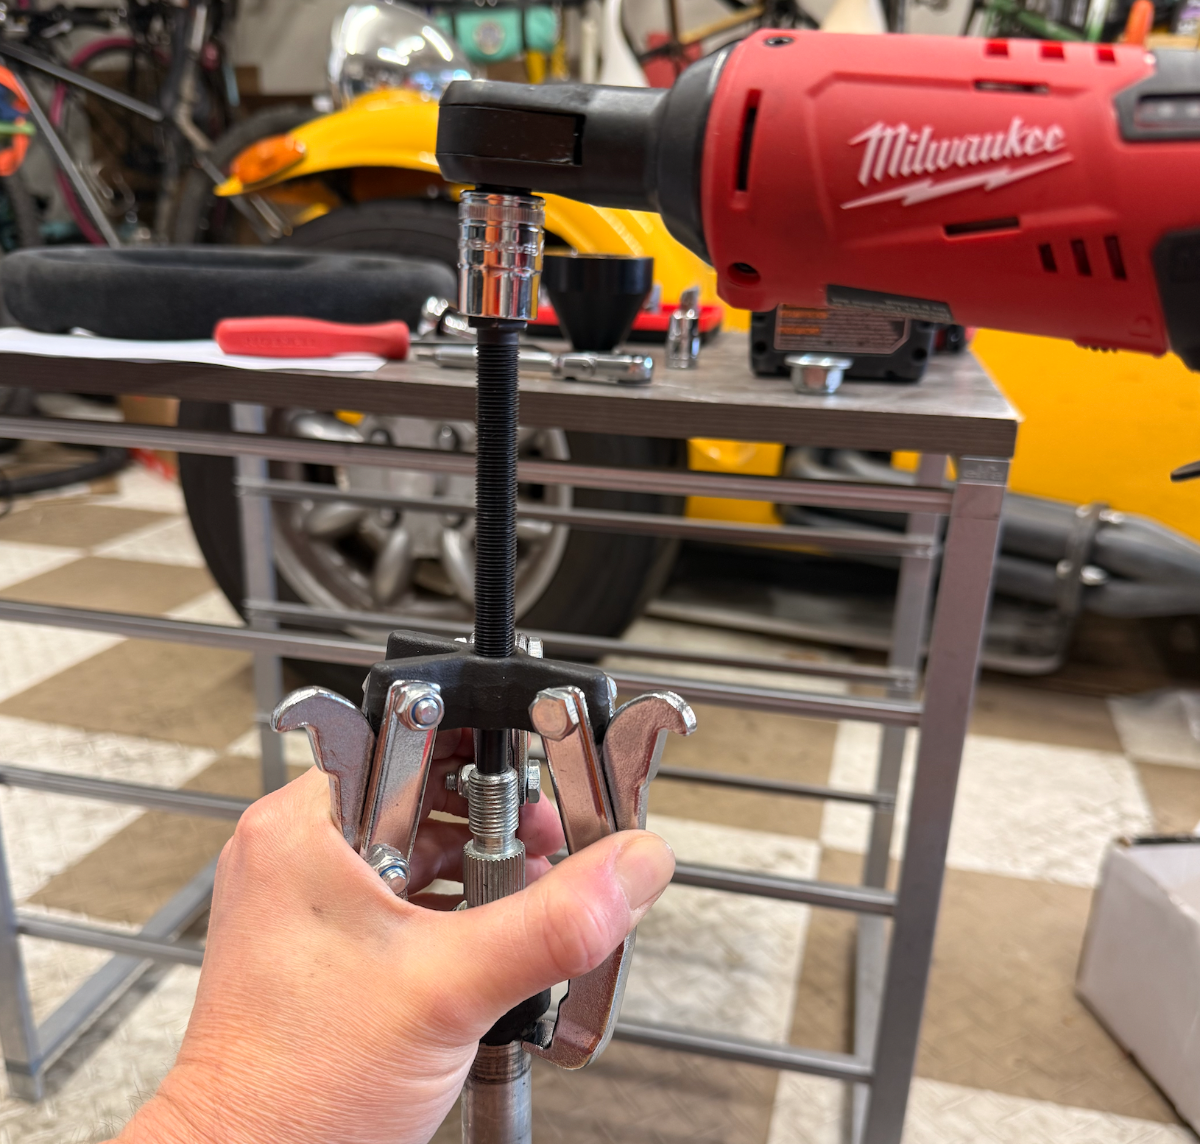
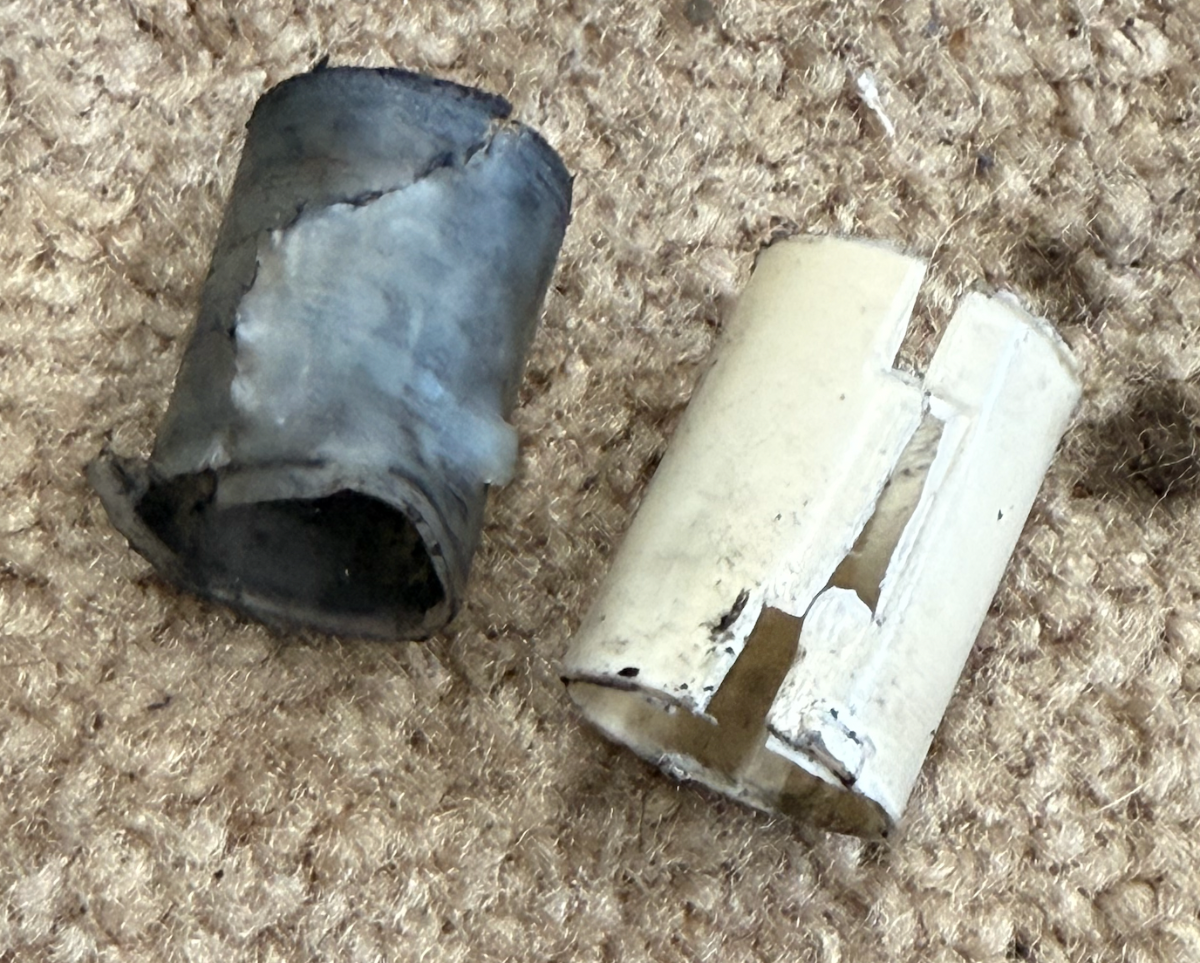
Next time, next time! I would love to be able to add more information to this thread after all... (as for removing the boss from the column using the wheel, that would have probably worked fine except that I wanted to use the steering wheel to slide-hammer the old bushing out, and had already loosened the column clamp at this point in the proceedings. With hindsight, a good order to do things would have been to follow your suggestion first though! Second time I did the job, the boss actually appeared to be stuck on but the column fell out on its own (narrowly missing my rear fender!) so YMMV. Final data point for now: Even though it's probable that they all come from the same source, bushing I just installed was from Rocky Mountain Caterham, and the one that gave me issues was bought in 2018 from Rimmer Bros (i.e. https://rimmerbros.com/Item--i-209423 ). Now that I look at their stock photo I see that there's no split in the plastic part (maybe that's an even older version), maybe that's what I found way down the steering column of my car. The one I actually received from them didn't look like that but it didn't look as tid y as the one I got from Rocky Mountain Caterham either. I know these are an ancient part that's used on tons of Triumphs etc. I did find a dealer that has a quantity discount on the uprated bushing if anybody wants to do a group buy... (only downside: the quantity for a price break was 25 pieces)
-
Changing to a removable track steering wheel
Slonie replied to Xhilr8n's topic in General Sevens Discussion
The good news is, as of yesterday my second attempt at this job went off without a hitch. You can see more in my replies further down the thread. Tried to put it all in there for people searching to find in the future. When you put it together again make sure to do the two bolts on the column clamp first with the grub screw fully loose, then tighten the grub screw and then the locknut. That's the procedure I've read everywhere. -
Changing to a removable track steering wheel
Slonie replied to Xhilr8n's topic in General Sevens Discussion
I think what you're encountering is one of two things: It's either the steering column lock (make sure to put your key in and switch to the unlocked position) or the steering column lock collar hitting the back of the upper column bushing. Here's what I went through! In my case (and others, from reading old forum posts), the column lock collar hitting the back of the bushing can feel like metal on metal contact, which it is. But it'll come out with some force (either yanking like a slide hammer, or applying strong force forward on the steering wheel). -
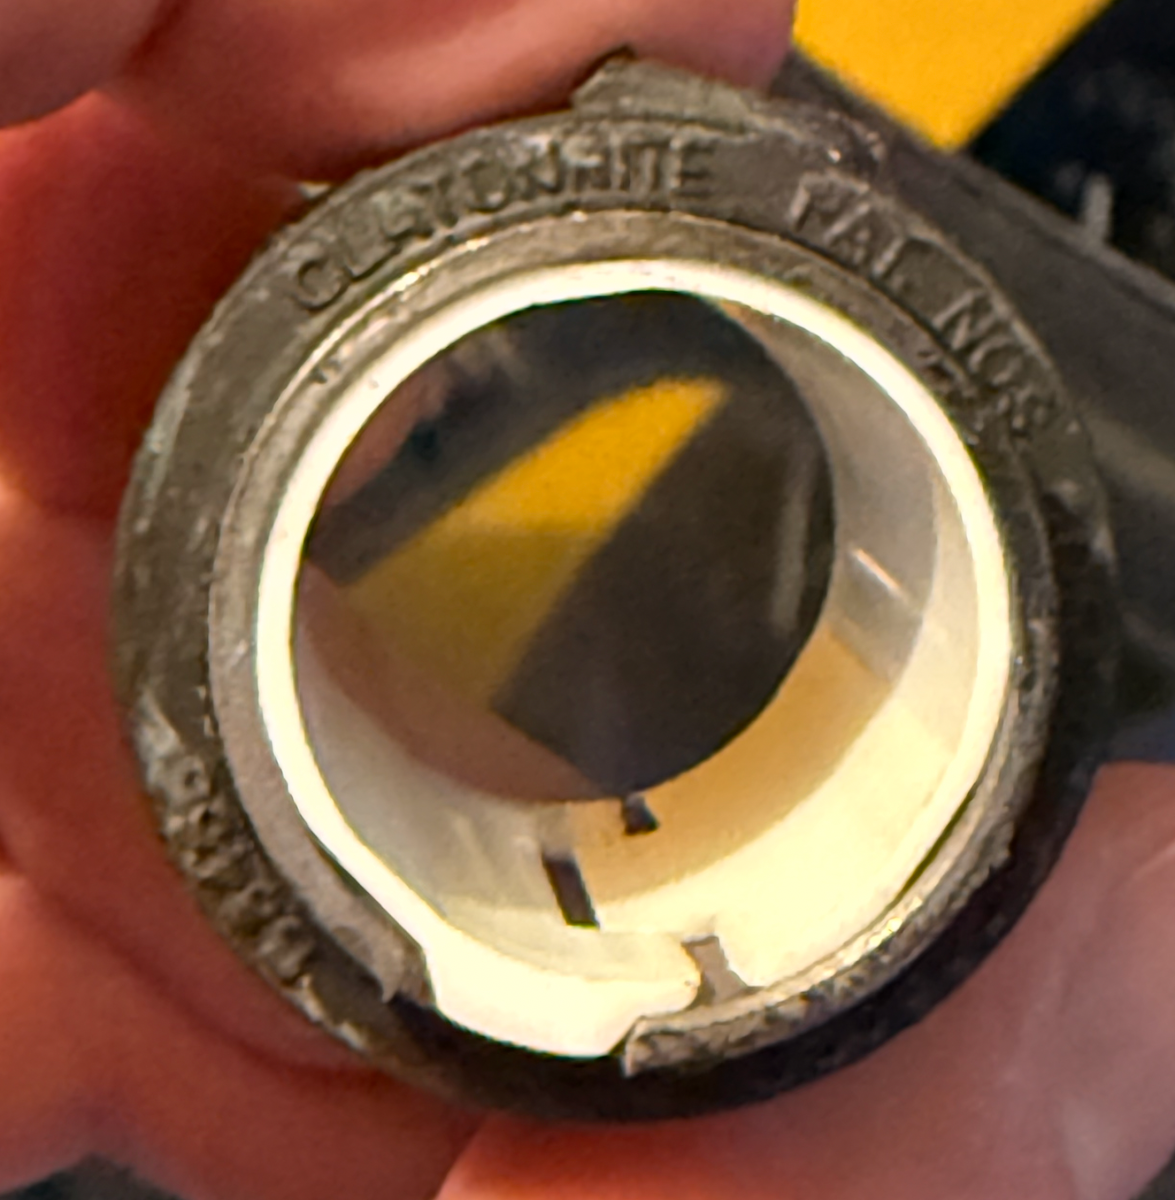
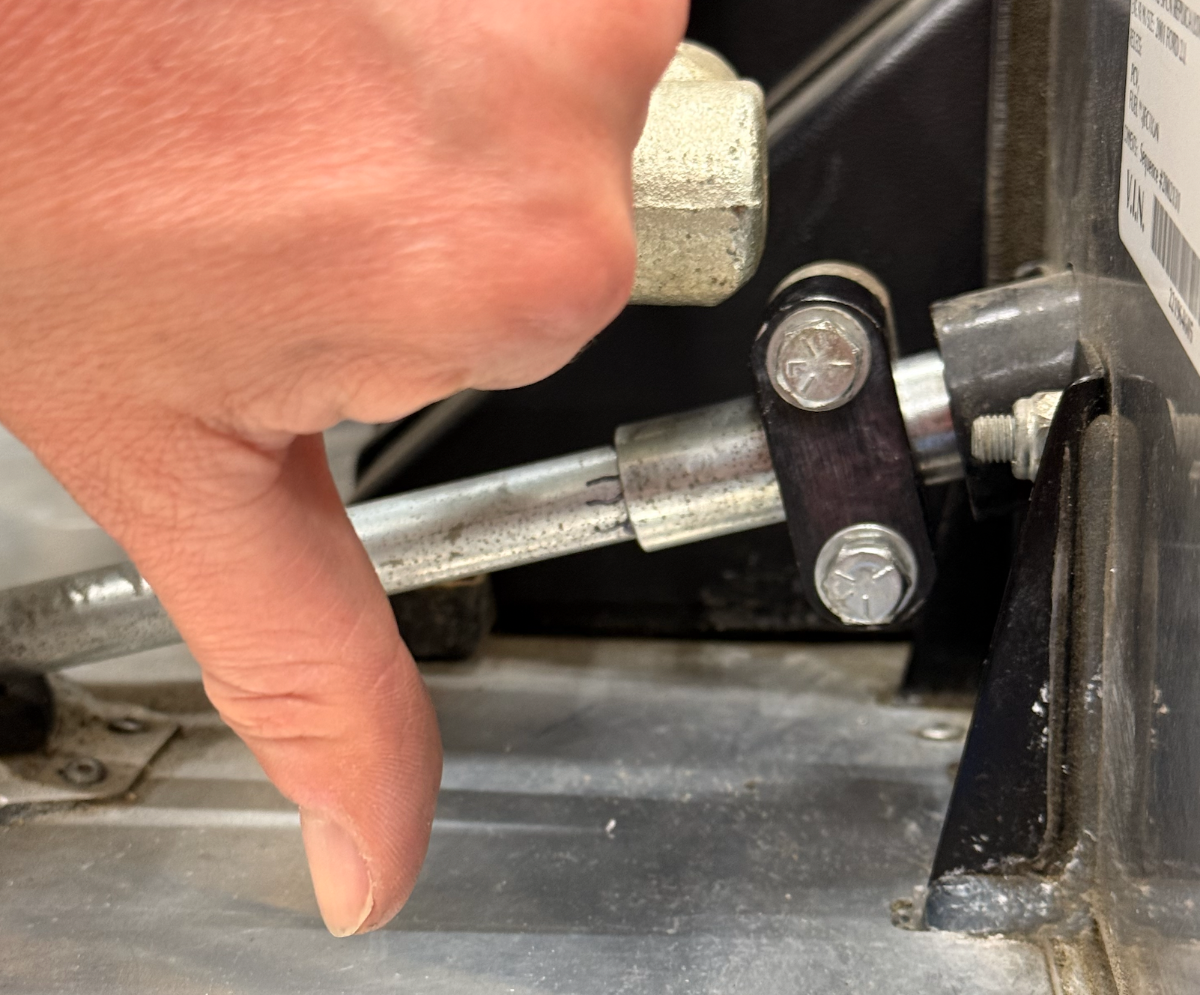
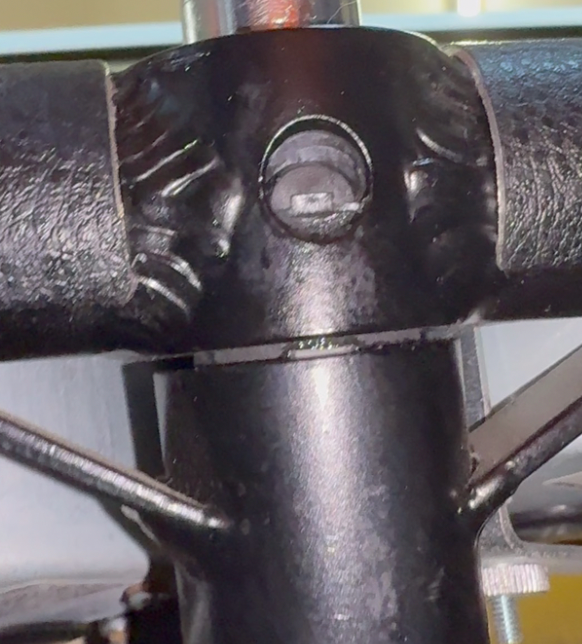
An update! So where we last left off the bushing was turning inside the steer tube after a somewhat difficult installation. Subsequently I ordered two more bushings from Josh at Rocky Mountain Caterham. Pulled the column again (the old bushing came out easily, attached to the column). The new bushings appeared to be better quality or at least had spent fewer decades in a warehouse compared to the one I had installed previously. Or, if you can notice from this photo, I may have been doomed from the start the way the plastic liner had doubled over on itself on my old bushing: Old new bushing: New new bushing: In any case, it was damn near impossible to get the old bushing off the column - it was REALLY stuck on there, no wonder the whole bushing was rotating in the steer tube — it had nothing to do with column alignment and the little rubber nubs would have done nothing to hold the bushing in place versus the column. In any case, I used the jaw puller again to remove the old new bushing... Then took a detour to remove the ancient fused-on plastic sleeve of the OLD OLD bushing that came on the car which appears not to have a split in it, or had welded itself together. Got it off (destructively) with a mini pry bar. That's the old old one on the left compared to the new old one on the right. I reinstalled the column clamp. Take care with the position of the clamp as it will foul on the brake master cylinder. I thought I had noticed this and positioned it accordingly, but this photo depicts "too close" and it hit the MC when the column was turned 180 degrees. Only noticed that when everything was torqued up, whoops. I also polished the steering column in the bearing surface areas with metal polish to give myself a better chance of success. Note that according to several other guides I've read, you want the plastic sleeve's protruding tab that faces you to be the one opposite the split, this will help prevent the sleeve from coming out of the bushing. You can see both sides in the photos of the two bushings above. Apparently this is more of an issue with the lower bushing, which I did not touch for this job but do have a spare now... I've buried the lede here which is that the new bushing, with a modest amount of silicone lube on it, went home with only a bit of hand effort, no mallets required and no destruction to the rubber nubs. I actually pushed it a bit too far on my first try as you can see here when viewing from below the dash (steering wheel to the top of the frame). This required undoing the column clamp (again) and nudging it back outward with the steering column lock collar until the nubs aligned with the holes. That's better! A mirror would have helped here, I used my phone camera instead. With everything back together and torqued to spec (60Nm for the big 3/4" steering wheel boss nut, 14Nm for the clamp bolts), the wheel turned freely in the bushing and I can finally put this topic to rest* for the time being. Hopefully this will help someone out in the future! *except that I am still missing the locknut for the steering column clamp grub screw, need to source that. Also, if you have any play in your steering, that grub screw is the first place to look.
-
R888Rs (what I actually run on my 13" wheels for lack of any other options) also come in that size but they're nearly $200 each