NVP66S
-
Posts
486 -
Joined
Content Type
Profiles
Forums
Store
Articles
Gallery
Events
Library
Everything posted by NVP66S
-
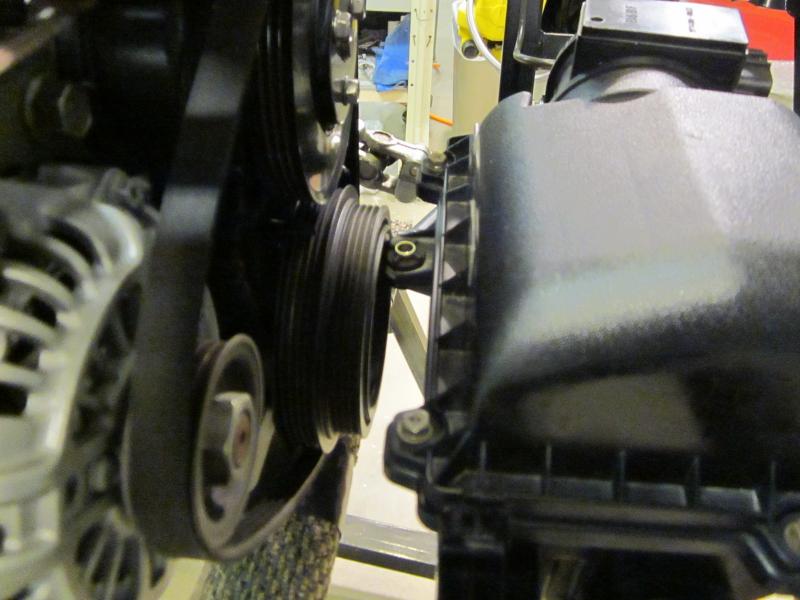
The WF uses the Mazda donor airbox/MAF sensor. It's relocated from the port side engine bay to in front of the engine because there *is* no port side engine bay. The Miata is huge compared to a 7 in this respect. A few minutes with a coping saw fixed that problem.

-
Wow. Nice trailer.
-
After the engine came the differential. WF uses the donor car for this. It bolts right in with little difficulty, although I did have to take it loose and reposition because I read the manual wrong. The driveshaft is custom made as it's about 10 inches shorter than the Miata, and it's a good idea to replace anyway. Halfshafts and uprights are straight out of the Mazda, but as I mentioned before, I had the wheel bearings replaced.
-
You mean when it's heavy? Because there's lots of work to do after the engine is physically in place. The Flyin' Miata yellow car build diary shows them using the engine hoist to lower first the front then the rear. Their white car build shows them using a fork lift. Nice if you have one of those. I highly recommend studying that site for build info, and joining WSCC because they have lots of builders who can and do help answer questions. They're mostly RHD guys though and some of the problems I hit are due to WF not supporting the LHD customers in as much detail. Now that you mention it, I've not seen a discussion on this over at the WSCC site. Dan
-
Here's the left side mount showing the extra hole pattern. And the right side that just dropped into place. The WF only has 3 inches of ground clearance to the oil pan, so I added the two 1/4 inch spacers on each side. That adds 1/2 inch without needing any other mods. I made the spacers from some 2024-T3 scrap I found. Plenty overkill on the strength but not so corrosion resistant. So out came the yellow Rust-Oleum and the airbrush again.
-
The next step was to drop the engine/trans into the chassis. This part went fast and painless. WF supplies motor mounts and the only problem was that the cleft side hassis mount holes were off about 1/2 inch. So I just drilled another set.
-
Thanks, I have about 110 hours logged on donor removal and refurbishment stuff, like derusting and painting the uprights and grinding off the forging flash. The rear bearings sounded a bit unhappy so I took the rear uprights to an independent car repair shop to have new bearings pressed in. "They're off my '97 Miata" was good enough for them. The Mazda dealership refused the job, saying they only do that if I bring the car in.
-
I'm traveling so no continuous net access. The next build step was to hang the front & rear suspension. The WF and Mazda parts work well together with few questions or problems. Of course it helped that I got a phone call from this guy: http://www.ronmathis.com/ He said he was bored on Sunday and did I want any help on my WF project? I couldn't turn that down and I have no worries the steering rack and suspension went on right. The only problem was some of the rear A-arm bushings needed to be reamed to fit the attach bolts. No problem as it could be done with a hand pistol drill.
-

Should I get a shortened oil pan for my WCM?
NVP66S replied to GunshipDriver's topic in General Tech
There's a market for shortened/widened Mazda pans. The Westfield installation gives 3 inches ground clearance and I know of 2 people trying to get custom made pans that have another inch of ground clearance for street use. Anybody know of such a thing on the market, or an enterprising company that wants to supply these? -
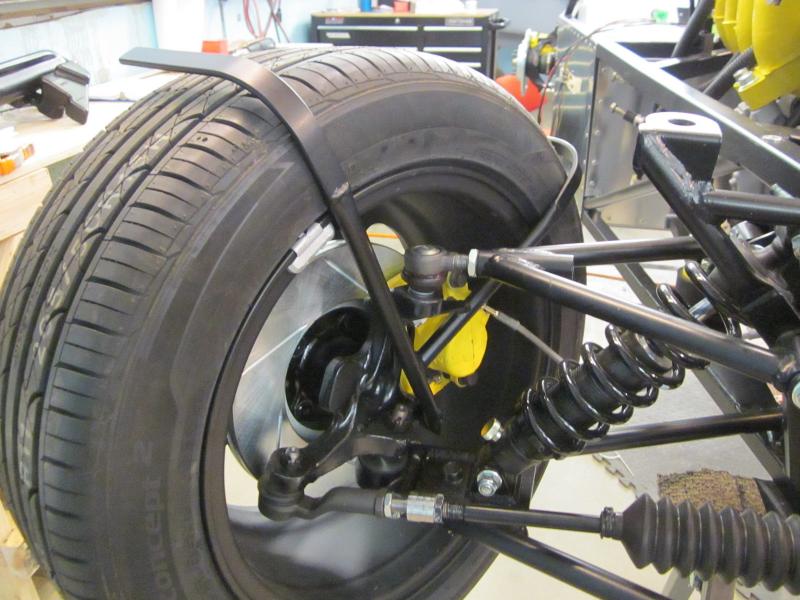
Yes, WF uses the Miata front & rear uprights, and yes, they supply nice fender stays. Sorry about the black on black, but I derusted my uprights and painted them. The upper attach is a flat bar running between the two stay tubes. The bar mounts to the underside of the upper ball joint. The lower attach picks up the lower caliper bolt. Quite the nice installation. Dan
-
I should be able to post photos tomorrow night.
-
Climate change enthusiasm and the doomsaying that goes along with it is far bigger than the news media. It's trivially easy to debunk just by looking at the past billion years of climate and CO2 levels. http://theresilientearth.com/?q=content/grand-view-4-billion-years-climate-change We've had Glaciers in Pennsylvania when the CO2 level was higher. The enthusiasts like to repeat that "97% of climate scientists agree..." First, that number came from a poll of fewer than 100 climate scientists and those chosen to participate were already in the AGW camp. Second, appeal to authority has had many, many examples in the past of being wrong. Frenetics is a recent example, and Galileo's heliocentric solar syatem is a famous example. Third, appeal to authority is not part of the scientific method. If it doesn't welcome skepticism, it's not science. If one person can repeatably show it fails, that's it, end of theory. That's how science works. Feynman on Scientific Method. - YouTube Richard Feynman was one of the greatest scientists ever, and he took time to lecture an intro to Physics class. I still have copies of his lectures. The future climate projections are based on computer models, not data, and those models are tightly held secrets. Freedom Of Information requests have been turned down by the University of East Anglia and University of Virginia where the models originated. Hiding your source is not science. But let's just for argument say the the smart people should know and we have to follow them. OK, here's 1300 peer reviewed papers saying it's not a problem. http://www.populartechnology.net/2009/10/peer-reviewed-papers-supporting.html Or how about 31,000 engineers and scientists including 9000 PhDs calling baloney? They're listed here: http://www.petitionproject.org/ I can't sign it because I work for a company that has some government contracts, and yes, I have personal experience with government agencies' vengeful tactics. Or how about a look into the daily conversations between the "leading" scientists? Here's an annotated dump of professional emails: http://www.lavoisier.com.au/articles/greenhouse-science/climate-change/climategate-emails.pdf It's a real eye-opener to the tactics used to crush skepticism or honest questioning. The AGW enthusiasts respond by claiming that those emails were acquired illegally. Maybe they were, probably not, but nobody claims they are not real. Sorry for the rant :cuss: but I think the belief in AGW is undermining real science, and doing mankind a huge disservice. But, hey, Americans voted to install the community organizer that campaigned in 2008 saying: "Under my administration, electricity rates would necessarily skyrocket" OK, I'm done ranting. Let's talk about cars.
-
Yeah, the 7 family seems to have an entire spectrum of build/buy choices. On one end is the Locost where you build everything and design a lot yourself. On the other end are turnkey cars. I think I found the middle ground that suits me best. Here's a similar angle shot with the brake and fuel lines done. Pop rivets and 'P' clips both supplied with the kit. You can just barely see the pedal box mounted. And speaking of the pedal box, it comes nicely assembled with an aluminum AP Racing clutch master. Too bad the location is wrong. Maybe it fits the S2000 donor, but with the Mazda clutch slave, the master needs to move up an inch to get the correct force & stroke. The 2nd photo shows it moved.
-
I had a '99 SLK 230 Kompressor for about 8 years. It had a manual transmission. That was a $40k car new in '99 compared to your potential $80k AMG car. I thought the 184 HP was enough, so I have to ask the embarrassing question: Does your partner want/appreciate the difference between the standard M-B offering and the AMG, or is that you? Hey, I had to ask. As others have said, it will cost more in maintenance.
-
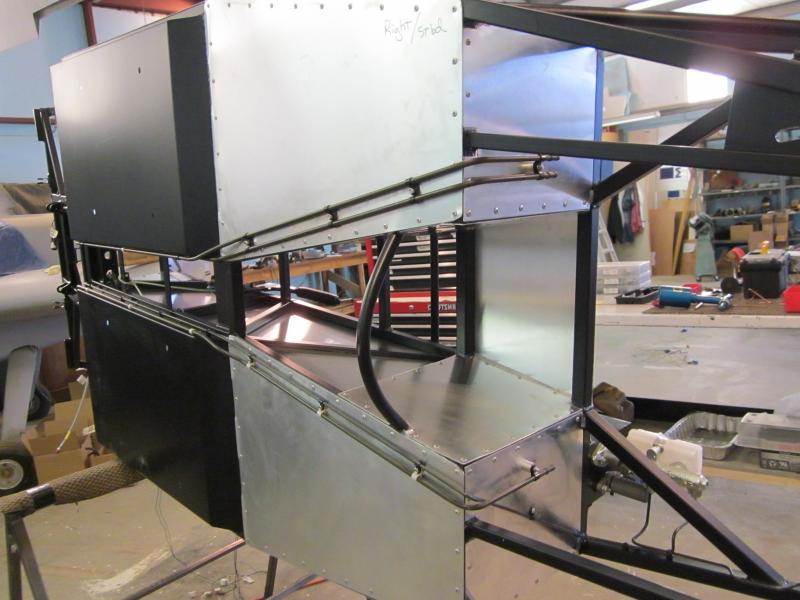
Still in February, here are 2 more photos of the chassis upon its side. The first shows some of the Miata wiring loom. There's a lot of tape to remove. The second photo shows the fuel lines going in. There are 3 lines that run fore/aft, the fuel supply from the rear-mounted pump, the return from the regulator, and the charcoal can.
-
Thanks for the accolades, but the handbrake early installation came from Flyin' Miata's build diary and the straight rows of rivets come from the predrilled holes in the precut sheets from Westfield. There are other issues with the kit, (It's not perfect!) but I'll get to them later. Dan
-
Back to sheet metal work. At this stage, it's easy for two people to flip it over. Sure beats working from underneath.
-
I intended to buy the factory installed brake line option, but that is only available if you also get them to skin the sheet metal. A friend offered to do the brake lines for the same price. He did an excellent job. As practice we did a mockup of the lines with welding rod. The 2nd photo shows 2 brake lines (dark green) and one welding wire yet to be replaced. The kit comes with those really nice mounting clips. You drill the frame and pound in the clips like body pins.
-
Yeah it's an airplane hangar which is good for space, but it's 3 miles from home and sometimes when I should spend time working on it instead I rationalize not driving to the shop. Plus, when the wind blows I get a coating of dust on everything. Am I complaining? No, just pointing out that different shops have different advantages and disadvantages. As for tools, I'm finding that I'm placing weekly orders for more tools during the car build. That's in the budget. Dan
-
So is your car one in the silly photo in front of the really big dump truck? I love that photo.
-
Engineers in the corporate world? That painful video reminded me of when I worked for a government agency (no, I won't say which one). The corporate world that I live in now as an engineer actually makes sense.
-
Some of the rivet holes are in tight places. The right angle air drill came in handy. I took some time out from riveting panels to install the Mazda handbrake lever. This required setting some 8 mm Rivnuts. According to other builders, placing the handbrake before the skins are on is better and easier.
-
It's a street car, not a track car and this old man, at least at the moment, is happy with 144 flywheel horsepower in a car that weighs 1000 lb less than the Miata. So, no forced induction planned................. yet. Getting on with the build... The first order of business is to attach the aluminum panels. The panels come pre-drilled from the factory, so it's a matter of clamping them in place and match drilling the holes in the steel tubes. Then, remove the panel, deburr, and apply silicone sealant. Here's what it looks like just before replacing it just before riveting. There's about 1.32 billion rivets in this thing. The second photo was that panel about 20 minutes earlier with a few clecos for alignment. Notice the aluminum comes from the factory with protective film. That gets stripped off just before riveting. And here's a panel fully riveted in place. Maybe someday I'll figure out how to put text between the photos.
-
OK, that's a Defiant and I have 4000 building hours on it. The Westie is a short construction job as a break from building the plane. (Pay no attention to the 25 ft long canard)
-
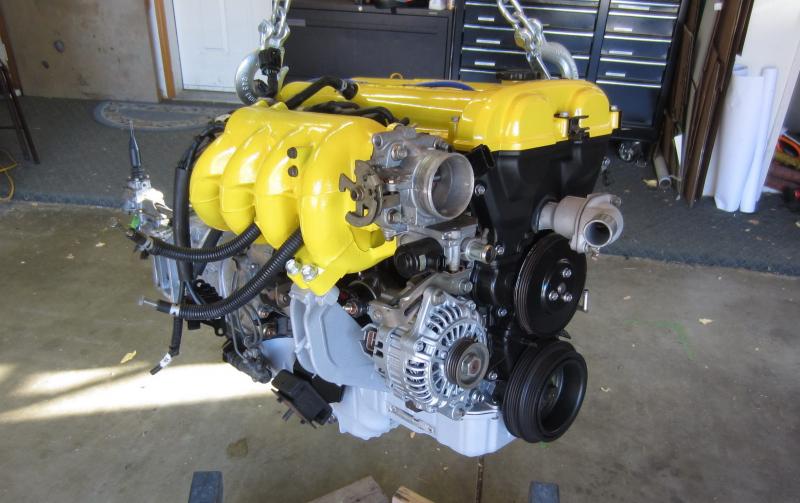
Yeah, it's easy to change the cam profile, just use sandpaper. As for where the thread belongs, y'all decide and I'll follow it if it moves. I didn't think it was a member's ride because it's not actually a ride yet. And here's what the engine looked like after the refurb with powder coat.