
searya
-
Posts
73 -
Joined
Content Type
Profiles
Forums
Store
Articles
Gallery
Events
Library
Everything posted by searya
-
Thanks I like that design so I am going to do a mock-up this weekend to see how the alternator fit! The head bolts are m10 and the water pump are m8.
-
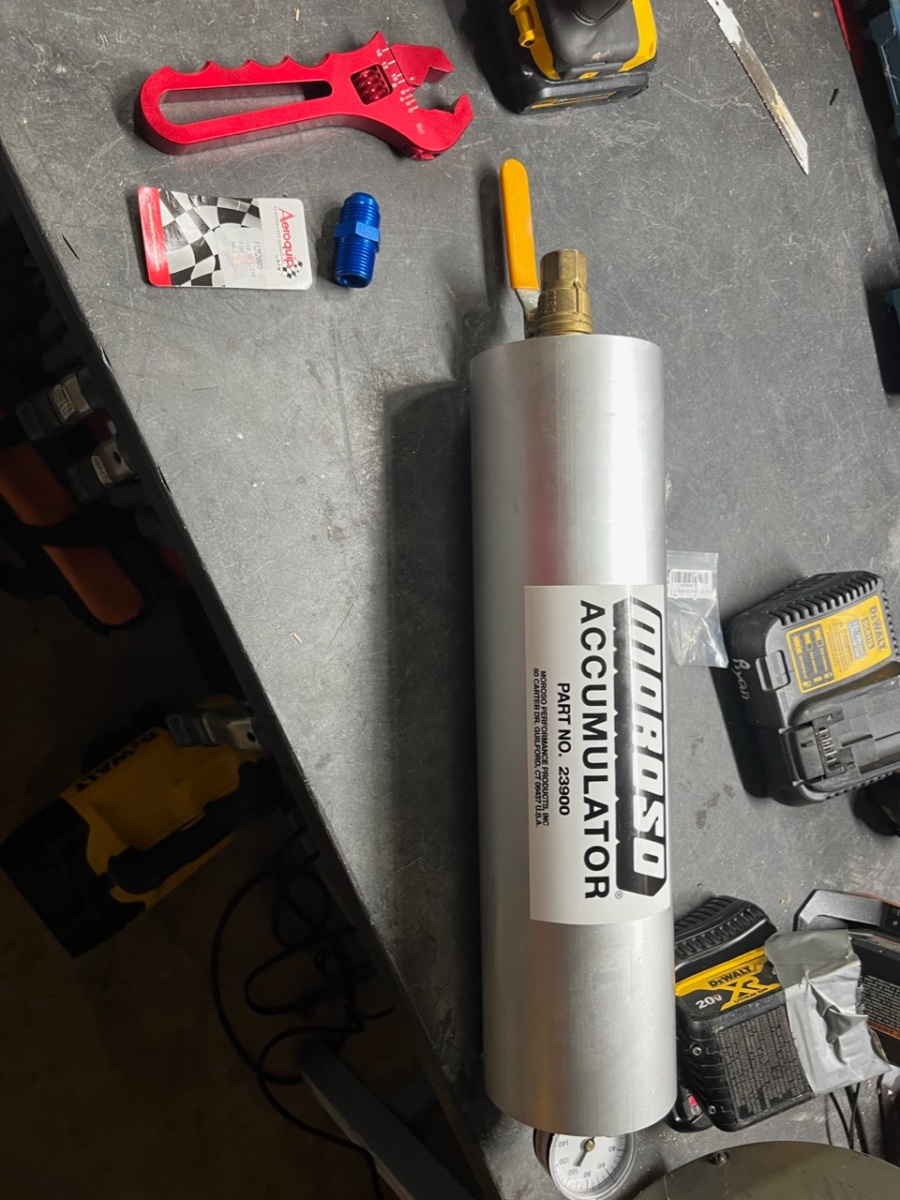
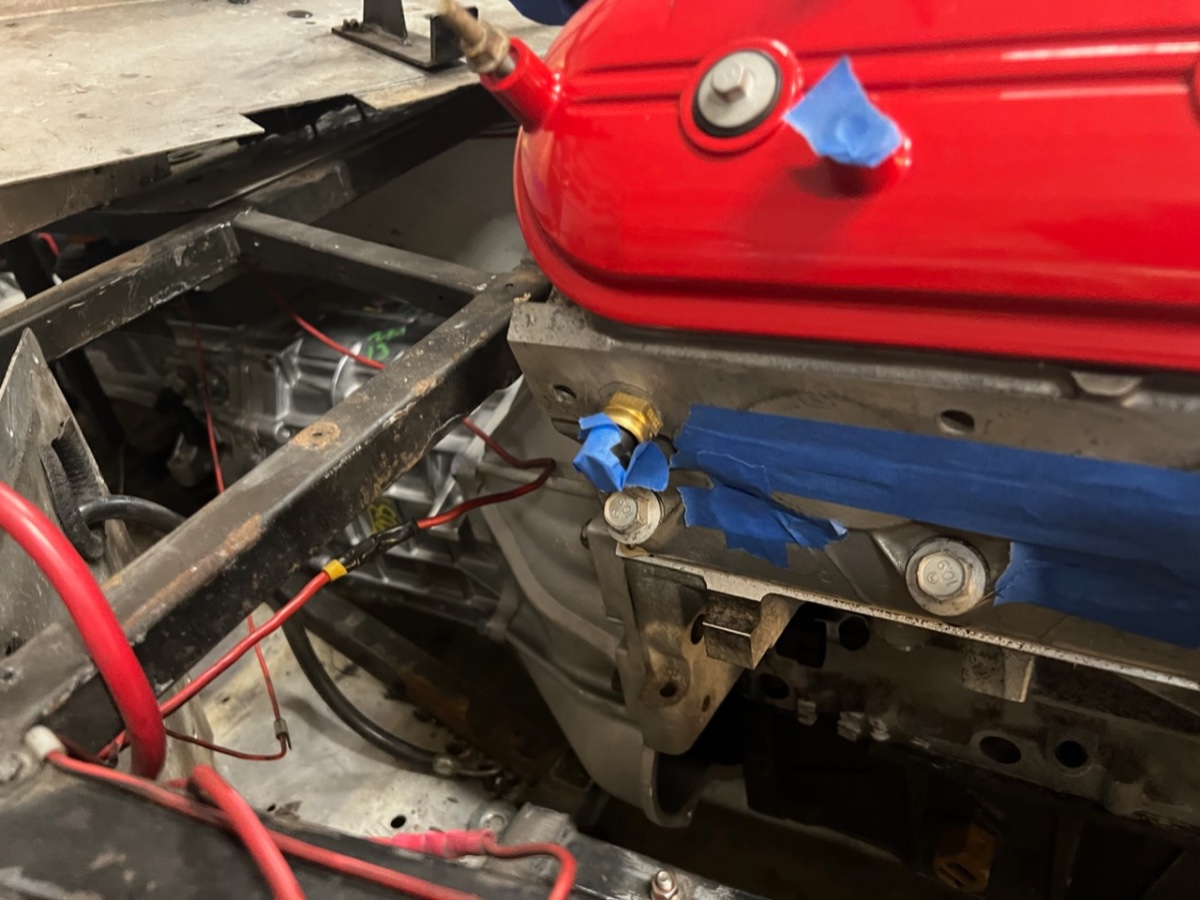
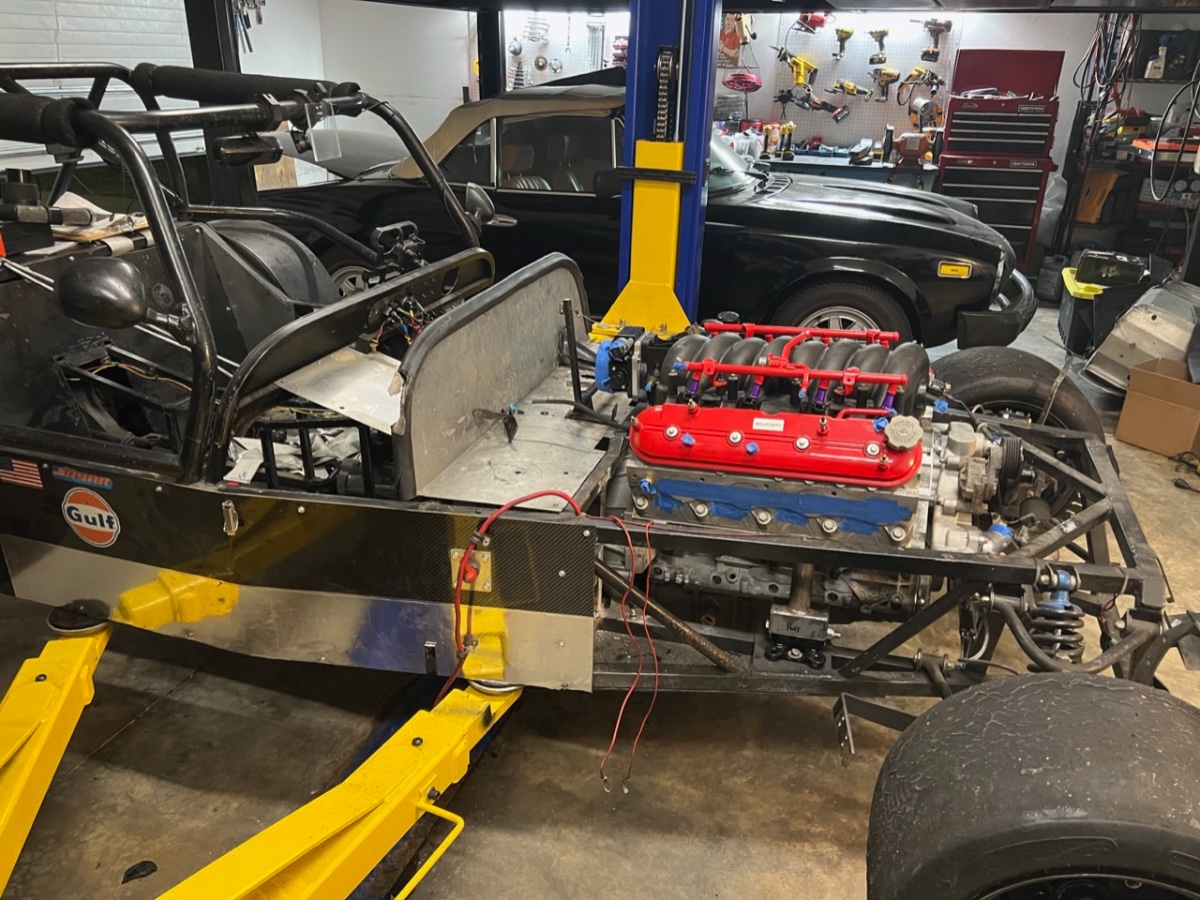
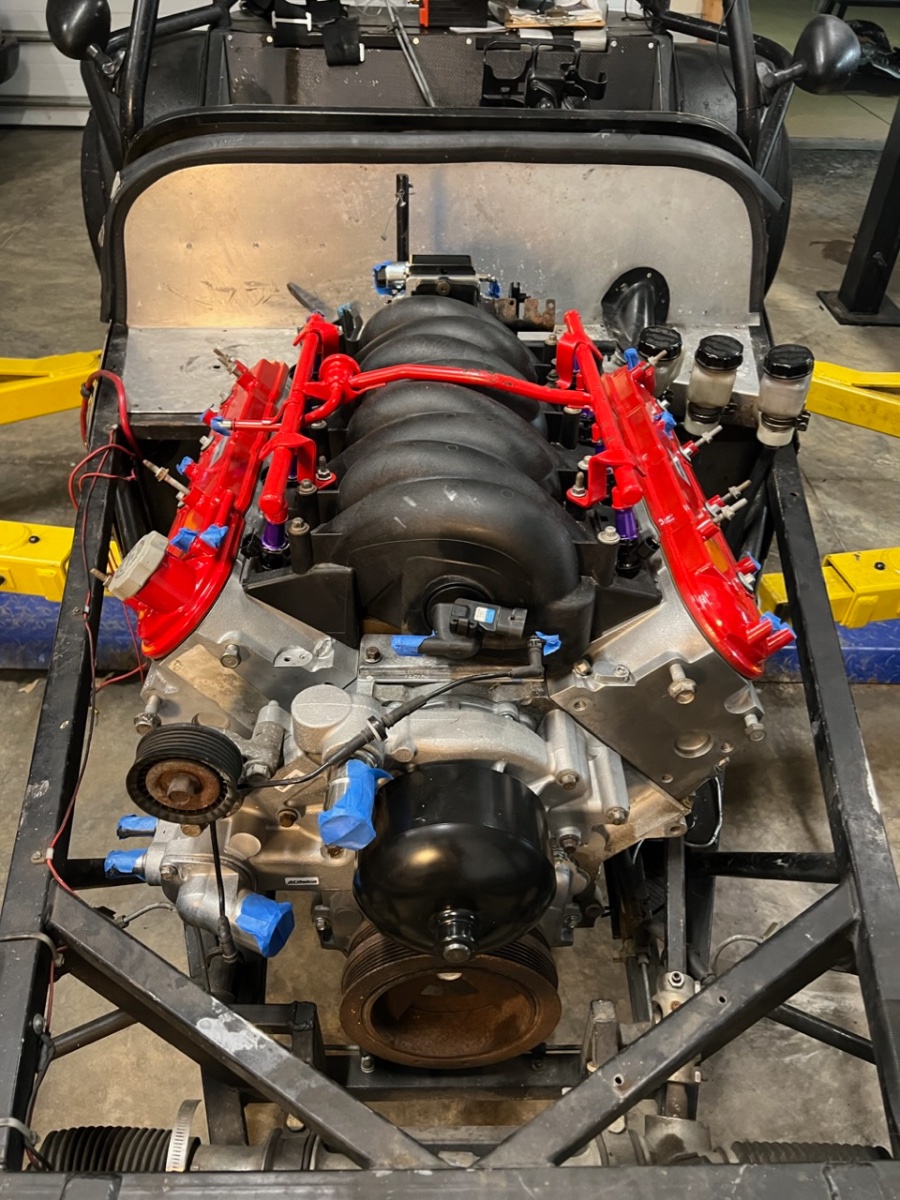
Lots of work but not much ‘completed’ in the past week. I fitted up the oil pan which is definitely the lowest part of the car. Plan to weld on some sacrificial metal pieces a little lower to protect it. I have is moroso 20142. It is a racing baffled pan that holds 7quarts and is 6 inches deep. Minehart recommends the stock corvette ls3 oil pan which I think is 4.85 inches deep but it only holds 5.5 qts and doesn’t have a racing baffle. Being concerned with oil starvation in the high g and sustained g turns I am also adding a 3qt canton oil accumulator. Nice benefit on that is I am also going to use it to pre-lubricate the engine before first start. To do that I just used a plastic hanger piece, opened the valve and then while pressing the hanger part into the accumulator I simultaneously opened the tire style valve on the back of the pump. This allowed me to press the piston inside the accumulator all the way back. Plan now is when ready I will fill the accumulator with 3 qts of oil and wire it to the oil pan in port and then pump up the tire valve. This should then force the 3 qts of oil through the system so I won’t have a dry start! I though I was ready to wire up the fuel tank but then realized the ls1 engine with a stock fuel rail doesn’t have a fuel return line like my old 3800 sc does. To overcome that I bought a post pump fuel filter that has another fuel pressure regulator incorporated into it. So if pressure in that filter hits 58 psi it is routed back to my gas tank without even making the trip up to the engine. Nice benefit if that is one less hose running through the transmission tunnel. Finally with the help of my son and his 3d printing skills I started to design an alternator mount that will allow the alternator to be flipped backwards (pulley facing the engine). I looked for hours at every type of alternator bracket on the market with no luck. Every time I found one that I though would work I would measure only to realize the alternator would hit the frame, suspension mount, driveshaft, water pump or hood. Good thing is if I get this figured out my plan is to send the 3d models to sendcutsend.com and then anyone else that needs them can do the same.

-
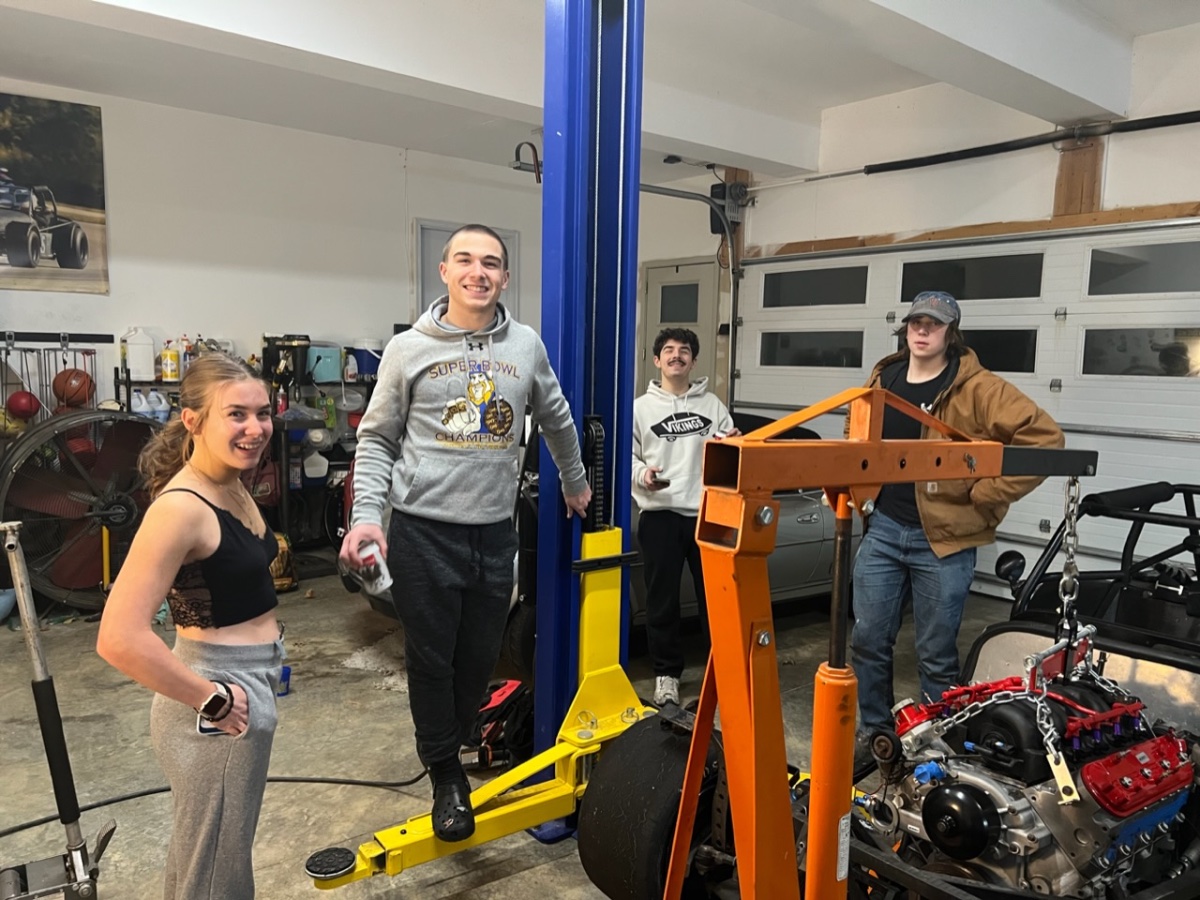
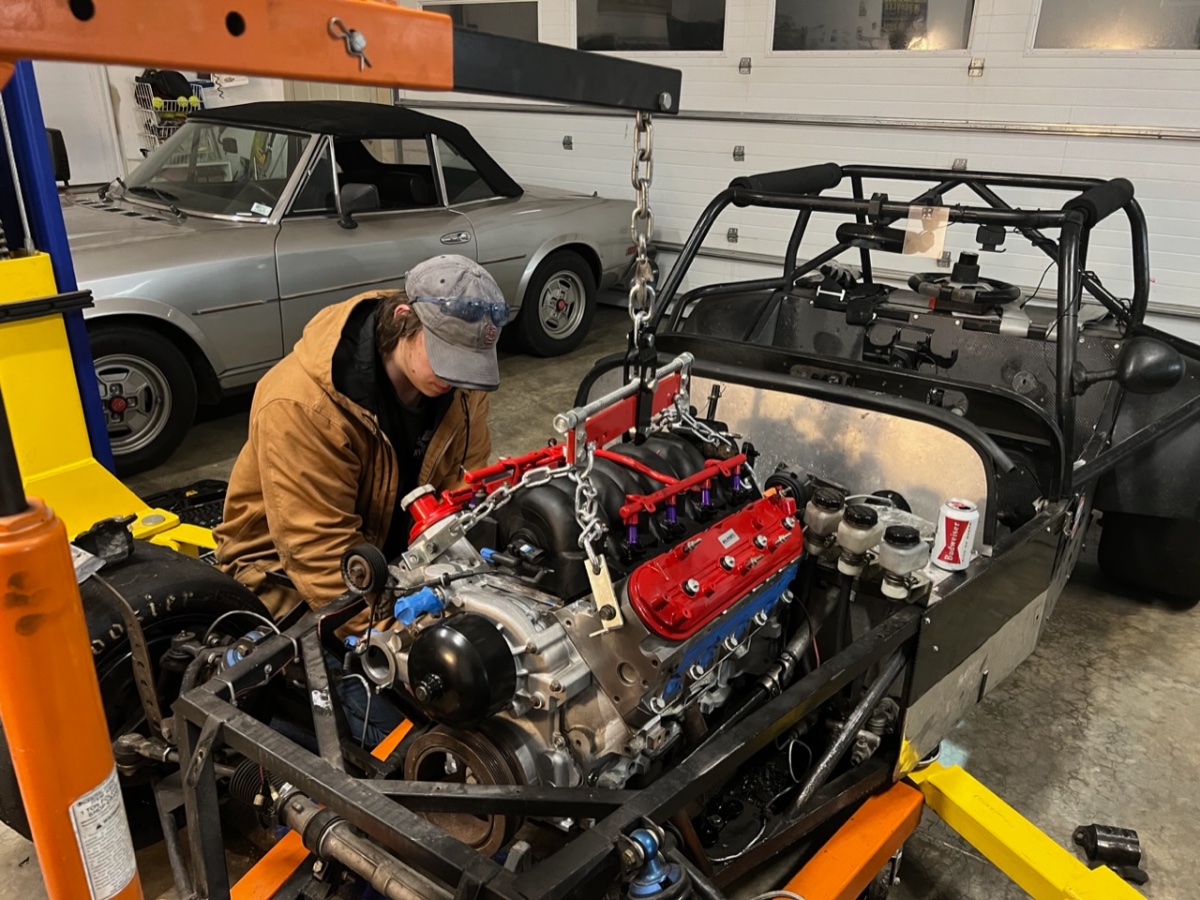
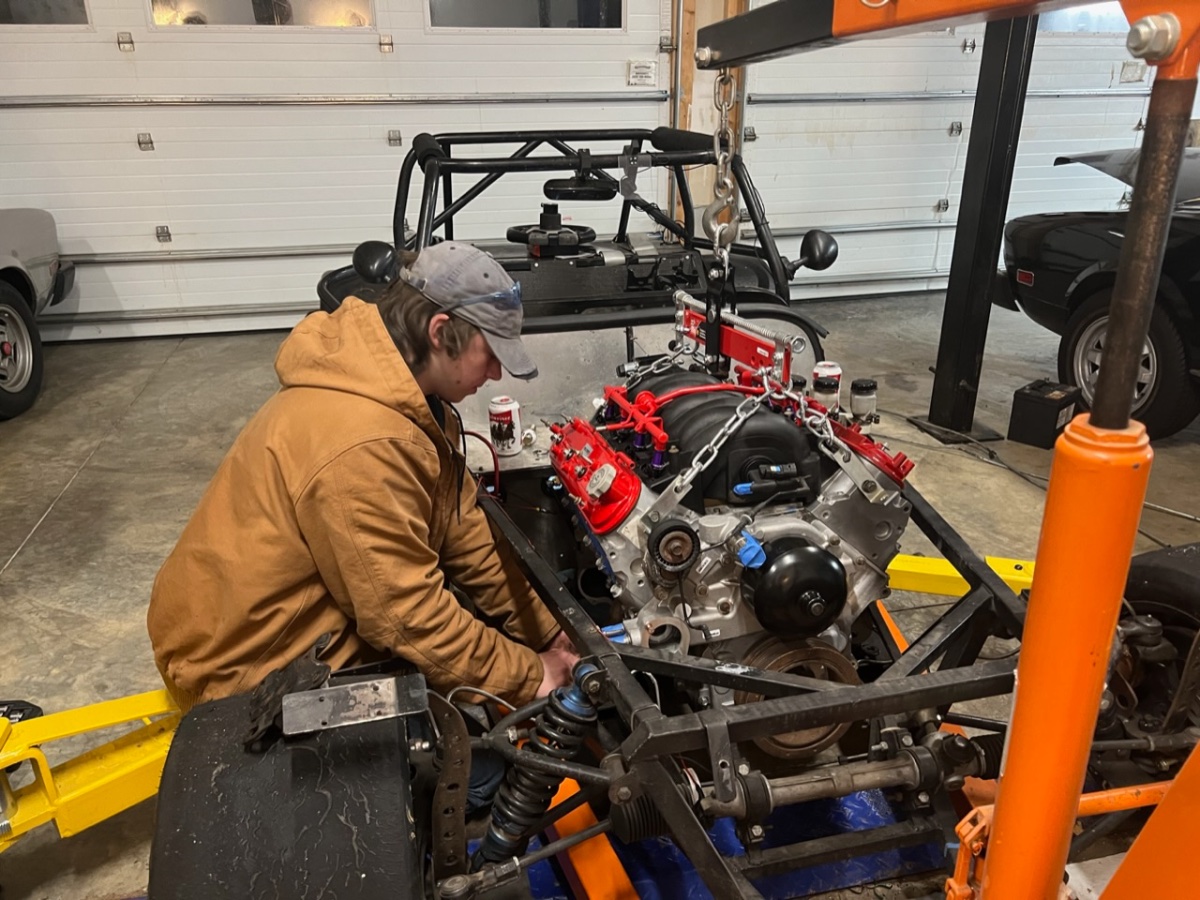
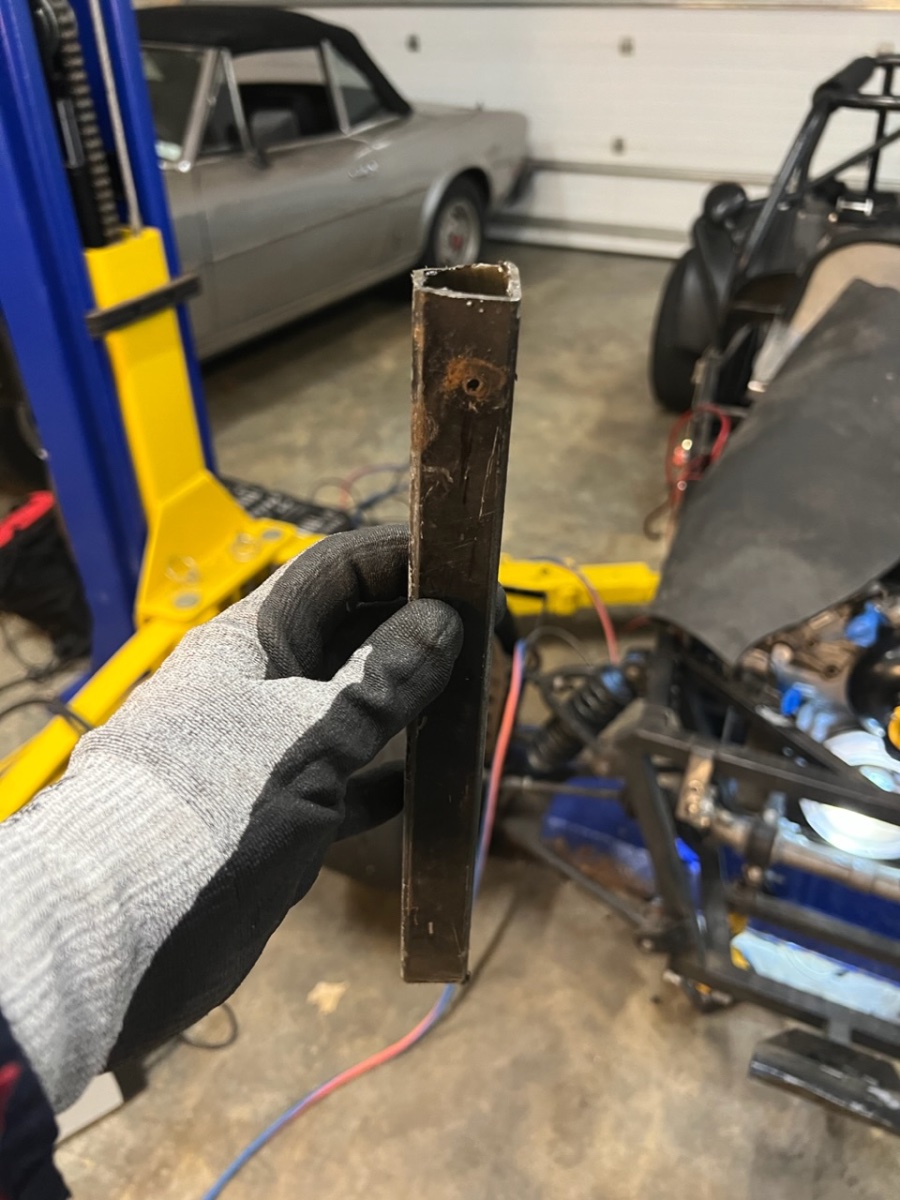
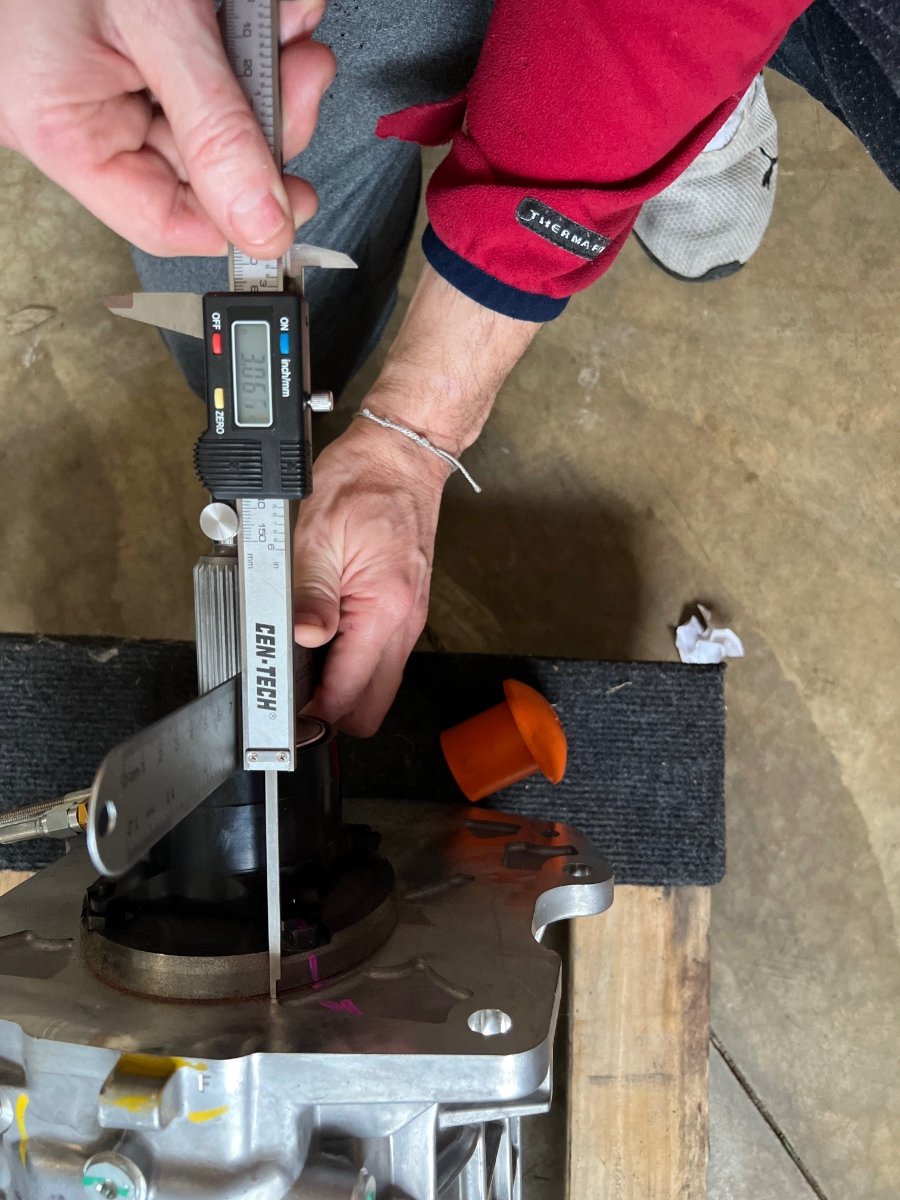
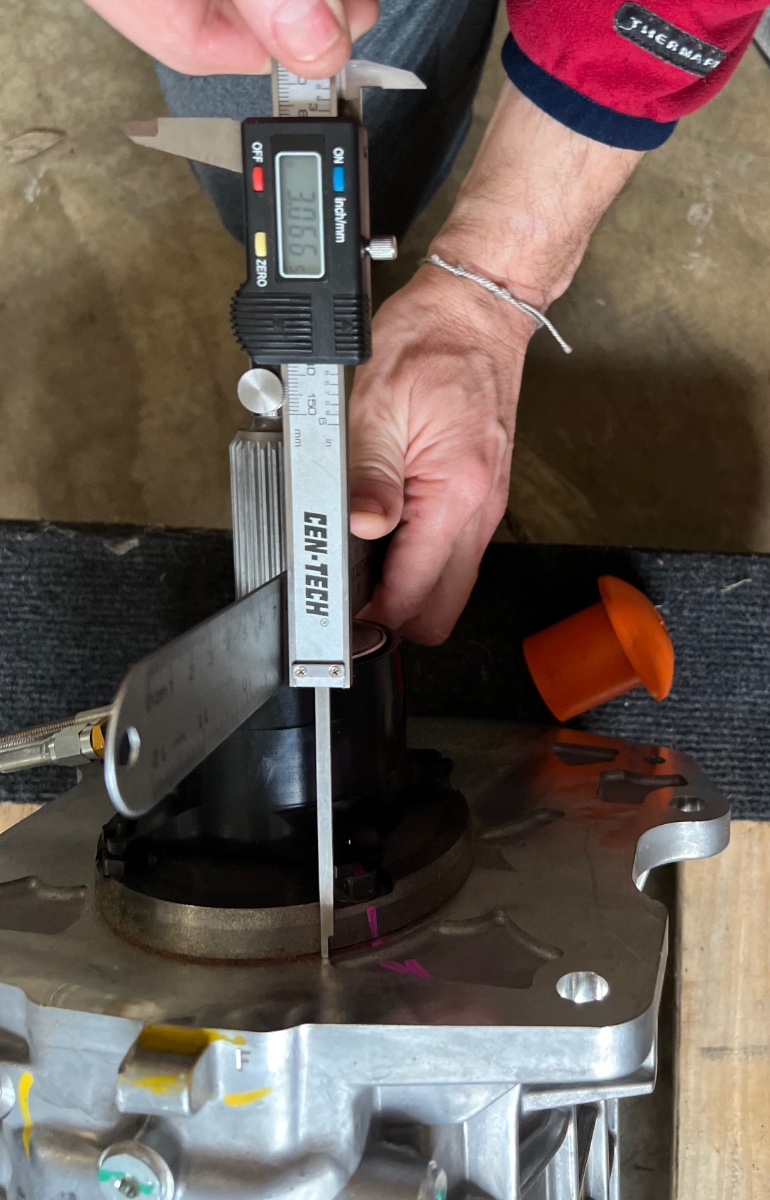
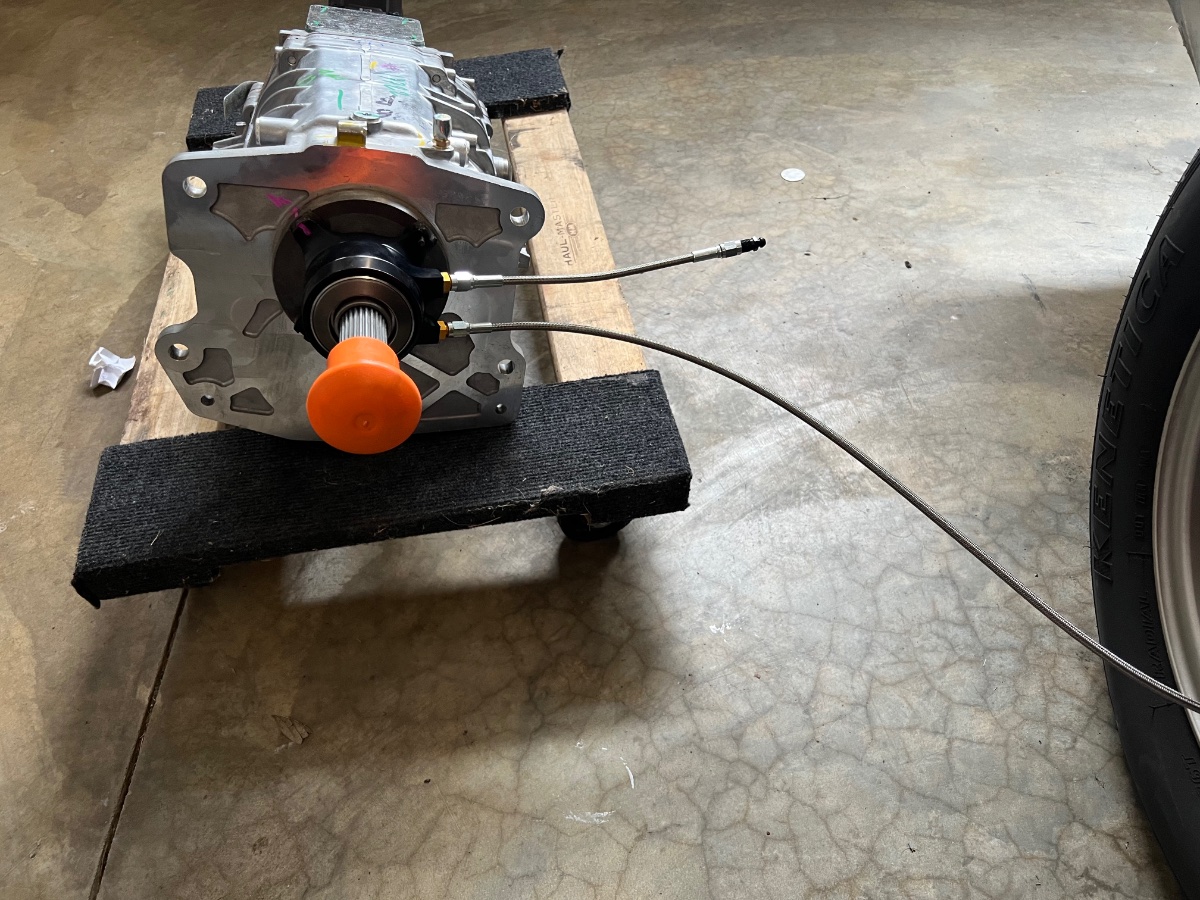
Things are moving fast! After measuring for clearance between the clutch fingers and throw out bearing my son and I got the transmission bolted to the engine. Took a bunch of wiggling but once the spines lined up it went right. Since my bell housing was made for a mechanical throw out I was even able to double check the measurement using a feeler gauge through the hole made for the clutch fork and it looked perfect! A couple days later my sons friend joint the fun to help cut and weld back on one frame bar that has to be moved a few inches to clear the starter part of the bell housing. We though that we would have to also cut and increase the height of the cross bar above the bell housing but when test fitting the engine in we found we still had .25 inches of clearance! So we just bolted up the motor mounts I got from Scott Minehart at stalker cars. Another pleasant surprise was that the transmission mount bar lined right up with the tkx mount plate! All I had to do was slot out the original bolt holes some so I could screw them in. All in all the new heavier tkx transmission fit in the transmission tunnel EASIER than my old t5!
-
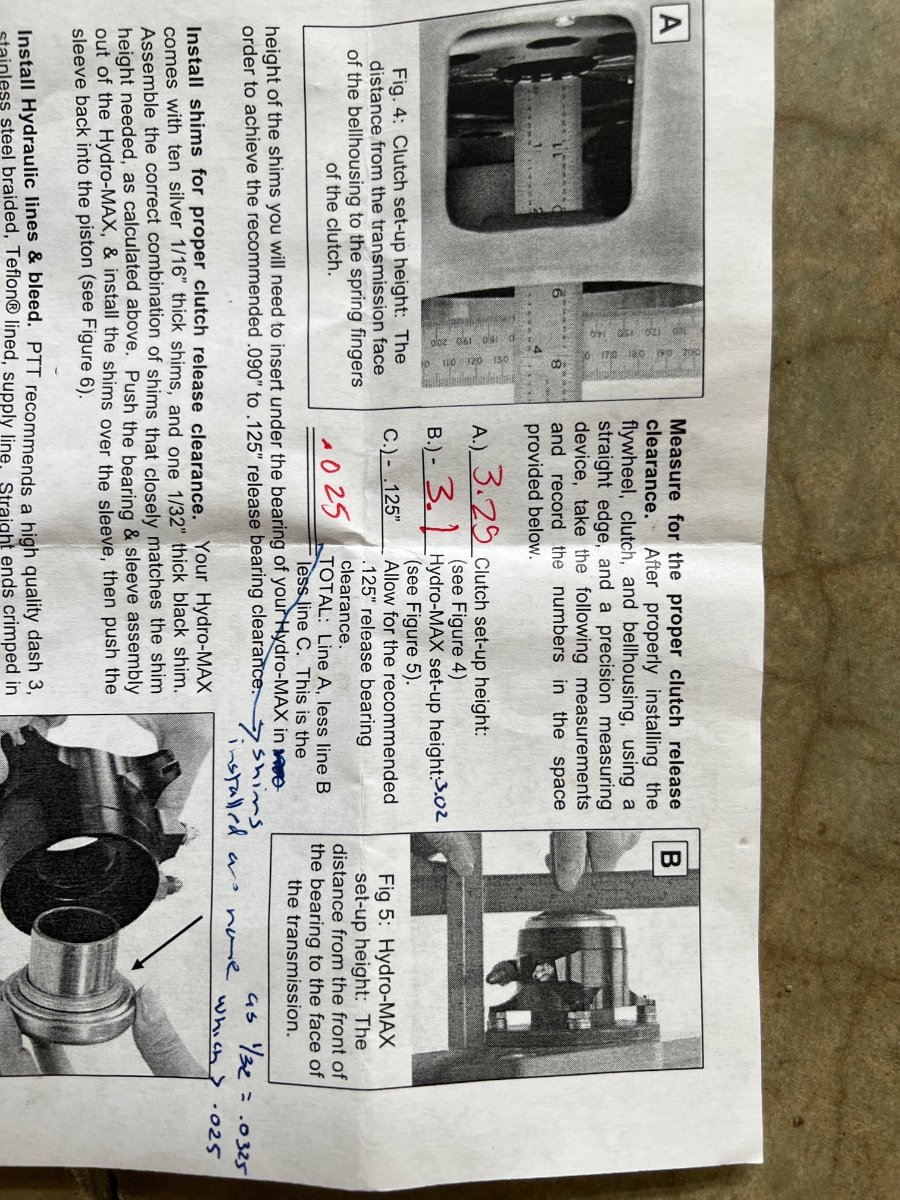
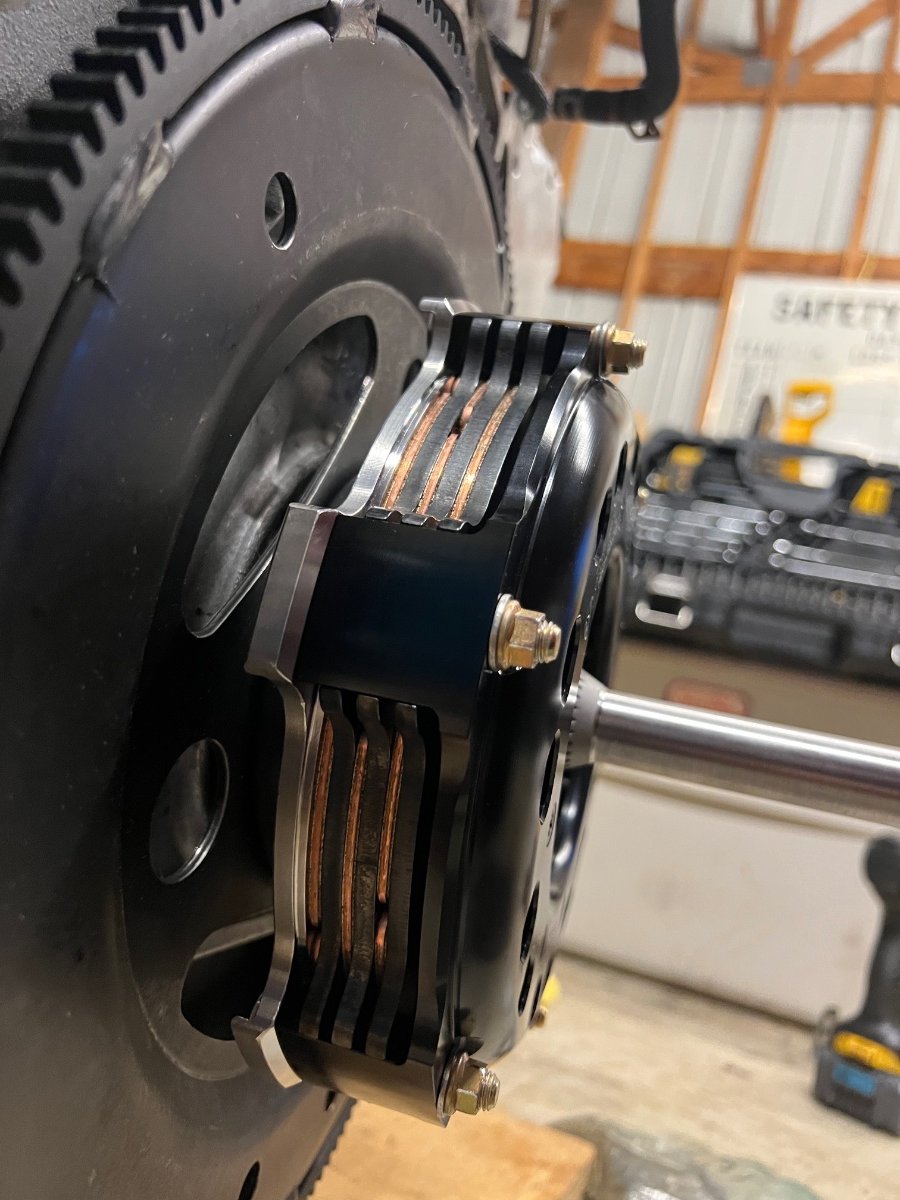
Also got my PowerTrain technology throw out bearing installed. As part of the install my daughter and I had to measure to see if we would need to add shims to the bearing. Turns out that that no shims were needed. I guess the height of having a triple disc clutch takes up all the space between the throw out bearing and the clutch fingers. In the end you are supposed to have between .125 and .1875 between the two. I ended up at .150 with no shims. install is super easy. I have a bleed tube top that will extend out of the bell housing for initial bleeding future fluid changes. Then the longer master cylinder hose on the bottom. Since I didn’t have to add shims the only other part of the install was to undo one bolt and put in an anti spin stud in its place. Once that was in you just slide on the bearing and you are done.
-
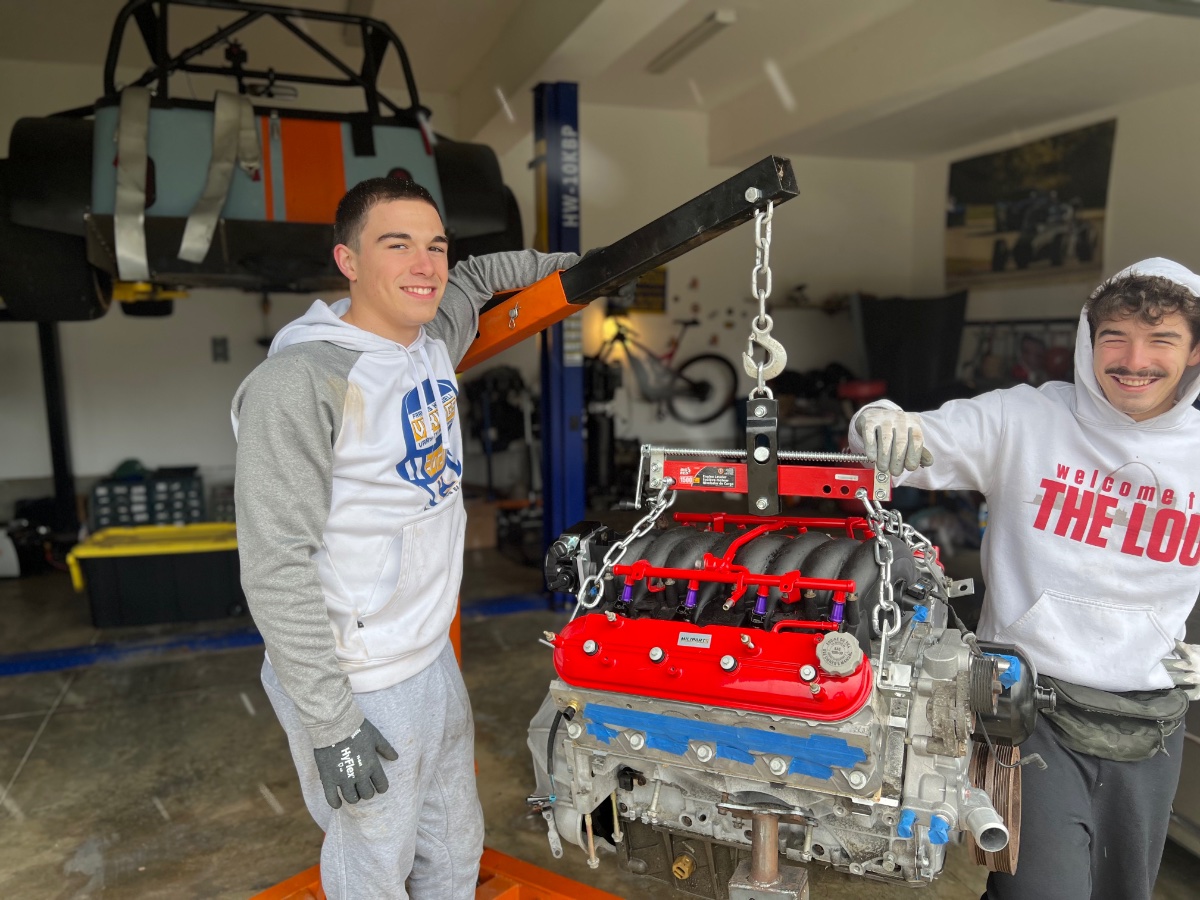
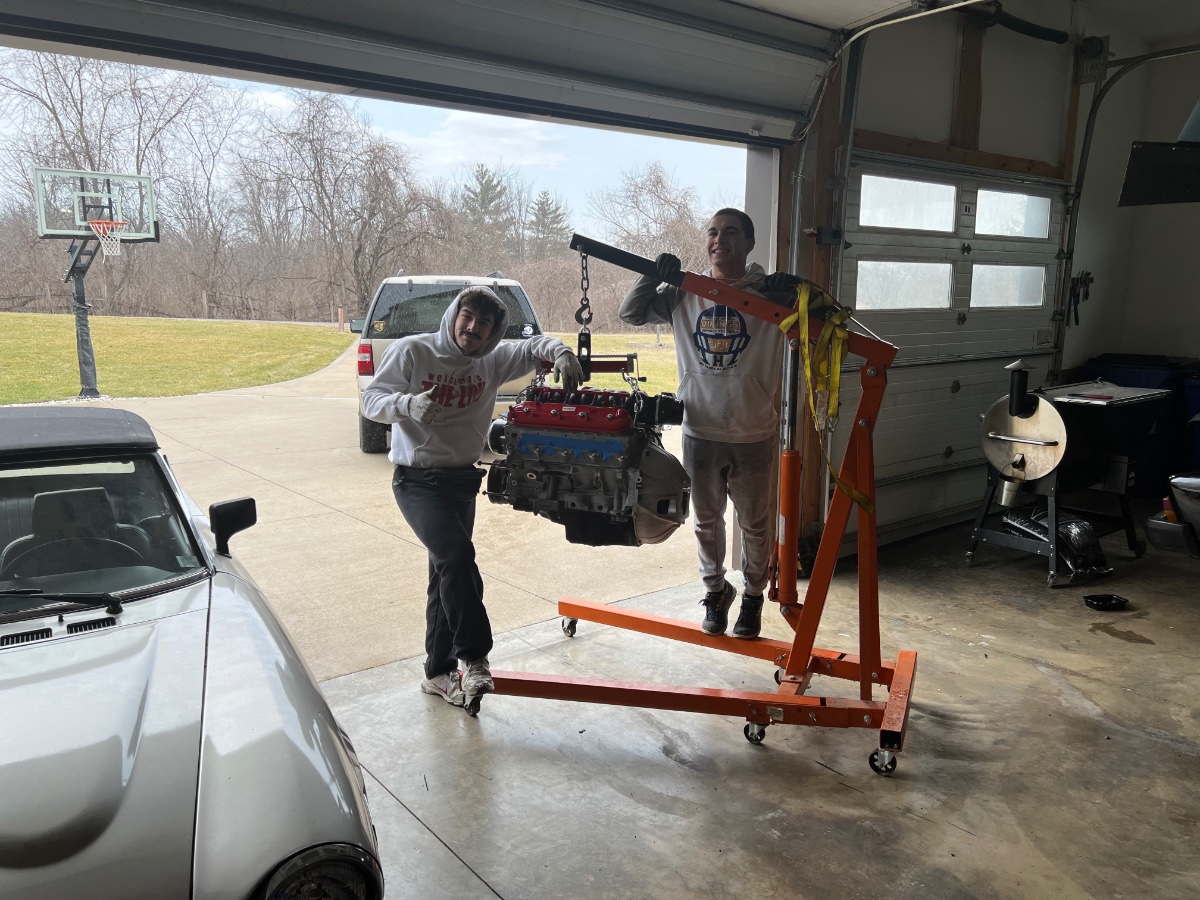
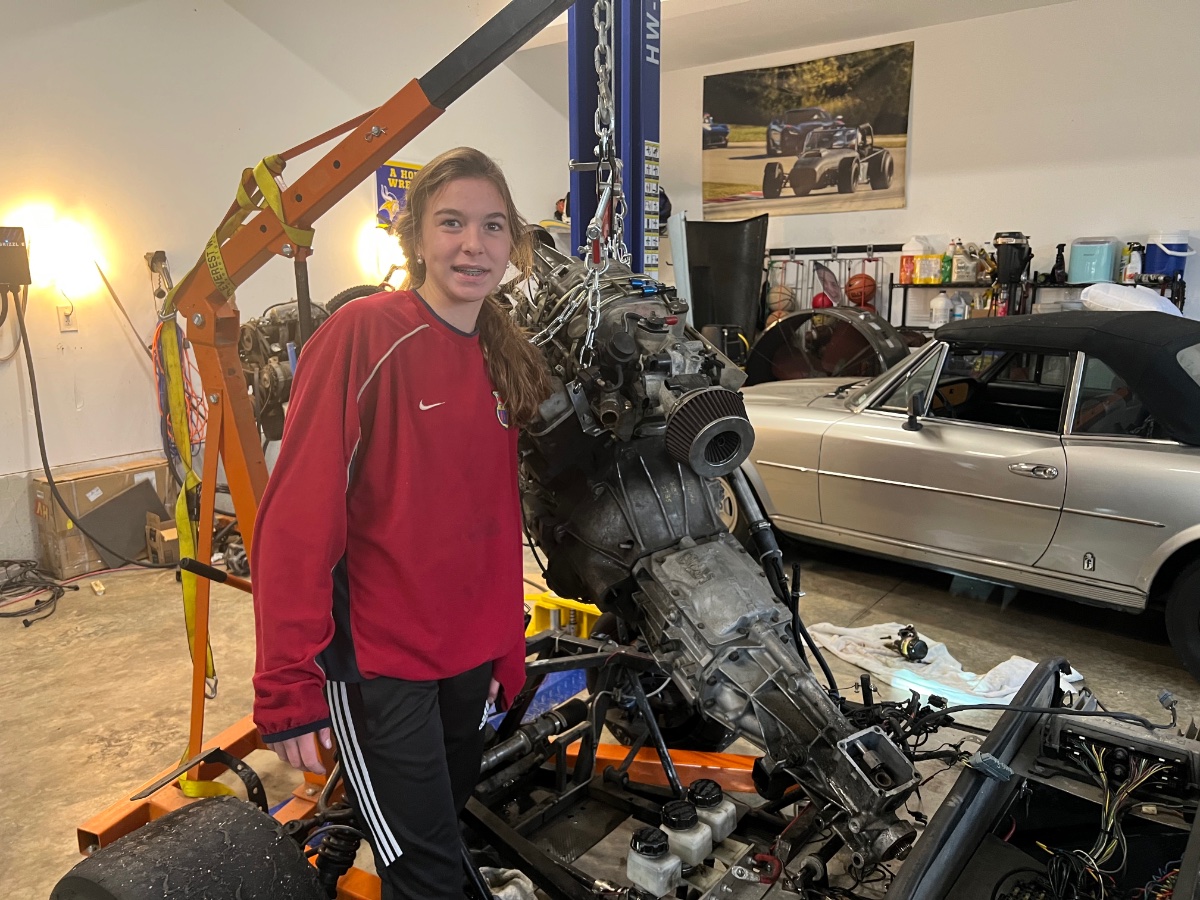
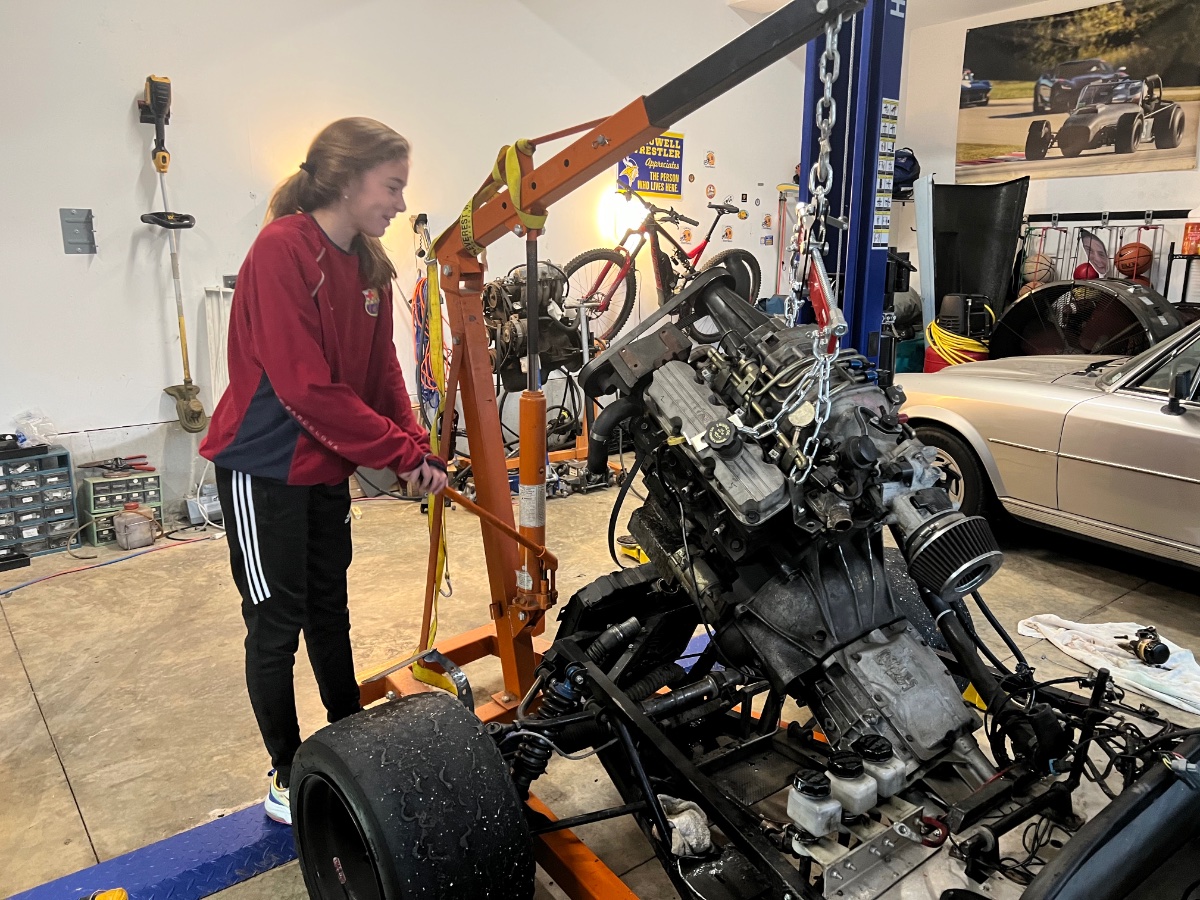
Got the engine moved from my pole barn down the garage with some help from 2 of my boys. With their help we were able to use the cherry picker to load it into the back of my Ford Expedition and drive it around to the garage where we reversed the process and used the cherry picker to unload it.
-
 I used to go to 471 pair to see all sorts of build information on Brunton Stalkers but haven't been able to get to the site for quite some time. Wondering if anyone knows of another site that the content moved to?
 -
MV8 thanks for the ideas on fixing the holes and and the sun shield for the screen. I will try both of those. Croc - yes it is. It is actually my 19 year old sons. We restored it as a father son project just over a year ago and he learned to drive stick on it.
-
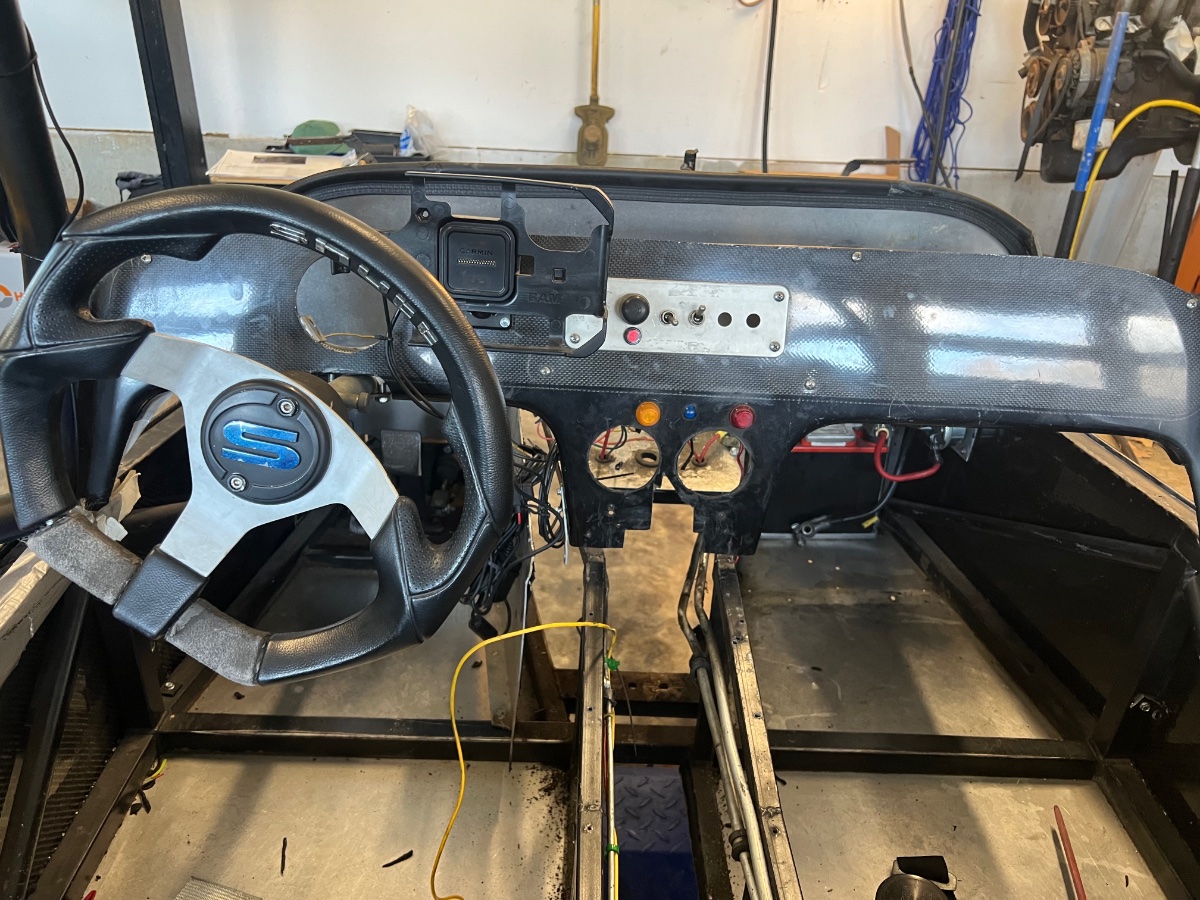
Lot of empty holes in the dash now that I don’t need separate gauges. Guess I need to figure out what to do about the empty spots now. Update: I ended up just cutting off the section of the dash in front of the shifter that had the gauge holes in it. For the whole right in front of the steering wheel I added a piece of carbon fiber to the back side and mounted the 3.5 inch dash on the front.
-
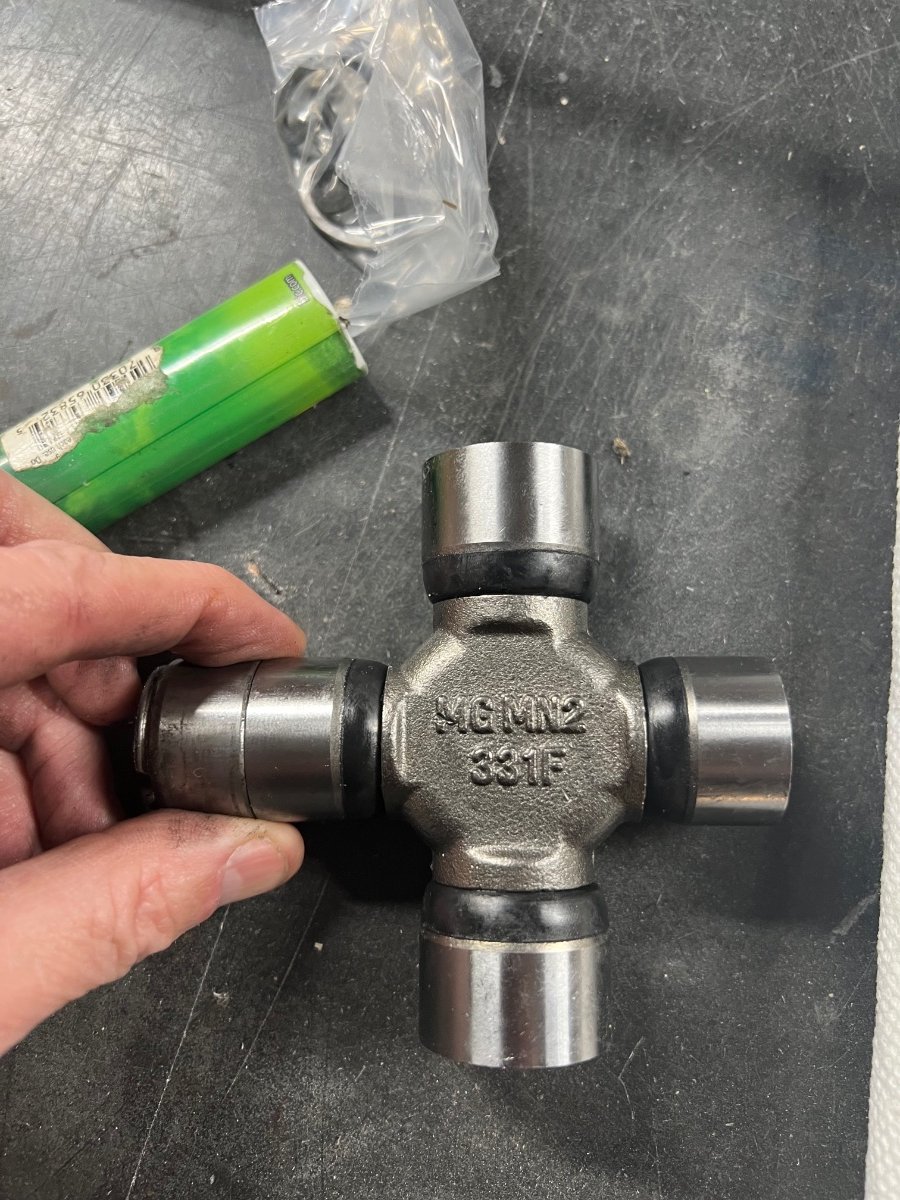
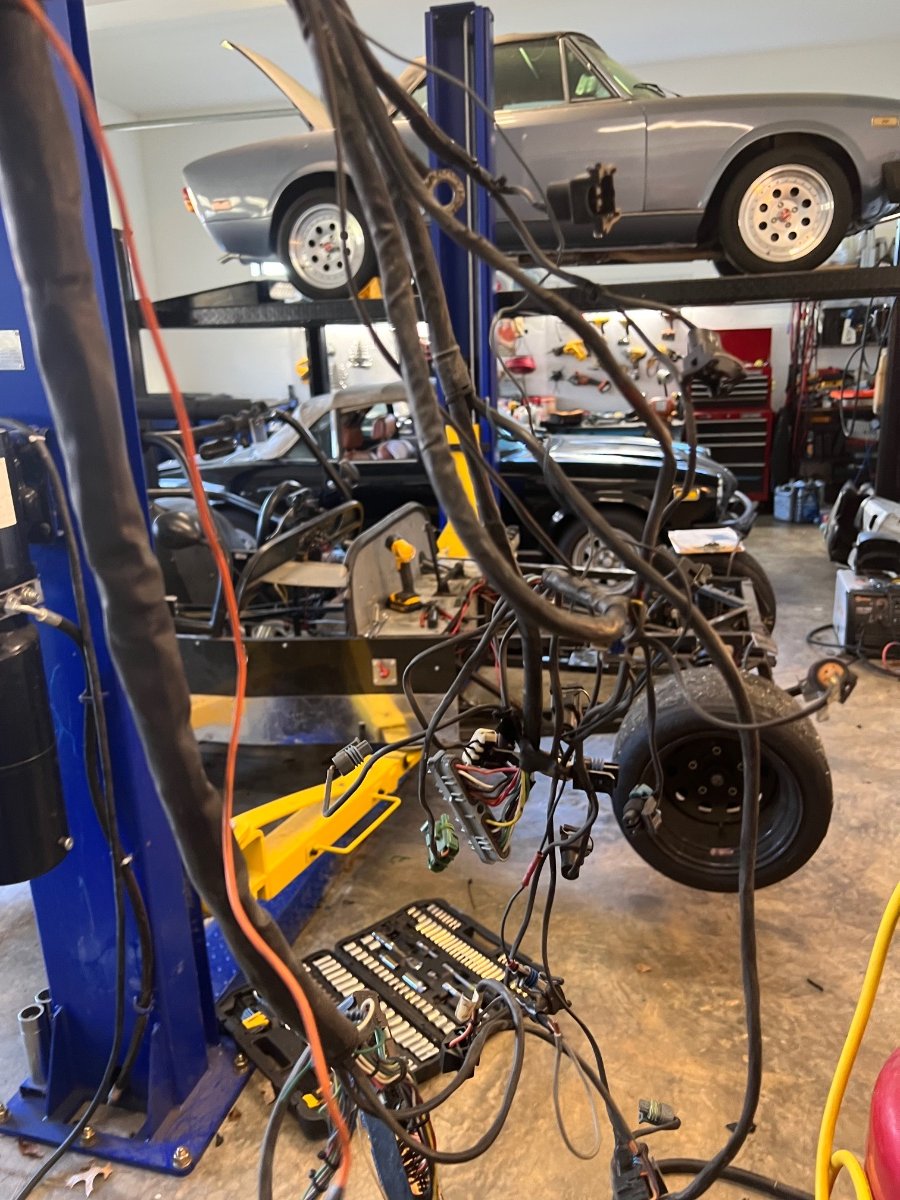
Picture of the split size ujoint I found old ujoint and old slip yolk after I finally got he caps off. Pressing the ujoint from side to side was a piece of cake but getting a cap off that too a lot of cussing. matching up the now Broken apart old ujoint end cap with new part small side to ensure they were both 1310 size. pic of the old Pontiac engine wiring harness once I freed it from the car.
-
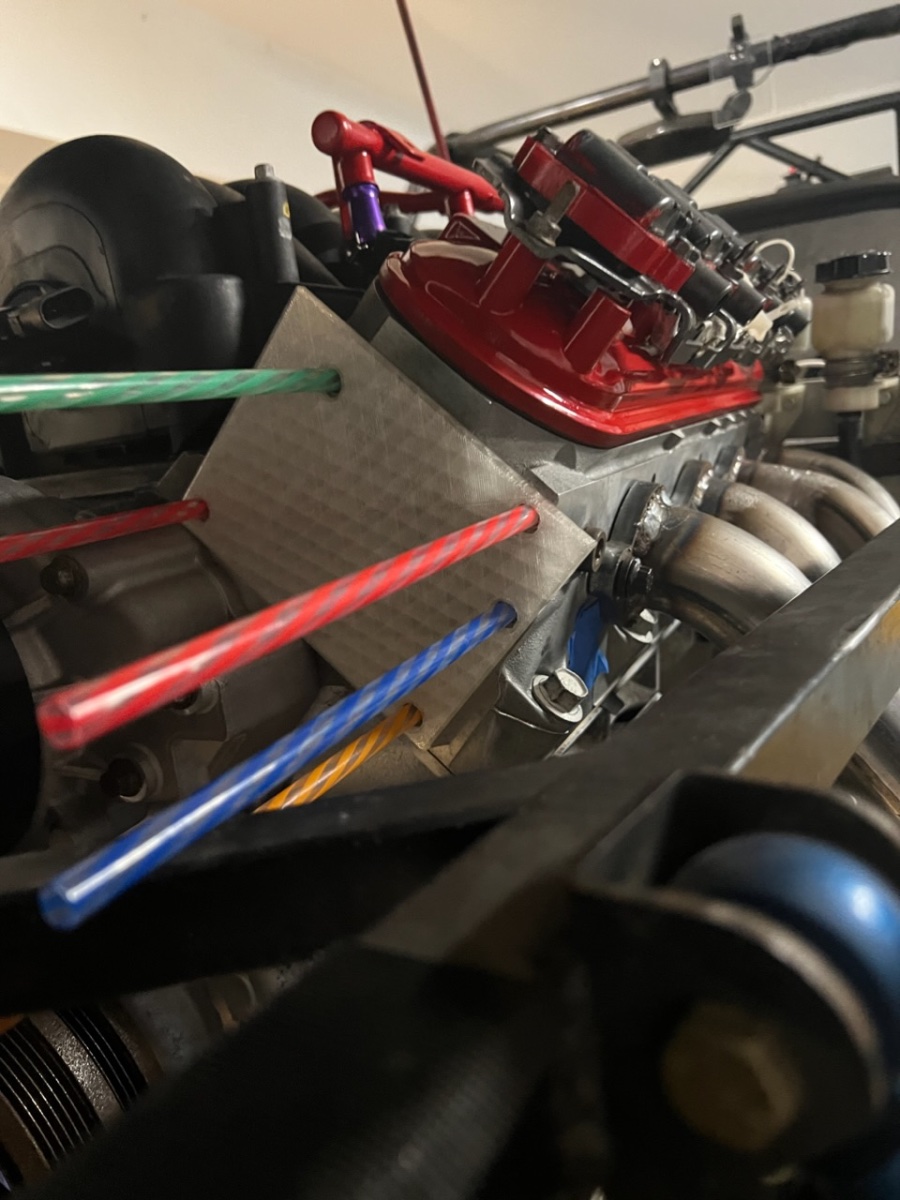
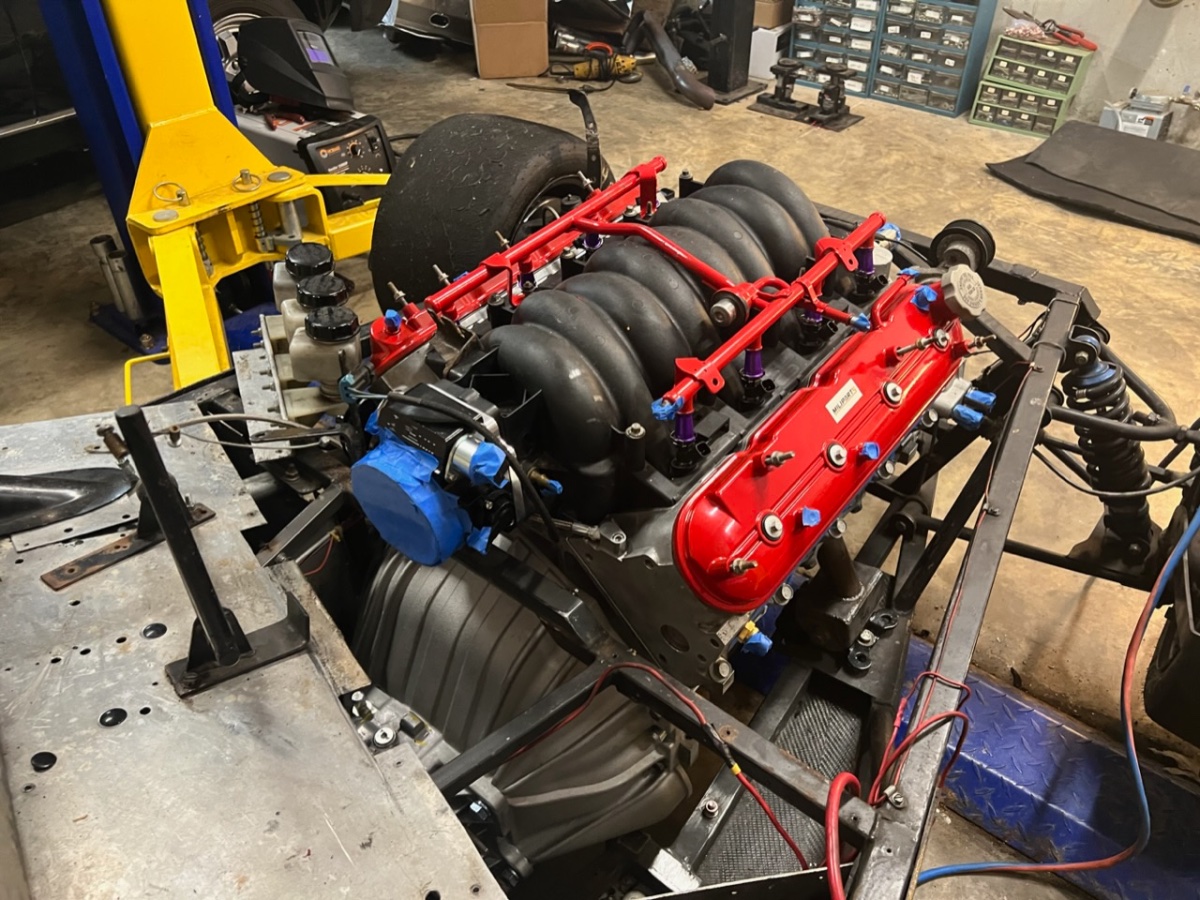
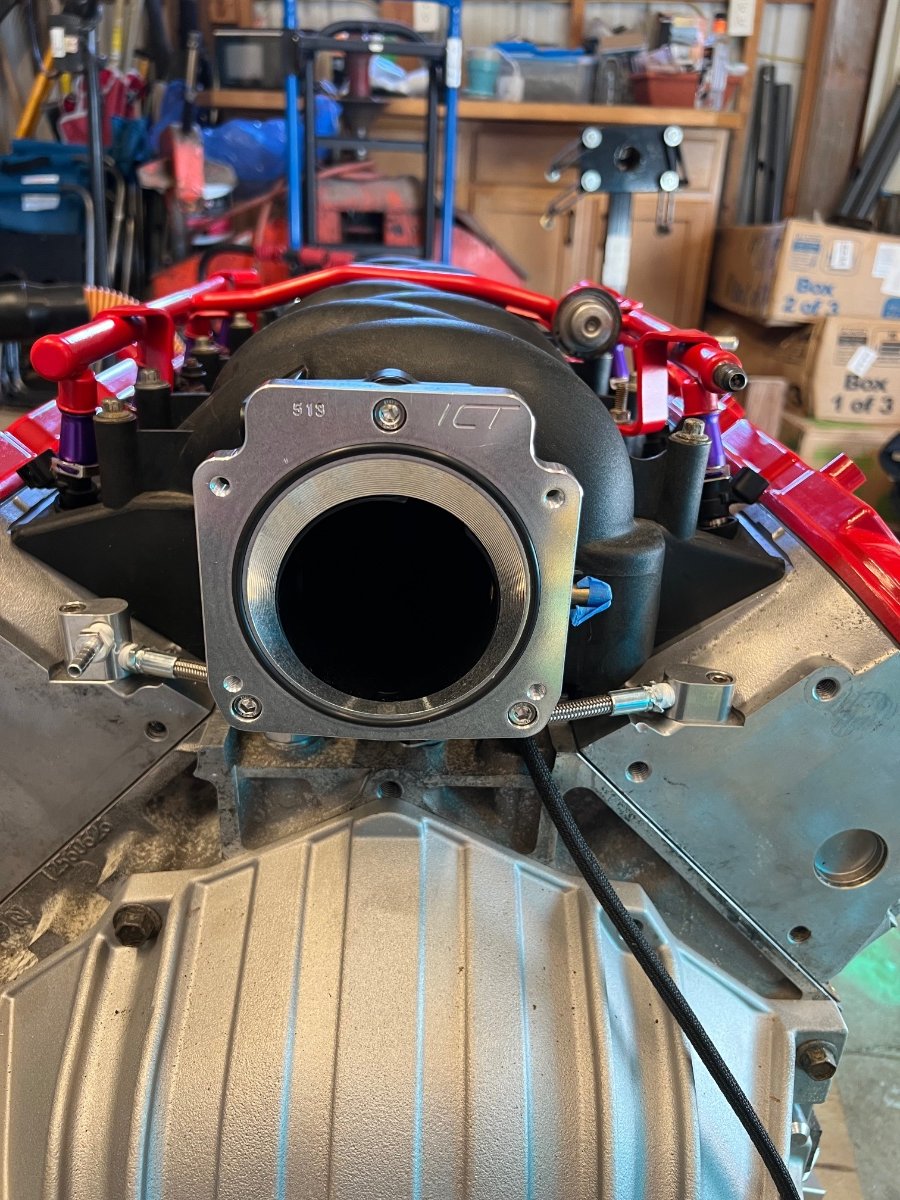
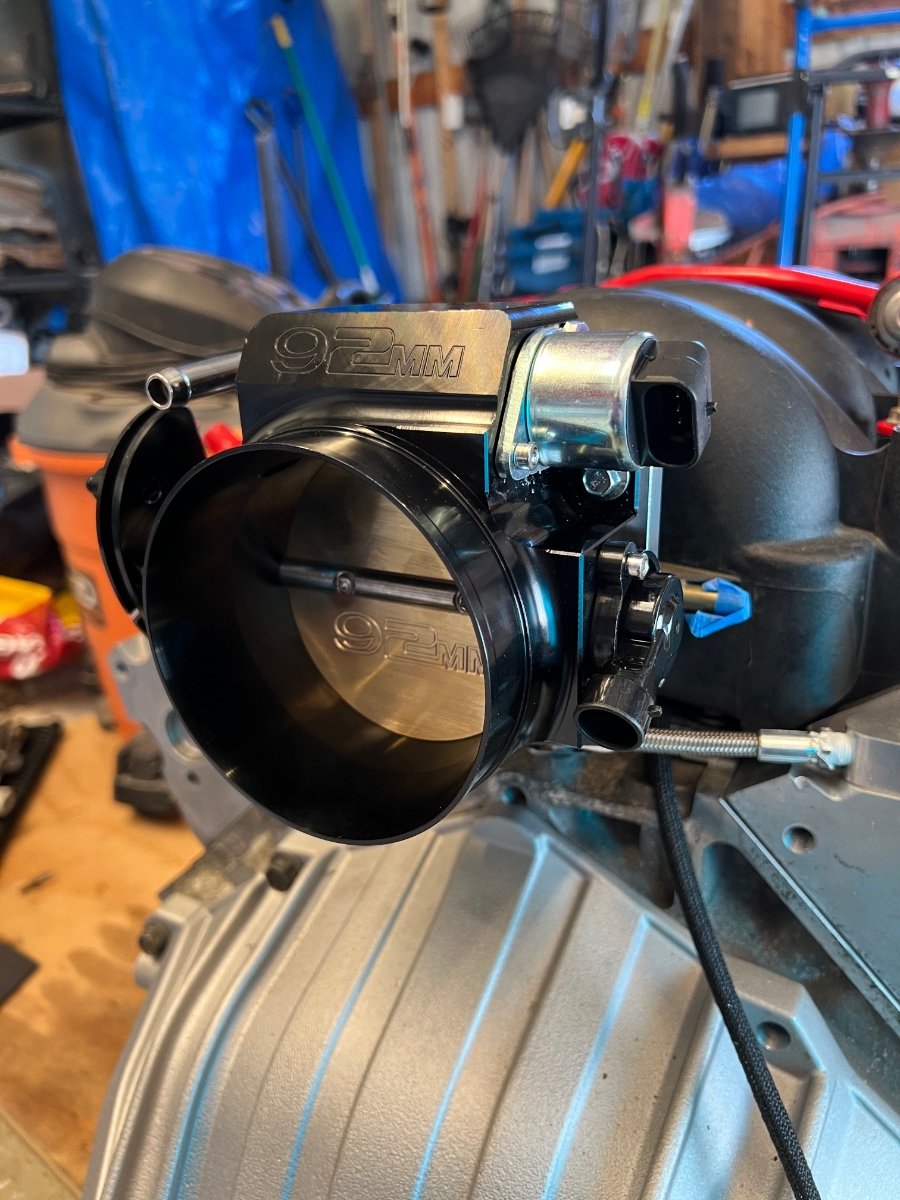
Got a little more done this week. Mostly stripping down the car of the now un-needed components like the old wiring harness and gauges. The holley efi system comes with a 3.5 inch dash that can display anything you want to see and also light up different colors for warnings (like low oil pressure etc). Also had one sarcastically fun time getting the old u-joint off the drive shaft. In the end I won though and it came out. Turns out the drive shaft side of the ujoint is a ‘1310’ size but the slip yolk I bought was a ‘1350’ size. I must not be the first one to make that mistake as they have ujoints that allow you to mate them! I also bought and installed a new throttle body and adapter plate. The old throttle body was just too junky so this makes it look at least a little nicer and can be used on larger ls engines if I ever switch in the future. picture of the adapter that allowed me to mount my new 4 bolt 92mm throttle body to my 3 bolt 75mm LS6 intake. Really nice piece for from ict billet that cost $30 or less and came with all the mounting hardware. new throttle installed. I used the 4 bolts that came with the throttle body to mount it instead of the ones that came with the adapter as those were too long.
-
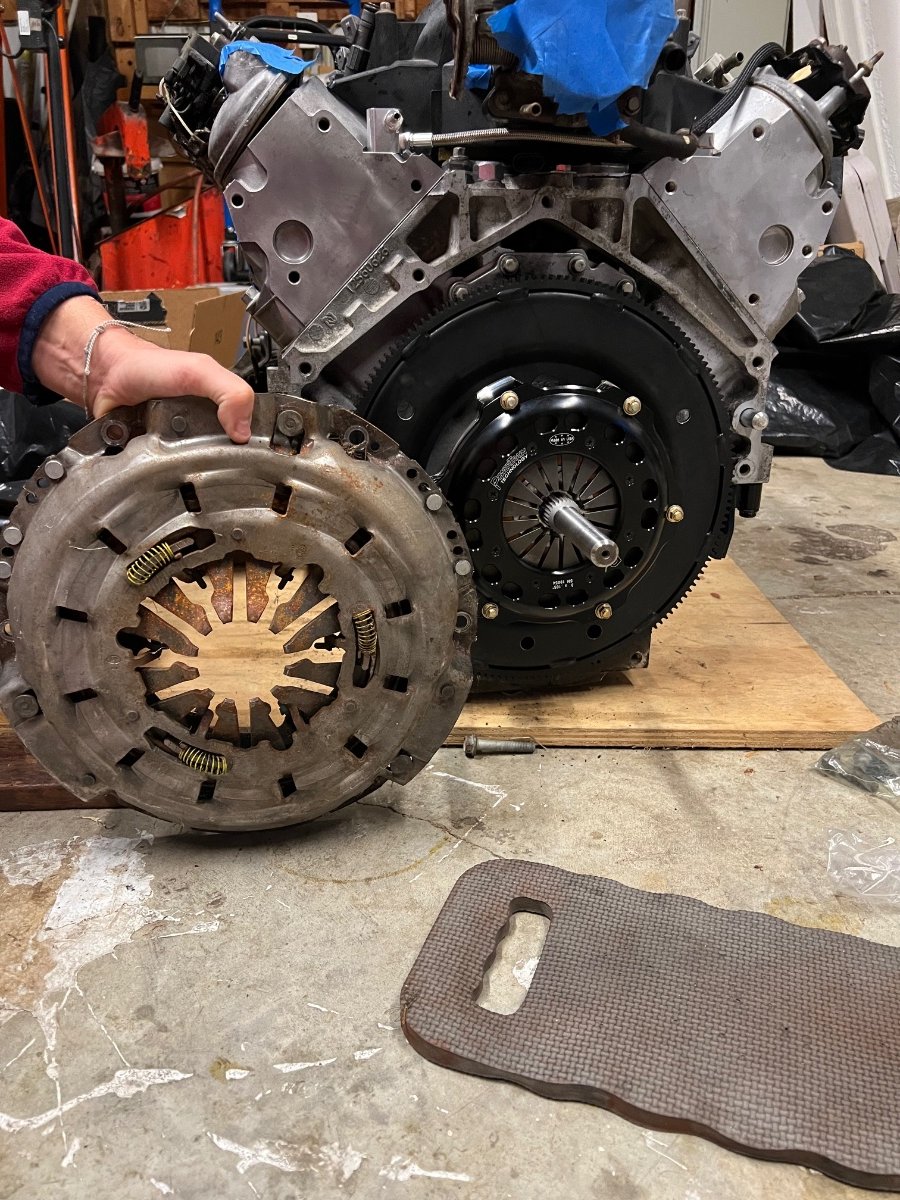
I will definitely be doing a garage sale or all the unused LS and 3800SC parts after I get the new engine up and running. I have so many parts around that I think I am going to have to get more shelving to hold them As to the pressure plate I may not be seeing the potential problem you referencing or could be that the 7.25 clutch connects to a “button flywheel” (the silver part of the clutch). This small flywheel then attaches to the flex plate and crank. The whole setup including flex plate weight just 21lbs. Vs the stock clutch and flywheel weight of 52lbs! https://www.powertraintech.com/collections/clutches-flywheel/products/7-25-clutch-flywheel
-
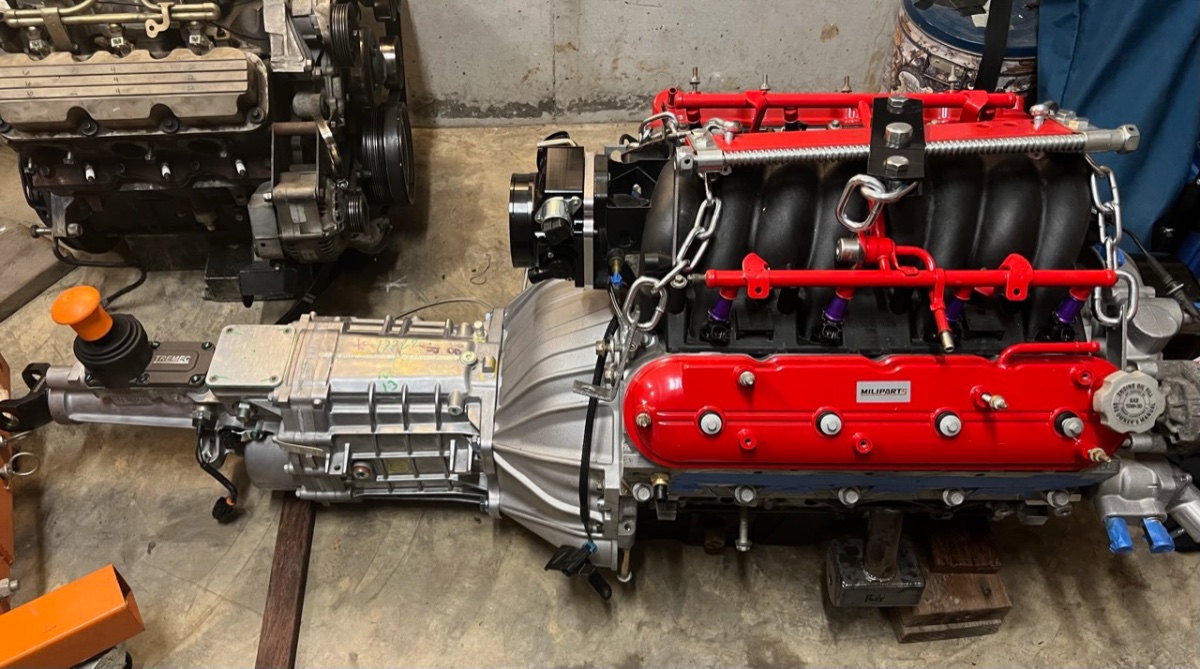
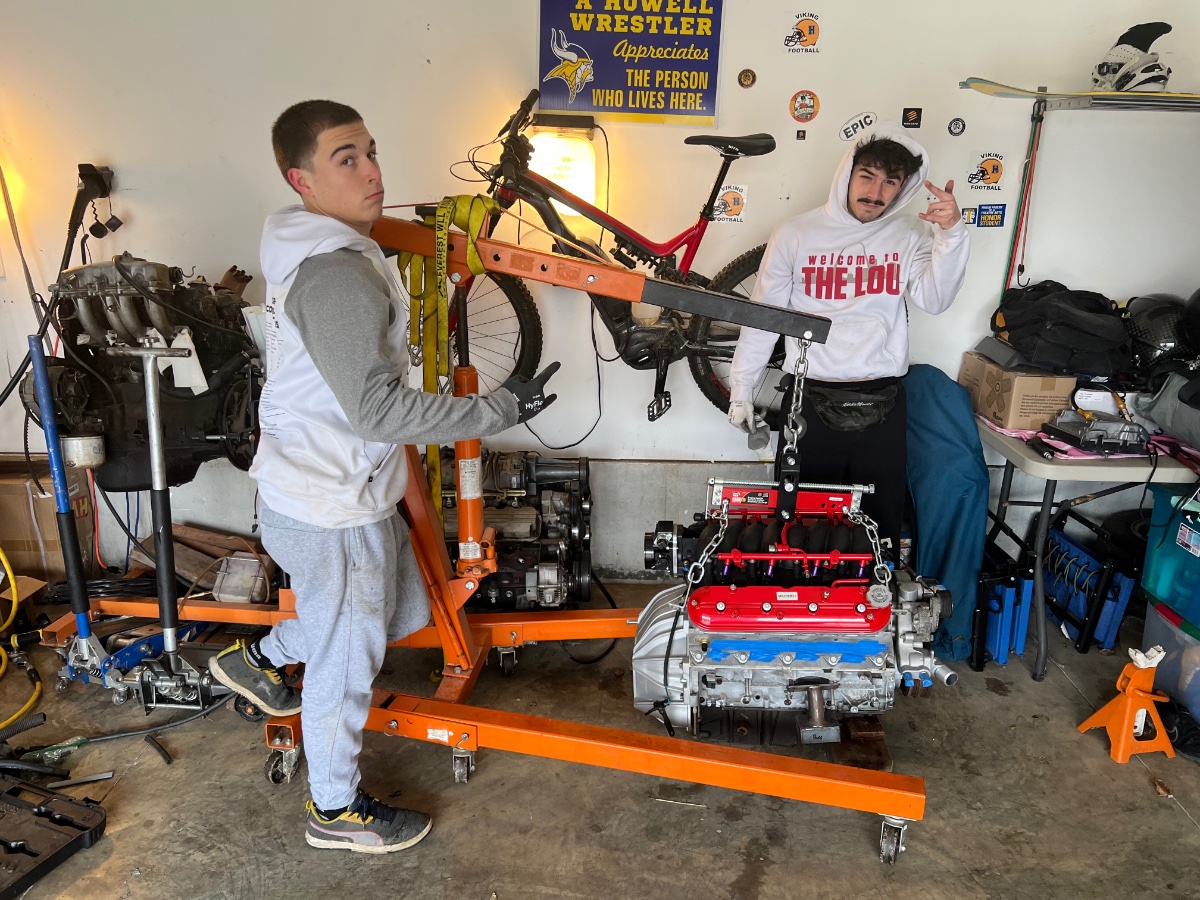
Finally making the upgrade to an LS Engine in my Stalker this winter so figured I would post up some pics and info on the upgrade for others that have yet to take the leap. Main components of the upgrade are: 1. Upgraded naturally aspirated ls1 (don’t do this just buy a crate ls3 as the cost is almost the same) 2. New close ratio Tremec Tkx transmission (really looking forward to having a usable 5th gear on the track) 3. PowerTrain technology 7.25 inch triple disc clutch 4. Holley TeminatorX Efi system (going to learn how to tune!) My 8th grade daughter has been helping me out with the engine build and work so far which is also really fun! Here are some pics so far.
-
it is with 10/10ths Motorsport. They are a great bunch of guys to run with. And I just love NCM.
-
I will be at Putnam sept 18th and 19th and then NCM in October 2nd and 3rd. Be great to run with another 7!
-
I am looking to buy some carbon fiber wings for the front and back of my Brunton SuperStalker. Catch is I run 10inch wide tires at all 4 corners. Was wondering if anyone knows if there are carbon fiber fenders that would fit such a wide tire?
-
Looks great! Not sure if you travel outside of Michigan but I will have my Stalker at NCM Memorial Day Weekend and Putnam June 19-20 both with 10/10ths Racing.
-
That was a fantastic session! I have only driven Barber in a c6 z06 so far but so want to go back in my stalker as it seems like a great track for a seven. Can’t imagine I will get near the times you set though really impressed!
-
Wow I love both the key fob and key chains above! Great stuff.
-
Below are photos of the Parts and steps described above: Applying the Carbon fiber to the Foam Core with adhesive Saturating the Carbon Fiber Finished Parts! They turned out really nice. Very hard, and very light. They also had nice shine to them. Not perfect but not bad for the first couple of pieces considering no sanding or second layers of resin were applied.
-
Wanted to post my first update on progress. My son and I have made two of the underbody pieces so far and just today made a good mockup of the rear diffuser including Rakes using this HardBoard from Home Depot (only $12 for a 4x8 sheet and real easy to cut with a jug saw). First off how we made the first 2 underbody Panels (Panel 1 = right behind the nose cone and before the oil pan, Panel 2 = driveshaft cover) 1. Mock up the Piece you are making using Cardboard or the Hardboard linked above. I used cardboard but if I did it again I would use the Hardboard as it doesn't flex like the cardboard does and is just as easy to work with. 2. Wax the Glass you bought with 4-6 layers of the Release Wax. So far the release wax has worked great for us. The carbon fiber piece with resin cures right on the glass with the wax and when done curring it has popped right off the glass for us. 3. Using your Mocked up Piece, cut out all of your materials (details below): Note 1: I recommend cutting the Carbon Fiber last as the less you move it the better off you are. Note 2: Also be gentle with the carbon fiber as the weaves can shift and and any place you grab it tightly will likely show as an imperfection in your final product. Parts to Cut: Foam Core - Cut 1 piece to the exact size of your mocked up part Peel Ply - Cut 2 pieces to big enough to cover your part plus a few inches on each side Breather Cloth - Cut 2 pieces to big enough to cover your part plus a few inches on each side Breather Cloth - Cut a third piece of breather that you can run from the Part you are making to the vacuum attachment hole. Carbon Fiber Cloth - Cut 2 Different Sized Pieces using your Fabric Scissors Cut 1 should be 4 inches bigger on all sides than your mocked up part (the extra allows you to wrap it to the backside) Cut 2 should be cut to the exact size of your mocked up part 4. Making the First Side of your part: Adhering the Carbon Fiber cloth to the Foam Core Take your Foam Core and give one side of just a light spray of spray adhesive so it has a tacky feel (I used 3m super 77 from home depot). Gently pick up your big piece of Carbon Fiber (cut 1 above) and lay it down on the tacky foam core I try to hold it from underneath with my palms and pinch it a little as possible with my fingers When laying it down on the Foam Core I try to let it droop in the middle and then move my pawns out slowly so it goes to the edges Make sure everything lines ok and then apply even pressure directly downward to get the carbon to stick evenly to the Foam Core Once stuck flip the Foam Core over and give a light spray to the edges of your part where the carbon fiber will wrap to. Wrap the edges and once again make sure everything lines ok and then apply even pressure directly downward to get the carbon to stick evenly to the Foam Core Mixing your Resin and Hardener Note: with the Resin and Hardener I bought you want to get everything below done and vacuum bagged in about 30 minutes after mixing them Each Weight of Carbon Fiber and Each type of Foam Core needs a different qty of the mixture For the my Carbon Fiber Cloth and Foam Core I needed 95grams combined per square foot (144sq inches) My Resin to Hardener ratio is 2 to 1 so that gave me Resin 63grams per square foot Hardener 32grams per square foot Figure out the square feet/inches of your part and use that to determine how much Resin and Hardener you need to Pump out and weigh the amounts to ensure you got what you need (I used a digital food scale that can be zeroed out for the weight of the cup and measure in grams) I attached the calculator spreadsheet I use. Just enter the square inches in the green cell and it will tell you what you need. Mix the resin and hardener using whatever you want (i used wood popsicle sticks and mixed them in a plastic disposable cup) Applying the Resin Using your throw away paint brushes apply some resin to the waxed area of your glass Apply resin to the part you are making until is it fully saturated No real trick here just don't let bristle fall off and don't apply lots of pressure that could move the weave If you have build of resin in area you can use your Plastic Spreaders to move it around the part and even it out Flip the part over and place it on the resin area of the glass Apply resin to the carbon fiber you wrapped to the back side of the part (just the carbon fiber portion no need to put resin on the still exposed foam core) Vacuum Bagging the Part (this applies nice even pressure and removes any excess resin weight) Put 1 piece of your Peel Ply on top of your Carbon Fiber Part Put 1 piece of your Breather Cloth on top of your Carbon Fiber Part Put your 3 cut of Breather cloth running from the breather on the part to the vacuum attachment hole This allows the vacuum to suck the air out as the breather prevents the bottom of the bag from sealing the air extraction point Put your cheap roll plastic on top of everything (don't let this cover the air extraction point I do this so that if Resin seeps through the breather cloth it doesn't stick to the expensive vacuum bag Get a helper and have one of you pick up the glass with the part on it while the other slips the Jumbo Vacuum Bag over the part Seal vacuum bag (basically a big zip lock end) Attached your vacuum or shop vac to the air extraction port Flip on the vacuum and watch all the air get sucked out and the part become visilbe Removing the part and seeing your creation Wait 12-24 hours for the part to cure Release the vacuum from the bag Remove the Glass with from the bag Separate the part from the glass using your Wedges Clean up: Spray the glass with rubbing alcohol and Use a razor blade to clean off an expoxy resin on the glass Repeat until clean and ready for next part. 5. Adding Carbon Fiber to the back side of your Part Follow the same steps above but use the small piece of Carbon Fiber (cut 2 above) Resin and Hardener Calculator.xlsx
-
Parts List and Links to what I bought (fyi I was surprised to find out it takes a lot more than just the carbon fiber cloth): Carbon Fiber Cloth There are lots of different weaves a weights and thread counts but for this I bought Toray t700. Main reason is it supposed to be good and I found a deal on Facebook Marketplace where I got it for $16 a yard vs $42 retail. Yards are 50 inches x 36 inches Foam Core - used to give rigidity and strength to your parts without increase weight Buy the ones linked here as they are definitely the best value out there in the 4pack of 2x4 feet wide so shipping isn't crazy I bought 2 4 packs of the .125 inch thickness Note: I also bought 1 4 pack of the .375 thickness at the same time since it didn't cost more to ship and I may use it for the diffuser. Resin and Hardener and Pumps I just told them I wanted glossy and clear finish and they recommended this one I bought the linked kit which was 1 gallon resin + 1/2 gallon hardener and you mix it 2 to 1 so you run out at the same time Peel Ply - this is plastic that won't stick the Carbon Fiber Resin I bought 5 yards to start with I bought the 60 inch wide yard Breather Cloth - this allows sucks up excess resin to reduce weight and also allows for even vacuum pressure I bought 5 yards to start with I bought the 60 inch wide yard Jumbo Vacuum Bag - like a big zip lock bag. Kit from target came with 2 bags 48 inches long by 35 inches wide I have been using a 5hp shopvac to suck the air out of these bags Seems to work well and WAY less hassle than making your own bag Note: for the diffuser I will have to make my own vacuum bag since the part is too big to fit in the one from target. For bigger pieces like that you will need: plastic - to make the bag. They sell special plastic for vacuum bags but it costs way more than the stuff from home depot so I am going to try that first butyl tape - used to make an airtight seal between the plastic and the table your part is on. Buy it from amazon vs the carbon fiber dealers as it is cheaper vacuum pump - I bought this one on facebook marketplace for $125. Really I think any vacuum pump would work. vacuum bag connector - punches through the plastic and then runs to the vacuum pump to suck the air out. Release Wax - used to coat the surface that the carbon fiber rests on so it comes free once the resin cures Glass - used to give the carbon fiber a smooth surface and it is easy to clean the resin off of when you are done Search Facebook Marketplace and buy a piece of glass, shower door, glass table or something vs. calling a glass shop I bought piece of glass that used to be in storm door. It was 32x70 inches and was $10 Plastic Spreaders - used to spread out resin so you don't have build up in one area I bought 5 and you can clean them with alcohol after use if you don't wait too long Wedges - to separate the finished carbon fiber part from the glass base I bought 3 Cheap Paintbrushes I just used ones around my house I plan to try foam brushes next and will you know if that works better Fabric Scissors Regular may work too but I my wife had this pair and it works great to cut the carbon fiber
-
So lets start out with my goals. Create a flat bottom to the car (as much as possible) - this is necessary according to the internet in order to make the air flow smoothly to the diffuser. Without this they say diffusers are pretty much for show Make a rear diffuser so that I increase downforce without much drag Make side body panels for the car I might make the main nose panel in the future but not real interested in taking on making a mold right now I want carbon fiber fenders/wings but if I can buy them vs. make I will Keep it as light or lighter than the aluminum option After taking a passenger on several laps during my last track day I got first hand experience with how weight slows you down. I lost 4-6 seconds per lap with a 180lb passenger in the car Since carbon fiber is way more expensive than aluminum I hope it will look cool right now my car is a very functional track car but lets put it this way I am not afraid to pull out an angle grinder to grind down the fenders or make something work with duck tape should an issue arise while at the track. After making the carbon fiber parts hopefully it will look good enough for me to at least think about it before making a track side hack
-
After seeing xcarguys's flat bottom and rear diffuser and hearing about the benefits of both I decided that I had to have them for my V6 Stalker Classic. At the same time my son who is a High School Senior this year and going into engineering asked if he could buy Carbon Fiber and make some parts. The timing was great so I cut him a deal and told him I would buy the materials if he made parts for my Stalker. Not sure if the parts will turn out well but this thread will document the process and parts we are making either way
-
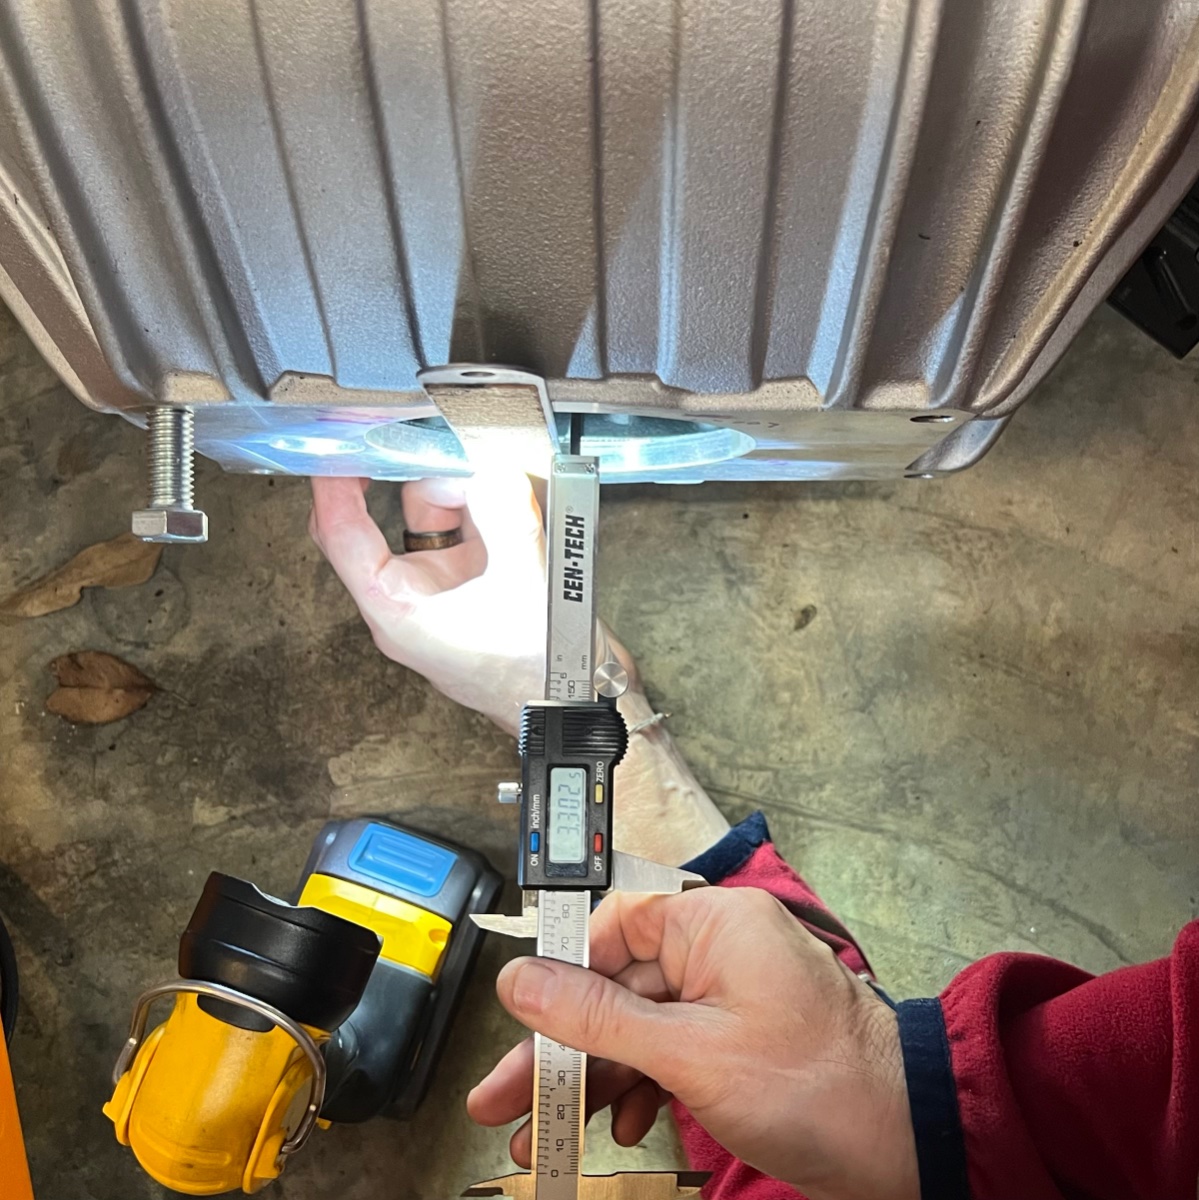
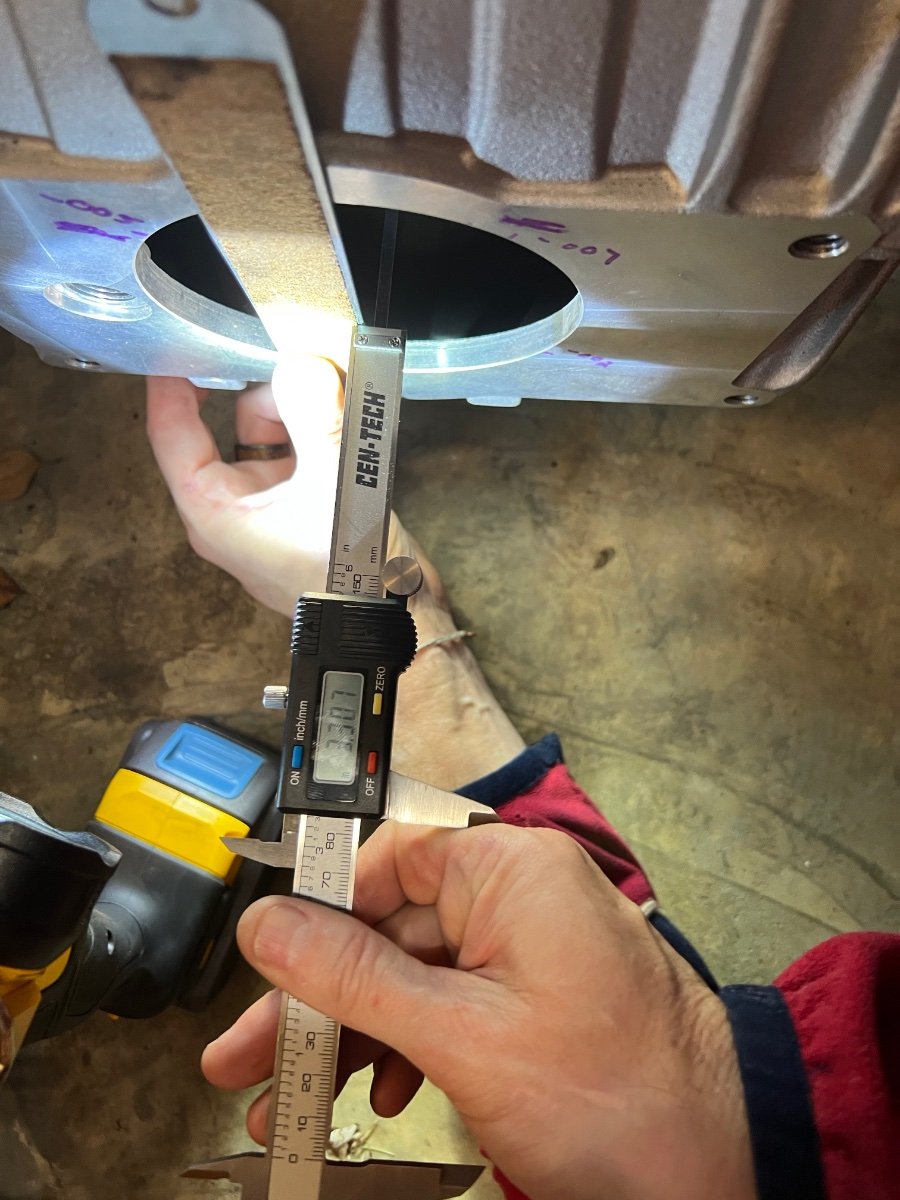
I am planning to add a diffuser to my Brunton Stalker similar to what xcarguy created. Also I was planning to add additional under body panels to my car to make it as flat as possible. In the pictures below I plan to add aluminum or carbon fiber panels (the rear splitter would also have rakes like xcarguy). Any thing I should think about before embarking on this project? For example, I wondered why the drive shaft wasn't already covered by aluminum? I plan to cover it but seemed like the opening may be there for a reason.
-
Thinking about adding window and roof nets to my 7 (brunton stalker with rollcage). I searched but didn't find any pictures of folks using them so was wondering if there was a reason not to add them?