copy.jpg.dd4bdbb41ccb3ea8a585d1ad217ef61b.jpg)
.jpg.da03509438cc84820b8cf5d64db570ab.jpg)
Austin David
-
Posts
391 -
Joined
-
Last visited
Content Type
Profiles
Forums
Store
Articles
Gallery
Events
Library
Everything posted by Austin David
-
isotunes.com -- they aren't active, but they are excellent for noise-suppressing. and they play very nice for non-Iphone bluetooth connectivity.
-
I'm glad it was of use to more than just my future self, trying to figure out why my tach was set up weird.
-
oh man, I forgot about my bomber helmet. From the 90s. It was wool-lined tho, 100% winter, would not fly (pun) in this weather. I ordered some "sun balaclavas" to add to my list of things to evaluate.
-
jumping in a little late, as I'm on my "maiden" voyage and discovering how much fun it is to lose hats. setup: windscreen + RHS tonneau * do-rag is OK with half hood and/or half door and RHS tonneau cover. * do-rag ejected hastily at 80-ish MPH with side curtain / no half hood, RHS tonneau * ball cap is never OK > 50mph, no amount of snugness, any configuration. * boonie / bucket hat is less OK, airflow seems to hit right about ear/cheek I've been playing with a half-door. I mocked up a minimal version (mid-arm height) using the outer snaps, it helps. I also tried just folding down / using folded LHS tonneau cover, which helped more but was also more restrictive (shoulder height). The hood SEEMS to make things worse, but it helps with the sun and I didn't lose the do-rag even after a couple hundred miles. With "reasonable" windiness -- defined as something as tight and secure as a do-rag will stay put -- I've only really found success using good sunglasses, do rag, and a gaiter for sun. Half hood provides ample sun protection, but in the coming weeks I'll be checking out my aeroscreen / no hood.
-
I'll make a post when I get to it. I like the "float on 2 gals" method because I don't need to look at the gauge so much, assuming the float-deflection roughly matches the gauge deflection. Thanks for the info & confirmation, it will help me plan that fun event. In the meantime, I'll keep an eye on the trip odo.
-
uh, stupid question: where is the in-tank fuel pump? Do I remove the Al panel from the boot to expose the tank, and in a very obvious place will find a cover, from which presumably hangs the pump + sending unit / arm?
-
I'll just (some day...) bend the float. No other plans to change the fuel delivery or otherwise further complicate things.
-
obviously never driven a supercharger. Battery eliminator + park on a hill tho, that might be a good path forward.
-
Hey, I know I'm coming in late. 14v @ load seems kinda low -- wouldn't you expect the alternator to run closer to 15v when charging, and ~ 13.5-ish when it thinks the batt is full? I would definitely leave the battery on a trickle charger in the garage. If you're able to start normally on a full battery, and hard-to-start when it's been sitting, then this really does sound more like "phantom drain" / dark current, and less like "engine problem." If the battery is sufficiently low it can soak up a lot of your jump current, which would give some of the issues you've described about "hard to jump". hard-running when cold could be a lot of things. I don't know that zetec motor but an SC has some parasitic load at idle (where the SC probably isn't contributing any boost), and if your alternator is also trying REALLY HARD to charge a battery, it could be that your idle just isn't high enough to deal with both. If you're in the mood to tinker (and I don't know the rest of your build, so ... grain of salt) pop the belt off that charger during your garage testing, just to eliminate that load from your troubleshooting. This may help you decide something's not right with your charging system (faulty ground, bad regulator, bad alternator etc) without confounding issues like "also the idle is rough". To follow up on MV8's suggestion -- all tests with an independent voltage read (not your dash gauge). A $10-20 meter is your friend here. - test voltage right after a nice long run: engine on, ignition off, ignition on (3 separate readings) - test the cold voltage (ignition off, ignition on) the next morning keep track of those. If it's a new battery, the off/on readings shouldn't change much after a run or overnight, and definitely not day-to-day. For my car (yours is very, very different so YMMV) 12.8-ish is right after a nice hot run, battery is fully charged, ignition off. The ignition load will induce a drop to like 12.5v or so, and this is more than enough to start the car. If you're seeing a LOT of drop (like 12.0v on a freshly-charged battery) or a significant change after sitting overnight, you could have a short or some sort of parasitic drain in the system. ... every car is different, especially since they're hand-built AND british (double-whammy). I would love to know if you have a slow-to-react gauge or if there's something else happening. MV8's proposed testing is a good place to start. PS I love that zetec + SC. Looks like a J&R kit for a Zetec, I think they used an Eaton unit? I bet it's a blast, nothing sounds quite like a good roots blower spinning up.
-
.thumb.jpg.885191d302e6c3704c848a8f5ac3a612.jpg)
Tool kit, for touring / far-from-home? (Caterham)
Austin David replied to Austin David's topic in General Tech
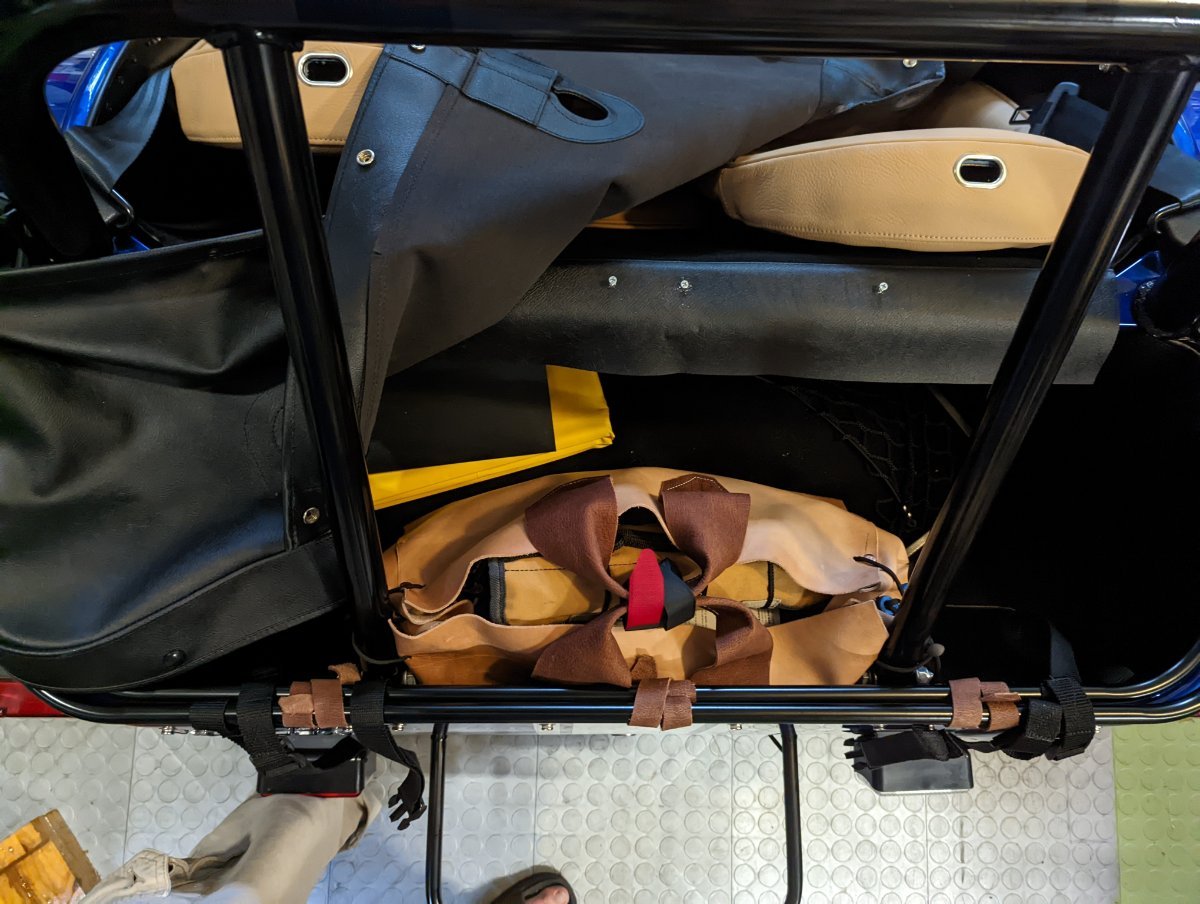
Following up, partly for posterity and partly to track my own progress: I mocked up a few potential bags, v2 shown below. It's a little overstuffed right now with "the kitchen sink" in there (read: bulky garage tools useful during assembly). I think I can slim it down after this maiden voyage, 300 miles from home. The bag is 18" wide (left-right in the boot) + 6"long (fore-aft) and 8" high. By comparison, the softbits bag is about 16x6.5x6.5. The boot is 8" high in the back, deeper toward the bulkhead.This should leave some extra space when I unload the non-emergency tools. I fixed the toolbag to the rollover bar, I do think it needs to be pretty securely fastened. I don't much like having it occupy most of the easy-to-access space at the back of the boot, though, so I may try to fix it up against the bulkhead somehow. This bag is also soft, and doesn't really hold shape well -- v3 will fix that. I may also add a zipper or snap closure for the top.
-
That's an interesting idea. Would it be reasonable for me to drain the tank down to an "OH NO" minimum like 2g, then set the float to bounce on E at that level? That way I would know very well how much is left in there. I have MC experience and that petcock / reserve "tank" option is gold. They're also on carbs so there's the first ride trick of running it bone dry and checking mileage, while carrying a can, then never driving that far. I don't really want to run my EFI motor dry if I can avoid it, and I'm not quite ready to play chicken with the fuel level in my new toy. So far (3 fill-ups in, all at ~ 5g) mileage seems consistent. Still not super confident on that fuel gauge, but I've got at least 2 fillups before I'm back home so .... ps: Good Luck sainthoo, sorry for highjacking your thread I know how nerve-wracking the first crank can be... IMO get the idle set (TB screw) to like 1200 RPM, then deal with oil and coolant verification at temperature, then everything else (like brakes and stuff). The tach is probably the least important gauge, until you get your license plate / get it on the road or track. When you're actually putting your foot on the accelerator the RPM starts to matter more, but even then you've got hundreds of miles at low RPM before you really really start having to care.
-
The ODB reader will help. My idle was low on first crank, and the tach was way wrong. I read the manual and found a switch configuration that works, eventually I "should" get the ECU flashed correctly, apparently. For now it's right. https://usa7s.net/ips/topic/13594-360s-in-charlestonish/?do=findComment&comment=125828 With an independent signal from the ECU (not the tach) you can set your idle correctly, and deal with the tach later. Like when everything else is correct. The fuel gauge seems very pessimistic, and mileage (mine at least, during break in) is absurdly high. Below 1/4 it will maybe take 5 gals, and I believe capacity is near 10? In the garage (as you are) I basically kept the needle where I could see it at all. The first 2g was enough, then added more as I went around dealing with various coolant issues.
-
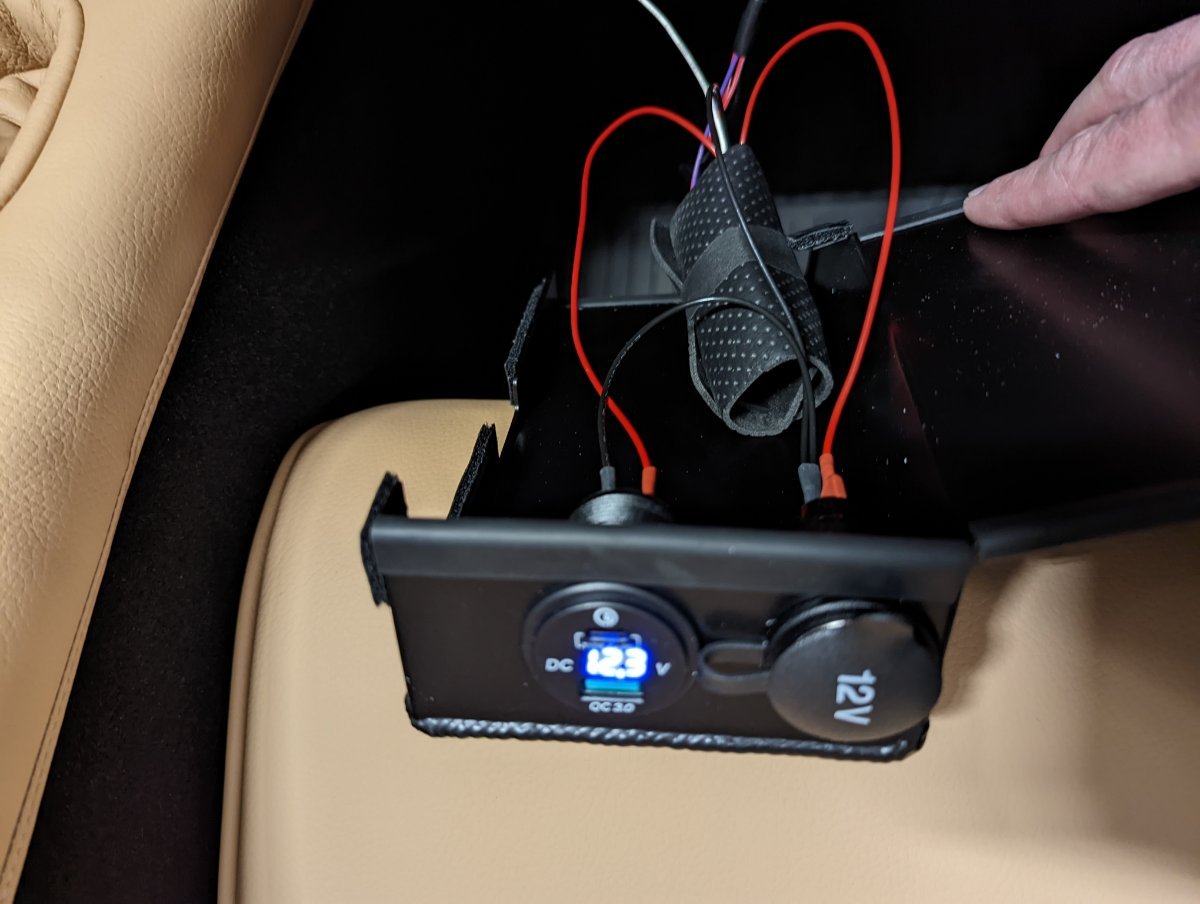
I added a relay to switch on/off the 12v socket, using a fuse tap on the ignition fuse to drive a standard bosch-style 40A relay. I also added a dedicated USB socket off the same relay, so I can charge my phone and run any sort of microwave-detecting devices for purely scientific purposes. One item of note, the fuse panel actually eats up a bit of space inside the cover, so if you do run a second port, give it a little room. I'm OK but cut it kinda close. The outcome looks really nice tho. Plenty of space on the right for that extra relay.
-
I threw this in here in case anyone missed the post in the main thread.
-
-
UglyFast -- DM me when you get a VIN. There is some SC magic that may save you several weeks of pain.
-
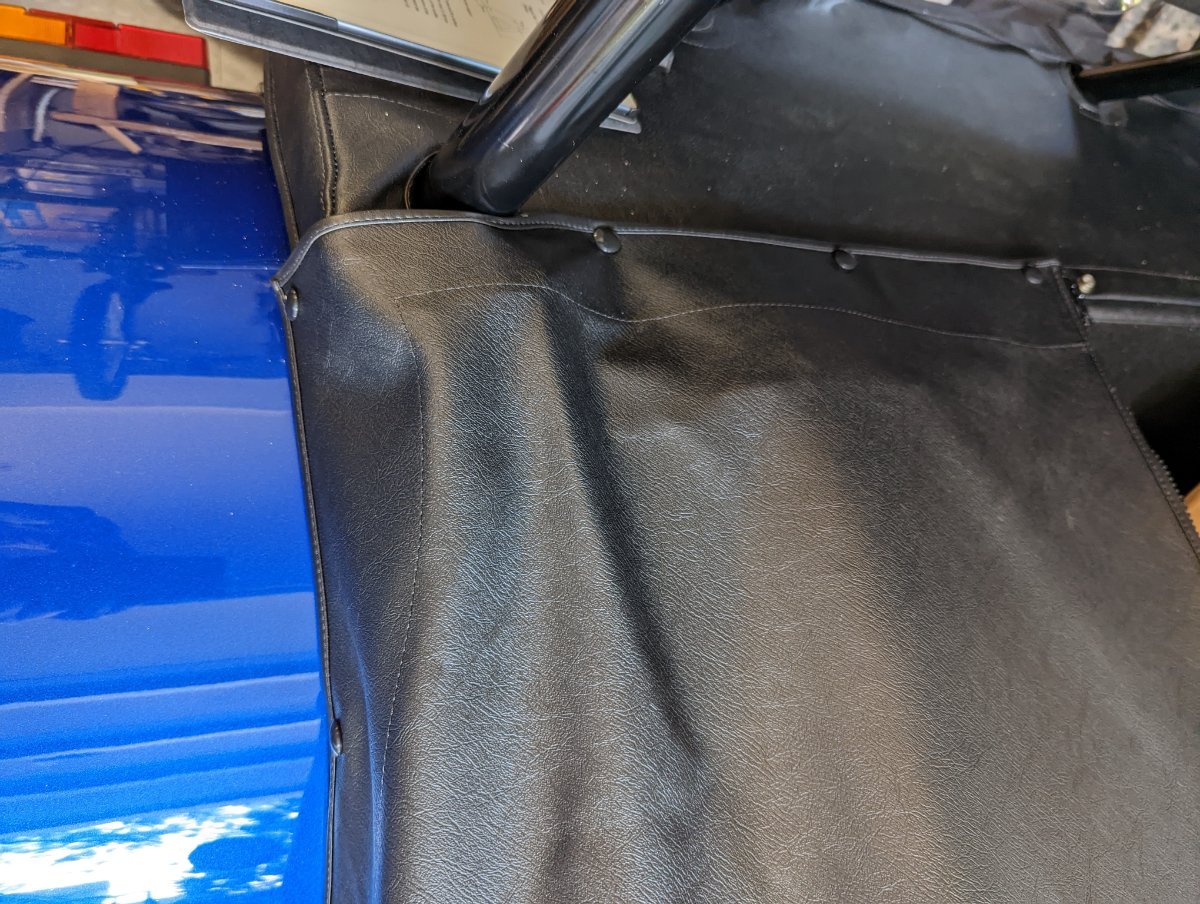
Tonneau Cover is fitted per instructions. I had to figure out some stuff, so I've added photos to augment what little info seems to be out there. It hasn't gotten any wind yet, so if I add more snaps I'll post back in here. 1) this was pretty nerve-wracking for me, I don't like drilling into paint. The recommended locations appear to dodge interior frame bits tho, so I do recommend sticking to them 2) the riveted-on snaps need a pretty thin rivet gun head; I hear the Stanley gun works, I used a bench grinder to fix mine. Pix below 3) tape is your friend here. Also sharp drill bits. 4) at least one of my snaps was defective, eyeball 'em before making anything permanent. 5) the pliers-style punches and rivet setters aren't great. Invest $10 in a punch and die. Also 3# hammer and an anvil will make your life slightly better. 6) One at a time. It's a lot of on/off, but things shift around or don't come out precisely where marked, so you get to re-measure every hole, every time. Still better than the diff install. The back side: my boot cover came installed, but the outer snaps were finished with a button cover. You need to drill this out and replace with a gypsy snap (male) and standard female inside. The tonneau cover fastens over this, onto that new male snap. My kit came with precisely two of these gypsy snaps in the tonneau pack, so either get it right on the first try, or hit sailrite.com for a few more. Also note that removing those riveted snaps is annoying, they want to catch the drill bit and spin. Vise or vise-grips. Per other instructions, I lined up the front + back on the centerline and marked the front snaps, installed both LHS + RHS, then marked the centers on the back & installed the snaps. Same across the rest of the back. For the outer corners I gave a little slack to stretch over the seatbelt cover (I use retracting 3-point), and mostly lined up with the cover flush against the piping on the wheel well. It's still pretty snug. There's another snap already installed at about the center of the wheel arch between the rollover bar and sill. I again measured with the cover snug and aligned to the piping on the arch, double-checking by holding it snug against the scuttle. The remaining 3 snaps per side involve rivets and drilling. The book recommends good locations, but I did move the 2 scuttle points about 5mm toward the front wheel, putting the snaps closer to the edge of the cover to match the others on the top side. I measured per the book, marked over tape, knocked around a lot to be sure there wasn't anything hiding under, and drilled it out. I did not attempt to use backing washers -- the two under the scuttle are covered with the wiper motor (RHS) or some controls support on LHS, and the lower ones are under interior panels. I did use helicopter tape under the body snaps. Rivet through the snap and the hole (if taped, you have to cut that helicopter tape -- can't just punch through). I also put a fair bit of painter tape over the assembly in case the riven gun hops out when the rivet pops. All 6 rivets went in very clean. So: measure the scuttle rivet per the 2015 manual, double-check with a cover test-fit, drill+install the rivet & male snap, unzip the cover, stretch to mark your female snap, install it. Then mark and measure the lower-front rivet, install it, stretch the cover to fit, and do the snap. Repeat for 3 on LHS, then 3 on RHS. The rear sill didn't include any photos in the book. There is a frame member in there, so they are pretty serious about 45mm forward of the arch. The book claims the zipper will take up some slack, I'm less convinced. The vinyl will loosen a bit in the direct sun, I'm sure even more than my 80-degree garage. But it looks like it will fend off rain, and the RHS / passenger side looks pretty secure. I'll get some wind on it this weekend.
-
better than trying to calculate the odds of a fixit ticket vs. impound!
-
it took a 2nd opinion; my preferred office again said "no way" so I went somewhere else, and they did it. I finally have a plate!
-
SCDMV has field agents, I talked to one today. By coincidence the paperwork sent to Columbia also came back today. The agent and the letter both said the same thing: I need form 400 (straight title app) and the MCO. The "chassis number" is VIN format and Agent + DMV-by-mail both say that's to be the VIN. Planning to drive all that down to the office tomorrow and try the expedited process, again. The agent left me with his card and two forms 4038 + TI-021B, verifying the chassis number on MCO matches what's etched on the car.
-
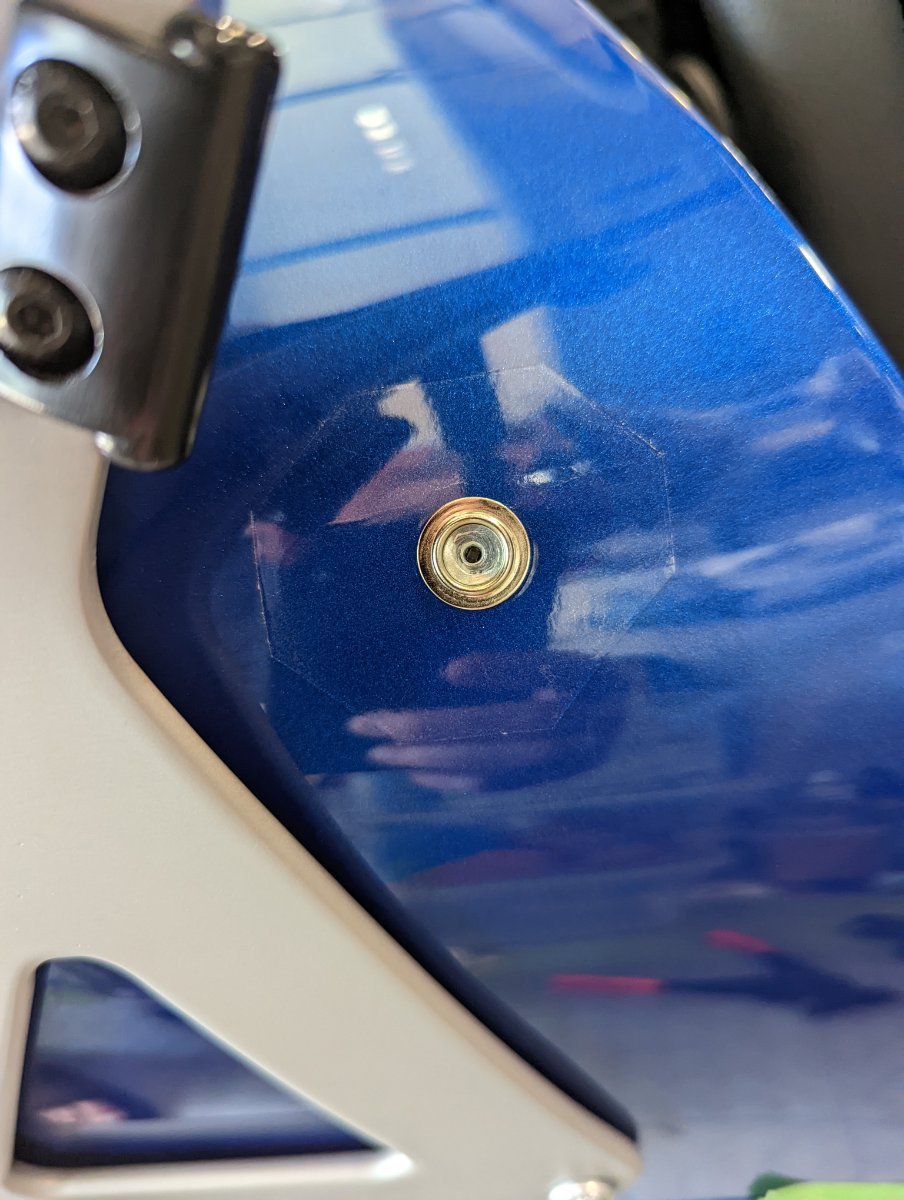
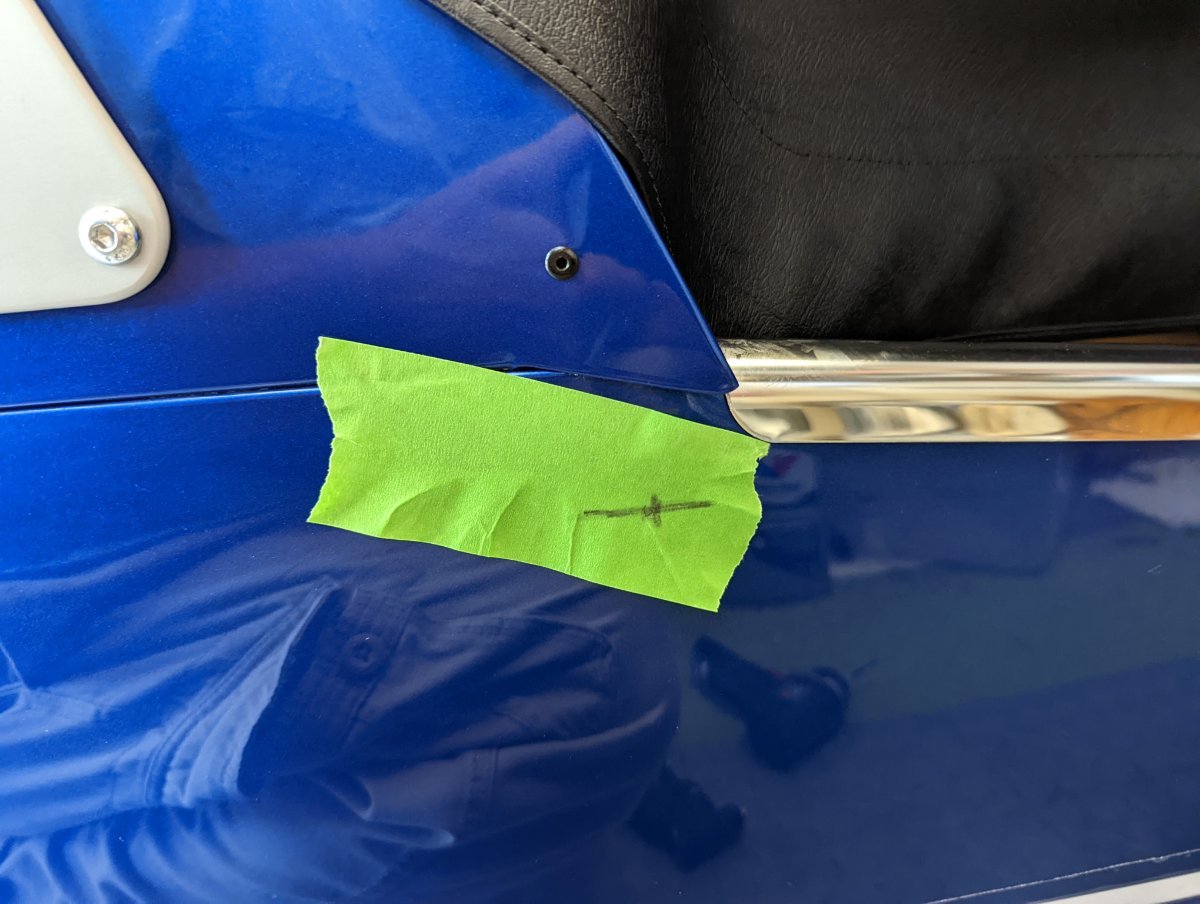
Boot carpet: all the panels are *slightly* too large and may need some minor trimming. I am probably not going to install the triangles in the bulkhead, but did the rest. The forward corners under the roll bar) tuck in pretty well, and taped up. The back corners needed about 1/2" trim from the forward edge, and the lower edge I flared up against the deck. A little nipping to bend around the corners. The carpet went behind and under the cover for the fuel tube. I did not disconnect the tube per instructions, just cut the lower part of the ring in the carpet to slip it under the tube, and all that is under the cover. Those side pieces were all secured with carpet tape. The deck piece just laid over top of all that. I did not trim it to go around the fuel door, there's a little extra over there but with gravity and the other panels in place it mostly tucks down. Tonneau cover is going, but not yet done. I guessed wrong on the boot cover and have a replacement set of gypsy snaps arriving tomorrow. I have not yet drilled holes, I think I'll need 2 in the scuttle and a 3rd in that body panel (per side), kinda holding off on those. No plans for half doors so I don't think I'll have to worry too much about precise placement of those body snaps.
-
my blinkers are louder than the horn(s), no chance I'm forgetting that's on. Those switches look great; now I just gotta find someone who will sell me just a few...
-
I've previously noted there are a LOT of switches on the dash, many are redundant or won't be used in my environment. Has anyone rearranged or changed these? I'm specifically looking for any gotchas, and ideally a source or description of the plastic-cover / toggle used. 1) the blinker is on the right / center, which is odd. not necessarily a top priority. (on-off-on, sideways) 2) there are 3 headlight switches: a rocker for off/park/headlight, an off-(on) (top-bottom) for highbeam flash, and off-on for highbeam. 3) there's another rocker I haven't tried to figure out yet, plus stuff like the windscreen washer which would 1:1 map to features I may eliminate. Before I start re-arranging and/or rewiring, anyone got a source (or name of) replacements?
-
catching up: 10/24 thread repair kit ($20 or less) gets 10/24 threads in the mirror stalks. Hot rod mirrors work well, 4" round / convex. Matches my chrome headlights. LHS tail light flipped, now symmetric -- flashers are outside, brake lights to the inside. Also the 360 wet sump dipstick needs to be adjusted by shortening the tube. I changed the oil, added the right amount (4.75 qt), shortened the tube after mostly disassembling the plenum to get at it. The tube has about 4" of room to adjust up/down, I needed to take out about an inch. Confirmed the reading when hot & idle at level. Consulting with some other enthusiasts, I driveway-aligned the front to 2mm toe, erring toward neutral. It rides straight, and the stickers on the tires aren't wearing down much even after 60mi; no scrubbing evident, so I think it's pretty neutral. Once I finish with the DMV will get a professional alignment. Still to-do: - nose cone badge - tonneau cover (critical) - aeroscreen (need fall/winter, not critical) Also, for safety I added black retroreflective tape on my black roll bar. It is not invisible, but I put it there and I can't really see it. At night it turns white/bright, and is much more visible -- especially from the sides where there's very little light.
-
I have a VIN and MCO, but this is a brand-new CKD kit, never titled. It's "only" been 6 weeks, I thought you said it took 3 months?