Off Road SHO
-
Posts
452 -
Joined
Content Type
Profiles
Forums
Store
Articles
Gallery
Events
Library
Everything posted by Off Road SHO
-
I supposedly have a standard Ford Focus engine with the four Weber UK throttle bodies running off of an Alpha P1043;E4 computer. It is a narrow band sensor I believe. I say that because even the NTK PDF doesn't have a listing for the OZA30-D3 sensor that was in my car. I left a message on Lance Stander's voice mail but haven't received a call back yet. I tried to get with him a couple of times at Barret Jackson, but both times he had a real customer in front of him and I didn't want to interrupt him for such a piddly question. Tom
-
Had it happen to the side window of a parked Ford Van when a weed eater being operated 50' away kicked up a few little pebbles and hurled them our way. We heard 2 or 3 hit the skin and then kablooie! It exploded with such force that shards chipped paint off of the window surround. Tom
-
S-1 Engine mount question.
Off Road SHO replied to Off Road SHO's topic in General Sevens Discussion
We'll rats, maybe my mounts have just sagged a quarter inch. I don't know how easy it would be to add shims. Tom -
I buggered up the wires very close to the sensor and need to find a replacement. The existing one is an NTK unit with OZA30-D3 stamped on the body. That number can't even be found by Google. Has anyone with the 2.0 Zetec replaced their O2 sensor yet and if so, which brand and model did you get. Thanks. Tom
-
S-1 Engine mount question.
Off Road SHO replied to Off Road SHO's topic in General Sevens Discussion
Well, I trimmed 1/4" piece off the ends of all 4 primaries to no avail. The secondaries didn't move up and away from the bottom rail, just inward more. Still have less than .050" between the secondaries and the bottom rail. I will have my Tig guy weld in a shallow but long "dimple" to give it a .25" or more clearance. He is also going to make a new thermostat housing-to-radiator pipe to get it out of that tight spot next to the driver's footwell. Tom -
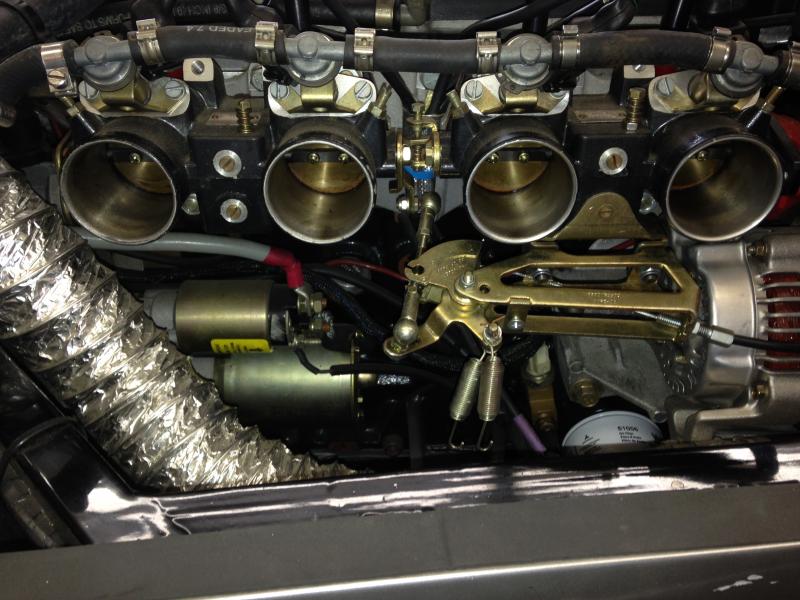
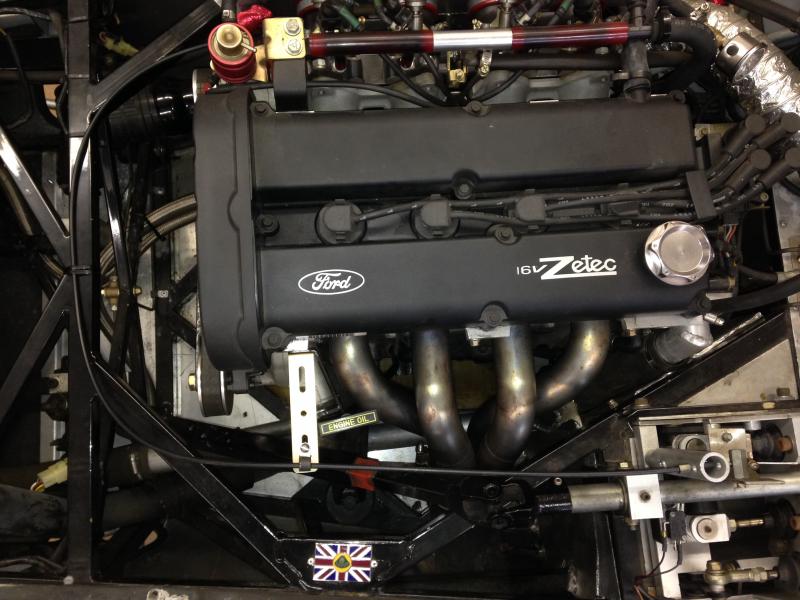
So, the original and I believe OE throttle cable did this crazy U-turn right over the exhaust header that gave the path a total of 360 degrees of bend on its way to the throttle body bracket. The bracket is two pieces; one that attaches to throttle bodies 3 and 4, and the cable grip and pivot assembly. I removed the grip bracket from the mount bracket and then moved the mount bracket to the two front throttle bodies. I then loosened the lock nut on the pivot push rod, rotated the grip bracket back onto the mount bracket, and voila'! My throttle cable now attached to the throttle body bracket from the front of the engine compartment, allowing the cable to make a gentle 180 degree sweep instead of a sharp 180 and two sharp 90's. My old cable was roasted so bad that the outer sheath had burned away from its close proximity to the new bare stainless steel header. This in turn allowed the outer sheath to rust and make so much friction on the inner cable that it and the tight bend made for impossible throttle pedal pressure. I found a nice lined cable that originally was the fuel door release on a Taurus SHO. Not only does the new cable have more strands but the sheath also has a teflon liner. Now the gas pedal is SOOOO easy to move. No more jerky starts! WooHoo! My headers will be ceramic coated shortly so the heat wont be an issue any more. I added a bracket to the head, that attaches at the same point as the dipstick tube brace and placed a "P" clamp though which the throttle cable passes, to keep the cable away from the steering shaft's u-joint.

-
Wanted: Superformance S-1 tail lights
Off Road SHO replied to Off Road SHO's topic in Parts For Sale / Wanted
Don, Here are the tail/stop lights I used. http://www.amazon.com/Round-Surface-Mount-Brake-Lights/dp/B004NYKBGM The turn signal lights look identical when they are off also, just light up amber when hot. Tom -
Superformance S-1 Brake light switch.
Off Road SHO replied to Off Road SHO's topic in General Sevens Discussion
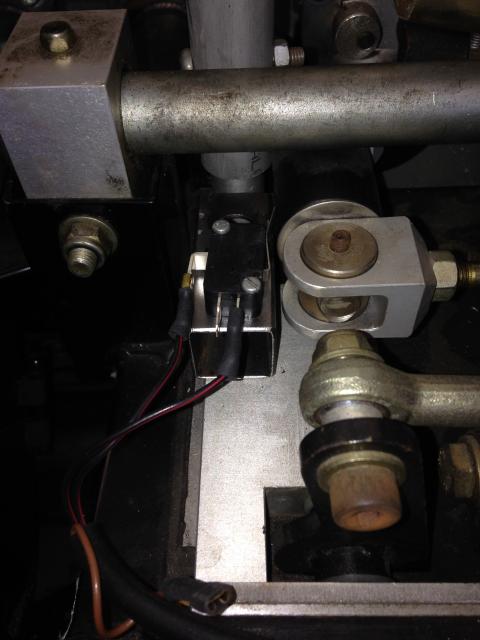
Here is a pic of my solution to the poorly placed micro switch that Superformance used in the S-1. Basically, it is a short 2" long piece of 1x1 tubing with the micro switch mounted to it in just the right position so that the long arm of the switch contacts the part of the brake arm that moves the most during braking operation. Where they had it originally, the toatal movement that the switch would see was about 1/4". In the new, raised location, the switch see about 1/2"-3/4" of movement. The piece of 1x1 is mounted to the pedal box using the same mounting hole and screw as the original aluminum switch mounting plate. Tom
-
S-1 Engine mount question.
Off Road SHO replied to Off Road SHO's topic in General Sevens Discussion
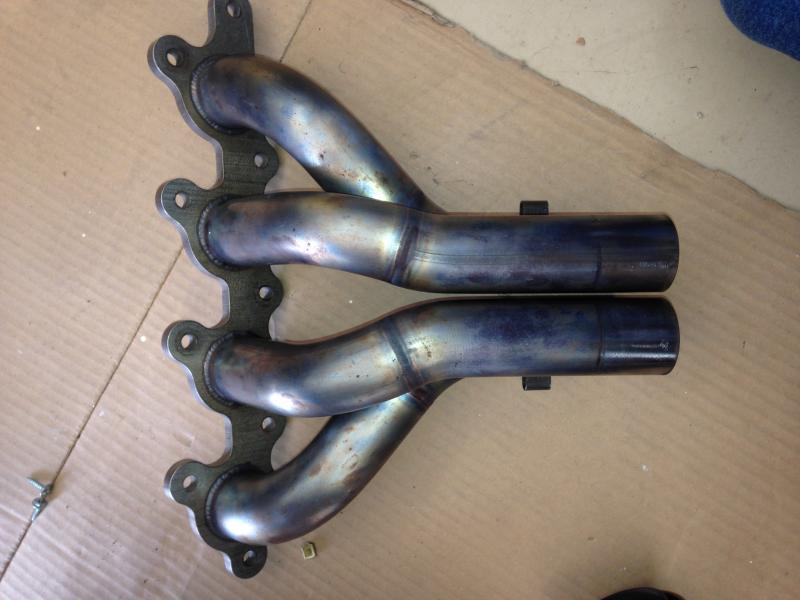
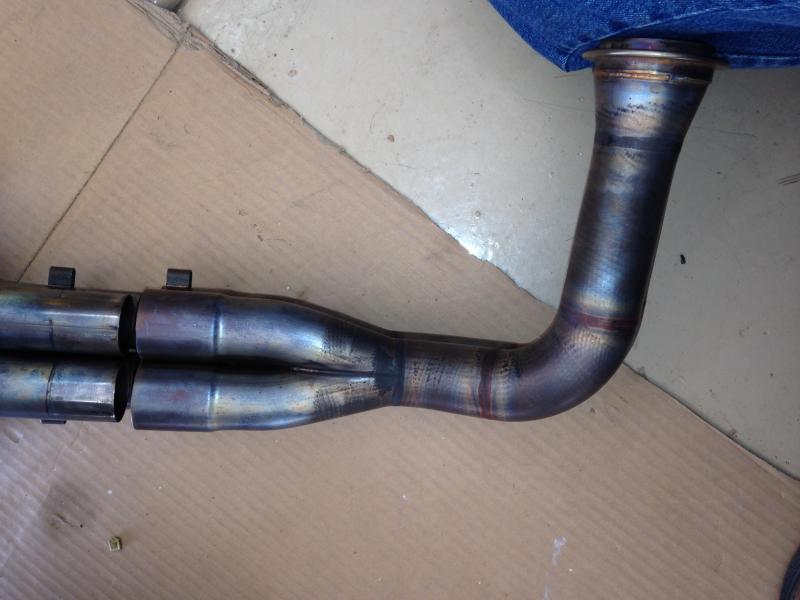
I will try and upload two pics here: In the bottom pic, what looks like a single pipe is actually two, one on top of the other.
-
S-1 Engine mount question.
Off Road SHO replied to Off Road SHO's topic in General Sevens Discussion
Steve, Thanks for the pics. Evidently, my original Zetec factory header had cracked, so the previous owner spent 1,700.00 on a new header, down pipe and muffler. This new header ends as 4 separate pipes, inside the engine compartment. From there, the down pipe converts the four to two, which then goes through the skin, above the bottom rail, in a one above the other arrangement, which then converts to a single right before the muffler's v-band clamp. It doesn't touch by much, since only the surface was scratched up a little, but that's still too close for me. The coupling for the four primaries is a slip fit and when I went to take off the two double-nutted cinching bolts, I noticed that both of them were very loose. The more I think about it and after hearing that your engine mount height is the same as mine, I think I will trim off 1/4" of the four male primaries and see if that gives me enough clearance at the bottom rail. My fabricator friend was admiring the workmanship of my headers and down pipe (he himself being a very talented Tig welder) so I am not anxious to build anything new. Tom -
So, for those following along at home... I removed the header and down pipe from my Superformance S-1 so that I could get them Jet-Hot coated in an effort to reduce some of the engine compartment heat. They were installed by the previous owner along with the muffler to repair a cracked OE header. He had wrapped the down pipe but not the header with heat insulating fiberglass tape. When I removed both pieces from the car, I noticed that the fiberglass tape had become very brittle and basically fell apart in my hands. Not a problem, I was going to get them ceramic coated anyway. However, I did find that the bottom of the down pipe had been rubbing on the frame and whomever had installed it had even ground away a small part of the corner of the bottom tube to give it more clearance Clarence. Now seeing what a beautiful work of art the welds were on these pieces, I called up a fabricator buddy and upon seeing it, he thought that something might be wrong with one or both of the engine mounts, allowing the engine to ride lower than normal. Before I pay to have a new down pipe fabricated, I was hoping one or two other S-1 owners could measure the height from the top of the engine mount to the plate on which it sets. Mine is 1.30 inches right now, and if it's lower than most, I can either add a spacer washer or two to bring it up or get replacement donuts made or bought. Thanks in advance for any help. Tom
-
Wanted: Superformance S-1 tail lights
Off Road SHO replied to Off Road SHO's topic in Parts For Sale / Wanted
Don, I went with the 3" round LED turn and stop lights from the internet. They are not as bright as I'd like but for now they solved the melted socket syndrome. I also had to change out the flasher unit to a NAPA unit, part number EP-35L. I also modified the position of the brake light switch so that it was acted upon by a part of the pedal arm that has more movement. In other words, I moved it away from the pivot point of the arm. I can take and post pics if you need them. Tom P.S. My heating up problem came back and I found that the plastic air blocker that connects between the top of the radiator and the top of the nose cone had come loose from the nose cone side and not only blocked the top half of the radiator from getting any air movement, but also open up a huge escape route for the rest of the air coming in the grill. I am going to fix this once and for all. I'm also going to remove my headers and have them Jet-Hot coated to keep some of the heat out of the engine compartment, and install a new and longer throttle cable which will not make such tight bends (and not be melted from it's close routing to the bare headers). On a side note: My car has the 4 throttle bodies that have their own internal return springs, but the cable attachment bracket also has two helper springs, to make it even harder to press the gas pedal. I have a feeling they added the two extras to overcome the tight bends in the throttle cable. I removed the helpers and did a pedal check; the throttle plates still returned to close with plenty of tension, so I will be disconnecting those on a permanent basis. P.P.S I tried the exact replacements as Transaplian recommended but found that the light sockets actually did not fit the fiberglass correctly and did not feel like cutting the fiberglass to make a cheap ass light fit. I still have those if anybody wants them. Tom -
Anybody else in Phoenix area up for a drive in our beautiful weather. We'll be leaving the Cave Creek area around 9-ish, heading East towards the McDowell Mountains on Dynamite Blvd, to Rio Verde Rd to Shea Blvd to State Highway 87, over to Bush Highway and back to East Mesa. Or whatever looks good. We stop a lot for coffee and breaks and to take pics, and to explain what the heck we are driving. Tom
-
Superformance new USA Caterham Distributor
Off Road SHO replied to Kess's topic in General Sevens Discussion
Well, I wasn't going to go to Barrett Jackson this year, but I will now. Of course, I will have to take the S-1. Tom -
Superformance S-1 Headlight problem.
Off Road SHO replied to Off Road SHO's topic in General Sevens Discussion
Steve, Please do, I'd like to be prepared. One thing I found on my investigation of this problem was that a 30 amp fuse had shed its plastic enclosure. The bent wire inside was still making contact but the top and sides had come loose. Very strange. I replaced it with a new one anyway. On another note...I replaced the cheap ass Land Rover tail and turn signal lights with LED unit and while very bright, the turn signals not flashed a such a fast rate that they almost looked like they were just on and not flashing. I had heard that this would happen when I went to LED's instead of incandescent and that a simple relay change would fix it. It did, but getting the correct relay proved more difficult. O'Reily's and Auto Zone didn't carry them and it took NAPA two tries to get me the right one. The NAPA number is EP-35L. Now I've finally got the tailight, turn signals, brake light switch and flasher relay all doing their respective jobs in a dependable manner. WOOHOO! Tom -
Superformance S-1 Headlight problem.
Off Road SHO replied to Off Road SHO's topic in General Sevens Discussion
Mine is not solid state because I can hear and feel the relay clicking when I toggle between high and low beams. Tom -
Superformance S-1 Headlight problem.
Off Road SHO replied to Off Road SHO's topic in General Sevens Discussion
No, I hadn't gotten that far and now they're mostly working. I don't know what I did to get them working. That separate relay next to the fuse panel is a VW headlight relay and the pin-out doesn't match the standard US relays so I couldn't swap in another. I hate it when I can't pinpoint a problem. Tom -
Specifically, the headlights no longer work. And the fuses that supposedly protect the headlight wiring are no longer "hot" at any time. The fuses are all good, but the sockets they reside in at the fuse panel, positions 3,4,5 and 6 are dead, both side, key on and key off. Do any of you S-1 owners know if there is a master fuse for the headlights? Do you think they ran a relay in there (I have one in my car, next to the fuse block, that is not on the wiring diagram) that feeds the power to those 4 fuse positions? Any help would be appreciated, thanks. Tom
-
And as an addition to what Bill said. The places where Gravity forces water into will take normal dry air under atmospheric pressure and flow years and years to evaporate, all the while the rusting process continues. Tom
-
That looks like one of those hill climbers from Iceland or one from King of the Hammers.
-
Superformance S-1 Brake light switch.
Off Road SHO replied to Off Road SHO's topic in General Sevens Discussion
Finally fixed it permanently, I hope. I basically moved the micro switch's actuating arm away from the pivot point of the brake pedal. They originally had it mounted so close to the pivot point that the switch could only see about 1/4" of travel from the pedal's arm. I built a new platform out of 1"X1" tubing that not only raised the new switch up 1", but was also able to move it away from the steering shaft. This allowed me better access to both of the mounting screws of the switch. At one inch above the pivot point, the arm moves about 3/4", thus allowing a full "ON" condition as well as a full "OFF" condition. I still don't like the use of micro lever switches on brake light systems and might eventually go to something like JLumba81's solution. Tom -
And probably just as humble...
-
Wow, old Cheech and Chong.
-
keeping the lies straight is so hard.
Off Road SHO replied to slngsht's topic in Politics, Religion and Controversy
Speaking of true stories... The Pope went on vacation for a few days to visit the rugged mountains of Alaska . He was cruising along the campground in the Pope-Mobile when he heard a frantic commotion just at the edge of the woods. He found a helpless Democrat wearing shorts, sandals, a "Vote for Obama" hat and a Save the Trees' shirt. The man was screaming and struggling frantically, thrashing all about, and trying to free himself from the grasp of a 10-foot grizzly bear. As the Pope watched in horror, three Republican loggers wearing 'Go Sarah' shirts came racing up. One quickly fired a .44 magnum slug right into the bear's chest. The two other men pulled the semi-conscious Democrat from the bear's grasp. Then using baseball bats, the three loggers finished off the bear. Two of the men dragged the dead grizzly onto the bed of their pick-up truck while the other tenderly placed the injured Democrat in the back seat. As they began to leave, the Pope summoned all of the men over to him. "I give you my blessing for your brave actions!" he proudly proclaimed. "I had heard there was bitter hatred between Republican loggers and Democratic environmental activists but now I've seen with my own eyes that this is not true." As the Pope drove off, one of the loggers asked his buddies, "Who the heck was that guy?" "Dude, that was the Pope," another replied. "He's in direct contact with Heaven and has access to all wisdom." "Well," the logger said, "he may have access to all wisdom but he doesn't know squat about bear hunting! By the way, is the bait still alive or do we need to go back to California and get another one?" -
I know it's not a seven. Anyone in the area?
Off Road SHO replied to mfast's topic in General Sevens Discussion
Search for his phone number on Google and you will see a lot of busted vehicles he is selling. Cadillacs, jeeps, Mustangs.