BlueBDA
-
Posts
250 -
Joined
Content Type
Profiles
Forums
Store
Articles
Gallery
Events
Library
Everything posted by BlueBDA
-
Seven + NA Miata + GTI = always something fun up and running to drive.
-
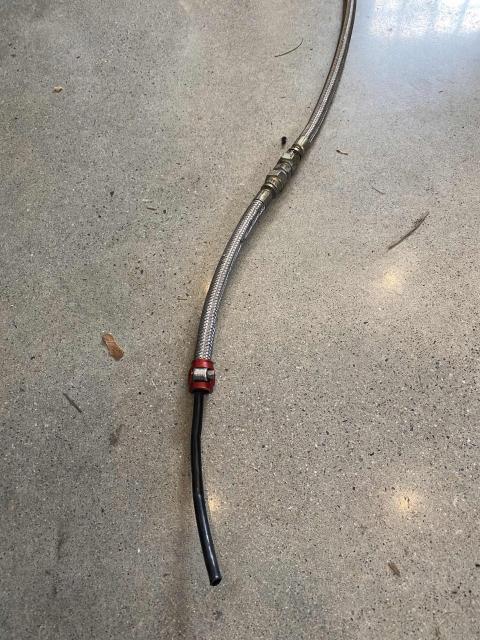
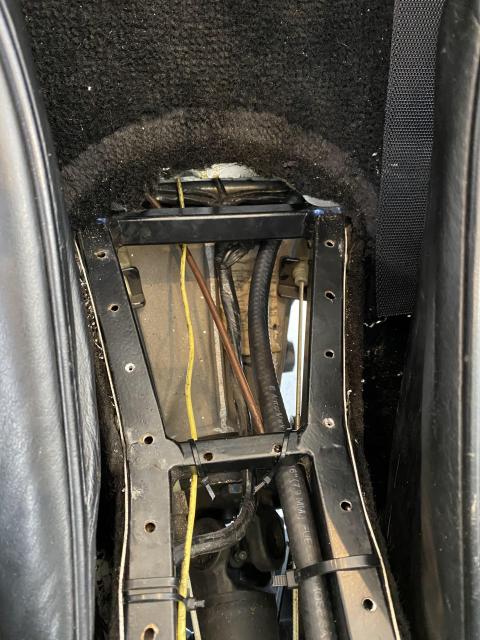
Just thought I'd close the loop on this thread. I completed the fuel line replacement this past weekend. Removed the center tunnel cover, drilled out all of the rivets that hold the aluminum plate over the rear section. Got the old line out, which looked like this: Pump to rubber to plastic to braided to braided to carb. 5 connections in total. Replaced with one length of rubber fuel line, and tidied up fuel pump power wire while I was in there: . Of course I knocked several wire connections loose while doing this, so when I was done I had no ignition, then ignition but no starter. Finally got it all back together and started it up at around 7:00pm. Went in the house and told my wife "I hate that car".:banghead: Next day tuned up the carbs (I had them off over the winter to fix some stuff). Engine running beautifully. Went for a blat (as they say). Came in the house and told my wife "I don't hate that car anymore". :driving:

-
(A was, of course, joking)
-
Already done. Pretty convincing - huh?
-
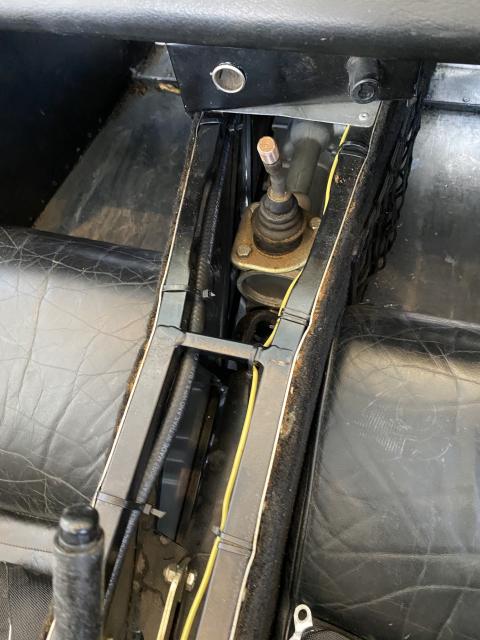
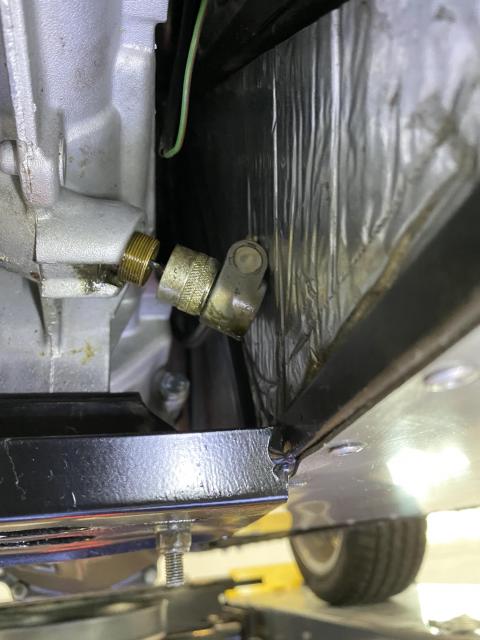
Thanks. But isn't the driveshaft fully surrounded by frame members, so that even if I disconnected at the u-joint, I wouldn't be able to get it out of the tunnel? Also, maybe kind of a newbie question, but where's the tranny oil fill location, and how do I access it?
-
Can I take the driveshaft out without removing the differential? Can I access the center tunnel from above, if I remove the center armrest?
-
Good news/bad news. The good: I've spent the winter slowly trying to fix engine oil leaks. New sump gaskets and goop, better sealing of oil tank fittings, etc. Started it up today, and it appears that I have fixed most of the oil leaks. There's one area that might still be leaking, but I'm not sure yet. And time may change things. But first experience is it's drier than it used to be. Yay. The bad: I now have a gas leak. WTF?! I have a braided stainless line that runs from the fuel pump in the rear all the way to the carbs. It's dry at both ends, so somehow it is leaking along its length, in the vicinity of the shifter - the only place where I can't see the line, of course. Seems very odd to me that a braided line like this has sprung a leak, but it is leaking. Didn't leak with the fuel pump running before I started the engine; only leaked when I ran the engine. So, I need to replace the fuel line. Seems as if I'll have to remove the driveshaft to get access? I assume I have to remove the differential to do that? I don't have to pull the engine, do I? Or is there access from the cockpit? Car is a 97 Caterham, standard size, T-9 transmission, BDA engine with Dellorto carbs, Facet fuel pump. Please share any words of wisdom re how to go about fixing this. What a PIA. :banghead: Now on to the bourbon.
-
Caterham? SV or regular?
-
Thanks for the help guys. My alternator has 3 spade connections, just like in the graphic in the link I posted. No identifying letters anywhere, but I'll pull the cover off and check inside. xcarguy that's the same link I posted. Your schematic is great - where'd you get that?
-
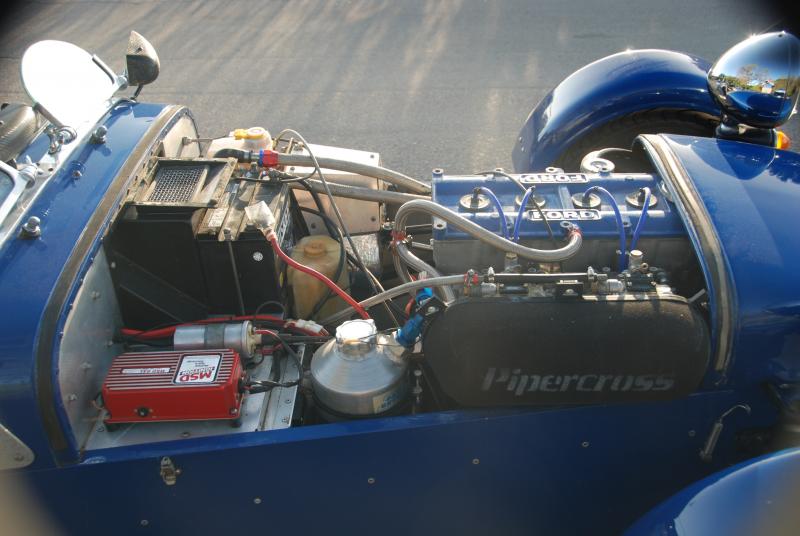
The alternator on my 1700 BDA is a Powermaster 8172: http://www.powermastermotorsports.com/005___IS_Jum.pdf In my car it has the battery wire connected to it, as well as two wires connected via spade plugs to two of the three connections shown in the above link. One of these wires (brown and black) is powered when the ignition is on, the other is not powered with the ignition (brown and yellow). I just had my alternator tested and it is working fine. The guy at the alternator shop said I don't need anything connected to any of those spade connections - he said that since testing showed proper amperage on his test stand without an ignition wire that I should leave those 2 wires disconnected. When I called Powermaster to ask some questions they also told me that this alternator does not need any connections beyond the battery wire - it is a "one-wire" alternator. The link above to the jumper wire instruction is likely for an older version of the alternator that was not a one-wire. My guess is that the Brown/black wire is to turn on an alternator that is not a one-wire alternator, and the brown/yellow is to control the charging idiot light, which I don't think has ever worked with this engine in this car. This car used to have a crossflow in it. Can anyone confirm what those two wires are, and whether I should connect them or not (to the alternator - or anything else)?
-
 For that kind of cash I'll take a Caterham, a Lotus Elise or Exige and a 1980s Porsche 911. Al used of course.
 -
Just posting to say that I took the pan off this weekend, and totally understand now about the cork and rubber gasket configuration. Pegasus sells a kit with all 4 parts: https://www.pegasusautoracing.com/productdetails.asp?RecID=25651 I understand about RTV where the gaskets meet. This is standard practice on an NA Miata cam cover gasket. Even though it's one gasket, it transitions from planar to going around the cam ends, so same kind of potential leak point. Just want to confirm - the Aviator #3 (Permatex) is a better option than RTV for the rest of the gasket? Also, I'll search for this, but do happen to know the torque specs for the bolts for a steel pan?
-
Doesn't matter what color it gets painted, as I believe that on this car the regulations state that it would need to be covered with red fur.
-
One more thought: From people's experience, should I just pull the engine to get all all the potential leak points?
-
I was going to say - from speedo right-angled drives to Cincinnati chili and its effects. Never could have seen that coming. Getting back to more mundane things, I think the problem I have is with the threaded part that sticks out of the tranny case, not the right-angle drive. I'll get the C-clip off and see if I can get that out. Will my tranny oil come pouring out when I do that?
-
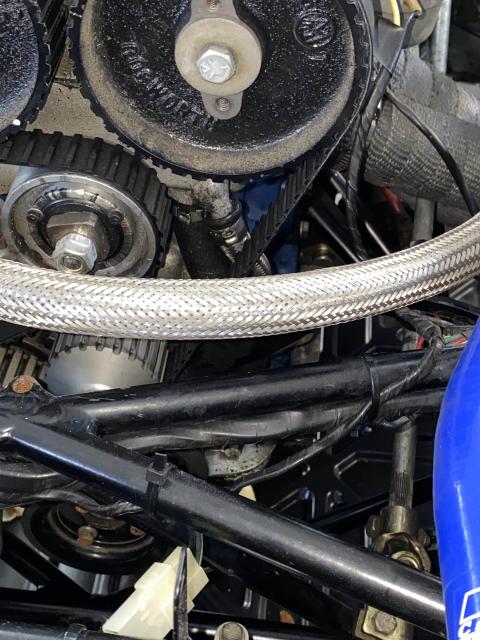
FYI this picture shows the two hoses to which I referred:
-
Yes - I am dry-sumped. I guess I should have mentioned that, but I assumed that all BDA/R engines are. Oil pressure is good. Runs high when cold - per the previous owner's advice I keep the revs low to not go over 80psi when cold. I don't remember exactly where it runs when warm. At idle it's very low - like maybe 10-15 psi, but Quicksilver Race Engines who built the engine told me that that is normal for these engines, and I am running the oil they recommended. There is definitely no room for AN fittings on the two vertical hoses - the connections are I think cast into the block and head, and in very tight spaces. One hose is braided stainless, and the other is black rubber. I am guessing, but not sure, that Quicksilver would have replaced these during the rebuild 4 years and under 2k miles ago. Trying to tighten the clamps is an interesting idea. I need to get into that area this weekend and see if there's even room to get a tool in there with the engine in the car. I suspect not but we'll see. I have wondered if I really do need to pull the engine to really get at all the potential leak points. When you refer to rubber saddle seals do you mean to use those (whatever they are?) in addition to the cork gasket? Also - should I use any RTV silicone or other gasket adhesive in addition? Torque spec on the pan nuts is very low - it's very tempting to tighten them a bit more, but I know I shouldn't. I've even thought about installing a manual petcock in the oil feed line, so I can just shut it off when the car sits for a while. I think I could manage this, putting a sign that says "Turn On Oil" or something like that on the steering column whenever I shut it off. But I realize how risky this is.
-
My (BDA/BDR) engine leaks lots of oil - like tablespoons, not drips. Some of it is from the oil tank, and I should be able to track that down and fix that. Some of it is in the area of the two vertical hoses at the front left on the engine - the hoses that run from the head to the block. One is rubber, one is braided stainless. Both use crimp hose clamps on both ends. Here's a picture of the top connections for those: I was planning to remove and replace those hoses, but based on how tight the space is and the type of clamps I might pass on this. Thoughts? It also might be leaking around the oil pan gasket, so I plan to pull the pan and replace that. Lastly, I am considering installing an oil check valve, like this, to keep oil from flowing from the tank back into the engine when at rest: https://www.pelicanparts.com/More_Info/RS30A.htm?pn=RS-30A&gclid=CjwKCAiA27LvBRB0EiwAPc8XWRHCdGVBbQxK6XPQO2TF3CwCmRYORiQuoJ_iN2t_yQt0Usz99qsCeBoCmMEQAvD_BwE It just seems like the oil flows back to the engine and finds places to leak out. This is a high quality part (and priced accordingly), which is used in the Porsche world. Thoughts? Also thoughts on other common leak points in BDA/BDR/crossflow engines?
-
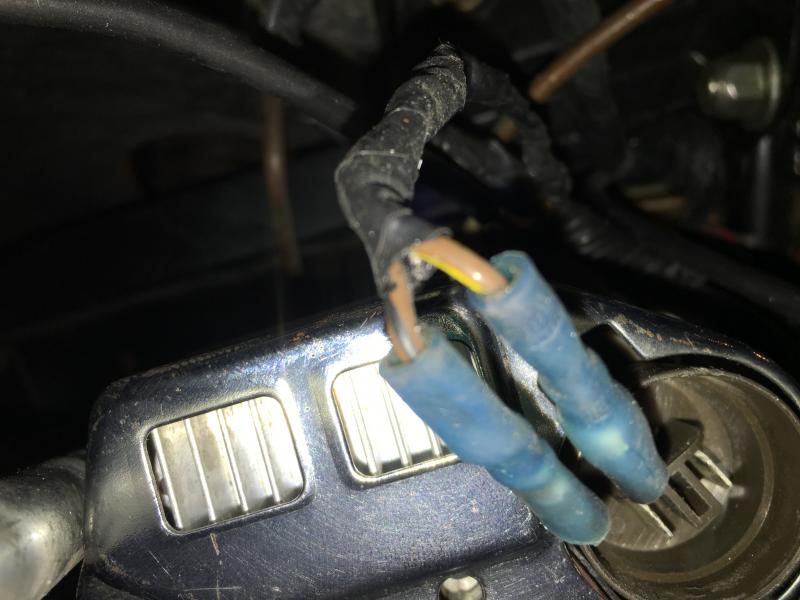
My speedo cable connection has come unattached. See picture. The knurled female threaded part is supposed to screw onto the male threads coming out of the tranny housing, shown to the left in this picture. But - those male threads spin free, and slide in and out of the tranny housing. Advice anyone?
-
good
-
I can only read down to #81, not being a subscriber to the Telegraph, but - did the VW Beetle make the list?
-
I'll check it out. They have all different sizes, so probably have (or can make) 5' x 12'.
-
Nice work Croc and Tom. It's on my calendar - looking forward to it. Oct 2020 gives me more time to get everything sorted on my car . We just got a new Toyota Rav4 Hybrid. 1750 lb towing capacity (although the "Adventure Grade" Rav4 has 3500lb towing capacity - not sure what makes the difference). I'm looking into trailers like this: https://www.alumaklm.com/utility/single-axle/6310-utility-trailer#standard-equipment My car would fit, and it would put me under 1750lb. If I tilt it properly I might even be able to use that ramp for my car.
-
Yesterday I removed my Brooklands screens and installed the standard windscreen. Brooklands have been a bit too chilly for New England. Took a drive last night with the "doors" on. Much more comfortable, although the sensation was that the cockpit shrank a lot. Just a visual thing, as with the Brooklands my head is out in the world. With the windscreen and doors I now feel enclosed in a little box. Not good nor bad, just different. I tried putting the top up over my tall rollbar, without the supporting hoops, and it's about 2" too short, front to back. I figure I can make a vinyl extender to snap between the boot and the back of the top, to fill the space. Just curious if anyone has successfully fastened their top over a high rollbar, and if so, how you did it?
-
I'll play. Here's my winter list. Was never intended for public consumption, so some of it might be meaningless to anyone but me: Right rear tire leak Check coolant hoses for leaks Fix oil leaks Oil tank extra outlet Front left hoses Oil check valve Carb throttle catching New throttle cable - reverse operation at carbs Carb screw that’s stuck Rebuild carbs Aim headlights or new headlights Windscreen back on Pad left shoulder area or new seat Mud flaps Replace broken snaps on car and tonneau cover New 6 pt belts New helmet? (current is Snell 2010) Better GoPro microphone mounting Replace gauge lights Blacken grayed switches Determine differential ratio New differential? Differential axle seals Fire extinguisher Figure out why right rear is higher Carpets/floor mats Have alternator tested Front wheel bearings adjust or replace Alignment Make extender so top can be used with high roll bar