MV8
-
Posts
2,303 -
Joined
Content Type
Profiles
Forums
Store
Articles
Gallery
Events
Library
Everything posted by MV8
-
In Oregon, "Antique" vehicles are only issued one plate, but instead of a reasonable rolling cut-off year, they were very creative. If memory serves, to fit the category, it must be older than half the years between the current date and 1900. Right now that means nothing less than 62 years old is an antique (1961 model). A 1969 model won't be considered an antique until 2038 at nearly 70 years old.
-
When I say lower edge of the rivet, I'm talking about the shank, not the edge of the head. I would not drill any lower than the center and maybe higher depending on the diameter of the hole needed.
-

The Regular Summary of Classified Ads of Se7ens Found For Sale
MV8 replied to Croc's topic in Cars For Sale
A replacement windshield can be an issue if it is needed. -
Effective wind deflector/buffeting reduction?
MV8 replied to Cueball1's topic in General Sevens Discussion
A clear panel across the roll bar behind the head rest would probably help reduce the buffeting. Easy to try out as a temporary fix with four cushioned strap clamps around the bar and strip of aluminum extrusion across the bottom for rigidity. 1/4 inch acrylic or polycarb from the glass shop cut to match your hardboard pattern. #12x3/4" pan head machine screws and nyloc nuts. -
The lower edge of the rivet holding the top snap on the front of the frame clears the glass.
-
You're welcome. Are you all good then or are you looking for feedback on something?
-
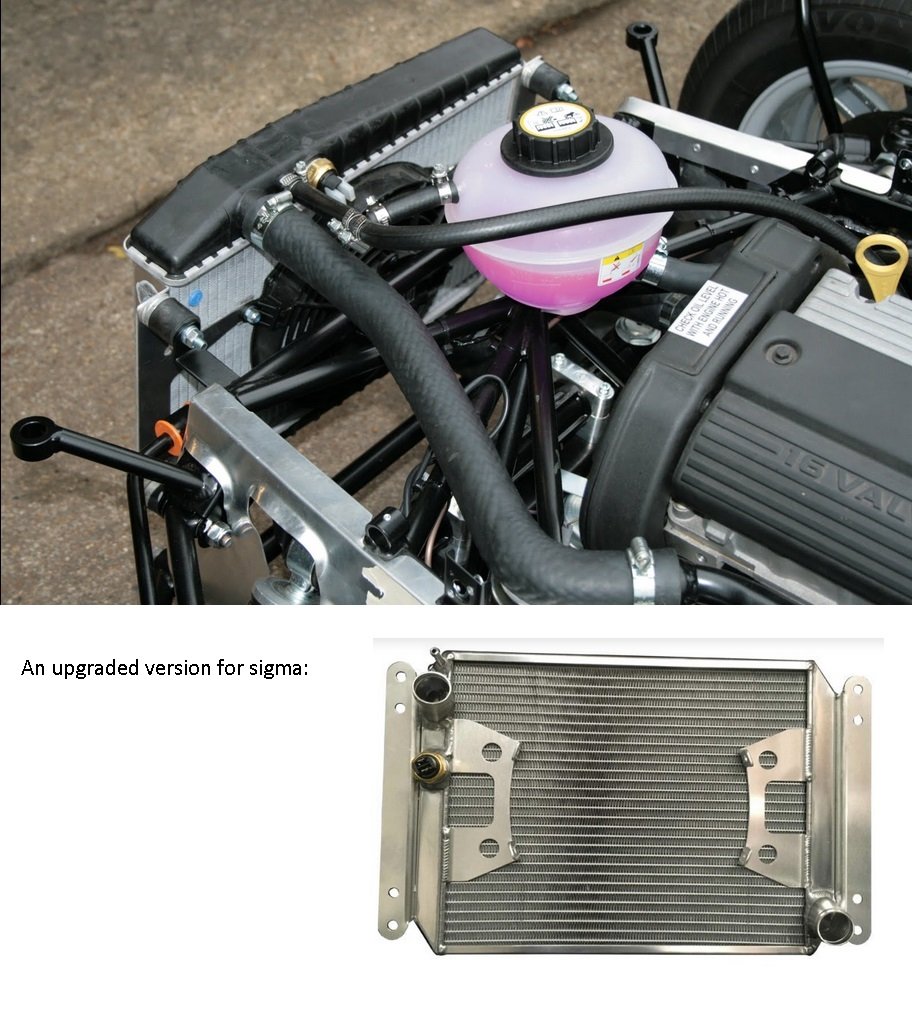
Can I see a pic of the radiator and fan? How did you determine the "easy car electrics" pdf is for your car? If the builder used the fiesta ecu to control the fan, the oem programing may not cut the fan on until 215f or so for better emissions. You may want to replace the plug in the radiator next to the upper hose for the 197f sensor to control the fan through the relay the way Caterham designed the harness for a sigma. Fan ON temps are typically 12 or so degrees higher than the OFF temp which is a little higher than the thermostat opening temp that sets the minimum operating temp. A fan temp too close to the operating temp would come on once and never shut off until the engine is off long enough to cool down. EDIT: Found a pic of a rover powered sigma and a link to an upgraded radiator for the sigma with a similar fan switch location: https://www.coolexperts.co.uk/product/caterham-sigma-engine-uprated-aluminium-radiator/

-
Unless there is a common runner tube connecting all the intake ports to a vacuum line to a MAP sensor, then you are running the "alpha-N" option with the MAP providing barometric pressure (no vac line). There is an internal correction factor applied based on the baro input but speed density offers better driveability overall. I expect you need to lean the load table across the board and probably washing down the cylinder walls with fuel for rapid bore wear. I expect it was running rich at 1900ft. I recommend not driving it anymore until you get this resolved. You can park it for a month, equip yourself and spend many hours studying to make logical changes or to minimize down time, have it tuned now on a local elevation dyno and plan to equip yourself in the near future. Emphasize to the tuner that you are looking for max driveability for local elevation and temps, and are not concerned with peak hp numbers and keep the original tune file as a backup. A few pictures of the various tables of the new and old tables would be nice to see posted and give you more info later if you don't install the software on your pc in order to see the old tune. I would consider fitting vac ports to each runner to tee together for a MAP source, then switch to speed density mode for better performance all around. Just cutting brake line, flaring the end, cutting to about an inch long, drilling a slight smaller hole in each port around the top or side, then pressing the brake lines in to provide a vacuum port. The ports are connected with three vacuum tee's with the third in the center, going to the MAP sensor being used for baro if it is the same part number. The MAP should be mounted very close(short hose) and the lines/hoses kept thin/small for rapid response to changes. Easily reverted to alpha-N by capping the ports.
-
B+ = battery positive. Don't test for ground on coils unless you are checking for a wire shorted to ground by unplugging the ecu and the coils. I guess you are trying to do something while waiting for the injector noid kit to be delivered? How about inspecting the #4 injector inlet screen, check the B+ key-on to #4 with the dc volts setting, and the resistance across each injectors terminals to compare them to each other?
-
Injectors and coils should have full B+ with the key in RUN and START. The "difference of potential" associated with applying B+ and a ground across something is controlled by the ecu and crank trigger but not an actual consistent "ground" normally checked with a dvm.
-
I suggest getting a few small sheets of the material and thickness you plan to use, to tinker with bending to get a feel for it including annealing. A hand bottle torch has enough btu to anneal but the cone is not optimum for that. I've used black magic markers for the area that needs to be softened, then heat those areas with a constantly moving torch until they disappear. If bending around a frame member, the sheet should be lightly clamped with wood (such as a 2x4) along the length of the bend to the member to control where it bends. Any cuts should end at a drilled hole or radius to minimize the chance or cracking later. I prefer 3003-h14 .050". If not bending at all, go with a harder material, same thickness. N "non-structural" rivets work well and are cost effective from aircraft spruce as is the 3003. You may end up welding a small area together where the sides meet the rear sheet covered by the rear fenders. Butted with a doubler with two rows of rivets or lapping with a joggle/offset/step bend edge would be an alternative if it were not a dedicated resto.
-
I expect the fan switch to be next to the upper radiator hose in the top of the radiator. Check for a ground on one of the connectors. Touch the other connector to ground with the key on and if the relay and other wiring is good, the fan should come on. You may need to remove the ground wire eyelet from the chassis, wire brush the chassis and eye, then reinstall for a good ground. If the coolant is too low, the fan switch won't be submerged and won't feel the heat. The clear coolant filler tank/expansion tank on top should always have the coolant level visible. The fan switch is a very common part for vw/audi/porsche and easy to find here for around $10. Here is a link to the switch I think you have (reference # 823959481F, TS-151): https://caterhamparts.co.uk/cooling-fans/38-cooling-fan-switch-thermostatic-rad-fitment.html https://www.summitracing.com/parts/smp-ts151#overview If you want to bypass as a back up to a failed relay or switch or low coolant level (to keep the fan engaged until you reach a source of coolant), A switch rated for 15 amps at 14vdc and 12-14ga wire should be ok for the standard cooling fan.
-
I don't think it is controlled by the ecu. Check the radiator for the fan thermoswitch (remove nose) or just follow the wiring from the fan motor. One of the two wires should go to the fan thermoswitch and the other goes to the relay. The thermoswitch should come on/short at about 197f/92c to ground the fan relay located with the other relays in your pic. Should be on the end of the bank of relays. If controlled by the ecu, just following the fan motor wires should determine that.
-
Unclear. What did you read exactly? Why bypass the fan circuit?
-
Everybody wants to go to the party, but nobody wants to clean up after...... How about an entry level 5 psi regulated turbo setup with rising rate regulator, small oil cooler, and no intercooler. Waste gate integral. Bov if you want to add one.
-
Waxoyl is much thicker. Linseed is about the same thickness as deck oil or house paint. I've not tried spraying it but a plug in the end of a gallon hand pump sprayer wand, drilled around the radius with holes should work to coat with the excess to run out. I coat all my yard tool handles with it. It has also been used in a bucket of sand for oiling spaded tools. I've also used it on leather. One good use for waxoyl is coating rivets before popping in place to aid sealing. Low cost Waxoyl recipes: 1) two toilet to floor sealing rings (about a $1 each) dissolved in one gallon of mineral spirits. Add one quart of non-detergent engine oil. Adjust amount of spirits for desired consistency. 2) Some use turpentine instead of mineral spirits. 3) 12 oz bees wax dissolved in 2.5 quarts of turpentine. Add 1 quart light machine oil.
-
"Boiled" linseed oil works well and the traditional choice for protecting the inside of tube frame aircraft. A table is good for layout but you are not trying to align new tubes but hold when the tube is removed/repaired. You just need a jig frame to resist chassis warping and also not be in the way of final welding. You could weld a 1x2 11ga frame to clamp directly, weld a doubler/bridge tube to the jig frame on the leg against the tube to be replaced, then cut out the jig tube against the tube being replaced for access. The clamps can be pipe with the right id for the chassis tube od, split with a pinch bolt to press against the cut away half of the pipe to prevent crushing/damage to the chassis tube including longitudinal clamps on the vertical close to the node/tube cluster to counter expansion and contraction from the heating and cooling.
-
Instead of engine mods, consider setting up a spare diff with numerically higher gearing appropriate to the course. Much more cost effective and you can go back to original easier.
-
Essentially. There are many different injector connector designs. I use a traditional incandescent style test light probe with a clip lead to back probe the connector but a snap-on "noid light" would be easier to use. Look for a set that cover fords if you have oem type injectors. It sounds to me like you've pretty well covered ignition. Idle and transition from idle is more critical than midrange where there is a lot of airflow, inertia and rpm, so the problem won't be as noticeable once moving but still exist. Injectors have a tiny "last chance" screen that is easily clogged. An O2 sensor typically is not a tuning input at idle. On a side note, one thing I like about the old throttle body injection systems (TBI) that filled the gap between carbs and multiport was the ability to see the injectors spray pattern just by looking.
-
Check out rustoleum professional greys at home depot. It looks the same on my screen.
-
Fuel, spark, timing, condition. See if the injectors are all blinking an led test lamp similarly at idle (move wiring around looking for inconsistency). If so, move the injectors around to see if the problem follows. Check for vacuum leaks around the affected cylinder intakes and injector seals with a LITTLE, short squirt of carb cleaner or starting fluid while idling, listening for an rpm change.
-
The site says those items are "made to order".
-
A short cable lock in the boot for the wheel, with a small locking "dry box" mounted through the inside of the box makes sense. Preferably under the boot cover. I've seen them under the bonnet where the heater normally goes.
-
The Regular Summary of Classified Ads of Se7ens Found For Sale
MV8 replied to Croc's topic in Cars For Sale
-
If it is fully welded, why braze? I have gas, stick, mig and tig setups, but I usually reach for what is the most convenient to drag out to where I'm working; Eastwoods 130 amp 110v with fluxcore wire so light (no bottle), upgraded ground clamp and an hbf automatic helmet. The flux comes off easy enough. The tig is not necessarily less heat than mig. It comes down to skill for both. Mig with shielding gas would be easiest to learn. If using a bottle, make it large as it runs out quickly and the cost is about the same to refill/exchange as a tiny bottle. I use milwaukee angle grinders with various wire cups, grinding wheels and flap wheels, drills with carbide rotary files, and portable bandsaw with 14tpi bi-metal blade for metal work. I use an electric 1/4 inch diegrinder with 2-3 inch cutting discs for detail work. Craftsman made high quality ones. Also handy to have a arbor to use a drill at lower speed in a pinch.