MV8
-
Posts
2,303 -
Joined
Content Type
Profiles
Forums
Store
Articles
Gallery
Events
Library
Everything posted by MV8
-
Yes, metro 94 and older. Requires a pulley swap. 14767 is a honda alternator.
-
Did you push the throttle body linkage toward the throttle body idle stop while checking the voltage idling? Did you check for intake leaks hot and idling? Did you set the rpm, closed throttle gap and each idle screws per the service instruction provided by Sltous before raising the idle to 1100rpm?
-
I'd lean toward the "flexibility" parts button versus the "power" button. It reduces the choke size recommendation for better drive ability off-idle, better, economy, and emission. FWIW, my suggestions were not from a calculator.
-
I suggest staying with a commonly available vented lead-acid where the cca is tested at 0f versus 32f (not a direct comparison to the popular sealed race batteries). What is the BCI code on the battery you have or the dimensions? The code would provide the dimensions. Higher cca provides a margin/cushion for starting when it can make a difference between driving and towing.
-
You may be better off time-wise by doing this piece-meal, with a focus on the mech-of-the-moment being tasked with one thing only. Once a task is complete, you can tow it home or talk about the next one generally in this order: (fuel/clutch/brake/normal engine maintenance/tires&align. This is a very old car, so expectations and the inspection requirements of your location have an impact. I'm sure you could be driving in a month in a less blue area, but there are always bad apples.
-
Sounds like a good start. If after tuning, if fully closed butterflies still results in a too high idle rpm with 12deg advance, you might consider F9 smaller air bleed idle jets. You can check if the idle jetting is correct after tuning by raising the engine 300 rpm with the idle speed adjustment screw, then turning the mix screw in or out slowly to to see if it increases rpm (remember where you started). IN for more rpm=rich/idle jet too big, OUT= too lean. No rpm increase from turning the mix screw either way at 300rpm above idle means the idle jetting is correct.
-
A pcv valve is essentially maintenance free and been installed on most four wheeled vehicles from about 1966. No need to add one or remove it. I think the main regulatory issue stems from folks tasked when ensuring there is a positive crankcase ventilation system, which does not always require a PCV valve in order to be compliant. Just running the drysump vent tank hose to between the air filter and the throttle body would be a pcv system with no valve. I think motorcycles have had this type of system since the mid-70s.
-
What parts do you have now? I would expect to see something close to the following for a standard or mild tune: 4.5 aux venturi, 33-34 venturi, F11 or F16 emulsion tube, 115-135 main jet, 160-190 air corrector, 40-43F9 slow jet, 35 pump jet, with a 7.5-8.5mm float level.
-

The Regular Summary of Classified Ads of Se7ens Found For Sale
MV8 replied to Croc's topic in Cars For Sale
If it is just about the driver and not a track, extending the exhaust to the rear with a couple mandrel bends spliced together should have the least affect on back pressure with the greatest reduction in noise at the driver's ear. Tip inserts can be made, tested, and modified with a port forward of the muffler for checking back pressure when driving and a db meter or phone app. It can be a thin, baffle insert with packing or just a 1/8-1/4 rod rolled into a circle/ring and held with screws. -
Yes, just a single connection to a pressurized tank that acts as a fill point and original to most sevens. Many are on ebay for under $50 as universals or oem like the vw jetta ball type for under $20 with cap, but a mounting bracket must be made for that one for support. I assume you have a copper-brass radiator, which can tolerate more aggressive cleaning and can be cleaned by a radiator repair shop if you can find one. They put the radiator in a solvent tank for a period of time, desolder the tanks from the core, insert a rod through each tube to ensure it is clear, then solder it back together again. The process of cleaning can leave a core serviceable with pin holes and replacement cores are very expensive if they can find one. Traditionally lye has been used to clean copper-brass radiators but there are other diy options though you may want to remove the radiator, mix a solution in a bucket, then pour it in to sit a few days before flushing and re-installation. Flushing is always the path of least resistance and most welded or plastic tank radiators are often throwaway once some tubes become clogged since it can't be brought back to 100% without a cut and weld. The plastic tanks are easily broken and are not sold separately. I've not seen a dial type regulator offered today that was updated with a new diaphragm and claims of compatibility. It may be more cost effective to use a pump made to provide the right pressure for webers since ethanol compatible dead-head/non-bypass regulators can cost as much or more than a quiet, carter gerotor pump with the right specs.
-
Sadly, no, but reprints and eprints are available via the R&T publisher. Interesting article: https://www.roadandtrack.com/car-culture/a29156/side-glances-lotus-seven-round-three/
-
Might could use a new gasket on the bonnet side to tighten things up. With no modification, you could add L-tabs on the latch side (attached by the same points as the latch, then fit a hair pin that must be pulled for the lever to move away from the the latched position. The hair pin can be retained with a couple inches (after twisting) of safety wire to keep from losing it. There are a number of locking over-center latches available that are also adjustable for tension but I don't know of any direct fits.
-
The Regular Summary of Classified Ads of Se7ens Found For Sale
MV8 replied to Croc's topic in Cars For Sale
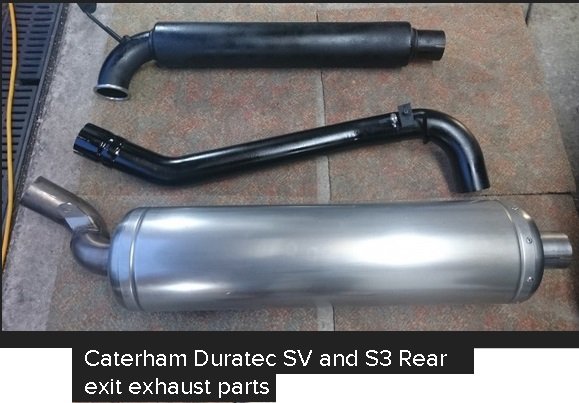
You could also cut the tip off, and add an offset to bring the tail pipe along the lower chassis rail inboard of the tire to the rear. That may be all you need and still very clean looking. I've seen a few configured that way. Apparently a factory option? If still not quiet enough, there are tip inserts that are also effective. Found a pic of the factory rear exit exhaust parts. I expect you'll need to cut the two bolt flange off to fit any typical muffler which are longer. An offset inlet on the muffler would help keep it close to the body.
-
The system you have is "closed" as long as the hose in the plastic overflow tank reaches the bottom and the tank is filled above the end of the hose when cool. No system is closed during an overheat. A system without an overflow loses coolant with each thermal cycle. I'd reverse flush the radiator by disconnecting both radiator hoses then use a garden hose to push through from the upper pipe, fit a new thermostat (180f) or at least test the one you have on the stove to see if it opens fully, test the fan circuit and fan amps to see if a better front mount fan is available, restrict the coolant bypass around the radiator to force more coolant through the radiator, and add an expansion tank to the firewall to fill completely (no other changes to the system) for more coolant capacity. It tees into a heater circuit and is not affected by the heater valve being open or closed. Is the dial-type fuel pressure regulator ethanol blend compatible? SAE J30R6 or 9 hoses or euro equivalent?
-
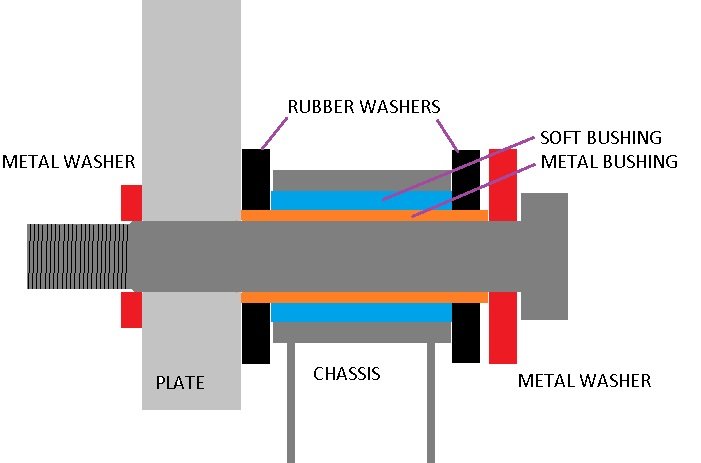
Everything red is fully tightened by the bolt and nut to where it does not matter if it is a lock nut or regular nut. The nut should not run out of threads. If there is not enough clearance when tight, the metal bush/sleeve/machined hat is too short or needs deeper machining of the hat integral washer. A small od shim could be fitted or the machined hat replaced with a washer and longer bush/sleeve.
-
Yes. That is the practice/idea with using the longer aircraft bolt, but it could be threaded all the way to the head with no unthreaded shank and still be fine. The bolt is just a clamp for the steel sleeve/metal bush/machined hat, to float on the chassis tube via the soft bush with rubber washer thrust bump stops.
-
Very nice! The Blackjack Zero is vw based with guzzi power and vw irs transaxle with a flipped ring and pinion for fwd or porsche 901 transaxle from a 914, but the Zero requires the engine to be forward of the wheels (the only downside imho). The Corbin Merlin and electric Sparrow use the same configuration. The Dino appears to be rwd, using the guzzi swingarm/diff with a long driveshaft to the rear through support bearings. I've contemplated something similar using a honda goldwing.
-
For raw and simple, look for an old TVR (like a Griffith 200) to fit between a miata and a CAT for size and weight. Fiberglass versus aluminum sheet, fully enclosed, space frame, typically ford german v6 or 260/289 v8. Short wheel base can be a handful.
-
Do you have a picture of the components? I expect the stack of washers was added in order to use an extra long bolt to move the aircraft bolt unthreaded, thicker shank completely through the aluminum plate but usually car parts are so over engineered/over sized that low-grade hardware store fasteners are more than adequate. It looks like there are four rubber washers when there should be two. The bolt when tight should not compress the washers. A small gap is desired. The purpose is to allow minor movement at the bushing inside the black boss) without the black boss striking the aluminum plate. It could also be that the bushing is worn out or missing. It could be replaced by having a machinist cut new ones (nylon rod/tube would be a good choice but there are many options of varying hardness). The bush can be three piece with a bush and two washers or two "top hat" bushes with integral thrust flanges. This type of engine mounting is typically for racing and has no bushings at all if the transmission is also solid mounted. Otherwise, damage can occur to the transmission tail housing.
-
I thought the mk4 was the 1500. My spit is a '78 (1500) and was just a shell when i bought it.
-
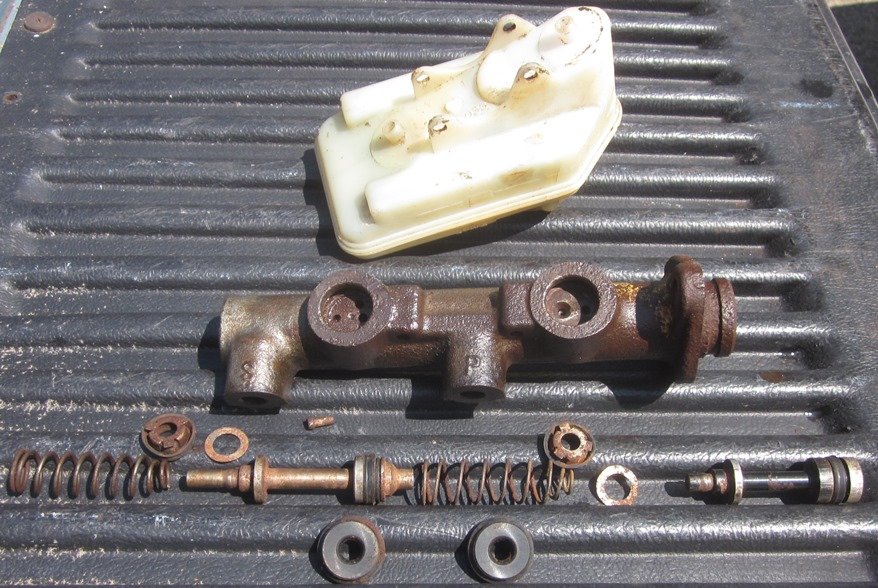
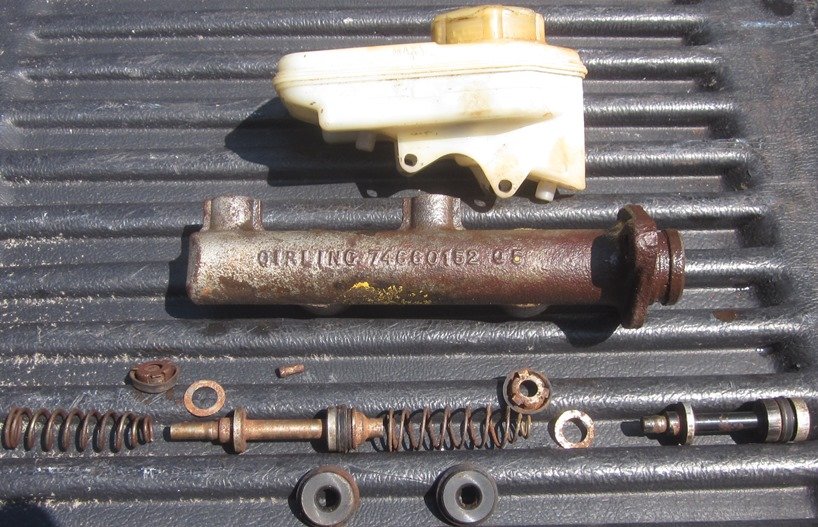
I don't have the plastic ring to show the ratio, but I believe this is a 50/50 due to the length of the piston stop for the secondary piston. A shorter tip would allow more secondary piston travel. The bore is not stepped and the piston diameters are .703". The small pin is what holds the pistons in the bore; no snap rings. It is stepped and drops into a hole above the secondary bore between the secondary piston lands. This is from a drum rear brake mk4 1500 spitfire. I agree a rebuild with a quality kit using seals compatible with all brake fluids is probably going to be better than a new knockoff.
-
I located the girling master that came with my spitfire. I'll take some measurements and pics of the internals.
-
For the sake of discussion and no first hand knowledge (I have an MK4 Spit but not the original brake system), If the larger bore is 0.70" then a 62/38 split bore would have (approximately) a 0.62" bore for the front circuit (more pedal travel/higher pressure/softer pedal/less feel), not counting the ratios at the wheels. A bore stepped like this would be like a balance bar with dual master cylinders but not adjustable. A proportioning valve is a completely different function.
-
Looking at page 9, it appears the seal was driven too deep before installation of the dampener. Generally seals are installed level with a housing or slightly higher. Use the appropriate socket/pipe/driver to make sure you are pushing on the outside edge where the metal is, not the rubber seal. If pulling the pump, get a seal driver kit if necessary. The driver will be only SLIGHTLY smaller than the bore of the housing. It is possible to use a 3/8 extension if you can get it started without distortion of the seal, then back and forth (like tightening a wheel) to slowly, gently tap it down to level. Also, to remove the seal without damaging the crank or bore, use a 3 inch deck screw with the torx head on each side. No need for a drill. Use pliers to walk it out.