-
Posts
644 -
Joined
Content Type
Profiles
Forums
Store
Articles
Gallery
Events
Library
Everything posted by SENC
-
I think "wind" is not the buffeting issue, rather the extreme low pressure pulling in air. In other words the more you block the wind, the more you're increasing low pressure in the cockpit and the more buffeting introduced. Thus, brooklands type screens increase wind but decrease buffeting relative to full windscreens. I have wind deflectors from Redline and at certain speeds they do help - but mainly by moving the air flow eddies slightly rather than blocking wind. I suspect the real answer to addressing the issue when using a full windscreen is not attempting to block more wind but in finding other ways to get air into the cockpit to increase air pressure behind the screen and reduce buffeting from the side and rear. I've not yet gotten around to trying to develop some sort of scoop to attach to the windshield (like those for Miatas) to pull in air and distribute it down and outward, but thay might be beneficial. I also like the idea someone else here implemented of a scoop below the car ducting air into each footwear. My bet is either would be multiples better than the side deflectors.
-
For what it's worth, I don't care for the braid covered hoses. Though they certainly provide external abrasion resistance, you can't see and monitor the condition of the hose itself - and I'm not confident the inner hose is any better quality than the cheap stuff. I've stuck with high quality hose and barbs.
-
Nice! And congratulations!
-
Not sure if you've found what you want, but if not you might add the LR Discovery 5 to the list to consider. Had my LR3 in for some planned suspension work and they gave me a D5 for a couple days. I was unexpectedly impressed, really a nice vehicle with lots of space. Drove it both in town and for a few hundred miles on the interstate. A V6, but rated for about 8k pounds towing. Had a long conversation with the indy shop manager - they have found them quite solid mechanically, in fact he'd bought one about a year ago for his significant other.
-
The Lotus Elan Shop Manual says 12-15 ft lbs of torque. A kent ford manual I have reminded me there are lock washers for these bolts.
-
Chris - I saw this morning that there is an active discussion on lotuselan.net on concentric slave use (and I know I've seen others there). You might check that thread and others on that forum for additional guidance. https://lotuselan.net/forums/viewtopic.php?f=31&t=46138&view=unread&sid=00f39b24fa44b51a0f4f4399959b2ee9#unread
-
Hylomar Blue, Wellseal, Loctite Aviation Gasket Sealer - any or similar should do the job just fine if surfaces are good. I think I used Wellseal as I had it on hand. I think the keys is to not use a silicone based sealant like rtv that can get into the oil and bead up and clog passages - though even that is probably fine if just a smear that won't squeeze out. Threadlock is fine if you choose - but I tend to use anti-seize (copper or nickel depending on metals) for such bolts. Proper torque should hold them in place. I can't remember torque for these - will see if I can find if I had a resource specific to our engines and pumps, but there are generic torque charts for bolt sizes across the web.
-
Priming the pump can sometimes be an issue. Redline Assembly Lube or a similar product that disperses in oil can be used in the pump before assembly to ensure innards are protected and improve suction.
-
Not nearby (eastern NC), but keep us posted if you get something organized. I need a good excuse to get to the mountains for a drive.
-
I bought a 2007 Land Rover LR3 about 2 years ago with similar thoughts in mind. 130k miles, 2 or 3 owners all in the South, and a service record. The trump cards over other vehicles were towing capacity (just under 8k) and price. With a purchase price under $6k and setting aside $7-8k for potential maintenance in the first 12 months, I was comfortable total cost would be 20% lower than the others and I'd have a better towing and off road vehicle. I think I ended up with a total year 1 cost of about $11k. It has been a brilliant vehicle I really enjoy driving. The downsides are it is slow and drinks gas, relative to the others you mention - but the first is irrelevant to me in a daily driver and tow vehicle. The extra $800ish in gas per year is offset by lower taxes and lower insurance costs, so immaterial. I've found the LR3 to be relatively easy to work on, and have done about 50% of the work to date myself. I use a good independent LR mechanic for bigger/more technical stuff or when I just don't have time. The LR3s and LR4s (and UK cousins Discovery 3 and 4) have huge followings and active communities so advice, parts etc. are very readily available.
-
The revised Library is much easier to find and remember - at least for me - thanks! Perhaps once this supplier list is more complete, it could reside there as well. Re the supplier/vendor list, it's been my observation that vendors tend to focus on particular "eras" of Sevens with some, but very limited, overlap (Redline, for example). Organizing the list by major car groupings might be a way to make a long list easier to use. Parts suppliers for pre-70s Sevens Dave Bean Engineering (DBE) - Primary West Coast USA supplier of vintage Lotus parts (focused on Seven, Elite, Elan, Europa, Cortina) - https://www.davebean.com/ RD Enterprises - Primary East Coast USA supplier of vintage Lotus parts (focused on Elan, Europa, Elite, Eclat, Esprit) - https://www.rdent.com/ Tony Ingram Historic Racing (CA) - Restorations, engine rebuild, and parts for racing and street Sevens (and a few other cars) - https://lotus7.com/Home.html Lee Chapman Racing (CT) - Parts for Sevens and other period Racers, primarily suspension - http://www.leechapmanracing.com/index.html Sevens & Elans (MA) - Rebuilder, sells cars and used parts - http://www.sevenselans.com/carsforsale.htm Redline Components (UK) - Top UK supplier specific to Sevens, with Lotus and Caterham - https://redlinecomponents.co.uk/ Tony Thomson Racing (UK) - supplier of bits for racing Elans - https://www.tonythompsonracing.co.uk/ Kelvedon Lotus (UK) - supplier of parts for Elites, Elans, Europa, Cortinas - https://kelvedonlotus.co.uk/ SJ Sportscars (UK) - parts supplier of vintage and newer Lotus cars - https://www.sjsportscars.com/home.htm Mick Miller Lotus (UK) - parts for classic Lotus cars - http://www.mickmillerlotus.com/lotus-parts.html British Classic Spare Parts (UK) - parts for classic British cars - https://britishclassicspareparts.com Classic Team Lotus Parts (UK) - bought out Paul Matty, supplier of classic Lotus parts - https://www.parts.classicteamlotus.co.uk/ MEV Spares (UK) - parts for classic British cars - https://www.mevspares.co.uk/home.php Small Ford Spares (UK) - English Ford parts, incl Anglia 105E parts - https://www.smallfordspares.co.uk/vehicles/ford-anglia-saloon-105e-106e-1959-to-1967 Ford Anglia 105E Owners Club (UK) - parts forb105Es - https://105eoc.com/spares/ Standard 8 & 10 Spares (UK) - parts for Standard 8s and 10s (S2 Sevens used Std 10 axle) - https://standard8n10spares.co.uk/ Standard Motor Club (UK) - parts for Standard cars - https://www.standardmotor.club/standard-8-10-etc Will look forward to what others might add to this list.
-
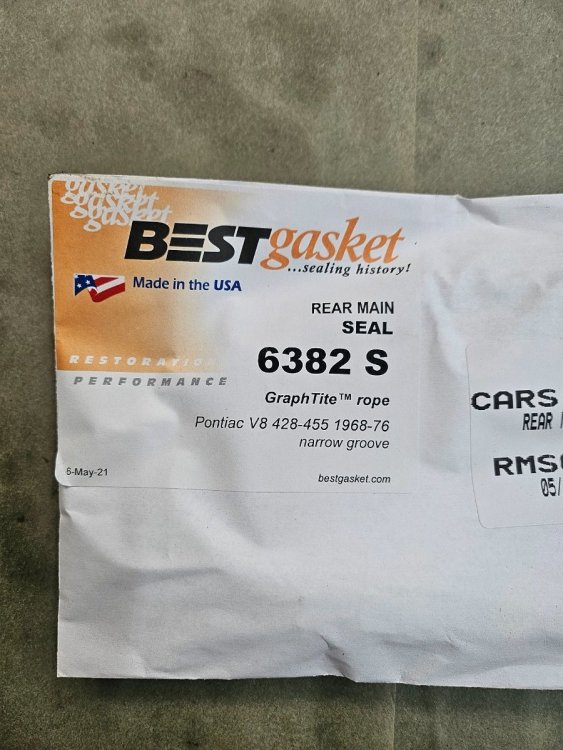
Attached is the article and below a picture with the part number that fits our sumps. Re the cork gasket, I used Wellseal - first applying it sump-side. Then I flipped the sump upside down and added a touch of weight and allowed it to sit overnight. This kept the gaskets from moving around on install. Another good option is to replace the bolts with studs/nuts as the studs keep everything in line. I can't remember if RD Ent carry them, but if not one of the usual Brit suppliers do. RopeSealArticle.pdf
-
I used a Best Gasket graphtite product alternative, after reading a great article on it. So far so good. Will try to find that article and share this evening.
-
I suspect what's happening is that you're starting with a big air pocket, and as the clutch is actuated multiple times the air is getting mixed with the fluid so you're ending up with a more broadly compressible column of fluid.
-
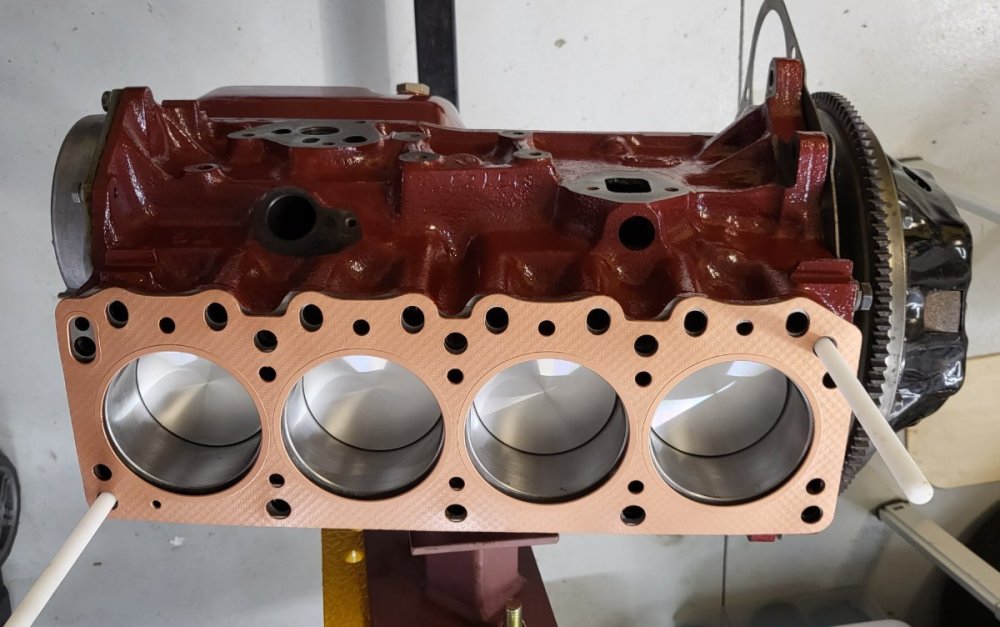
I would trust them, too. Ken is very knowledgeable - if you have any doubt, just give him a buzz and discuss, I'm sure he'll either put your mind at ease or replace (if the 2 of you determine that prudent). For what it is worth, here is the one I used. It came from Tony Ingram, and has been copper-coated in advance of install.
-
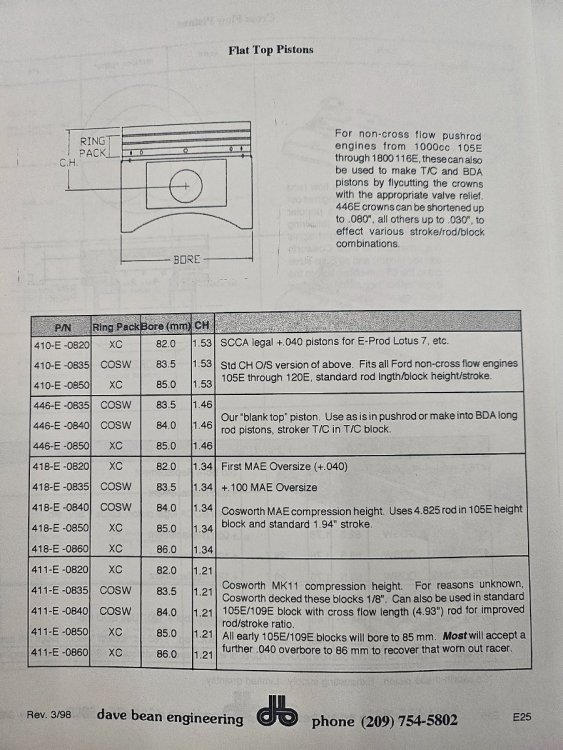
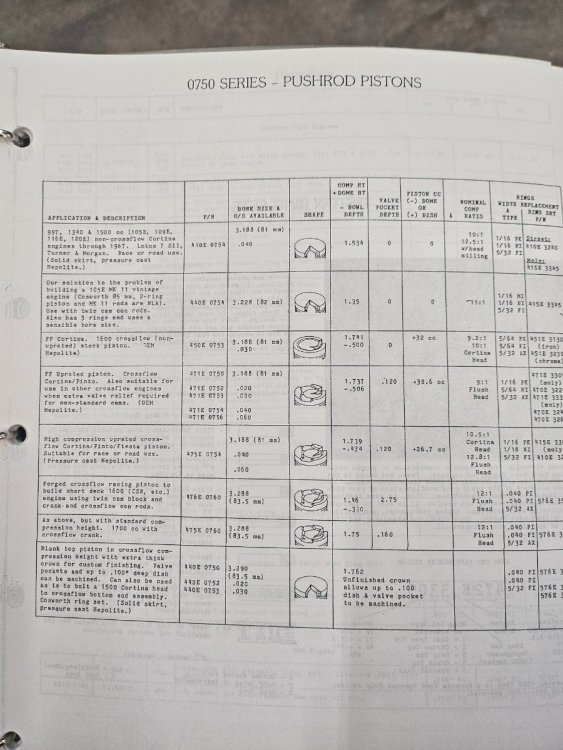
I should have commented that I know my engine was rebuilt in the 70s/80s after a thrown rod, so the pistons that came out were not likely original (at least 1 one them). The following photos are pages from the DBE Elan/Plus2/Cortina catalog and DBE English Ford Racers catalog, respectively. I take them to suggest flat tops were standard for pre-crossflows.
-
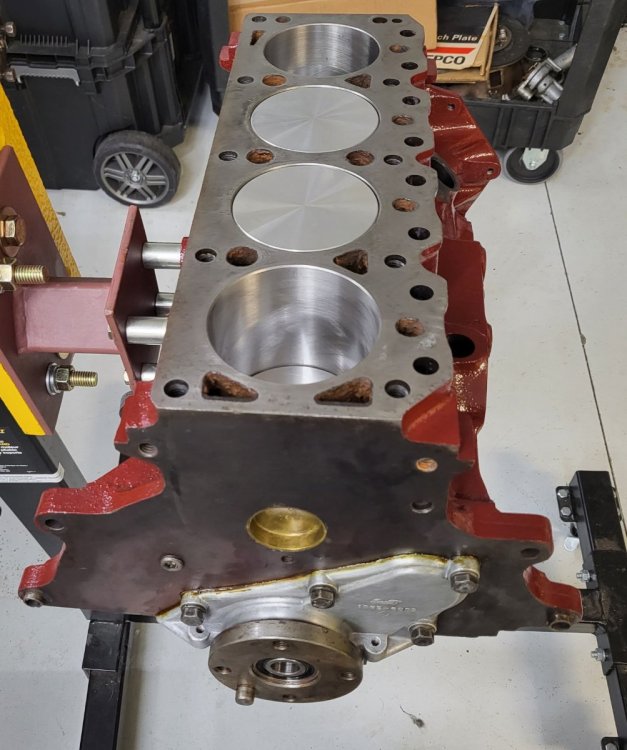
Mine were flat and replaced with flat (picture below). There isn't much clearance, so I'd think that protrusion on yours could be the issue. Maybe wasn't originally but if the head got skimmed and/or a thinner head gasket used?
-
I was wondering about that protrusion, and thought it was maybe just an optical illusion.
-
Agree with others, I'd be investigating for other symptoms that might help narrow things down. Before pulling things apart, I'd also check and adjust valve clearances and double check head bolt torque. Given the water flow/overheating issues you were having for a bit and (if I'm remembering correctly) a history of the car not being used much since any PO work on it years ago, I'd both want to make sure something easy wasn't missed and also note current state before removing the head.
-
Reach out to Tony Ingram (lotus7.com). When I was rebuilding mine he had a specific recommendation based on his experience building many of these engines.
-
Excellent, enjoy!
-
There is a bearing/bushing in there - it isn't off kilter and blocking you, is it?
-
Here is a link to Joe's old Seven on simplesevens.net - you'll find pictures of his blue engine, which looks a lot like the sprayed blue you tried. Looks nice to me. https://www.simplesevens.org/1736/1736.htm
-
@SevenAmerica - John - do you have any known sources for S2 clutch kits?
-
Lotus did paint engines - a number of different colors! Check out John Donohoe's simplesevens website and you can find pictures of lots of cars and engines with different paint jobs. Ford gearboxes appear to have been all black, all green, or green with a black bellhousing. I think blue or blue gray were used on a number of engines/vehicles. The S2 Cosworth 1500 seemed to have been painted wine red - and it's gearbox dark green. I can't remember where I read/found that initially, but I did find this download of a thread on paint colors from the old se7ens mailserve. Even here some disagreement - yet another indicator Lotus was never as consistent as we sometimes wish they'd been - John Watson's opinion is last in the list for each part. His matches best with what I've seen/read elsewhere. I don't recall reading whether earlier Cosworth engines like yours were similarly or differently painted. I chose the red/green scheme - because of what I'd read and because I found traces if both whe cleaning my engine and gb. But I did not take the time to try to specifically color match, finding POR-15's MG Maroon and Ford Green approximated well enough (for me) pictures I'd seen. S2 Paint Colors.pdf

