copy.jpg.dd4bdbb41ccb3ea8a585d1ad217ef61b.jpg)
.jpg.da03509438cc84820b8cf5d64db570ab.jpg)
Austin David
-
Posts
391 -
Joined
-
Last visited
Content Type
Profiles
Forums
Store
Articles
Gallery
Events
Library
Everything posted by Austin David
-
.thumb.jpg.885191d302e6c3704c848a8f5ac3a612.jpg)
So, tell us a little about yourselves
Austin David replied to slngsht's topic in General Sevens Discussion
For those of us without the Kimini book, which brake light are you looking at? -
how does it feel while driving? I don't have a target weight. if I wanted to save a few hundred grams I could leave my phone at home. Having done some braining and some research I may try to fill it with silicone, which seems to be a good, inexpensive vibration dampener. I wanted to test it in a Miata last week on a road trip, but the treads are 10x1.25 in the Miata, and 10x1.50 in my Caterham.
-
so far, this one lucky shot seems to be the better of both options: it damps vibration through the various linkages, and doesn't get hot (or cold). They're also pretty easy to make in this form, so if anyone wanted to try one (and can use M10-1.5 / Miata threads, or tap their own) I'd be happy to make extras.
-
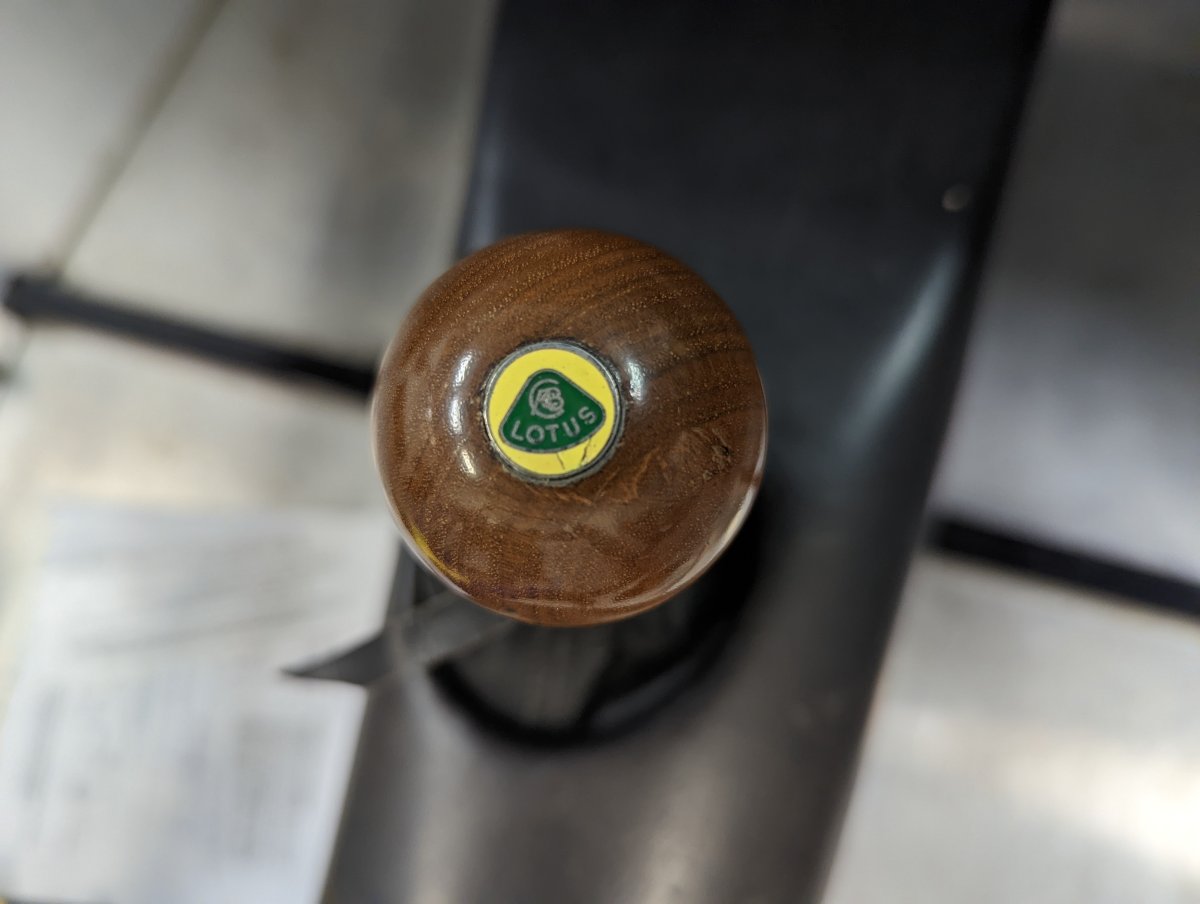
well, I was modeling my design on what I assume is an original, based on the knob I saw on a '68. Eventually I was thinking of using wood, but I am presently distracted with prototyping to settle on weight and design. I'm 3D printing the prototypes, figured I'd do wood myself the hard way, or outsource it locally. That said -- on a whim I ran a rubber knob. Sort of long story but the outcome is hilarious and amazing. I used rubber mostly because that was in the printer already, and I broke the plastic test part while moving the threaded sleeve. I took it for a spin tonight and it's AWESOME. The plastic one (tested yesterday) feels pretty good, but sounds like a maraca under 45 or with partial throttle (I hadn't potted it, the lead was still loose). I had a good feel for the weighted deadblow, and was moving the sleeve back to an empty model, and I broke the ball. No big deal, but rather than swapping out the material I figured I'd just print off this rubber unit. The rubber material itself is flat black, and is what I am using for the gapfiller / sleeve between the shift boot and the ball. It holds the locknut to keep the ball from rotating. It's about 95A which is sort of hard, about like a tire sidewall. Feels good under skin, but it's not shiny and not really polishable, so I wasn't planning to use it for the actual knob. So here's the surprising part: the model is hollow, with basically a baffle in the center for structure (running transverse left-right, straight up the axis of the stick). I mostly wanted it to survive inserting the threaded sleeve, but ultimately the knob would be full of epoxy and lead so it doesn't need much internal structure. With hard plastic all the little vibrations as transmitted directly; but with this rubber model, the internal structure makes it basically like a tennis ball. I can squeeze it a little, or roll it forward/back a little, but it's PRETTY rigid. Like I didn't notice the compliance until I was trying to figure out why it would shift so much better than the others. So the accidental side effect: it is just a little bit compliant fore/aft, which soaks up smaller NVH when shifting up & down. The effect is subtle, but has more benefit than adding 100g lead. The surface is a little bit grippy, which isn't terrible. It's not as smooth as the polished version but after a few minutes I kinda like it. So now that I don't have to fill it with lead, I'm wondering if I should make a hybrid wood model with a compliant rubber sleeve...

-
Google seems to think it was a 917. Interesting. I can get down to about 28-30g total, including the sleeve to cover the gap between the ball and the boot. The 917 model seems to come in around 35g with the internal shank to hold it together. Pretty sure I ate about 350-500g of dinner tonight.
-
again the internet is torn on this -- range is "don't do it" to "it makes no difference", but clearly there's an upper limit. I don't necessarily think the Caterham setup is perfect in every way, but I figure as long as I don't make it heavier than the 200g stock knob (about 7 oz) I won't be creating any new problems.
-
testing 2 models, shifting 3-4-3 in neutral. unit A, 31.8g vs unit B, 136g. Similar materials and construction; both ~ hollow plastic. Unit B mostly filled with lead shot; it's loose, so this may also provide dampening (like a deadblow hammer) Both work, unit B is "smoother" -- less notchy bouncing in/out of neutral. No meaningful difference in the effort required to shift in/out of 3-4-3. For the reference: a similar sphere made of water would weigh about 56g, so I assume a solid wood knob would be about 50-60g
-
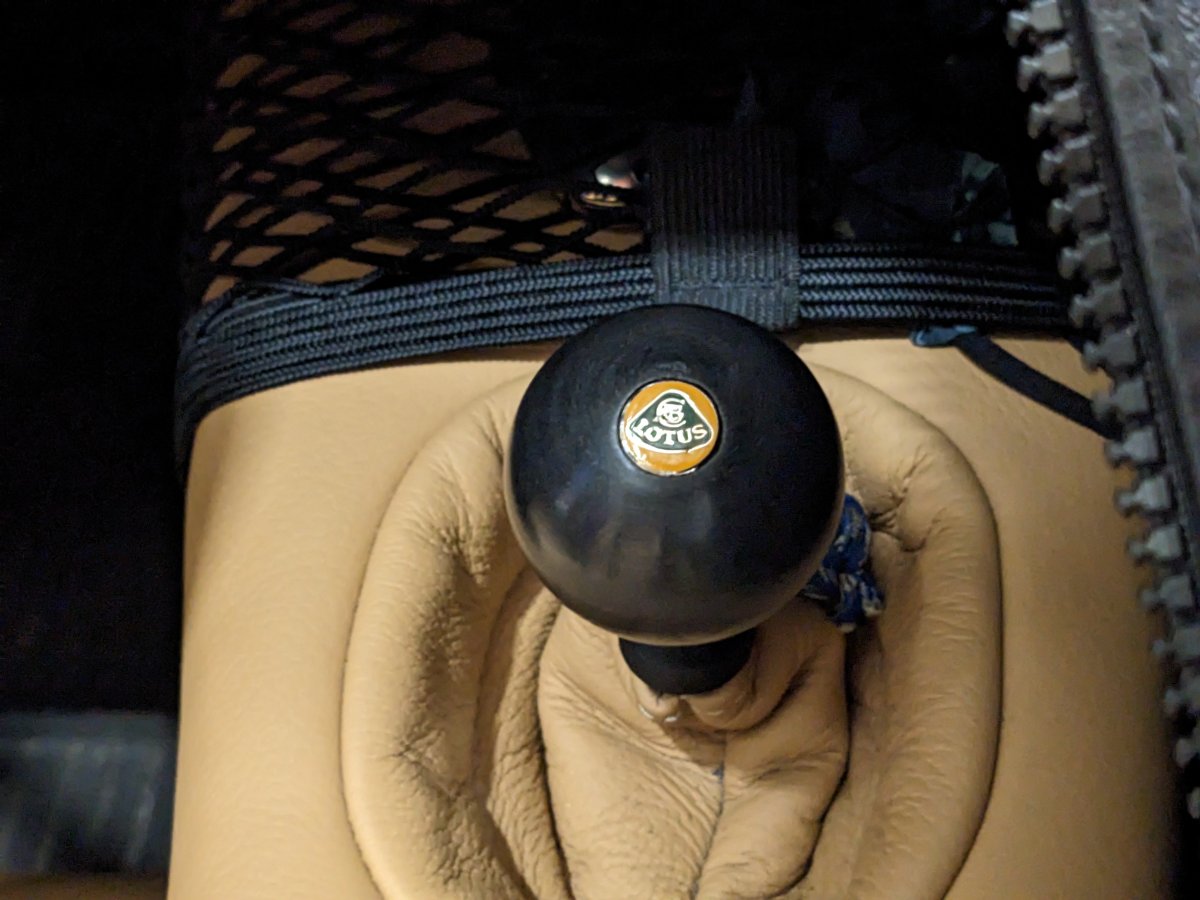
I've always liked a small sphere, but the stock knob had a pretty deep inset "S" that feels weird. And it's solid metal, so kinda warm in the summer and very cold in winter. I've got a polished plastic sphere with the insert Lotus logo, it looks good and feels good. I'll try packing it with lead to see if there's a useful difference with added mass. I think the range will be about 30-250g without having to get too creative...
-
for the record: stock shift knob is 196g, my test unit was about 30g.
-
Yeah, trying to see if I need to pack it with $30 in tungsten powder, or melt down some lead, or beg some steel shot from the local armory. Or something. Having a target weight might help. I'll see if I can get some cheap lead tomorrow...
-
the question is really "stock weight" or "less than stock weight", but I get your meaning. I'll try a few different weights and see what works.
-
new Caterham, MX-5 transmission with what I assume is a not-quite-Miata shifter (at least, shorter than my NB MX-5 which AFAIK is the same transmission). Should I use a weighted knob? My stock knob is pretty heavy, and I'm making a new one because bored and whatnot. Current iteration is about 40-50g, but I could fill it with tin or tungsten or something and get it much heavier, if it matters. The innernets are relatively divided between "lighter is more agile" and "heavier is more smooth." And of course, both are best. What do y'all think?
-
the best work I've done / seen involves uninsulated crimps, covered later with heat-shrink. That way you can do the crimp correctly, then apply the insulation around it in the color of choice. Otherwise, (a) color matches wire size, and not purpose, and (b) you crush the insulation when applying the crimp, which looks less fast. It takes about 4x as long to do it this way, but gets better with practice.
-
ZZS in winter -- less sticky, or am I just more blippy?
Austin David replied to Austin David's topic in Wheels and Tires
Cool, I'll just enjoy skating on the way to pick up milk. It's still awesome, just need to roll it on a lil more gently. -
ZZS in winter -- less sticky, or am I just more blippy?
Austin David replied to Austin David's topic in Wheels and Tires
fortunately "fun" is ultra predictable in this thing. My other car also has 200TW tires for 4 seasons, but I hadn't noticed them changing a lot as the weather cools. It also has maybe half the power::weight, and is less torquey. Croc, do you drive year-round in NYC on ZZS? I saw ZT7s out there but I'd need to stash a set of wheels for 'em, and that's a lot of garage space. I did NOT see a lot of interesting 4-season options in smaller wheel diameters (< 16) though. -
Do the ZZS tires lose grip in cooler weather? I've got 185/55 R13 ZZS tires on my 360S, and 4000 miles on 'em. They generally still stick really well, but I've noticed I kick the rears around a little more than I used to. It happened today when I was a little spirited coming off a stop. Weather was about 60F and dry. I haven't made any suspension changes. I AM a lot more comfortable with the car, and it's possible I'm just a little more generous with the right foot. I live in coastal SC, car lives indoors. 9 months are 80+, and winter months cool to ~ freezing. Should I be thinking about winter tires?
-
Shoes are cheap, and "driving shoes" make a shocking difference. None of my street shoes are any good, but driving shoes / mocs are fantastic in the pedal box.
-
signal boost. All excellent, GENERAL advice really. But omg I now run two wires every time I run one, "troubleshooting ground" is the worst possible use of time.
-
Or miles
-
Heat shrink gates clamps are very nice too, but definitely not reusable.
-
The original intake isn't bad. How does inspection work up there? Is it a one-time event when they assign the registration? When you get around to turbo you'll want to gut the intake entirely (and maybe add an intercooler). As a naturally-aspirated car with 1/2 the weight it probably doesn't matter as much.
-
I took a lil test ride tonight, about 40 minutes each way in FREEZING 60* weather. The seats work great. They start getting warm after about 3 mins, and by about 15 we turned them down a little.
-
I've got the 4 seat-parts refit as planned, and driver side mounted. Definitely easier on the second set. And I did a "test run" in the garage. It's nice -- I wasn't in long enough to make it HOT, but definitely enough to confirm electrical. Warmup seems like ~ 3 minutes, which matches my expectation. Not as good as factory (since it's behind the bonded foam) but still pretty good, and very even / no hotspots. And it's invisible, apart from the switches. Wiring: - I ran a pair of dedicated lines from battery (positive fused 15A) back to the bulkhead, under the tunnel. I happened to have some braided loom. I also added a third trigger wire, which is hanging off a terminal tied to the fuse panel, hanging off the ignition supply fuse. I'd previously used this to fire a relay for the cig lighter + my added USB charging port. - those 3 lines run under the tunnel cover, along the brake lines & other wiring, and are tied to a terminal block on the top of the tunnel / under the cover, about where your center elbow rests. - the Caterham has a *lot* of space under the cover in that spot - I had so much space, I have no yet shortened any of the included harness wiring from the seat kits. I riveted down a couple extra ziptie holders, just to keep things snug. - added a clean terry rag to secure the control cans for the seats, to avoid rattling - for now, the switches are temporarily fed forward through the handbrake boot and just hanging out. More below - the wiring to the seats: it is presently run between the two mountpoints for the seatbelt, under the carpet. There's a forward mount for my 3-point belts, and an after mount for (I assume a 4+ point. My harnesses emerge from the carpet about there. - The seatback is behind the seat, and just plugs in. There's extra wire, and enough space for it between the seat and the bulkhead. The pan / butt section wiring pops out at center. This section of seat rests on the seat frame, and the wiring can avoid getting crushed by running out the outside of the seat frame, along the carpet/floor, to the back bt the hookup. Again plenty of room to tuck the wiring out of the way. In an SV chassis you might have more space, but in this S3 the seat is touching the carpet and hides that wiring just fine. When lifting the seat back out the wiring stays exposed with plenty of slack, and will be easy to unplug. Switches: I have not yet cut any leather. The tunnel padding feels pretty thick, like 1/2" (leather over ~1/2" pad over curved sheet aluminum). The switches are designed to mostly pass through a thin, flat panel. That tunnel area needs to stay pretty flush, so whatever I do needs to be pretty tight; I may end up making some sort of flush-mount fixture that can penetrate the leather and padding, back up to the aluminum structure, and secure the switches? If I mount on the tunnel (elbow area) it will have to be more than just "drill a hole". Another option I'm braining is mounting to the side of the seat; the side rails are mostly empty space and I think deep enough for the switch body + harness behind it. Unfortunately because of the thick padding, I can't use the flat area in the handbrake boot -- after the pad and internal tunnel structure, there's almost no free usable space.
-
Heated seats! It's literally freezing right now due to some awful cold front, injecting a false winter into our false autumn. 40s in the mornings, ick. I got this kit: https://leatherseats.com/shop/seat-comfort/seat-heaters/round-switch-seat-heaters/ because I like the round switch. The dual-seat switch doesn't fit in the washer bottle switch spot, so if I'm cutting holes I'ma cut round ones. My seats are the "signature" model. I have no idea how they compare to standard seats, and CF can come with heaters. This is not a "HOWTO" but I'll include enough photos and tips to get anyone going. The seat construction is ... interesting. I haven't done a lot of upholstery, I can just say this isn't the same as the Miata I refit. The two sections (back and seat) are similarly-built. In both cases the seat leather itself consists of large clear sections under the thighs and lumbar, and thinner ribbed sections at the butt and mid back. The large clear sections are just a layer of leather bonded to thin foam, over a thicker shaped pad. Those ribbed sections are a little more foam, but then they are spray-glued into the seat pan. This is obviously very annoying. The sides and edges of the material is sewn to a plastic strip, which is later (final assembly) glued to the pans. All stitching cuts are out of line of sight / under the seats, and easily repaired to look great. The heating elements MOSTLY fit thusly: horizontal under the thigh, and vertical at the back. Because the heater needs to have at least 12" of element, I went ahead and separated the glued section on the back, and trimmed about 1" of element from the back heater. There's about 18" of connector for each pad; on the back, the connector comes out the center / floor. For the bottom, the cable emerges toward the tunnel. Both will have to plug in under the carpet, with wiring routed up under the tunnel and probably forward (TBD) for power. To separate the leather from the sewn-and-glued edge, it's better to cut the stitching out. The glue broke cleanly about half the time, and not-clean the other half. All repairable with zip-ties, but if I'm tied it up anyway, better to keep it clean. On the pan, separate the front seam. The sides are held on with double-sided tape, it's very similar to scotch double-sided tape you can acquire from your favorite office supply store. it lifts right up, but has to be replaced to be useful (leather fuzz left behind). At this point the cover can be rolled back, the heater taped down to the shaped foam, and re-covered (see below) The back: there are zip-ties in a few places, cut most of them below where your shoulders would go. Cut the stitching at the bottom edge. The two side rails are just held in with tension, once you get the zip-ties free the molded back/pan comes off the rail, and the sides will slide loose. And the fun begins. Roll back the lumbar section. I had a little spray-glue at the edge of the lumber foam, then liberal glue between that ribbed section and the back pan. Very slowly separated the two, minimal tearing of the bonded section. I went up to the last rib, leaving the one intact / still glued to the back. I trimmed about 1" from the heating element for a test-fit to get coverage all the way to the bottom. Because the back was glued, and the heating pad doesn't normally get glued, I added a section of carpet tape (heavier double-sided) to the center of the heating pad, so it was secured on the taped sides plus my new center tape. Then I put three more strips of carpet tape on the center and sides of the pad, then pulled the seat material down over the back. For the lumbar section, it's taped more like "normal" with the heater taped to the foam, then leather pulled tight over that. The sides of the cover tuck back under the frame/pan and zip-ties get replaced. For the last bottom edge, I punched zip-tie-sized holes in the leather and drilled two holes in the pan, then lifted the lumbar foam enough to thread the ties back through. Five sets of these to get the edges and center, then pulled them all tight carefully to keep it straight. Note that my *first* attempt (the bottom section) was not as "clean", I tried to preserve the hidden stitching and ended up doing more work, for little value. The final product looks pretty good, I'll include more pics when I mount the switches. by "pretty good" I mean "you can't tell I monkeyed with them." The covers are nice and tight and apart from some new zip-ties in a spot that can only be seen with the seat frame unbolted.
-
How to heat a 7 cockpit / seating ?
Austin David replied to Lightguy's topic in General Sevens Discussion
The heater is definitely effective, but the air kinda leaks out pretty aggressively what with no doors. Or windscreen. I'm going with heated seats (similar kit linked above), updating my build blog with the actual procedure. Spoiler alert, it's a PITA because the seats are glued together, after being sewn up. But it's not as hard as installing a diff.