JohnCh
-
Posts
3,338 -
Joined
-
Last visited
Content Type
Profiles
Forums
Store
Articles
Gallery
Events
Library
Everything posted by JohnCh
-
Your best bet is to visit Miata.net which is a major Miata forum in the US. They have a Sponsors page that features a number of companies that could fit your profile. BTW Flyin' Miata was a dealer for the Westfield SDV that was based on the Miata and I believe they are still a dealer for the Exocet. -John
-
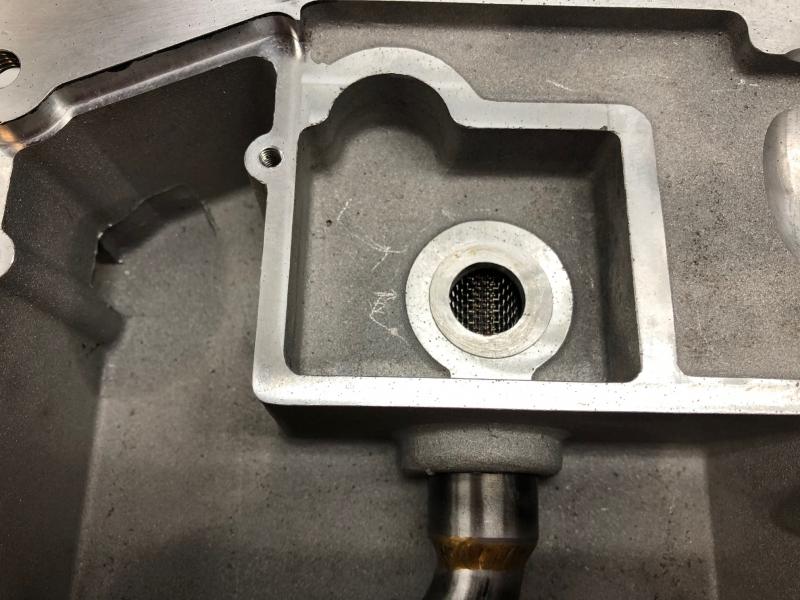
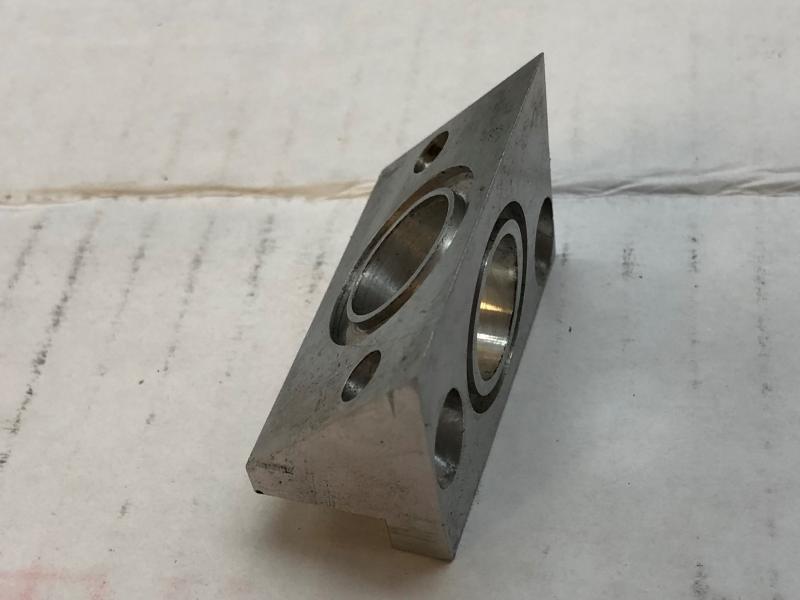
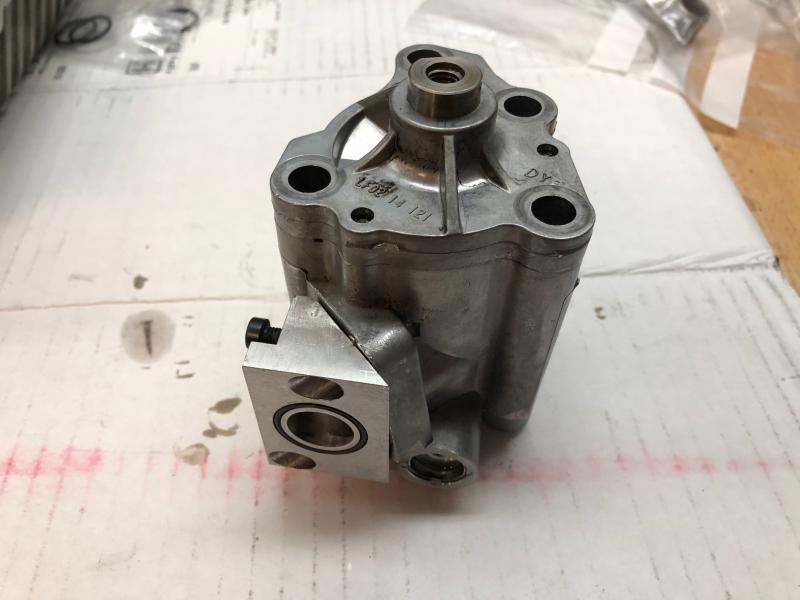
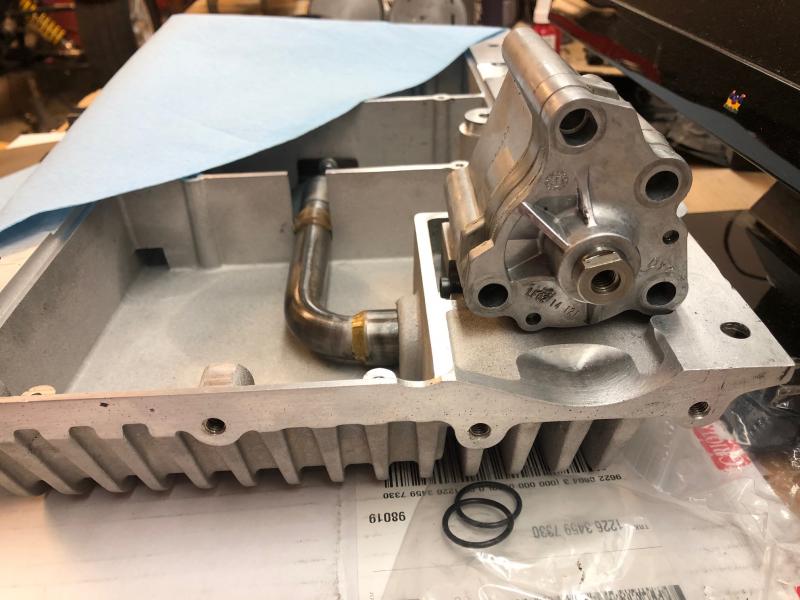
Those of you keeping score at home may remember Issue #3 from this post where I identified that Raceline had changed the sump design since my early unit and had supplied some O-rings in my rebuild package that were not utilized in my version. Peter explained they changed the connection method between the oil pump and the port at the top of the sump that leads to the oil pickup. Both versions make this connection via a wedge-shaped aluminum block that bolts to the oil pump and seals that area with an O-ring, but these wedges differ on the sump port side. My version has grooves cut on both faces of the wedge to accept O-rings, but the new wedge only has a groove cut into the oil pump side. The sump side is machined flat and seals to the sump via an O-ring assembly that is pushed into the sump port. This assembly, which Raceline calls a thimble, consists of s very short aluminum tube to allow oil flow, with O-rings fitted to the outside at each end. To accommodate this approach, the sump port is drilled to a much larger diameter and is reduced down to the correct size via the thimble. Apparently this newer design made it easier to assure that the hole in the wedge and the sump port are perfectly aligned. These photos show the sump port, wedge, wedge temporarily attached to the oil pump, and the pump/wedge assembly sitting on the sump port. Things turned interesting on Saturday morning when I started to assemble this area. After removing the old O-rings on the wedge, I discovered that the grooves are cut to accommodate two different size O-rings. One looked like it would accommodate the 2mm x 19mm O-rings I was supplied, but the other was a smaller diameter and the groove was much larger. Out came the calipers to measure both grooves: O-ring 1 Outer Diameter = 23.52mm Inner Diameter = 19.66mm Groove Width = 1.93mm Groove Depth = 1.98 - 2.21mm (this varied a bit) O-ring 2 Outer Diameter = 23.88mm Inner Diameter = 18.08mm Groove Width = 2.92mm Groove Depth = 1.32mm Looking at groove 1, there is a problem. The groove is deeper than it is wide, and is not machined to uniform depth. That means that an O-ring which will fit into the groove won’t protrude above the surface and create a seal. I connected with Peter at Raceline this morning and shared the pictures and measurements. He seems to recall they used an oval cross section O-ring from a Zetec oil pick up tube, but will have to do some digging to confirm. Looking on RockAuto, the Zetec in the Focus doesn’t appear to use O-rings for the pickup tube and digging through websites of O-ring suppliers and manufacturers, no one seems to make oval cross section O-rings. I ordered some plastigauge this weekend and will use that to determine the actual clearance between the wedge and sump port. If it’s really tight, liquid gasket may suffice which is the easy solution. If the initial design really did use an oval O-ring that is now unobtanium, then a trip to a machine shop to recut the groove may be the answer. This build remains…um, interesting. -John

-
I had the same thought. Prior to those tweets I had no idea he was a car enthusiast. Learn something new every day... -John
-
It's a long shot, but do you have 4-pots up front with inner bleed screws that you didn't bleed? -John
-
The Lotus Elan forum has a very active thread where people chime in with brief updates on what they've recently done to their Elan. Let's see see how that concept works here. Doesn't matter if it's a repair, maintenance, upgrade, taking it for a drive, or just sitting in it making vroom vroom noises while drinking your favorite beverage and waiting for local lockdown orders to expire. If it's tied to your se7en but you don't feel it warrants a dedicated thread, then share it here. Since I already have a long, active thread about the current damage I'm doing to my Westfield, I'll start things off by admitting I sat in the car today during lunch -- I plead the 5th on drinking a beverage and making vroom vroom noises -- and reminded myself of that aspect of the driving experience. I can't wait to get this sucker back on the road. On a more productive note, I also played around with placement for a USB port. My objective is to keep it hidden when not in use, but easily accessible when the phone needs power, so I'm thinking about affixing it behind the dash with velcro. When needed on tours, simply pull it down and plug in the device. Ok, who's next? -John
-
Back when I looked into this, the exchange rate was far less favorable than it is today. If I were looking for wheels now, I'd be very tempted by a 3-piece from Image Wheels. Lots of choices in design, size, and offset, and the billet versions are very light. At the time they quoted a 13x6 at 8.6 lb. -John
-
Found the list. Rial also made a really nice 13" wheel back then, but my understanding is they stopped producing it several years ago. Other folks may be aware of additional manufacturers, but this will get you started: Image Wheels, Panasport, Compomotive Motorsports Wheels, Revolution Wheels, Kodiak Racing Wheels, Pro-Race wheels (aka Rimstock) -John
-
If you do want to explore other aftermarket wheel options, let me know. I put together a list several years ago when I went through this process myself and am happy to dig it out. -John
-
Your 310 uses 4x10⁸. It's not very common, and you need to make sure the offset is correct. If you are getting a set for the track, is there a reason you want to stay with 14"? Personally, I'd look into a set of 13" Caterham wheels. There are some aftermarket manufacturers, primarily in the UK, who can make wheels with the correct PCD and offset, but the Caterham wheels are tough to beat at the price. Even I run them on my Westfield -John
-
I spoke with Peter at Raceline this morning and once again he came through. It turns out Ford stopped fitting the second dowel pin to the oil pump about 10 years ago, so that is the new normal and perfectly fine. This means I am ready to start reassembly...until the seemingly inevitable next issue arises -John
-
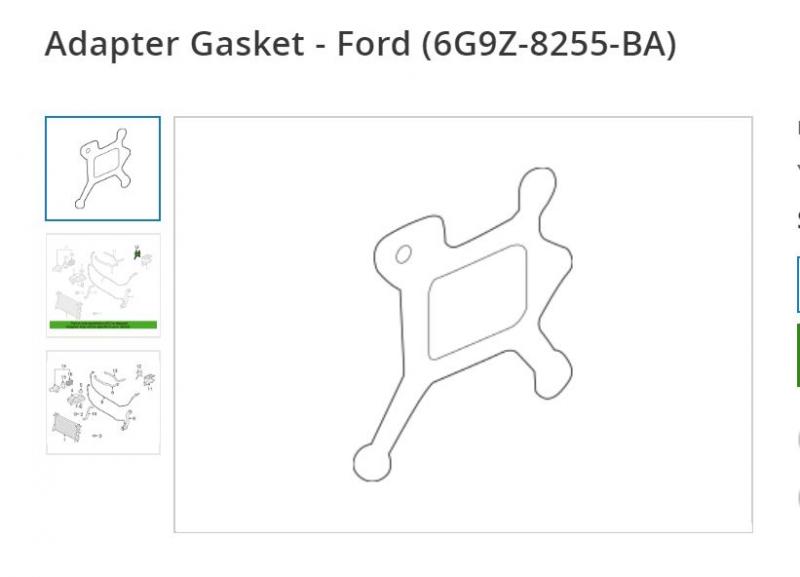
Thanks Paul. These parts are both for Fords, and they show they are for the same years, so it's not even a running change. Looking more closely at the RockAuto listings, there are different part numbers for the two styles although the descriptions are the same. Unfortunately the online listing at Village Ford, where I initially ordered the gasket and is shown below, includes a drawing of the part I need, but uses the part number of the other gasket. I guess there is no point making this easy It appears that part # 6G9Z-8255-BA is for the extruded gasket, and 1S7G-8255-BD is for the flat gasket. I'll know for certain once the order from RockAuto arrives. Now if I can just figure out the deal with the oil pump... -John
-
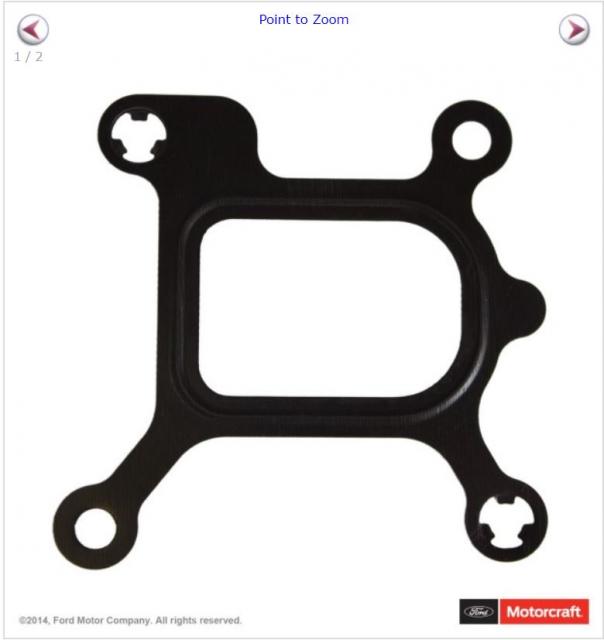
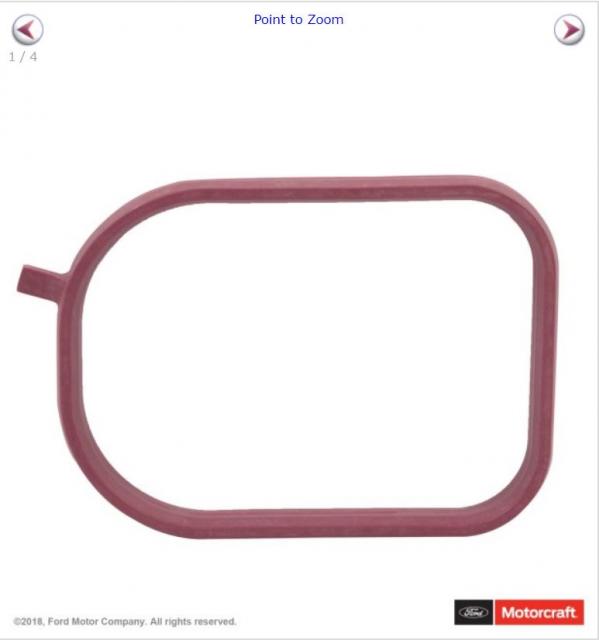
The rebuild has been on hold while I awaited delivery of the missing gaskets for the oil pump and for the water outlet at the rear of the head. The later wasn't actually causing delays since attaching the water rail is one of the last things to do prior to installation, but it is needed. The online Ford dealer I use for Duratc parts normally ships quickly, but with Covid-19, it took much longer than normal, and then USPS seemed to misplace the package for a few days. Thankfully it's here now and the plan for this weekend was to finally begin reassembly. First step was to install the oil pump which arrived with my first shipment of rebuild parts back in October. At the time, I took a quick look to confirm it was correct, and although there were some slight differences to the casting from my circa 2002 pump, the key aspects were the same. However, this morning I discovered something overlooked during my initial examination: one of the two locating dowel pins was missing. The pump body is machined to accept it, but it was neither installed nor in the box. Then I took a look at the oil pump gasket to make sure it was correct. It is. However, the water outlet gasket wasn't even close to the correct shape. Rather than a flat plastic gasket with 4 bolt holes splayed out, this was a rectangular extrusion that was meant to fit in a groove. The part number matched the order and a visit to their site showed the drawing of the correct part. However, entering that same part number on a different site revealed a drawing of the part I received. Hmm... A visit to RockAuto's site was next to view photos of both parts from various manufacturers. The water outlet gasket is a little odd. They show both styles and the descriptions match, but one shows a hybrid with the extrusion fused to the flat gasket. My best guess is that the Ford setup uses both, but the water rail just requires the flat gasket. Photos below of the flat, extruded, and hybrid versions. The oil pump photos created more confusion. Two of the pump brands include photos of the back side where the dowel pins are located. However, both show only the single dowel pin like I received from the Ford dealer. Given the pump body is machined for the second dowel pin, this seems odd. Does anyone have any experience with this? If not, I'll give Peter at Raceline a call on Monday. Thanks, John
-
Evo just published a short review here. -John
-
I like the concept and the fact they even went to the effort of fitting the Jenvey Heritage Throttle Bodies to maintain the old school vibe under bonnet. I wonder how long it will be before someone attempts to 3D print a BDA-style valve cover to complete the look? -John
-
I went through that hassle too. It was easier to find and order the Duratec tappets from a Mazda dealer. Ford dealers didn't even seem to know what they are Croc, didn't the K series have headgasket issues? Could the use of pantry items be related? :jester: -John
-
Earlier I mentioned the dowel pins that locate head to block were removed when the deck was blocked. I have the originals, but they were damaged during removal. Finding replacements proved a challenge. They don't show in any of the online Ford or Mazda parts diagrams, and calling the parts places that are still open resulted in Catch-22 conversations. Apparently a parts expert is highly capable of ordering parts, but incapable of finding them without a number. I suppose the only reason they state on their websites to call if you can't find the part in their online catalog is so a live person can tell you they can't help without a part number. Who says e-commerce killed the personal touch? One online parts search under cylinder head did return something that looked right but showed as a starter bushing when drilling down. Further searches on the part number at other sites confirmed that description and additional searches for starter bushing turned up a second part number. Hmm... Both were ordered and arrived yesterday. According to my calipers the first one is correct. If anyone is in this position again, the correct Ford part number is W701183-S300. -John
-
Sadly there are some things in life you just can't unsee... -John
-
The pictures certainly help, although I am surprised that Dave Andrews isn't mentioned in the attribution. He wrote that many, many years ago, well before the 2011 publish date. Regardless, it's a good basic primer. -John
-
Below is s good, basic resource for DCOEs and includes a simple but effective guide to setting idle and low rpm running. It's probably safe to assume the various jets and emulsion tubes are correct, but it's probably worthwhile taking them out to see what is installed and make sure they are the same in each carb. It's an old car and sometimes people do stupid things along the way. I'd also make sure the float levels are correct in both carbs. Apologies if you already mentioned this earlier, but a synchrometer or unisyn is a worthwhile investment to properly sync the carbs. http://www.s262612653.websitehome.co.uk/DVAndrews/webers -John
-
Good idea, but I'm afraid Jack Daniels wont' do it. Too wimpy. You need at least 60% alcohol to kill the virus. Something like this 127 proof Bruichladdich should do the job. -John
-
Mike, it should work now. If not, let me know and I can connect you two. -John
-
After my last post I looked at the specs for the two versions of Loctite. The 680 sounds like it's designed for exactly this purpose, so I ordered a bottle. You can never have too much Loctite or too much duct tape on hand I forgot to also provide an update on the O-ring and thimble described in the wet sump instructions. According to Peter the design changed quite a while ago to provide more latitude when aligning that port with the oil pump which can be cocked slightly when installing. Not an issue, but it does mean I need to take a little extra care when bolting everything together to ensure the port is fully aligned. -John
-
Thanks for the tips on the elbow fitting. I just spoke with Peter at Raceline and he said that he uses Loctite 270 when reinstalling. I have some of that on hand, but let me do a little digging on the difference between that and the 680. Vov, the actual range of the throw seems about the same in both slaves. With the I4 version I can push the throwout bearing well past that inner silver tube, but when released it will only extend a little above it. The V6 version when pushed down only goes to about the top of the tube and as you can see from the pictures, is quite a bit above it when extended. This should mean that with the I4 version, the pressure plate will not move as far when the clutch pedal is pushed. My assumption is that you would not get full disengagement, but without having all the parts in place, it's just speculation. As long as I was on the phone with Peter, I asked him about this and he confirmed that the V6 version is also correct for the Zetec installations. He also indicated that the I4 version can over extend and start to come apart spilling fluid inside the bellhousing. Have you noticed a drop in fluid level in your clutch MC? -John
-
Thanks Papak. I plan to do some more digging into the right approach with the elbow. I don't see signs of an adhesive, but it doesn't make sense that it's simply a press fit. Vovchandr, the 10mm extension means pushing the the fingers of the pressure plate closer to the back of the block. Here are two photos borrowed from RockAuto that highlight the difference. The first is the the 4 cylinder version (Sachs Part # 94ZT7A564AA) and the second is for the 6 cylinder (94ZT7A564BA). The end of the inner sleeve (see silver tube in the middle of the opening) is the same distance from the back of the slave cylinder in both versions. However, if you look closely, you can see how the V6 version places the throw out bearing much further forward. -John