JohnCh
-
Posts
3,338 -
Joined
-
Last visited
Content Type
Profiles
Forums
Store
Articles
Gallery
Events
Library
Everything posted by JohnCh
-
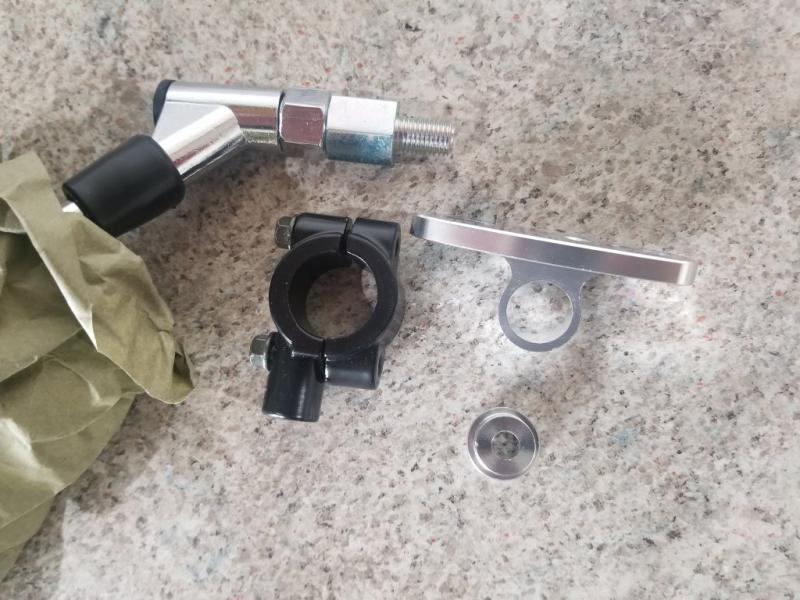
Here is the missing image of the mount and adapters: -John

-
Have you checked with Beachman Racing or Rocky Mountain Caterham? They both have parts inventory and it's possible one/both of them have the 13" wheels in stock. -John
-
Posting the missing images for Brightonuk: -John
-
When it comes to aesthetics, the only opinion that matters is yours. There will be some people here who think it adds a lot of interest and is gorgeous, and others will think it's too busy and strongly dislike it. But our opinions shouldn't matter. My advice is to leave it in place for a couple of days and see how you feel about it every time you walk into the garage. If it makes you happy, keep it. If it doesn't, pull it. If you know you want stripes, then maybe overlay the black stripes in a couple of days and repeat that experiment. -John
-
Vimeo is less stringent than YouTube... I suppose a live pay-per-view screening could help recoup some of my costs. Thanks for the idea! -John
-
Enjoyed, as in past tense? Don't go anywhere yet Shane, it ain't over Provided there are no surprises, I still need to report on perceived power and shape of the torque curve compared to the old engine, then add the dyno results. Logged another 100 miles today so now halfway to the target of 500 miles before getting on the dyno. -John
-
Did a 30 mile run over lunch and no leaks, so it looks like the T fitting was the issue. -John
-
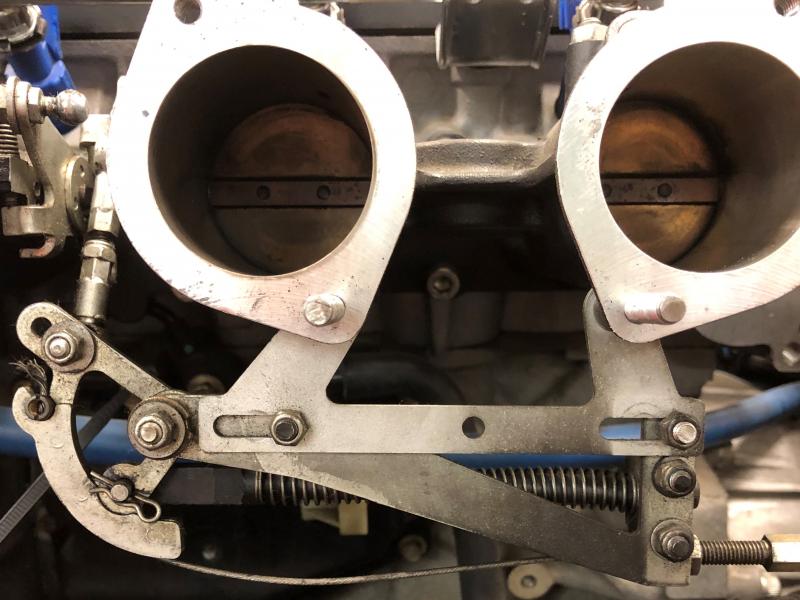
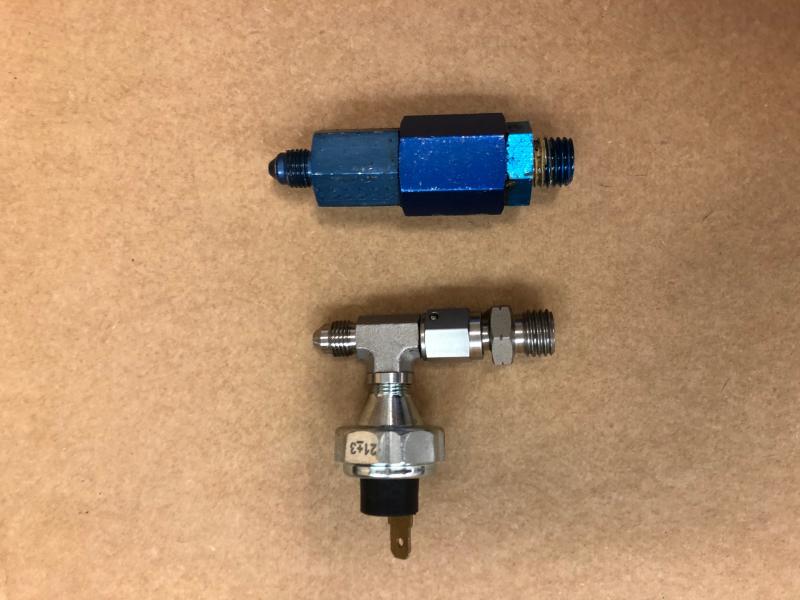
The engine has covered 100 miles so far, a number I hope to triple over the next couple of days. Much to my relief -- and surprise -- the oil leaks from the sump and blue sump plug have not returned. However, the one from the oil pressure assembly remained and was (no surprise) unaffected by the addition of thread sealant. As an experiment, I removed the T fitting for the low pressure sender, and attached the 3AN fitting off the line feeding the gauge directly to the M12 to 3AN adapter in the side of the block. I wasn't able to drive it afterward, but did let the engine idle for over 5 minutes and blipped the throttle several times. No drips. Hopefully it stays that way. After the drive to seat the rings, I noticed the revs weren't dropping between shifts as quickly as expected. Closer examination showed the throttle linkage return spring assembly seen in the old photo below, jumped ship. Fortunately the springs on the Jenveys are strong enough to make this just an inconvenience, but Raceline is working to secure replacements. Other than that, things have been thus far been uneventful. The ECU is now operating in closed loop adaptive mode, where it logs fueling changes based on a target AFR table. It was running fine before that was enabled, but even better now. Once I hit 500 miles, I'll do another oil change, switch from the the break in oil to a synthetic, and schedule dyno time. -John
-

The Regular Summary of Classified Ads of Se7ens Found For Sale
JohnCh replied to Croc's topic in Cars For Sale
With the original car, I'll never forget the first time I attempted a U-turn on a residential street. The question WTF went through my mind several times. The wide track fixed that, and the LSD made even that change superfluous. Just crank the wheel over hard and hammer it -John -
The Regular Summary of Classified Ads of Se7ens Found For Sale
JohnCh replied to Croc's topic in Cars For Sale
I'm curious, does the Caterham wide track allow for a tighter turning radius? On Westfields (or at least the older ones) with the standard track, the rack is fitted lock stops to prevent the cycle wings hitting the body on full lock. This results in a rather large, SUV-like turning radius. With the wide track option, no lock stops are necessary, thus the turning radius is more in line with the car's size. -John -
My high school physics teacher had a favorite acronym: TANSTAFL which stood for there ain't no such thing as a free lunch. People tend to conveniently forget that adage when evaluating various alternative energy sources. That doesn't mean they aren't better, but they ain't perfect. -John
-
My condolences Let us know what you learn when you pull out the old one. BTW I have both versions in boxes, so if there is any confusion or hard to read part numbers on yours, I can provide measurements. Thanks, John
-
See the first three posts on this page of my build thread for pics and part numbers. It's not clear if the Zetec uses the Contour 4 cylinder or V6 version used in the Duratec, but once it's out, you'll know. Both are easy to source in the US. -John
-
The Regular Summary of Classified Ads of Se7ens Found For Sale
JohnCh replied to Croc's topic in Cars For Sale
Hey, who let this Storker guy on here?? :jester: -John -
The Regular Summary of Classified Ads of Se7ens Found For Sale
JohnCh replied to Croc's topic in Cars For Sale
Skip, I'm glad you've stuck around, but I'd love to see you get back in a se7en. I hate to say it, but a certain percent of the population consists of pretentious knuckleheads. They exist in the Porsche club (what? your engine is in front? and it's cooled by water?? you heathen!), the Lotus club as discussed above, and I've even dealt with a couple of Caterham owners over the years who fit that same profile. When discussing people who own other brands of se7ens, one of them once wrote that he recognized not everyone can afford a Caterham (sigh...) The good thing is this percentage seems much lower in se7en circles, and has been non existent here for years. Mazda had a clear vision for an inclusive community when he started this site. I'm pleased to say we've collectively done a very good job turning that vision into reality. -John -
Usually when I see a comment like this, I think someone's hyperbole generator has been turned up to 11. However, this time, I'm not sure it's even on. Very impressive result! -John
-
Looks good Paypak, What are you doing for the floor? More aluminum sheet, or a composite? I finally had time today for the break-in drive. With the grounding strap connected to the block, the engine fired right up and idled smoothly at 2500 rpm. Kent recommends keeping it at or above this mark for the first 20 minutes to ensure the cams have adequate oil supply during this critical period. The first few minutes were spent looking over the car for leaks before heading out for the drive. Engine felt great. Despite a starter map in the ECU and TBs not yet synched, it ran very smoothly and had great throttle response. After breaking the 20 minute mark, I headed home to give the car a second visual examination and sync the TBs before venturing back out to seat the rings. Much to my surprise, the oil leaks I mentioned earlier self healed after that second heat cycle. Both the sump and sump plug were bone dry. However, the mechanical oil pressure take off assembly was leaking quite a bit on either side of the T fitting for the low pressure switch. The assemble consists of an M12 male to 3AN male adapter, then a 3AN female to male T, then the 3AN female end of the line that feeds the oil pressure gauge. This set up is new. Previously there was no T, and since no one made an M12 to 3AN adapter when I built the car, 3 different adapters were cobbled together to handle that transition (old & new are shown below.) That didn't leak, but thread sealant was used on the threads. Although oil pressure seemed fine underway, it was a little low at idle when the oil was hot. Only about 23-25psi. The engine is running a 5-30W dyno break-in oil which might be part of it, but I'm also hoping the leak mentioned above was affecting the reading. We'll see. Ring seating went well. The only odd thing is that the data logs showed I wasn't exceeding 4000 rpm even though I was getting to about 5500 rpm. Something else to investigate. After putting about 30 miles on the engine, the oil and filter were changed and more break-in oil went in. I also disassembled the oil pressure assembly and added thread sealant. -John
-
I wrongly assumed this was a liquid gasket that worked particularly well, not a wicking thread locker. Interesting idea and worth exploring more. Thanks, John
-
Thanks for the tip Andy. I really don't want to remove the sump again if I can avoid it. I've done this job before with the engine in the car, and although doable, it's a royal PITA, particularly with the early sumps. For the later versions, Raceline introduced some design changes that made it far easier to use a prybar to break the seal of an installed sump. On the early ones like mine, there are very few places to get purchase, making it very difficult. Even with the engine on the stand I struggled to break the seal last Fall. With it in the car and only an inch or so forward of the bell housing, the amount of swearing required goes up considerably. Fingers crossed this is a very minor, livable drip. -John
-
The Regular Summary of Classified Ads of Se7ens Found For Sale
JohnCh replied to Croc's topic in Cars For Sale
The 310SV (sale thread here) is a great deal. I'm surprised it's still available. Having visited Bruce's shop and seen the quality of his work up close, I wouldn't hesitate to pay a premium for a car he's finished, but at $43.5k, it's hard to view that asking price as anything but discounted. The 310 is also an interesting model. Although it doesn't have the big power and torque potential of a Duratec, from what I've read, it has a weight advantage that should make the handling even sweeter. -John -
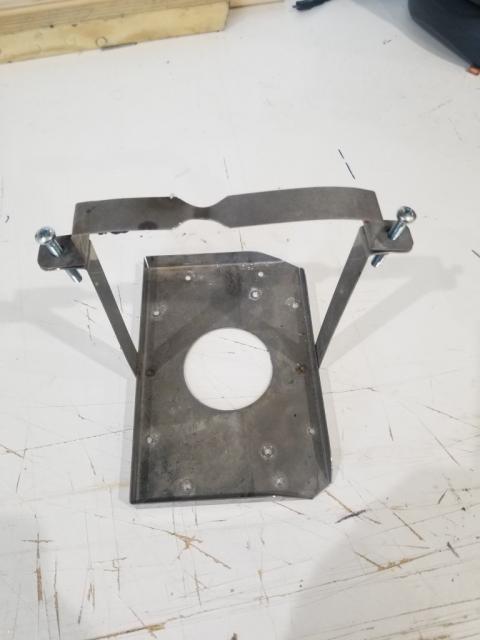
This thread is a great example of our tribal knowledge. Along the way several people have either provided answers to head scratching questions or valuable input based on first-hand experience. It's certainly made my life a lot easier. Papak, I also fabricated my boot box out of aluminum. It was an interesting challenge that taught me some new skills I've since forgotten, and enabled me to correct limitations of the original design. In hindsight I would have done it a little differently, but that's just an opportunity to attempt v2 in the future. I'm looking foreword to seeing your pictures. I still haven't had a chance to perform the break-in drive, but did find a couple of oil leaks. First is coming from the blue sump plug that provides access to the finger filter ahead of the oil pump. This one is a surprise given its torqued to spec, was fitted with a new washer, and was never a problem in the past. I'll investigate when I do the initial oil change in ~50 miles. If it's not obvious, I'll probably use a little thread sealant. The other leak(s) isn't a surprise. My sump has always been extremely difficult to seal. Taking a closer look this time when it was off revealed a number of tiny pin holes along the mating surface. I suspect that my early sump may not be up to Raceline's later quality standards making this aspect a bigger challenge. After the drive, I'll investigate more thoroughly to determine if it's coming down the threads of a fastener or if it's seeping from the mating surfaces, and go from there. Looking at the leaks did surface an installation goof. I forget to attach the grounding strap to the block. Oops. Easy fix, but might have contributed to the initial rough running. -John
-
UPS tracking showed a 12:15pm arrival time yesterday for the new accessory belt. It didn't show until nearly 5pm. Although that was early enough to install it and confirm the new size works, it wasn't enough to attempt a cam break in and ring sealing drive. It's raining today. Not sure I want to attempt that process in the wet, particularly given there is no guarantee the car won't leave me at the side of the road. However, I really want to know if it will start, and today does mark the 10 month anniversary of pulling the engine, so I called Kent to confirm that a simple start for a minute followed by a proper break-in drive tomorrow won't create any issues. They told me to go for it. To be safe, the cam lobes received another coating of assembly lube, then 3 fire extinguishers were placed between me and the engine, prayers were made to various deities (gotta cover my bases), and then I gave it a shot. At first it wasn't running on all 4, but things started to clear up before the engine was switched off. Quick post mortem revealed the primaries all felt equally warm (good), and the lower radiator hose clamp needed to be a little tighter (easy fix). The smoke seen at the end of the clip should be some coolant burning off that primary which sits directly below the fill location. Weather permitting, first drive is tomorrow. -John
-
Shroth lap belts with the Flexi II option can be configured independently for either pull or pull down, and you can move the location of the adjuster to get it pretty close to the buckle. Comes in handy if you have something like Mog or Tillet seats. -John
-
Cem, you definitely have the right attitude! -John
-
Ran into a bit of an issue with the accessory belt. The replacement is too small. Digging into it, it appears that the current one, which still has life, has stretched a lot since first installed. Over the course of its life, the steering column was replaced with a newer version that collapses and is slightly larger in diameter. When that switch was made, the belt had already stretched enough to allow that to fit, but a fresh belt creates some interference between the column and the alternator. I have a new, slightly larger, one arriving tomorrow. Other than that, the only things left are bleeding the clutch and getting fresh gas. The rest is done: all fluids, wiring, even the interior is back together. To end the weekend, I installed a special zero timing, zero fuel map in the ECU and cranked it over until I had oil pressure. Woo hoo! -John