MV8
-
Posts
2,303 -
Joined
Content Type
Profiles
Forums
Store
Articles
Gallery
Events
Library
Everything posted by MV8
-
https://www.minimania.com/part/MMKT0705/Classic-Mini-Alternator-Conversion-Kit
-
I see that now. Started hunting for ones with extendable legs. I thought they were still standard. Another example of the decline. I bought my hoist at a flea market where you'd find HBF sellers before they had stores. I think it was $150. It's identical to this one currently at $1200: https://www.northerntool.com/products/omega-engine-hoist-2-ton-capacity-model-44020-112351
-
Nothing directly interchanges but you can have your copper-brass radiator cleaned by a radiator shop or do it yourself to a degree. The radiator you have should be adequate for 43hp but as with all radiators, sediment builds up over the years and they require periodic flushing. Radiator shops are now rare (due to epa on the cleaning tanks and cheap oem and China plastic-aluminum rads) and subsequently very expensive. It may be cheaper to buy a new aluminum rad from caterham. Cleaning removes crud and often results in pin-hole leaks. If there are many, it will require a new core but the tanks can be reused. Is you cooling fan working and in good condition? Under what conditions does it overheat? Thermostat opening fully? Good temp gauge? How about some pics of your engine bay and radiator? There are many things that can be done to improve cooling. I'd start with a commercial flush, drive a few times and reflush. Use thermocure if the inside of the block has scale rust. I'd fit a standard output, vbelt GM 12SI alternator (typical 83-90 GM) with internal regulator. You can find new or rebuilt on ebay with no core charge. A reman 12SI 78 amp for $65: https://www.ebay.com/itm/285134192551?epid=79114327&hash=item4263527fa7:g:J5gAAOSw5EZj3YCc&amdata=enc%3AAQAIAAAA4Ez3VWrmjEEr6VEMPQJcis%2BVHFv6i1%2B4YsJDGlCzVJgpysUdXs1MlgFzdGhuA0hi3WhPmftq7qFocMftXJ1%2FnHSbcMjqm8zY4mMqe9utwCm9%2FSdyyVpBO4ayG24n6cLXEdYypr6buH5EceGfTj%2FYSwsxQcrAKXclbcOAyDu3rltpSuAimOrXr6KbQyN5895GGl6102yuS0yDOKrN5gdoeh0%2FsbtRDFMatKkuFEkjnQ0y2V%2F4iGeWC%2FxDmsp%2B5vNqI%2BEfQiXtRNw%2BMVRDZ4xDB9gMjZ%2FdUBMpOoGFqQnuTmZf|tkp%3ABk9SR6z4hIaGYg A 10SI/12SI two wire plug for $9: https://www.ebay.com/itm/275585019973?hash=item402a25b045:g:bZAAAOSwnaVe5Ozh&amdata=enc%3AAQAIAAAA4IEk4Ek0PVYl5i7KPYsBIUW43ZDrr77cjuzpGf31IqKoQEndB6dnmNcP6ZNBeTQHuyQH93GKE%2FyXOmtN4D5CV0dF0In55FQOfbkq6oHtCqmy90C%2Fgz%2BwNZN5AYY2qSvSSKdQDCCLVEamhSNnTWV2ep1LOwve9xruOmypbGHkm0PNGijjXUXEZ3cJZucrC5ziW672YkrjQqW84x45ezob2lK2%2FW3g03s5UGvNt7tZU4s3O5xtYS9MwqcI7NvKxEeQaQqQHwVSr52rUC3LIOktwqJwuVa2xtuspN7bLKKSOQ2q|tkp%3ABk9SR468ioaGYg You could go a little newer with a CS type for a smaller case and around the same cost, but more sensitive to failure from getting jumped off. The high output versions need to have the car wiring upgraded to cope with the potential output of a lot more amps.
-
I think all the original types are "fresh air", with the early sevens pulling from the center of the tunnel and blowing into the front of each foot well. Not much room in the cowl but a small coolant type heater could be assembled with the normal heater valve and a pc 12vdc box fan used in a diy box.
-
The legs extend just like the boom and must be extended at least as much as the boom. I have a much older model that has served me well. Only four wheels, no handlebar, different clamps and probably heavier. I'd put it on the floor to install the flywheel.
-
-
John's verbal judo is strong. He had me at "updraft". Actually I do have an updraft on my antique iron tiller. Works great, but this is not a race. Carbs are great, but not for everybody most people.
-
Rope is another option. I'd rather not hang anything off a rare, aluminum head. I like hanging from above the bell so the cg is below the attachment and bolted-on tabs can't slip out of place during the process. The chain should only touch the tabs and the sling beam.
-
Which loctite retaining compound did they recommend?
-
I expect the WOT pedal stop, once adjusted, can be trimmed to protrude from the nut to no more than a half inch. When trimming, mark threads with a permanent marker, remove from the car, reinstall the nut all the way down, clamp the end to be cut off in a bench vice, then use a hacksaw to make the cut. Dress the cut end at a 45 deg angle to a bench grinder or flat file, then remove the nut which acts as a die to chase the threads. Run the nut back and forth, off and on by hand until it is easy to turn and then paint the cut end. Don't cross thread. There should be a little slack adjusted with the cable end with the pedal against the UP stop; more if you want to set the height lower to match the other pedals with the ball of your foot. Too tight and it won't return to idle well. The WOT stop saves the cable from breaking after so many cycles. At pedal WOT, there should be minimal tension against the engine WOT throttle stop. As the cable wears in the sheath and stretches, the stop would be adjusted to protrude further from the firewall and/or the cable adjusted at the threaded ferrule on the engine. For adjusting the WOT rod, I suggest holding the engine throttle fully open with a helper, then lightly taking up pedal slack and adjusting the rod to touch, then jamb.
-
Three 1/8x2x4 strips with one end drilled to 3/8, some chain big enough for a 3/8 bolt to fit through at the end link, an adjustable balance point beam the length of the head. Two for the upper bellhousing bolts and one for the crank bolt, bent 45-90 degrees in a vice with a hammer (must be far enough away from the crank bolt washer for the bend to start). Most of the weight would be on the bell bolts which would be fine if the bolts are normal tight. The front would just be for balance and everything should be easy to remove after it's back in. Can use rags or bits of plywood to prevent potential gouges/scratches. Possible to do without the strips and use the pump flange but why risk it?
-
Paul Brodie, craftsman and brazing guru. Two good videos to watch (includes gas fluxer design and use). https://www.youtube.com/watch?v=OjRMbBl_Tbs https://www.youtube.com/watch?v=Y2CnJ9lmlQo&t=135s
-
For steel on steel with some lap, any bronze should be fine bare (heated a little and dipped in powdered brazing (not soldering) flux) or flux coated. You can find some at the hardware and home improvement stores but I prefer to go to a welding supply store. There are a number of specialty rods that are very expensive, but you essentially have to call them to get a recommendation. You can read the MSDS to get an idea on the make up for comparison. Avoid cadmium and low fume zinc is preferred; both for health reasons. Working temp around 1500f. Another consideration is that some alloys become very watery at the melting point which is good for wicking into pipes but bad for filling a lap that isn't very close fitting. I think the ones used for "braze welding" are less fluid. You can weld around brazing if not using a torch that dumps a lot of heat into the area compared to mig. The higher than brazing temp heat from welding is what ruins an existing braze. You can also use wet rags or heat sink putty around the brazed areas to keep them cooler and weld an inch, let it cool, weld an inch, etc like when welding sheet metal.
-
I would try loosening the two bolts in the right side of the tail housing so the plate is free to move around, work the shifter back forth to try to find some shifting improvement, then retighten. See video around 49 min.
-
That's easy. Take a Navy day, add some PT, then take away a few privileges.
-
What a guy! You'd do that for me? I'm speechless. I was thinking of a trade. How do you feel about Bud Light? Only joking!
-
Well...you seem really confident. Let me know when you are ready for me to come drag it away and end your suffering. No charge!
-
How about a link to the video?
-
If it happens to be brazed, a fluxer can is not required but they are available. It goes between the acetylene tank and the torch, picking up liquid flux on the way.
-
The 00-06 scion racing rads are no longer available. The traditional/book sized seven nose is just a little too small in width for most radiators. Forklift radiators almost fit. How thick is the core on your radiator? Should be a full two inches if it is the best honda radiator. What is the model number on the 12 inch fan? If you want to test before committing, put cardboard around the radiator in the nose. I wonder if your grill insert is restricting as well. I assume the heater fittings are capped so no coolant is bypassing the radiator. Does it run cooler with the hood/bonnet off?
-
Cork gasket? Do you have an inch-pound torque wrench? Most people do not and a foot-pound wrench that clicks or deflecting beam is not very accurate at 5-6 ft/lbs or 60-72 in/lbs. Use a screw driver with a 1/4 drive end and a socket. Better too loose and leaks than too tight and cracks the aluminum cover, leaks, and splits the gasket. "snug and even" is the goal. Some newer rubber gaskets have a positive stop for a set preload but you are just trying to squeeze the gasket a little, evenly, all the way around.
-
Minimal, even torque you can apply with a screw driver. Use rtv on the head side or the valve cover side but not both. If the gasket is extruding, it is too tight. All fasteners are brought up to torque evenly by going back a forth like when replacing a head gasket.
-
No oil, just a good synthetic wheel bearing grease. The boots are for keeping dirt out of the rack.
-
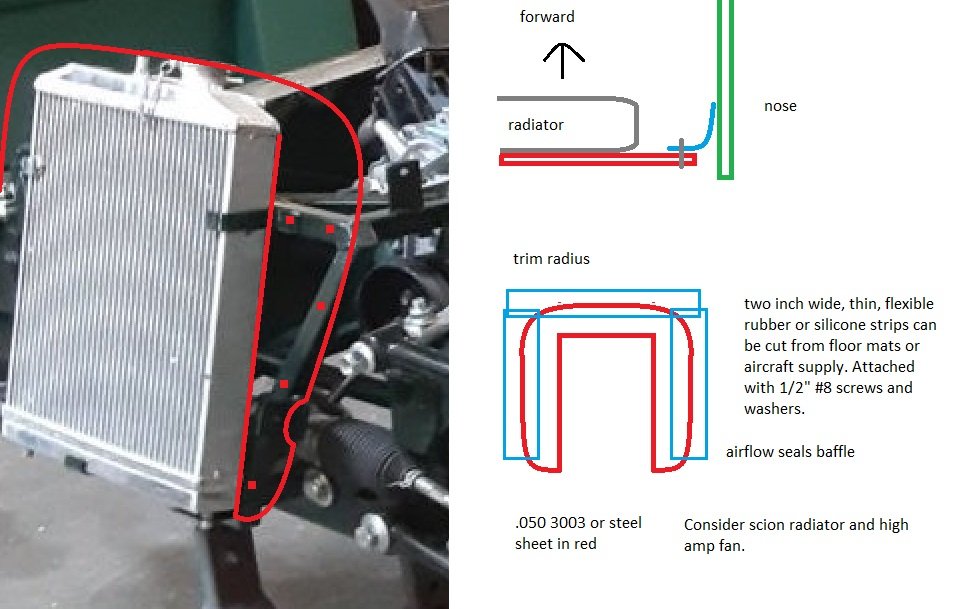
Looks like you have the honda two row which should be adequate if optimized. Baffles will help it cool at all speeds. The flexible blue strip baffles (can be made from a cheap floor mat) help but are not necessary if the red baffle is close to touching the inside of the nose. Make a card board pattern. The red baffle can be made from three strips 3-4 inches wide and screwed/rivetted together with a little overlap. A high amp fan (that will fit over the honda core) will help below 45 mph. Good universal fans are not cheap but you could run two cheap fans with one in front and back. Not best practice though but whatever works. If you want a better radiator, consider the scion racing radiator with no filler and a much larger surface area or a three or four row honda type. The honda upper tank and filler wastes space that could be filled with more core.

-
The one I'd most like to drive is the stock or stage one for most area under the curve with no spikes or holes. I spent some time as a motorcycle mech and had to drive everything I worked on. I much preferred the standard class bikes to the racers. They tend to surge with light to medium throttle and were more difficult to drive normally.