MV8
-
Posts
2,303 -
Joined
Content Type
Profiles
Forums
Store
Articles
Gallery
Events
Library
Everything posted by MV8
-
I put one about that size on a miata I turbocharged (no water jacket) to help extend the oil life to normal change intervals. I don't see the need for a cooler on an NA application. There is also the extra plumbing taking up space, oil pressure drop through the cooler and lines, plus oil drain and fill complications. If you need extra cooling, consider an aluminum radiator. More efficient than the cooper/brass.
-
It should be free to rotate the shaft in the gate. If it is stuck like you say, then it should be pulled. It may or may not be doing damage each time you drive it.
-
A few examples in there of the danger of running open wheel to open wheel/no bumpers. A little fiberglass over a rear wheel doesn't seem to do much to prevent launching the over-taker, tire to tire.
-
I'd pull the shifter and inspect the pocket. The saddle bushings don't last and are cheap to replace. Should help align your shifter and bring some precision back. I'd be surprised if Burton Power did not offer these. Ford D9BZ7K453B These fit many ford transmissions https://www.ebay.com/itm/Shifter-saddle-seat-bushing-damper-1-5-for-Ford-SROD-Mustang-F100-F150-T170-RUG-/361424507749?_trksid=p2349526.m4383.l4275.c1#viTabs_0 Some excellent info on these bushings with more sources, designs, and materials: https://vb.foureyedpride.com/showthread.php?170953-Shifter-bushing
-
I assume you have a steering wheel that comes off with three screws under the center cap, leaving a hub with three threaded holes and a big nut in the center. Harmonic balancer pullers also double as steering wheel pullers. https://www.amazon.com/ATP-Harmonic-Balancer-Steering-Puller/dp/B0721H8S84/ref=asc_df_B0721H8S84?tag=bngsmtphsnus-20&linkCode=df0&hvadid=80882941400106&hvnetw=s&hvqmt=e&hvbmt=be&hvdev=c&hvlocint=&hvlocphy=&hvtargid=pla-4584482468443972&psc=1
-
I don't see a fuel issue. I don't have experience with every injector out there but generally, injectors are powered open, not closed. Never short an injector across a car battery for more than a split second if it is high resistance/impedance; not at all if testing a high performance, low resistance/impedance injector. Use a 9 volt to pulse injectors open for testing or cleaning to limit current. A typical wiring arrangement is full battery voltage to one injector terminal with grounding controlled by transistors in the computer. High and low impedance injectors are not interchangeable on the same computer due to the low impedance injector acting as a short through the computer transistors. It is true that a test light can be used on the injector connector to see if the computer is pulse grounding, but the tester needs to be an led type, not an incandescent bulb to prevent damaging the computer from too much current.
-
I'd install the NGKs. Otherwise, it sounds like a cam/valvetrain issue.
-

Back in the game! And a (probably stupid) question.
MV8 replied to Saudio's topic in General Sevens Discussion
The mk7 was commissioned by the Clairmonte Brothers as a single seater. Since Lotus did not finish the car, the brothers did and called it the "Clairmonte Special". -
WCM Ultralite S2k - New First-time 7 Owner
MV8 replied to reid.duff's topic in General Sevens Discussion
That could be a big job, all things considered. Some pics of what you have with a wheel off and the new uprights could be helpful to gauge what is involved. Do you have the original control arm specs and dimensions? Hand brake and brake balance changes? Reusing same coilovers but new springs or relocated arm attachment? Do you have the cv shafts that would be cut and used for mock up to check clearances before sending out to be made to order? Most replacement cv shafts these days do not have oem spec female splines and individual replacement cv joints in general are not offered anymore. It might be a lot easier to correct with a custom steel upright than to change everything. I don't know how different the ford upright is from the subbie. The subbie awd joints are likely smaller with a smaller axle shaft that should be smaller than the spline minor dim, and likely taper so they will provide some twist (maybe use 300m). Since you are not talking about adding a torsen to the open diff, it sounds like you just need to fix the bumpsteer and travel problems. Your guy may have time to make new arms for you. -
What were the results of the last compression test? You document everything you do and when in a little spiral bound notebook right? Parts store wires are notoriously bad and don't last long.
-
Back in the game! And a (probably stupid) question.
MV8 replied to Saudio's topic in General Sevens Discussion
I had the opposite experience at a small gas station. Pulled under the canopy between the store and the pumps to refuel. A typical big suv had already parked halfway under the canopy diagonally so the nose of my car was directly behind it. I watched the soccer mom come out of the store, kid in tow, never looked toward the pumps or up from her phone and they boarded the land yacht. I walked over to the driver's door and tapped on the window. She looks and freaks out, slamming the door lock down as quick as possible. I'm surprised she didn't scream. I asked her not to hit my car. I'm sure she would have otherwise. A similar situation happened to one of the first exocets a day or two after they put it on the road only it was hit. -
The Regular Summary of Classified Ads of Se7ens Found For Sale
MV8 replied to Croc's topic in Cars For Sale
Could be the shoulder/curb side lamp was rotated to raise the beam away from oncoming traffic so the curb side bucket would not need to be tilted back, which would make the buckets uneven. I think that's worse than something uneven that you can't see when driving. DOT and EU lamps have similar patterns, reflecting a higher beam toward the deer or signs. Interesting how they split the seat back to suit the driver. -
I'd never work on the garage on nice days with that kind of temptation sitting there.
-
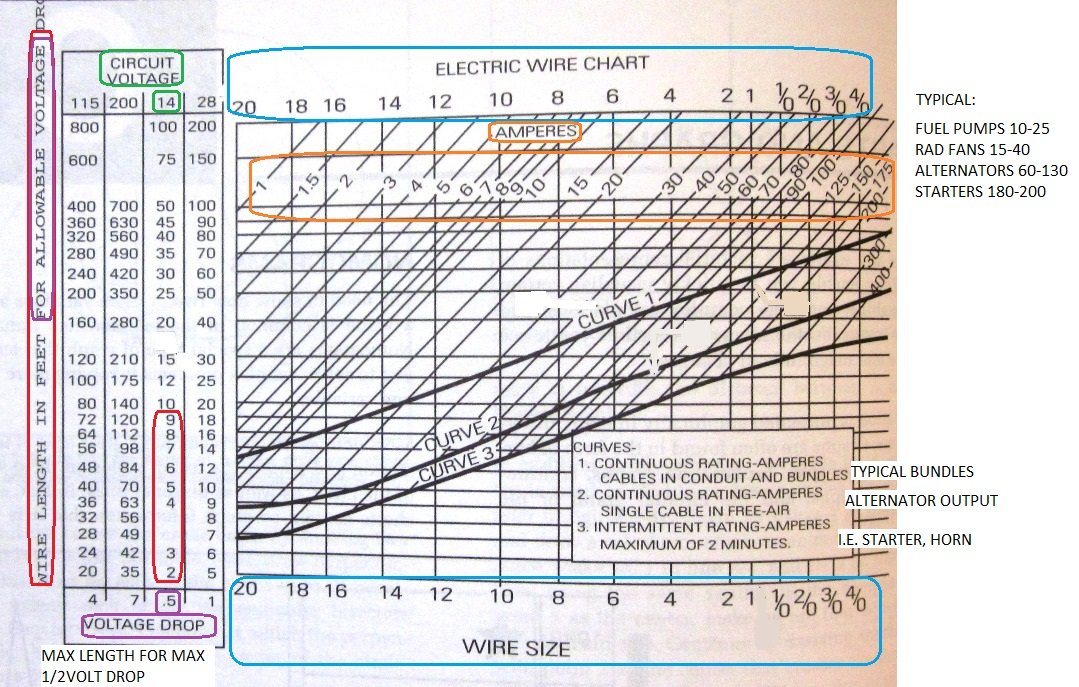
Essentially, but also the duty cycle / intermittent time is less than two minutes. You'd most likely severely overheat a starter before a three foot 6ga cable would get hot enough to melt the insulation. This chart is for copper stranded versus aluminum or copper plated wire.
-
It almost feels like I have a cat! (garage first) Glad it worked out.
-
Sizing should be for the intermittent starter load of around 180amps, so that length of 6ga is fine. Here is a handy chart I scanned and labelled. Don't remember the source.

-
What brand is installed? Should say something on the leads. Should be the same resistance per foot for each to get an idea of the condition. Also, the boots eventually start arcing to the head instead of the plug and it can be hard to tell looking at the boots. The first one to fail is usually the shortest wire (#4) because it has the lowest resistance and delivers the most to the plug. I believe NGK 52028 are the right wires for your engine: https://www.ebay.com/itm/363800225369?epid=75440564&hash=item54b42ee659:g:3SgAAOSwgPditI6s&amdata=enc%3AAQAIAAAA4KD%2FyCUsuLWn8klxIB45ocNmPF7ppA92ieLj4dmJkKrcR9aXNpX8iUpJE0W97HVVWjmpuaQJMOMw5GDJ6Y4DdIR2cGyNrxg9Sui3WTgvbaKaHKkt94W2NxNP5PyiRtcR4RoXQcUnyuyz83%2F1Tnp6rpryFprv6c67nBYFkH9Z%2F5f%2B%2Bhsy0HhCdw1as%2FgGOF8sicS%2BtgvvdSnkoaFdiboOvx%2BRuPzBMN13Osoo5%2Fy00szLAVfnYmPB7Rge9zt3SHK85PFrLvYfMRAXTYRYhLsJfp78apHgihG%2BJFf%2BzbsTo4IX|tkp%3ABk9SR4r-943-YQ
-
Plug wires are often carbon core which breaks down with age and use. That is the first place I'd look. I usually assemble spiral wound, solid wire / inductive suppression wires when able as they don't break down and have much less resistance per foot so the plug gaps can be widened and starting is easier. You may have proprietary terminals that would prevent building your own. NGK makes good replacement sets.
-
There isn't any relative motion between the positive cable and the battery body from the zip tie to the terminal, so there is no need to shim the cable away to isolate. The cable lug tabs are soft and can be bent easily without issue. I'm sure going from 8 to 6ga and half the length would show a significant reduction in voltage drop during cranking.
-
Caterham Will Show Its First Electric Car Later This Year
MV8 replied to CBuff's topic in General Sevens Discussion
Likely because of the danger to responders due to voltage/shorting and a fire that can't be put out easily. -
I know what a "reverse lock out" is. What I didn't know is the T9 requires a plunge action at the shifter to engage reverse, so you need to disable that (just removing the spring I suppose) and find another way to prevent accidental engagement. Maybe incorporate the plunge action at the remote shifter? I could see a ferrari style gate working with a spring loaded shifter and a notch in the shaft. Not that different from the internal system.
-
I'm confused about the need for a reverse lockout. A 3/4 inch tube link with 1/8 flanges would be fine to replace the link pictured. Doesn't need to have any washers on the outside and a much narrower flange since it uses a cross pin instead of a large contact surface to rotate the linkage. Could be greatly improved with a little work. The lower ball could be replaced with a rod end and 3/8 bolt welded to a 1/2 inch tube shift lever with a cue ball epoxied on or whatever shift knob you might want.
-
Rattles is a very broad reference. Depending on how loose it is, an adjustable depth, ball bearing type bead roller can easily make a press fit near the end but a sleeve the length of the block bore would better support the pickup. Fit can change with engine temp plus the vibration and potential to hit something spinning. Both tubes should be secured/stabilized like the original pickup. The bypass pipe should not rely entirely on a cantilever press fit.
-
Those are both nice pans. When tweaking to adjust the pickup to pan clearance, wrap the pickup in foil or slip over a zip lock bag, then add a lump of playdoh or modeling clay from the crafts store to mash with the pan. Same concept as plasti-guage for plain bearings.
-
The remote tunnel mount shifter and linkage could be improved or better yet, make your own remote shifter to fit the tunnel mount and make your own linkage while adding lightness. The bolt-on with the shaft through the tail housing plug can work well too if you can keep dust and dirt out of the transmission with some rubber. Maybe a pic with the tunnel cover off and the parts you have? You may be able to send/take the parts and shifter you have to someone who can make a suitable replacement hidden linkage, remote shifter, and modify the existing shifter.