MV8
-
Posts
2,303 -
Joined
Content Type
Profiles
Forums
Store
Articles
Gallery
Events
Library
Everything posted by MV8
-

An Annoying 'Feature' On My Seven's Zetec SVT Engine
MV8 replied to rcollum's topic in General Sevens Discussion
Seems like a lot of work for a little clearance on an otherwise unmodded duratec. The hole could be plugged, but the variable cam gear assembly would need to be locked in some way or replaced with a fixed/solid gear, tuning reprogram to eliminate changes based on cam timing commands that won't occur, and eliminate the ecu setting a code/limp home mode due to no solenoid detected. -
An Annoying 'Feature' On My Seven's Zetec SVT Engine
MV8 replied to rcollum's topic in General Sevens Discussion
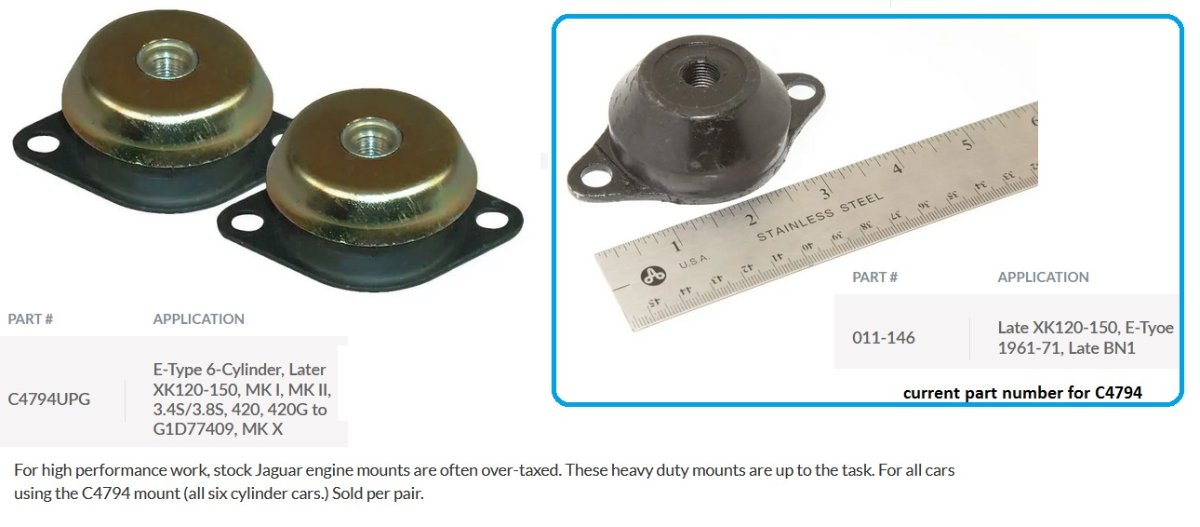
It could be the original, standard jaguar six mounts have been replaced with the heavy duty version that has a metal domed cap on top of the rubber. This cap makes the mount a little thicker which might be ok for a jag (installed @45 deg from vertical) but it does raise the engine a little in a cat with vertical mounts.
-
An Annoying 'Feature' On My Seven's Zetec SVT Engine
MV8 replied to rcollum's topic in General Sevens Discussion
No need for duct tape or the plastic cover. It is just a cosmetic cover over the solenoid. I don't think there is a lower profile noid that would swap. If the bonnet touches the solenoid, a "performance blister" could be formed and the bonnet repainted or polished. It doesn't have to be symmetrical. The original hood scoops were offset too. You could also lower the engine with mount bracket mods then shim the trans mount as needed for setting the ujoint angles. -
Low pressure gerotor pumps are very quiet and just spin but are sensitive to contamination and must have a pre filter right before the pump (included with the carter). Box/solenoid pumps like facet and the mg/su are noisier and vibrate from the oscillation but that varies. Just another consideration. The mg/su is more period correct. I've had a few facets that eventually failed but never a carter gerotor. Just be sure the box pump is ethanol blend compatible for todays fuels.
-
I thought I was looking at rigid fuel line versus brake line. Like Bill said, rigid should be isolated. If there are no holes for addels, you can zip with split fuel hose like I described.
-
I've also seen a solid state kit to replace the points when rebuilding the original electric mg pumps.
-
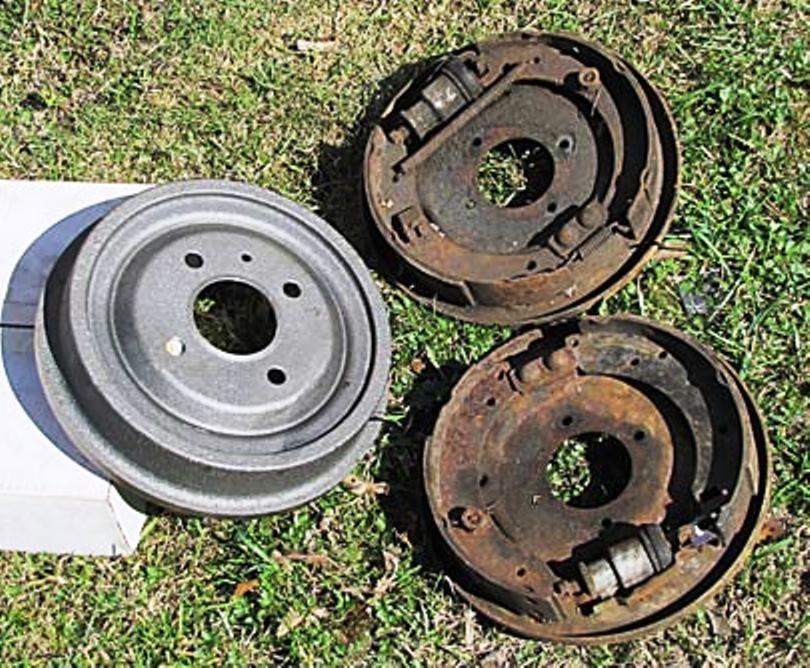
Pic illustrates my point I made (in Vinman1's other brake topic) on interchangeability of brake systems. Here is the other 9 inch cortina GT brake system around the same time. Note the difference in the outside edge of the backing plate which must match the drum but otherwise, interchangeable. A few mfgs were switching to a more rigid, rolled edge backing plate at the time requiring the drum design change.
-
If the fuel line is going to be zip tied to the chassis, I suggest cutting two inch sections of low pressure fuel hose, cut down one side, and slip over the line to isolate the fuel line from the zip tie, chassis, and wiring.
-
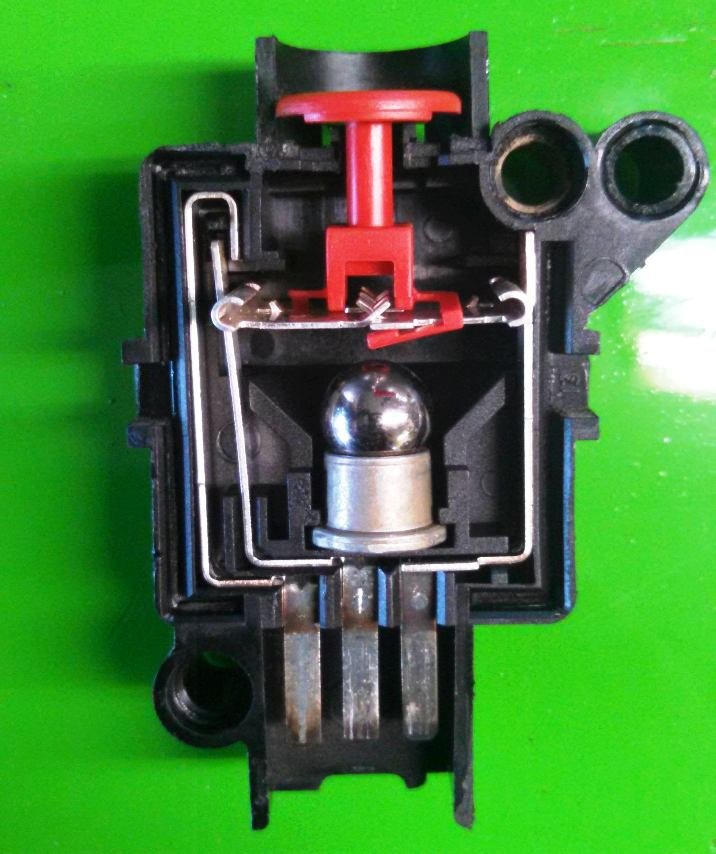
Here is a cutaway pic of a typical ford inertia switch. They can be found used at most any junkyard, amazon, or ebay for around $15 with the connector and some wiring to splice. They last forever since the only time they cycle is from an accident and they are in the most protected area of the vehicle so no corrosion. https://www.ebay.com/itm/175646298603?epid=679741233&hash=item28e555d1eb:g:~sMAAOSwDD5kC9r4&amdata=enc%3AAQAHAAAAwGQmYh93fn28fJQbVOzvEZtIOaLo26243sODqHUzTex%2FeNPAIDW53TEfYxcu71%2B3nWxnYGi%2Fvu51FOCLHErUxCih1AwRs%2FtoV7%2BUxoYbZxADX%2BLs2kLo%2BZn7WrykS%2B7JrrdhrGvdS2EHre5wV1CPN17Fs918A81NCTxsuz%2F8yiQ6eskoUCSLlZKZgh4eji1JyTTscEjX3CvlfXhEAHaKBtU7I0KNiP3kJFaiKTeWMjuZf5DYE73hvZLNPD6o%2B5zpTw%3D%3D%7Ctkp%3ABk9SR6j_6Z3dYQ The carter P90091 (previously P60504) is ideal for a quiet, reliable, inline pump with pressure compatible with webers. I use this fuel pump for all carb applications. Unfortunately, carter no longer lists actual specs on their pumps but here is the application list and you could always call Carter Tech Support: (888) 565-9632 for rated psi, gph. If memory serves, 2.5psi, 30gph. Plenty for carbs that have a bowl/accumulator to draw from with intermittent WOT versus fuel injectors which are more critical of gph when the regulator closes under WOT pressure drop in the fuel rail. Some of the more relevant applications for P90091/P60504: 1969-1971 Rover 3500S (In-Line); 1968-1973 Triumph GT6 (In-Line); 1971-1973 Triumph Stag (In-Line); 1968 Triumph TR250 (In-Line); 1960-1961 Triumph TR3A (In-Line); 1962 Triumph TR3B (In-Line); 1962-1964 Triumph TR4 (In-Line); 1965-1967 Triumph TR4A (In-Line); 1963-1980 Triumph Spitfire (In-Line); 1969-1976 Triumph TR6 (In-Line); 1975-1980 Triumph TR7 (In-Line); 1980 Triumph TR8 (In-Line); 1961-1974 Jaguar XKE (In-Line); 1973-1974 Jaguar XJ12 (In-Line); 1972-1978 Jaguar XJ6 (In-Line); 1965-1971 Porsche 911 (In-Line); 1965-1967 Porsche 912 (In-Line); 1970-1971 Porsche 914 (In-Line); 1971-1974 Opel 1900 (In-Line); 1973-1974 Opel Manta (In-Line); 1969-1973 Opel Opel (In-Line); 1968-1972 Opel Kadett (In-Line); 1968-1970 Opel Rallye (In-Line); 1977-1984 Renault LeCar (In-Line); 1972-1977 Renault R12 (In-Line); 1972-1976 Renault R15 (In-Line); 1974-1977 Renault R17 (In-Line); 1976 Renault R5 (In-Line); 1968-1971 Renault R10 (In-Line); 1969-1972 Renault R16 (In-Line); 1962-1968 Volvo 122 (In-Line); 1968-1971 Volvo 142 (In-Line); 1967-1971 Volvo 144 (In-Line); 1968-1971 Volvo 145 (In-Line); 1969-1971 Volvo 164 (In-Line); 1974-1978 Peugeot 504 (In-Line); 1981 Peugeot 604 (In-Line); 1966-1976 BMW 2002 (In-Line); 1966-1968 BMW 1600ti (In-Line); 1971 BMW 1802 (In-Line); 1971 BMW 2.8 Bavaria (In-Line);... https://www.summitracing.com/parts/crt-p90091#overview https://carterengineered.com/electric-fuel-pump-p90091
-
A fuel primer would be nice to have and could serve as an alternate to the oil pressure switch if it failed. Just a small momentary button you can reach around or under the instrument panel, zip tied to something. "Normally open (N.O.)/push to close connection like a horn button. An inertia switch would work similarly to the oil pressure switch only sooner and without adding anything under the bonnet. A standard part on most '90s fords and lincolns and located in the trunk. It's just a steel ball perched on a magnet bridging the electrical contacts until it gets bumped. It has a reset button to reposition the ball. The mounting orientation is important.
-
The Regular Summary of Classified Ads of Se7ens Found For Sale
MV8 replied to Croc's topic in Cars For Sale
That is hilarious. Sounds like me and GRM. I don't know why. Could be Tanner or when I upset the old stalkers group for not liking the s10 steering mod. Some places need an echo chamber to stay sane. As we say in the South, "Well..., bless your heart! -
It just occurred to me that Lotus may have used the sprite base but mounted it to the fender more vertically, requiring a new (wingard) lens and maybe a tweak to the reflector angle inside, so the sprite lens may fit the base but be pointing down toward the rear. Scott, he just bought the car. Original, early tire pressure specs are 20 psi all around for normal driving, 26 psi for sustained speeds over 85 mph. Bigger tires and wheels need to run just as much despite wear patterns to ensure adequate bead seat clamping pressure. Lower profile and stiffer sidewalls = less clamp for the same pressure. Bigger rim size = a little more clamping area and leverage to prevent the tire slipping on the rim.
-
Should be a common, domestic, ford rwd needle pilot bearing for which there are many different part numbers for the same thing from different sources and for different applications. One application to look up is '74-'80 Ford Pinto. You could also cross reference the part number stamped into the outer bearing cage edge (magnifying glass or a hi-res digital camera pic to zoom in on). Here is one source: https://www.pegasusautoracing.com/productdetails.asp?RecID=3478
-
Looks like the wingard 1055 to me. It looks like a sprite L549 lamp assembly could be fitted to a seven with a custom fender mount (the black part). I don't think the sprite lens will fit on the wingard base though.
-
If they are the wingard 1055 lamps, no. A source for wingard 1055: https://www.simplesevens.org/forsale/Painter/PainterParts.htm
-
I like a plate offset to one side under a tail lamp, Z-flange brkt sandwiched by the fender-tail lamp, parking/stop lamp compartment cut to glue a clear acrylic window over the plate. Look at universal trailer lighting for inspiration. The Z-flange plate mount would be 1/8 thick printed for rigidity, would be angled so the plate will match the slope of the fender (or the plate bent below the upper fasteners) and a 1/2 inch away for no paint contact no matter how bad the bump plus it would provide clearance to get a brush/rag in between for cleaning. Should be less weight than a separate lamp fixture. Print a matching 1/8 spacer for off side if the difference is noticeable. An alternative is direct mount to the tail lamp body (no sandwich shimming the tail map 1/8") with epoxy by printing a brkt that will lap the entire, sanded bottom edge of the body or a new tail lamp base could be printed.
-
FWIW, they started hanging the coolant pump off the side of the timing cover instead of the center of the block from around '98-on. The 1-1/4 or so pipe next to the pump is the pump inlet from the radiator. Not sure where I found this pic. I named it zetec s3. Looks like it was shortened with an aluminum mandrel bend added along with an straight section with the right od.
-
You may end up with a shaft too long or one that cannot be remove or installed without loosening the diff mount. I suggest inserting the slip yoke fully (without distorting the seal), then pulling it out a 1/2 inch. Bolt the pinion flange coupler to the pinion flange. rotate one end or the other so the bearing caps are aligned, then measure from the center of each hole where the bearing cap is inserted. Provide this dimension (bearing center to center) to the shop.
-
Thank you. Your current code may differ from what is actually needed. I am repairing a driveway that may receive a free standing car port or two that may eventually be fully enclosed. I am compacting clay but I may add some stone simply because it is easier to level than clay if you don't count getting it delivered and into position. With a form in place and leveled, another board across the form with notches can be dragged down the form boards to level small stone. My focus is on ensuring the concrete will be uniform in thickness with uniform height and hardness of support. I don't mind pouring thicker using 2x6. Concrete is cheap considering how much you material you get for around $200/cuyd. The trick is calculating how much as they will dump it all, even after your forms are filled so have a spot designated for concrete truck washout. A plastic vapor barrier is very important to prevent ground moisture from rising and condensing on the bottom of joists and roof or floor panels in a crawl space or through a porous slab. It will be added just before the pour. The barrier is essentially painters plastic. I use the thickest plastic within reason that comes in a roll that will result in the fewest or no seams to tape. I'm using husky six mil. Some have tried to block moisture rise by epoxy sealing the top of a slab or inside a basement wall with mixed results. Slabs and below grade walls should have plastic on the outside to prevent long term issues with mold. I think most older, southern homes do not have any mesh or rebar in the slabs or footings unless they are sitting on unusual materials or a steep hill side. Adding on to an existing house, I'd hammer drill for a couple 1/2 rebars to tie the new into the old on each side, epoxied into the old, encased equidistant from each other and the outside of the footing. The concrete pouring pushes the rebar out of place but a rake can be used to pull up on it then the wet concrete just poured helps to support it. Exact placement is not critical. I use rebar stakes (20 foot sticks at about $10, cut with a band saw to about 12 inches long to support the 2x4 or 2x6 forms). Once the area is leveled, I'll build the forms from 12 foot sticks, triangulate and level those with string and board bubbles. If hammer drilling to fit anchors (better to stick in J bolts shortly after the pour), the pad needs to be bigger to ensure it doesn't break from drilling too close to the edge. I'm using a tiller to help break up the clay surface to be leveled and compacted. Tedious, but everybody needs a little every day exercise right? Less time on the tread mill. I found tread mills have inadequate heat sinks. An easy fix to make one last, but that's another story.
-
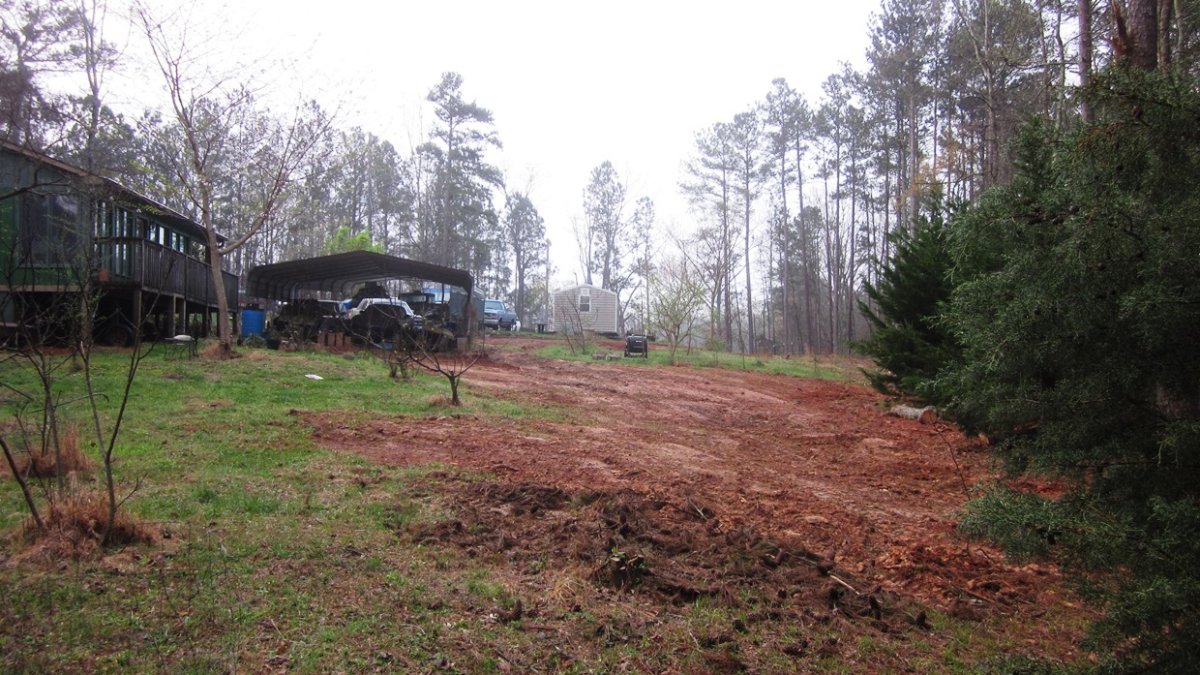
Not much to show of the hobo castle at this point. I'm at the hand grading/screeding point of the pad area near the blue truck before forming and pouring. Side yard before: After mulching: After grading, stump pulling:
-
Yes. They assembled one on the series "How it's made". The main issue was how the owners used them plus being so low and small.
-
Croc beat me to it. Regulation shaping the path of least resistance the same as suvs(trucks) and essentially killing wagons for a period of time due to lower safety and emission requirements and write-offs for businesses to buy trucks. Autocar/autocycle is a new category created for enclosed three wheelers with a steering wheel versus a handle bar, thanks mostly to the accident rate of T-rex trikes IMHO. The benefits of one less wheel are numerous except for when the single wheel is the only driven wheel. The most successful reverse/ 2f-1r / "tadpole" trike for handling was the fwd citreon based Tri-Hawk (not to be confused with the R.Q. Riley Tri-Magnum). Similar performance can be had with the Blackjack Aero/ Corbin Sparrow/Merlin platform, using a vw beetle irs 4spd with a flipped ring and pinion. If you are looking for a market, consider replacement composite fenders, noses, and scoops made out of carbon with a UV protective epoxy matrix.
-
I'm guessing you don't (yet) weld or hand fabricate. Many people build sevensesque cars. There are many different plans available online for free in different sizes to accommodate different drivetrains but these folks are also fabricators and not always engineers. Free online software allows for analyzing the donor components to optimize the camber gain, a reasonable virtual swing arm length, and a stable roll center. Determine your track width and rack width (inner pivot to inner pivot) for minimal bump steer and add ackermann with rack set back behind the steering arm eyes if you wish. Mount the coilovers as far outboard as practical for lower damping and lighter rate (spring weight) needs. Plenty of axles and spindles to choose from. Most or too heavy duty to be efficient.
-
A heavy duty diff can help to balance a nose heavy car without ballast but at the expense of greater curb weight and polar moment. The 90s thunderbird 8.8 is 90 lbs where the 7.5 is 80 lbs and the miata diffs are less than that. There are also a few different axle thicknesses and cv cup sizes used with the 8.8. The 7.5 is adequate, physically smaller, and a better choice to reduce parasitic loss but fewer ratios and diff options are available. I don't remember the balance percentages with the sbf. The oil pan is cut and shut very close to the rod bolts for rack clearance with a double sump pan. The hood needs notching for the normal upper intake clearance and sometimes the intakes were milled for a little more clearance or the subframe lowered a little with shims. Since we are talking about weight, the slant six is a real porker based on the component weights in the rebuild article. With aluminum intake or webers and a tube header, it should be around 500 lbs. It's interesting how many different non-production engines were fitted to the early leaf spring and coil spring cobras and some with power adders.
-
Me too. It's a small world. Much smaller back then. I remember when it was just nerds on boards, with no browsers yet and car stuff at all.