MV8
-
Posts
2,303 -
Joined
Content Type
Profiles
Forums
Store
Articles
Gallery
Events
Library
Everything posted by MV8
-
I'll assume you want one of the aftermarket fasteners which are similar to the aviation type but are measured differently for ordering. Generally, the aftermarket self-ejectors are not offered as individual components. If you want to replace just the fastener (no retaining groove for the ejector type snap ring), for the shank size, using a six inch dial caliper, measure the center hole size in the plate or find a known size bolt that is a little smaller in shank size. There are also metric fasteners available. For the "grip", with the dial caliper, as you open the jaws with the thumb wheel, a rod extends from the square, far end of the caliper. With the nose installed and pressed inward toward the chassis mounted fastener spring wire, place the far end of the caliper across the plate (not over the rivet area) and extend the rod to touch the spring wire. The "grip" ordered will be the first grip length size LESS than this distance. They tend to come in bags of 10 so keep some in a glove box. The spring is pulled out of position by the fastener to hold the panel and prevent falling out from driving. Self-ejectors also come in different grips and may have different rivet spacing. I think the spring wire thickness is fairly standard/universal.
-
I've used this vw one. Most oem types need support beyond the flange. Here is how I did that. Flange is angle iron with 1x1/8 steel support strip. https://www.ebay.com/itm/185476356011?fits=Make%3AVolkswagen&hash=item2b2f4097ab:g:7xIAAOSwkWNitDOT&amdata=enc%3AAQAHAAAA4BuBk7vCNOe2CvVCuS5i%2B%2BpsfhEIKDyEQdKLnwkSlHrrh665d1yOBUwBa3x%2B6kxD1Z1voRKL5O%2Bj3%2Ff%2BToPkWSIpCh3ipInmfF%2FNwJ4qSjYupHDSS%2FdWqcoMdXI37Om6skiJtFEZIZROW5Zzm%2BVXCag2WHgQOrSDfUdc7iGYglwagFw9EYD4XxeJ9xmyO8NidwzE5OwSGealDJo9Qkku%2Bp8hndcc2zYWBlsk0LJH8izhPP2vlvaWNDKSwW86Me1E8HHy7dNnLBsU7nmYKMuHadpYO41IwShgzCE%2BXm00L5Zq%7Ctkp%3ABk9SR6C1pLnmYQ

-
The zetec application in tank efi pump will last longer with the tee. You could pinch/restrict the return tee hose so the pressure is adequate at high rpm, wot, and high load with a standard inline regulator between the tee and the carb to prevent idle pressure from being excessive while still reducing the wear and pressure on the pump at idle (highest return flow). There are return regulators that combine these things and use a carb jet to dial in the return flow.
-
That is the Carter line of pumps I described. There are several different versions of the same pump from Carter with different psi. Looks like CB Performance relabels mfg parts for twice the price to obscure the source. That's enough reason for me to never buy from them. https://www.ebay.com/itm/175482284501?epid=250436671&hash=item28db8f29d5:g:JMEAAOSw2Yljastl&amdata=enc%3AAQAHAAAA4BsdZW6yscFsoJwGkOMOAPxyHHHpQ%2BCAkqownMOQO3IOxhV%2FwY6jOvvDfUitVBd8HoFI0ilMBjj3y6pJ11J69oGz93c1S%2BN60NSx6J6Bi8LNyGs%2BeRXr90Ui3eY%2BfqfQzXd8ufui6KzIOwZqwON6sX0Ub%2BdWZ2H%2B4%2FUPjBXX6PW6OtShbK1ieObh2cPGLu%2BebxuXm70APMBxvOA1PrGLSYZpvgUOOZ1lHRonFUBH6hWlcmU0zABJR4RtO6%2FPf0x9V41%2BviHzWx%2FouD4c2d4ALuAc652yUxgqz0CNba21lpSH%7Ctkp%3ABk9SR_af9MvlYQ If gph and operating psi are critical, I'd call Carter with your needs so they can recommend the best currently mfg'd pump part number or ask for specs on several part numbers to make your own decision. Also, excess pressure can overcome the float design and adjustment cannot compensate to shut off the flow into the bowl. Some carb designs are more sensitive to higher than 2.5 psi. We're just trying to keep the bowl(s) full. Most older sport bike carbs are just gravity fed.
-
Sounds like you want seven inch buggy lights versus 5-3/4 motorcycle buckets? Lots of options out there. Buckets can be stud or swivel mount, flat, round or teardrop back (like '40s chevy). Are they going to be mounted sideways like the car had originally? May need to mod cat buckets to change the lamp key slot 90 degrees if it has a slot. Small headlamps inside the grill?
-
Wire grinder wheels for removing rust from threads are typically steel but may have a golden coating. The wires do fly out on occasion and stick into whatever so wear glasses, or a shield, or at least position to where there is not a straight line from the wheel center to your face. I don't know if the hub thread condition had anything to do with damage being repaired, but wd-40 (or equivalent) and a tap and die set is a must have to clean threads on older equipment before reassembly. Hbf sets are ok if buying the middle cost set and the tools you use regularly/wear out can be replaced individually with name brand taps and holders. "HSS" is fine. No need for the golden sets. Taps that are embossed with markings are junk. Match up the tap by diameter and check thread pitch by laying the cutting threads against the bolt that came out of the hole. It should mesh perfectly. With the T-handle, 1/4 turns in until you feel resistance, then back and forth a few times to feel the resistance diminish. If it is really bad (full of gunk making it hard to turn the tap), back it out completely and blow out the hole then resume. If you see silver slivers, threads are being cut and you are probably trying too hard but if you have damaged threads, some silver slivers can't be helped. Never use a power tool or a lot of hand effort with a tap. They can break off in the hole if overstressed and that can be a big problem that will probably require a machinist to correct. https://www.harborfreight.com/hand-tools/specialty-hand-tools/tap-die-sets.html For cleaning gasket surfaces and removing rust without removing metal, two inch, 3m scotchbrite discs (Rolocs) are excellent and long lasting. They have a couple threads to lock them into the rubber drill arbor. Here is a ryobi kit with everything or you can find the 1/4"shank arbor and red discs separately. https://www.homedepot.com/p/RYOBI-2-in-Surface-Conditioning-Disc-Set-16-Piece-A911602/318211161
-
 I understand juggling priorities. Family outings, work, and normal upkeep maintenance. I'm working on my 45 year old, cast iron, Troy-bilt Horse Tiller so I can finish my clay grading for the concrete. Parts on order of course and the storms don't help with the grading. Pipe thread in the block is ok if not cut too deep for the fitting range/length of taper. The fitting should only be tight enough not to leak with liquid sealer or a couple turns of folded teflon tape close to the hex to ensure no teflon shreds get into the oil system. No more torque to install than you would want to apply with a short, 1/4 inch drive ratchet but if the block is out and clean, might as well have sealing seats cut. Remote filters and other aftermarket add-ons are usually npt ports in cast aluminum and may include npt to AN adapters.
 -
I think the wrong distributor was put back in the ford box. It happened quite a lot and sometimes on purpose with returns. I believe that is a distributor for a 60-70s Datsun 510/610/710/200sx 1.6/1.8/2.0.
-
How close is it to being ready to drive? What's next?
-
I'm in GA. That looks more like an mg distributor than a ford 2.0l. You can try calling the tech line to determine the application based on the part number. What are the other numbers on the box? https://www.holley.com/brands/mallory/
-
The polished aluminum would require roughing and specific primers to hope that it adheres for a relatively long term. Instead of painting, I suggest a satin finish on what you have that can be re-polished later. Green scotchbrite around a foam sanding block, lubricated with squirts of wd40 and running longitudinally leaves a nice finish that is lower maintenance than polish. Maybe try under the bonnet or floor first to see how it looks to you.
-
A picture of the mallory might help. There should be a gear on the distributor shaft that engages the auxiliary shaft next to the crankshaft, driven by the timing belt. The oem ford gear on the distributor (and gear retaining roll pin) currently installed will probably fit the mallory if the shaft sizes are the same. There may be shims between the gear and distributor body to control end play. Some distributors have no gear but the pinto is not one of them.
-
Do you have a link? I just looked on the Moss site and didn't see bearings like that, just the standard parts which have caged rollers and a separate race with steel/felt seals. It sounds like you are describing sealed bearings with an integral seal that can be metal or rubber and not as easily repackable.
-
I don't know how it connects underneath on the other models/engines. It probably connects to some point between the throttle body and the air filter. It is a vent that may leak oil at times. Also, pcv's don't work well when mounted horizontal. A breather tank is a common addition to a seven. It could be connected to that and keep oil out of the induction system. Bureaucratically, if you live in an emission testing county, the annual registration required to drive the car on public roads in Portland may hinge on the outcome of an emission test. That test may include a visual inspection that requires a visible pcv valve and no breather tank (which vents to atmosphere). The pcv has come up on other forums with bike-engined-cars (BEC "locosts") since the donor bikes do not have an automotive style pcv system but meet the fed standards.
-
The sigma 125/140 is routed like that. There is a different induction system for the EU 120 where the hose runs down between the runners then toward the throttle body. The pcv makes a handy adapter for the hose size mismatch and you may need it anyway for inspections. I don't see any benefit to removing the pcv but the J20R3 is not correct. Both hoses can be replaced with standard low pressure fuel hose J30R6,7, or 8. ISO standard 4079 covers oil and water based fluid transfer so the 1/2 inch hose might be ok. If either hose gets soft and gooey, makes your hand black handling it or the hose sweats, replace. I don't know what parts stores you have but I would go to O'Reillys or NAPA to find 1/2 inch fuel/emission hose or the HELP section for a hose that can be trimmed to fit. Dorman may not list the SAE standard on their product.
-
For other printed parts, I wonder about the binder/matrix of these materials when printing parts that go in a harsh environment. Things like temp range, resistance to oil, moisture, UV, and shelf life of the printed part (many plastics eventually crumble after a decade or so). Obviously appropriate powders are available. Just interested in the binder. I've done zero research.
-
Hydraulic clutch set up for Crossflow w/ Type E or 9 transmission.
MV8 replied to Vinman1's topic in General Tech
Care to share a link to Dave's site? -
Don't know. It may not have a bearing and just slide on the shaft with thick oil. Could be chipped or just straight cut (normal noise).
-
An Annoying 'Feature' On My Seven's Zetec SVT Engine
MV8 replied to rcollum's topic in General Sevens Discussion
The intake/exhaust side isn't consistent on the "duratec" either. Check out the late 2000's 2.3 in tributes and escapes. Smooth valve cover too and some with vvt (newer style solenoid) while some do not. Some "zetec" named engines in smaller displacements have vvt. Clear as mud. Doesn't really matter what it is called as long as you can get parts for what you have. -
Ahh. Oh well.
-
Hydraulic clutch set up for Crossflow w/ Type E or 9 transmission.
MV8 replied to Vinman1's topic in General Tech
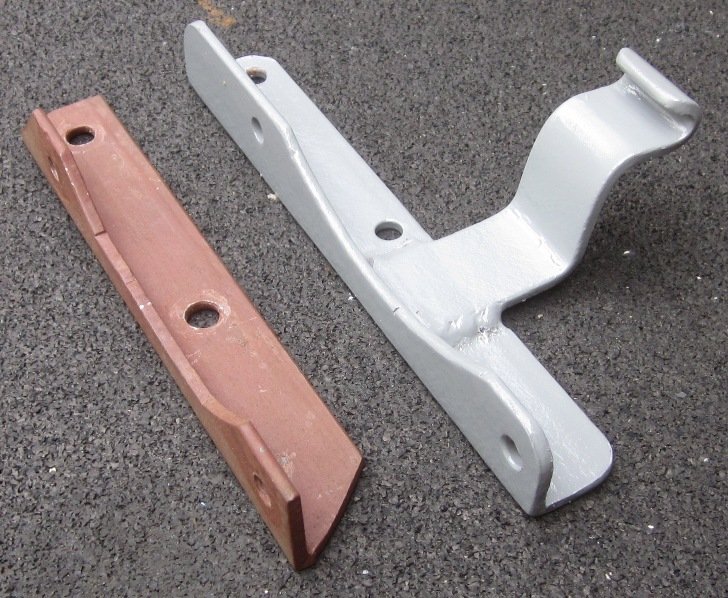
Looks like it may have been cocked on the trans enough to load the other side first with the worn side scrubbing with every pedal stroke, shaving the anodizing that cut the o ring. Could be the assembly was square to the trans but just the bearing inner was not seated fully on the still good side. Hard to tell from one pic/angle. It appears that all options require modifications. Why not weld on the bracket? Even new kits need work. -
An Annoying 'Feature' On My Seven's Zetec SVT Engine
MV8 replied to rcollum's topic in General Sevens Discussion
Imho, the naming has not been consistent. Not a duratec or zetec expert by any stretch but there was an early "duratec" 2.3l and later 2.5l vvt sol. The shorter production run may be why the aftermarket has not produced a vvt sol. I just use whatever name I think will best convey. -
If there is an issue with the new plate being thinner, you may need the thrust pad plate or adapter to fit the thrust pad to the normal plate. This would take up some clearance between the release bearing and the plate levers. https://www.burtonpower.com/helix-hd-clutch-cover-7-5in-190mm-with-thrust-pad-60-2490.html https://www.burtonpower.com/adaptor-spacer-clutch-carrier-apc1.html 190 (7.5 inch) is tiny. If you need to make changes and are worried about clutch performance, I'd look at fitting a flywheel/pp/clutch for an 8.5 inch (215.9mm) clutch common to most domestic 70-90 ford fours. That would be better overall than an aftermarket special plate or clutch. Domestic application for 190x23tx1 clutch is 71-73 1.6L pinto with the optional 23t x 1 trans versus standard 20t x 7/8.
-
An Annoying 'Feature' On My Seven's Zetec SVT Engine
MV8 replied to rcollum's topic in General Sevens Discussion
Aftermarket companies like Dorman are filling the oem gap for replacement VVT solenoids, but they don't appear to have one as a direct fit for early duratecs. -
That is not a Borg & Beck. It is a raised diaphragm, oem type pressure plate. All around, oem plates and discs are best. Specialty parts (typically to cope with too small of a clutch for the modified output) have tradeoffs. It is not unusual for a single clutch or plate to fit a variety of different oems since the transmission is from a third party also selling to other oems. There are two types of pressure plates that are common on mass produced vehicles in the last 60 years or so. They are the lever type and the diaphragm spring type. The lever type has two basic design groups with three or four rigid levers each. Each lever has its own spring and adjustment. These types are Borg & Beck and "long". The "long" has a larger opening in the center for the appearance of longer levers. The diaphragm type has two basic design groups with around 20 levers each. The levers are the spring. These types are "flat"(F.D.) and "raised" (R.D.). The "raised" is like the "long", with a greater opening and more exposed levers that also have "curly" tips. I don't see anything that would cause a driveline vibration. The springs look tight. If the plate is still serviceable and you have doubts about ordering a new plate, I'd consider a new oem type disc like what you have and reinstall with the original plate. Check ring flatness with a flash light and ruler, cover and ring cracks, and any wear. The difference between a new and worn out clutch disc is about .030" so you could clean with acetone, lube the pilot and a tiny amount on the splines (tooth brush out excess) and reassemble what you have. I'd be like to know more about the circumstances surrounding the driveline vibration.