MV8
-
Posts
2,303 -
Joined
Content Type
Profiles
Forums
Store
Articles
Gallery
Events
Library
Everything posted by MV8
-
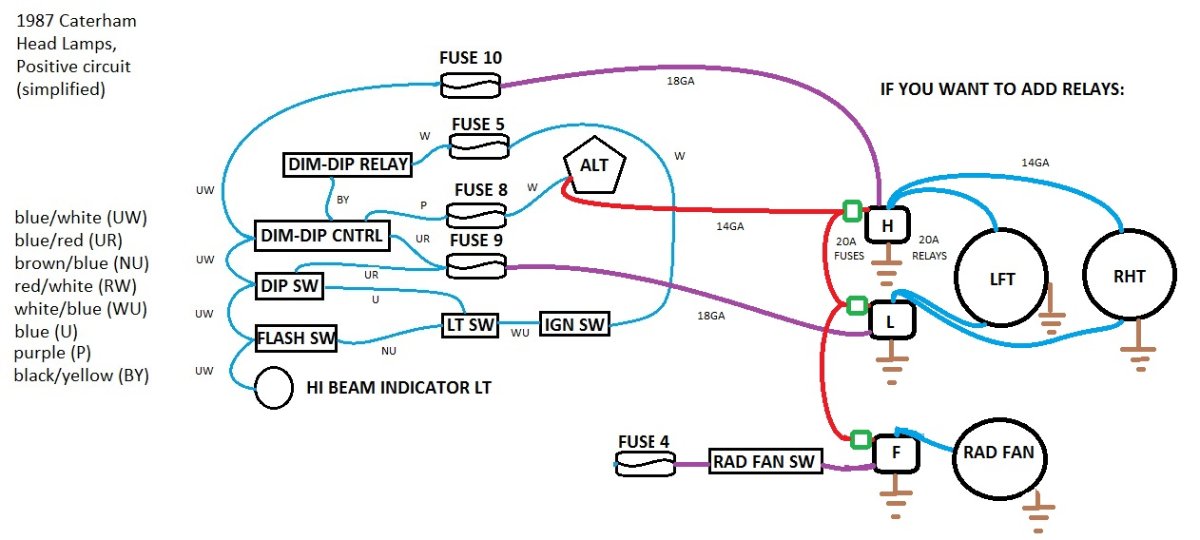
If you want to add relays for brighter lights, more effective cooling or potential fan upgrade, longer switch life, etc.....

-
Here is a basic headlight diagram for an '87. Not all connections and no grounds are shown for simplicity.
-

Getting closer to a purchase. More questions.
MV8 replied to Saudio's topic in General Sevens Discussion
About the visor issue, an option would be to try a window film two or three inches wide across the top of the screen (depending on your height/line of sight). Not necessarily a tint, but a polarized anti-glare shield. You could trim a piece and tape in place to determine what suits you before selecting a product to install. Don't rule out anti-glare films for residential use. If it isn't obviously tinted or mirrored, it may not be an issue. A aftermarket tinted strip across the top of a windshield is very common. Besides sun, night vision may improve with often blinding on-coming traffic when sitting so low. There are static cling and adhesive types that both install with a razor blade, squeegee and soapy dish water. scotch tape is used to separate the backing sheet on the adhesive type. Easily removed years later with a razor blade and wd40 but if you have a screen defrost grid on the glass, you'd need to be careful not to cut the grid when removing the adhesive. -
https://cortinamk2.co.uk/product/mk-2-9-road-shoe-h-plates-suit-1600e-gt-lotus/
-
I doubt rear drums would be any different between a standard Cortina and a 1600GT of the same MK. I'll look again.
-
Better to fit it and not need it. Being able to start the car in gear may be a no-go. If you'd like a method of fitment, I could draw on a pic of the footwell with the clutch pedal fully extended forward to the stop, as viewed from the right thigh. I'm sure you can do it with your bracket making skills.
-
When pressed, the white switch allows the starter to engage.
-
https://www.ebay.com/itm/285141516735?epid=1342363949&hash=item4263c241bf:g:p7EAAOSwezVW0NSW&amdata=enc%3AAQAHAAAAoBaheUsdCGaahikOTnRgjng3b6rUlU%2BSWyORcG1CP534S4HINEJPRdfDlKPtnYeH2ML7cGpc1J%2FidwIlA589C9fQ4Xe8L%2ByMr3%2B%2F1x20EfKD1HGmvKtJuiwoZMIEy3f6Zz7bGP3Z3S1Jx6qT4p2kcvxGlU03p4jekWgHACLhHXv7jIWMpBlIgByp88TnMsWrYjpgl1%2FdAs8GbS%2BFKASspwg%3D|tkp%3ABk9SR46U_dbPYQ
-
Getting closer to a purchase. More questions.
MV8 replied to Saudio's topic in General Sevens Discussion
Just found this article on the subject: https://www.pgmsussex.com/_files/ugd/a3e364_2ffc471a99f8410fb2c7868da09405a5.pdf?index=true -
Getting closer to a purchase. More questions.
MV8 replied to Saudio's topic in General Sevens Discussion
The overcooling was news to me, but I'm not on Blat. I did "a little" research. The issue as I understand it is the 620 warms up normally but once racing or running hard (i.e. hot revs), the stat can't close against the coolant pressure. Fit a tee to the upper hose that will connect to a heater hose fitting on the engine, then install a spring loaded check valve (pressure relief) that only flows when the pressure exceeds 12 or so psi, to bypass the thermostat. There should be no downside. -
It sounds like the light switch is corroded/bad and common to much of the lighting and likely since it carries many amps without a relay and is receiving B+ if the headlight flasher is working. When the switch is on, the red wire should have B+ to the left lights fuse and right lights fuse with instrument lights. Once sorted, consider a relay for low beam to extend the life of the switch and have more volts reach the lamps. Do you have B+, key in RUN, to fuses 2,3, and 4?
-
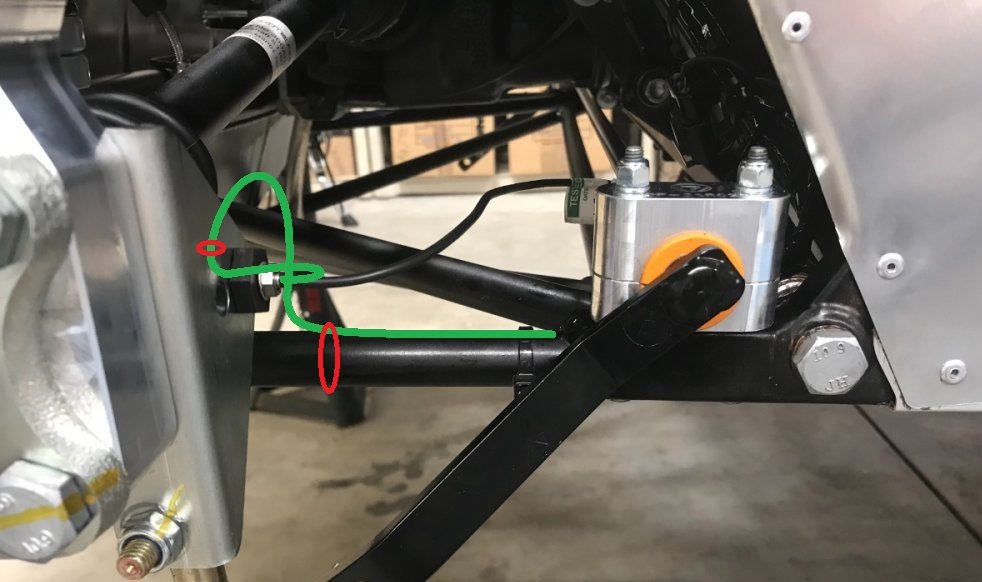
Wire and cable are usually much less flexible at the terminations and fatigue there first. I'd drill to secure to the base plate with a zip to eliminate repeated bending at the termination, then a generous loop inboard to minimize bending with suspension travel at the zips. A tab plate could be bolted on with the sensor to attach the zip. Just an idea. The harness may not be long enough to route this way.
-
I find that wd40 completely evaporates. "Boiled" linseed oil is traditionally used to protect the inside of tube structure for aircraft. It's just sloshed around inside then allowed to drain and dry. It is one of the main ingredients in the recipe for "waxoil" traditionally used on British cars.
-
Finished the prep, moving a few vines and fruit trees (Serviceberry/Saskatoon and Honan Red, Saijo, and Tanenashi Japanese persimmons), as well as cutting a few pines and an oak (Oregons latest, biggest electric chainsaw is fantastic; much better than the electric Poulan's I usually buy). Rented an 8,000 lb mini-excavator with a thumb for the concrete, stumps, and general grading. Dropped off and picked up for the weekend was about $900.
-
I'm guessing you found a deal from a third party that is more cost effective than buying replacements spec'd for the car. I would assume wide track lower control arms (LCAs) listed for sale on the Caterham site would fit all cars shown in the listing unless the specific model had to be indicated when ordering. It would make sense to move the lower damper attachment outboard with the longer, wide track LCA and spec a longer damper. This reduces the effective motion ratio and adds a little unsprung weight, so to be equal to the narrow track, the valving and springs would be higher rate/stiffer. Found the following here: https://www.pistonheads.com/gassing/topic.asp?t=240298 "These dims are for a '96 De-Dion car where the front damper mount is seperate to the wishbones, and the lower rear mount is welded to the bottom of the De-Dion tube. Front Open length eye to eye = 14” (narrow track) Open length eye to eye = 15” (wide track) Open length between spring pans = 7” Metallastic bushes both ends ½” dia Spring I.D. = 1.9” Wire dia = 0.32” Approx free length of spring = 7.25” (estimated, very little compression at fully open) Note:- the spring length is for springs 9 years old, having done 23000 miles. Rear Rear dampers are the same for wide tack and narrow track. Open length eye to eye = 18½” Open length between spring pans = 13” Metallastic bushes both ends ½” dia Spring I.D. = 2.25” (springs are standard progressive rate) Wire dia = 0.375” Approx free length of spring = 13” (estimated, no compression at fully open) Note:- the spring length is for springs 9 years old, having done 23000 miles"
-
It sounds like you know what the mixture is doing already. Is the fuel level kept low/just enough, circulating over and over with a return system, warming and foaming more with each pass through the system? If so, try carrying more fuel. Are you data logging? The coolant temp sensor (CTS) maybe be out of tolerance or failing as an open (infinite resistance). There should be a temp/ohm chart for the sensor to compare to ambient for the cold value. You could plug in a resistor (that matches the hot value) after warm up and test run for hesitation. Before aftermarket ecus became affordable and info about oem ecus was not readily available, manipulating the CTS was an early, crude way of providing mixture adjustment with the addition of a low value resistor or potentiometer in series with the sensor.
-
One way without programmables is to wire the MIL light in series with the charging failure light between the alternator and keyed power in the RUN position.
-
All of that makes sense to me for an axle without retainers. Uncommon on this side of the pond. It is what it is.
-
Those look like the perfect cycle fender (if you don't care about an aero hump off the back -I don't). You'd need fenders to copy in carbon. They could copy two sets of your original fenders, then trim and glass those to make one for each side in the length you want, then cast the prototypes in carbon. Keep the molds.
-
I've not seen that before on anything. That is odd and would make spline to side gear wear as likely as within the cv where it is supposed to occur and may cause diff leakage and seal damage at full droop. Did you take a pic of the inner cv spline? Is there a groove that is missing the wire clips? Clips are available separately.
-
Don't know. If they are longer eye to eye uncompressed, I'd want to know the compressed length to ensure they don't bottom out in normal travel and eye size, though I doubt it is different. There are many ways they could be different besides just fitting.
-
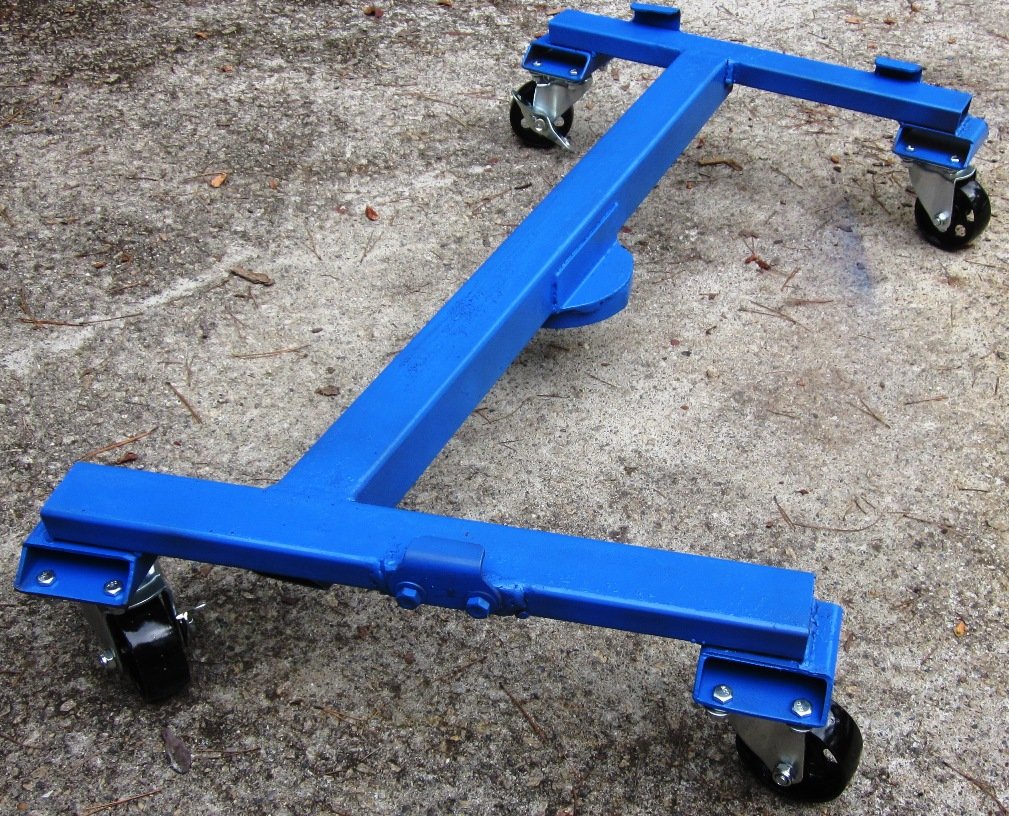
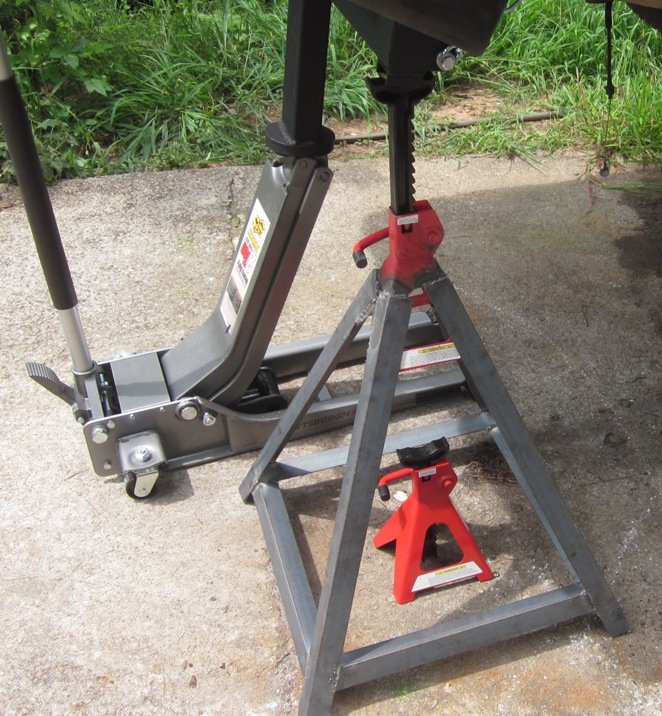
I agree. Unfortunately, the fiero requires a great deal of chassis height to remove the complete drivetrain, usually requiring a lift. This is due in part to a full depth rear trunk made for golf bags. It's amazing how many groceries will fit. I made a companion tool to the subframe trolley that bolts into the uni-body mating with the frame rail, bolts with chains to the strut towers, and cleats for safety stands. I also made another adjustable tool for supporting the engine without the transaxle from below within the subframe. Most tools of this type hold the engine from above across the strut towers. Not trolley stands but food for thought. I like the mechanical quick lift racing jack you can see in the movie Le Mans with Newman. The operation is like a wide hand truck with additional linkage that lifts one end without rubbing/scratching the underside.
-
Consider looking for a future source for glass replacement. If someone made replacement glass and offered frames for retrofit to other makes, there would be a market.
-
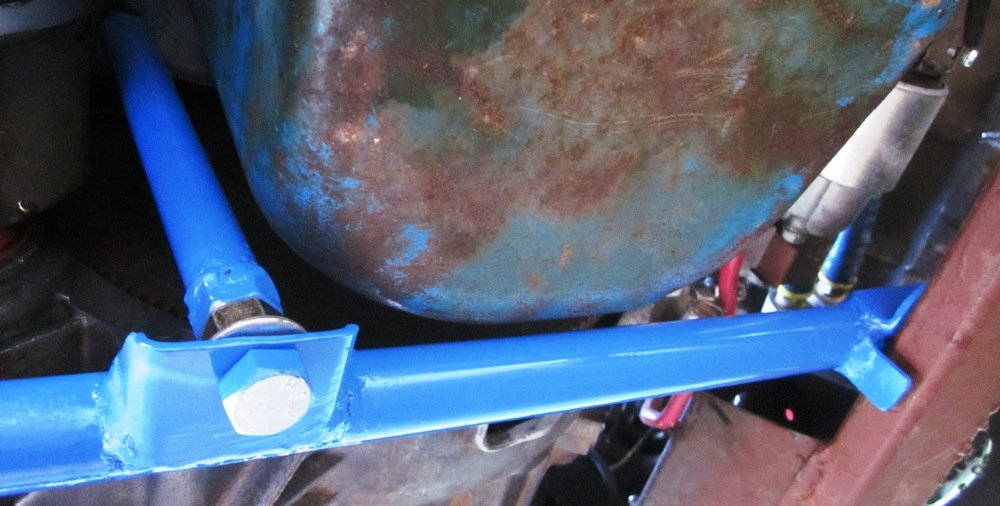
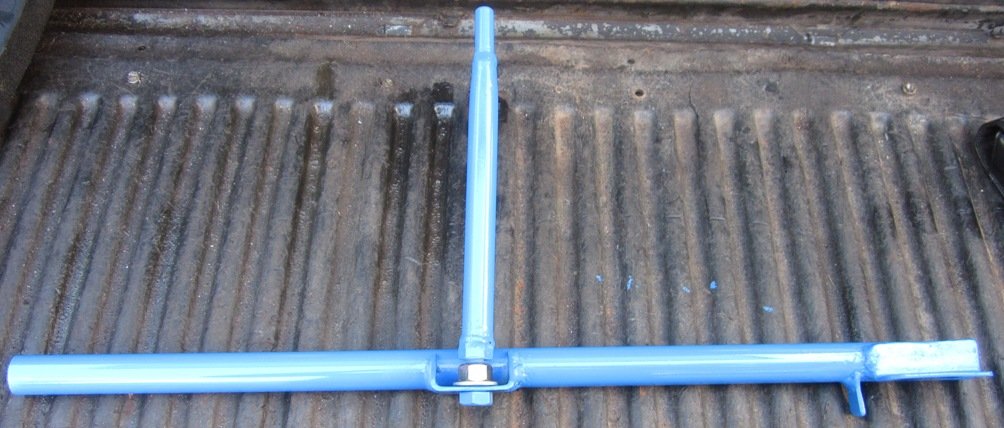
If having them made, consider using more durable, higher capacity casters. When making a trolley for the fiero subframe, I used these cast iron casters as a set for about $35 on ebay and made high lift jack stands from cheap stands using angle iron. The jacking pad and cross bar locations were determined after finding the cg of the chevy 4.3l-v6 and cobalt application F23 5 spd. Tabs are different from each other because the holes in the subframe were different at each location.
-
BMC A-series, "Seven America", 1098cc, 8.3:1 compression ratio, 43bhp at 5200rpm, 4.5:1 diff, sprite 4spd. For a review, see Road and Track, July 1961.