
Pokey
-
Posts
410 -
Joined
Content Type
Profiles
Forums
Store
Articles
Gallery
Events
Library
Everything posted by Pokey
-
I used an epoxy. While the bond is definitely permanent, when the time comes to replace the wing I'm planning on trying to saw through the adhesive with a thin wire, and if that doesn't work cut the wing off and then use a wire wheel to grind the residual from the wing stays. I'd consider just replacing the wing stays but suspect that would be more work than either of the aforementioned.
-
In addition to everything everyone has already expressed, I would just add that the sooner you figure out what really brings you fulfillment and joy the better able you will be to focus on creating the right opportunities for yourself. Ask questions of others about you, be open to criticism, and consider one or more of these self-assessments: 1. MyersBriggs 2. Strength Finders/Clifton Strengths 3. DISC 4. Holland Occupation 5. Big Five (also known as the Five-Factor Model) @Vovchandr, you mentioned an interest in tech, perhaps data analytics or coding, if you want more information about the knowledge, skills and abilities for these job types feel free to message me. I'm not a human resources expert but am coincidentally wrapping up a job architecture effort at work to help our employees map out their career path. It took me a few years to figure out enough about myself to set a direction. To be precise, it was half way through a doctorate when realization set in that I was on the wrong path for me, and then another seven years of juggling school, work, my first remodel, self-employment and our first child before having the job I wanted. Point being, it took years of grinding to get from point A to B, and it all started with figuring out me. I've got nearly 26 years at my current employer, and in that time I've had a number of different jobs but they are all stitched together with one common thread, a desire to help others develop into the best leader they can be. That's what brings me joy and fulfillment. If I could do it all over again I would probably try harder to make a go at owning my own business. Not consulting, and probably not retail, but something that produces a physical result. We owned and ran a travel agency for a bit, and I have done consulting both as an employee and as a contractor, and that was all very interesting, but I really like creating the tangible. I also like not having anyone telling me what to do, hence sole proprietorship is more appealing than employee. Not complaining though, I feel fortunate and am generally left alone to do what needs to get done at work. The fact that you've opened yourself up like this and are asking questions is a great step and shows some real emotional maturity. I suspect things will turn out well for you.
-
Very sad. The media reports overall seem to be, unfortunately, consistent with what I'm hearing direct from Ukrainian coworkers in Kharkiv or who have escaped west. If you want to give financially, here are two options, both recommended by Ukrainian's directly impacted by the invasion. Humanitarian. https://bank.gov.ua/en/news/all/natsionalniy-bank-vidkriv-rahunok-dlya-gumanitarnoyi-dopomogi-ukrayintsyam-postrajdalim-vid-rosiyskoyi-agresiyi Military. https://savelife.in.ua/en/
-
Thanks Bart, appreciate the detailed explanation. The SADEV sounds really intriguing, but I've read and heard of the headaches that can arise with the various ECUs.
-
Thanks for sharing Bart. Would you mind sharing why you chose the MBE9A9 over the other options available?
-
Nut keeps coming loose - any long term solutions?
Pokey replied to KnifeySpoony's topic in General Tech
Understood. Just curious, but you mentioned a flat washer on either side - does the rear linkage call for two flat washers on the outside (bolt head side)? -
Nut keeps coming loose - any long term solutions?
Pokey replied to KnifeySpoony's topic in General Tech
Any chance that the surfaces aren't perfectly flush and/or orthogonal? I wonder what would happen if you were to torque, then rotate the linkage by hand through the normal range of motion? Would the bolt still be at the same torque value? -
I believe the Seven and grommet were developed synchronously. Followed almost immediately by the plug.

-
Is it possible it is misfiring or firing on only three cylinders? If so, you could try disconnecting each spark plug coil one at at time while the issue is occurring. If you unplug a coil and the problem doesn't worsen then you've possibly isolated it to the coil or a connection upstream in the harness.
-
There are two assembly guides for your build that are good to contrast and compare: Seven 270, 360 and 420 plus ACADEMY, Version 02.2015c Duratec - Edition 2.0 The second one has the rather unkind nickname as the Ikea version because it is a pictorial guide. Note that Edition 1.1 of the Ikea version is still floating around out there even though it has been deprecated. The edition/version is shown on the title page. Both of the above are available on this site in the Download section (Browse/Downloads). Learning from others is a great way to avoid some of the more frustrating aspects of the build due to sub-optimum documentation. I'd suggest reviewing the build threads on this site, and checking out these blogs: https://caterham420detailedbuildblog.co.uk/ https://caterham420rbuild.com/ https://caterham360build.co.uk/ https://www.caterham7diaries.com/ http://caterhamsevenbuild.blogspot.com/ https://www.purplemeanie.co.uk/ http://www.simplesevens.org/
-
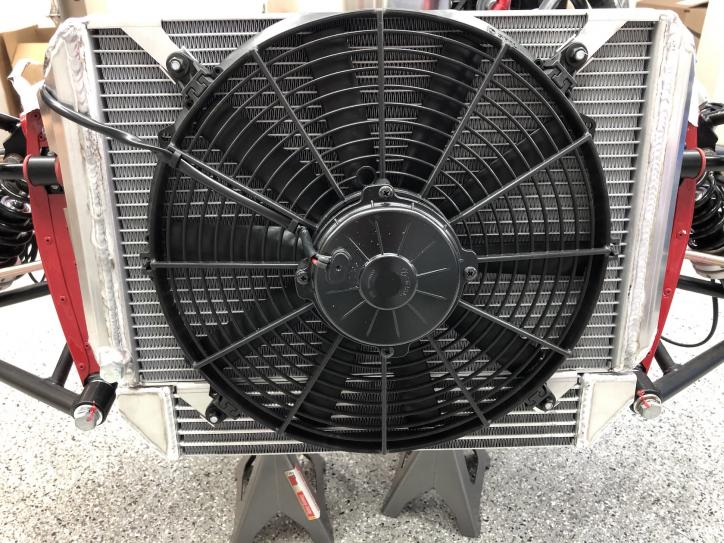
The radiator was a head scratcher for me too. The puzzle was solved after researching the fan and finding it was a push (rather than pull) design, confirming it belongs in front. From there it was a matter of rummaging until finding the right bits to make it work. You will run into these situations from time to time, so best to consider it as a part of the experience and try to enjoy. By the way, be circumspect about the torque values you see in the the build manuals. If it doesn't seem right then best to do some cross checking. And just checking, are you using Version 2.0 of the Duratec assembly guide?
-
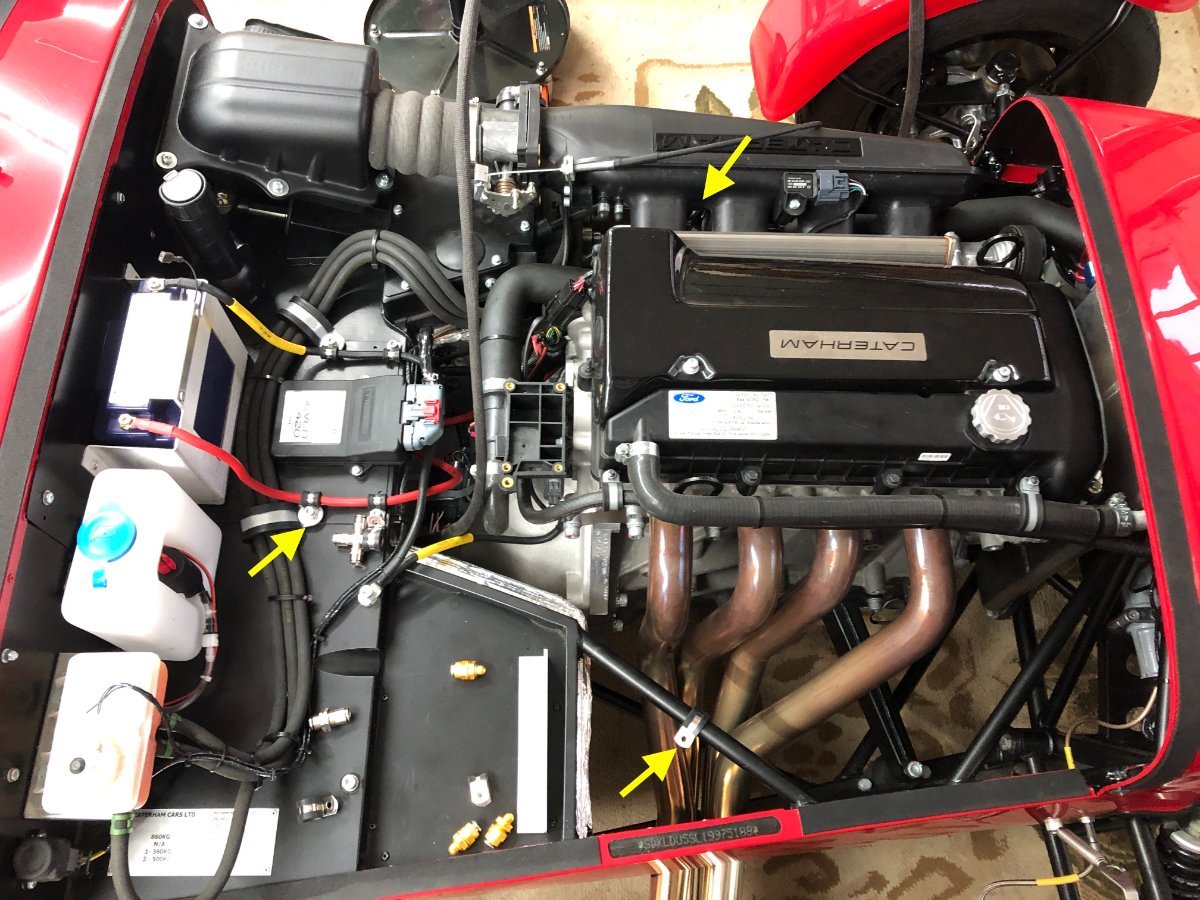
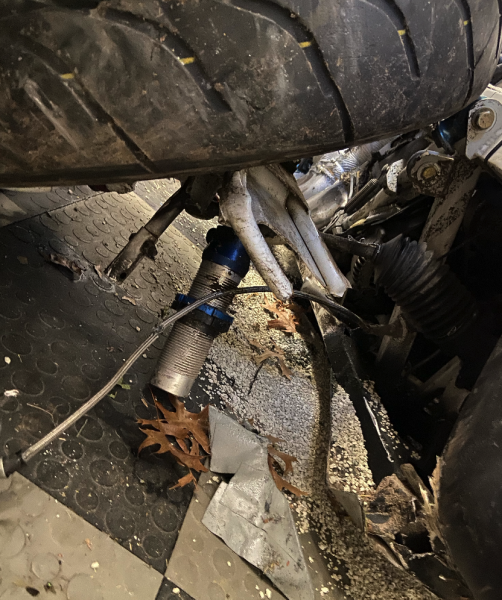
I'm jealous @sainthoo, I'd love to be able to do it all over again. I would install the radiator after the engine as it is pretty easy to damage it especially when you roll the crane into position. For the radiator brackets, see if you have what is in this picture:
-
How do we know it isn't P10 and P11?
-
Anyone have any great ideas for fire suppression nozzle placement, particularly in the engine bay? I'm hoping someone can share what they've learned and perhaps a picture? Left to my own devices I will place a nozzle on the diagonal tube by the exhaust and on the opposite side under the intake, and a third perhaps centered near the ECU. Mounting on the tubes probably involves a p-clip, and near the ECU a threaded rod to get the nozzle elevated. The cleanest install would be all three nozzles in the firewall right, center, and left, but I'm concerned that the distance is too great to the forward part of the bay.
-
I've got a stupid question so those reading please be kind, but how sure are we that the Caterham chassis are powder coated? I ask because the durability of the surface and the thickness of the coating is more reminiscent of paint. Even more so with the suspension components and the wing stays. To be clear, this isn't a gripe as I don't really care either way. What chipping that has occurred I've been touching up with an enamel and that seems to be working just fine.
-
I'm using an EarthX ETX680. They have other form factors and cranking amps available. The ETX models are designed for use with an alternator.
-
I did something similar. That location also has the added advantage of being far removed from the heat of the engine.
-
Installing: Lifeline Zero 360 fire suppression system On order: Superlight roll cage Soon to order: Blinkstop Third brake light with modulator Once I've gotten confirmation that the cage will actually get to me: Order the Soft Bit for Sevens SLR Cage Weather Set and new boot cover Remove hood sticks and replace boot cover (and sell sticks, hood and boot cover) Source mirrors w/ mounts for roll cage
-
When researching for my build it seemed like the general consensus was upper for road, lower for track. I went for the lower position and have left it there so can't compare, but the car seems fine on the road so no complaints.
-
Confirming @11Budlite, it is as you suspected Bruce, thanks again. Greg
-
That would make so much sense! All I can see is a profile that looks like a cap head, but it doesn't look like a bolt in the picture you posted. It would also explain why it protrudes from the case. I'm pretty sure you are correct but will try to confirm later today - maybe I can get a pick in there to probe the top. Thanks for finding and posting that picture. I spent a couple of hours looking for what you found and gave up in frustration.
-
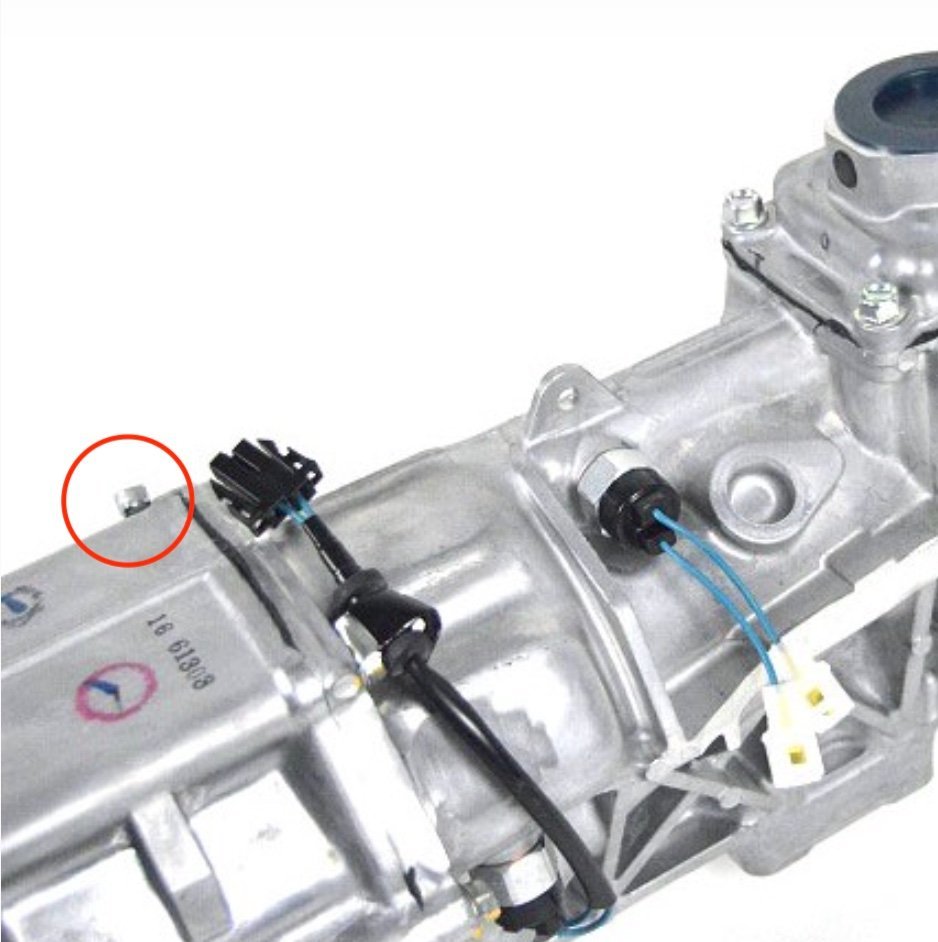
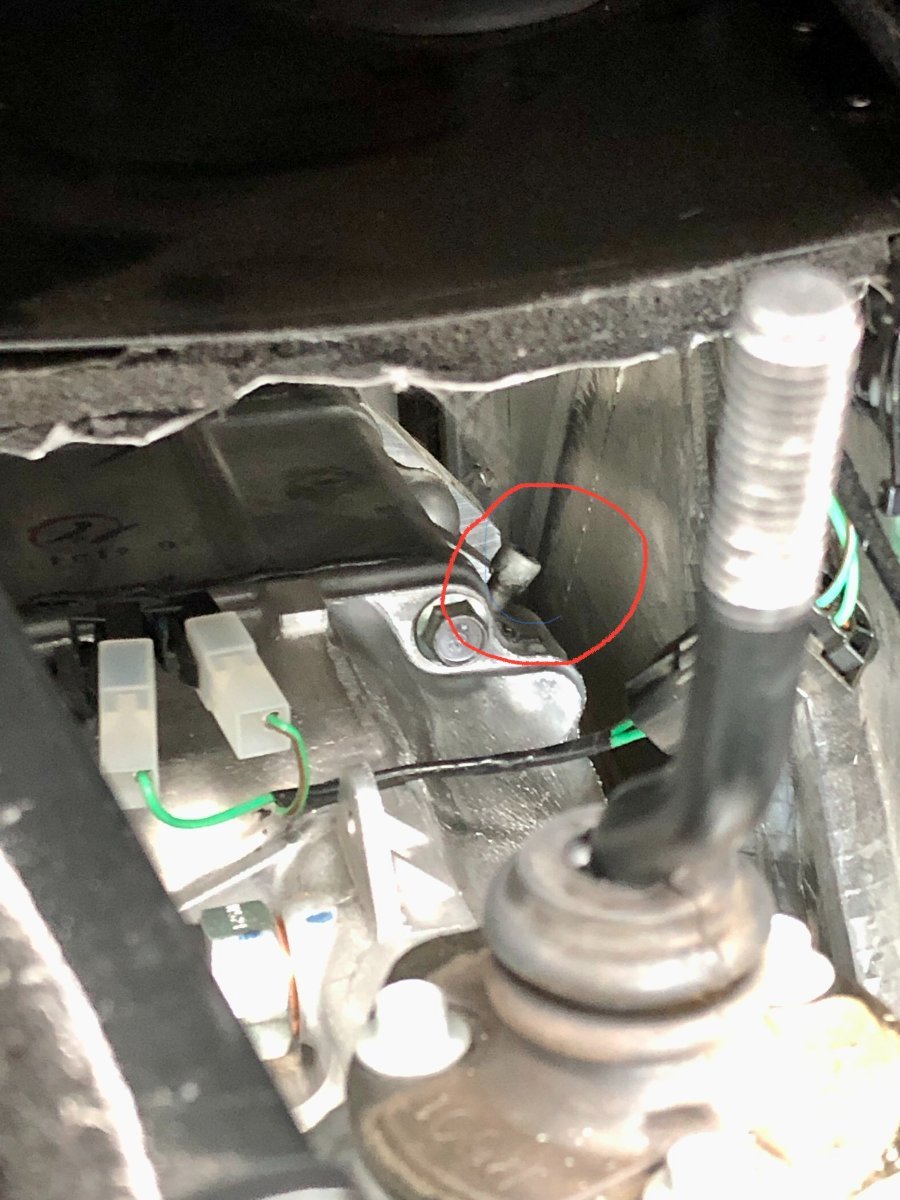
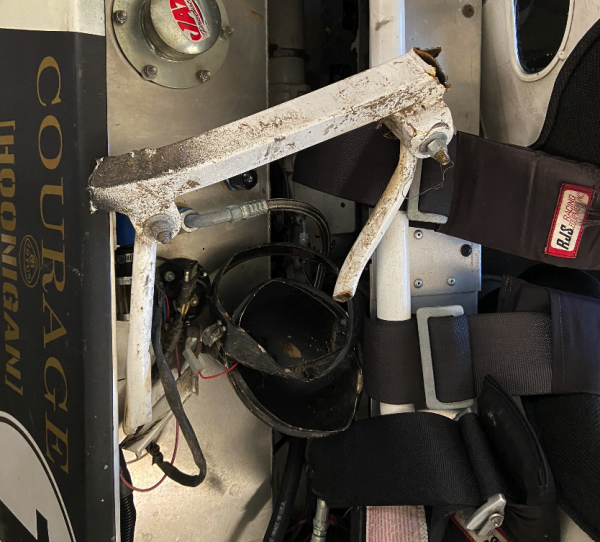
I could use a hand identifying a bolt that protrudes from the right-side top of the Mazda derived 5-speed gearbox shown in the photos below. The first photo is from Caterham's online parts catalog, where I've circled this protruding bolt in red. The second photo is of my gearbox, where that protruding bolt is now only finger tight. Was this bolt only finger tight when I installed the gearbox and just didn't notice? Does it penetrate through the case, and, if so, is it safe to remove to apply thread locker?
-
 Oh Bonjo2, those pictures are painful to look at. So glad you are going to be okay.
 -
-
I've never had to ship for a rebuild, but perhaps someone reading this has had a good experience and they can make a recommendation? But as 7Westfield points out, yours may not be serviceable.
-
Nice, thanks!