xcarguy
-
Posts
3,835 -
Joined
Content Type
Profiles
Forums
Store
Articles
Gallery
Events
Library
Everything posted by xcarguy
-
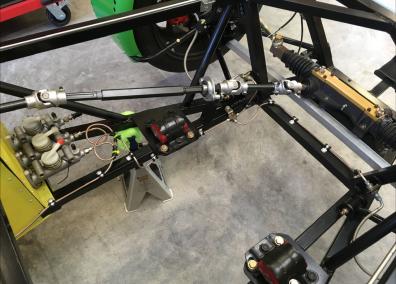
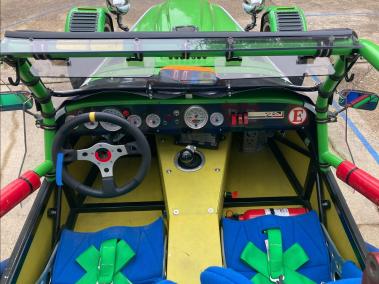
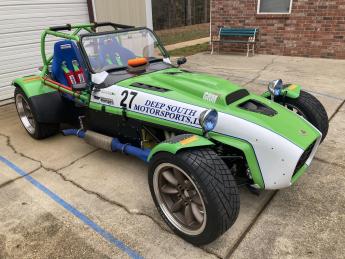
(POST 2 OF 3) CONTINUED FROM THE FOLLOWING POST Transmission, Clutch and Bellhousing: Tremec TKO 600 transmission built by, and purchased new from, Liberty Gears which includes - Surface Enhancement Processed Hubs & Sliders - Carbon Fiber Blocking Rings—2nd, 3rd & 4th Gear - Face Plate Engagement Conversion—2nd, 3rd & 4th Gear - Bronze Shift Fork Pads - Internal Shift Linkage Upgrade - Liberty’s Exclusive Threaded Front Cluster Bearing Support - Mopar SAE 75W-85 synthetic manual transmission lubricant (as recommended by Liberty Gears) * Monster Clutch LT1-S twin disk setup with lightweight flywheel and billet release support bearing Tilton hydraulic release bearing with stainless steel braided clutch lines Wilwood cutch master cylinder Holley Quick Time steel bellhousing Steering, Front Suspension and Brakes: Custom Colman Racing steering rack with QA1 self-sealing rod ends (heim joints) Custom built steering shaft assembly with Borgeson aluminum u-joints, steel shafts and flange support bearings Modified GM S-10 spindles (modified per Wilwood to accept Wilwood brake kit) 3" ½” x 20 screw-in wheel studs GM bolt pattern (5” x 4 ¾”) *GAZ bump / rebound-adjustable aluminum coil overs (rebuildable) with 600lb springs Wilwood S-10 front brake kit with BP10 brake pads Stainless steel braided front brake lines Driveshaft, Rear-end, Rear Suspension and Brakes: Custom aluminum driveshaft by FastShafts with central safety loop GM S-10 solid axle (*2017 rebuild with new axle seals and new pinion seal) which consists of - Four-link / panhard bar setup with QA1 self-sealing rod ends - GM (99 Camaro SS) 7.5” 28-spline Torsen LSD differential with 3.23:1 gears - Valvoline High Performance 75W-90 gear oil - Moser Engineering axles with 3" ½” x 20 screw-in wheel studs - GM bolt pattern (5” x 4 ¾”) * GAZ bump / rebound-adjustable aluminum coil overs (rebuildable) with 300lb springs GM Grand Am GT disk brakes Stainless steel braided rear brake lines Fuel Delivery: *15gal RCI Racing aluminum tank with AlltechMotorsports custom internal baffling and Holley Hydromat fuel pickup (zero fuel starvation during sustained high G-load cornering) *Earls Swivel-Seal 8-AN fittings and Pro-Lite 350 braided hose *FAST fuel rails Walbro external in-line fuel pump Aeromotive return-style fuel pressure regulator with return line from fuel rails Racetronix fuel sending unit Electrical: *Painless Performance 21 circuit wiring harness (car fitted with new electrical system during rebuild) *All wiring covered with Painless Performance ClassicBraid * Fuse block mounted on aluminum panel above passenger-side footwell for easy access *All wiring soldered (no butt connectors) and all connections shrink wrapped *All wiring sleeved to prevent chaffing in critical areas *All grounds mounted with machine screws (no self-tapping screws) *All grounds mounted at the following five locations on the car: lower left-front frame rail, lower right-front frame rail, right-rear of engine-to-frame rail, underneath right-hand cowl, and right-rear frame rail *All wiring from fuse block distributed along center / right side of car for better weight distribution Lightweight Nippondenso alternator (zero issues, charges well) 5.75” round headlights with blue lenses and bulbs *LED turn signals front and rear LED tail lights / brake lights Painless Performance LED flasher (plug and play; designed to work with LED turn signals) Exterior master cutoff switch (right-rear of car); cuts off all power to the car Interior cutoff switch (located on transmission tunnel in passenger side); cuts off all power to the car except for the GM computer memory Braille lightweight AGM battery (18.5lb) Interior: Dual Ultra Shield road race seats * Racequip 6-point camlock harnesses with bolt-in dual sub belts, bolt-in 3” pullup lap belts and wraparound 2” shoulder harnesses that accommodate Hans / FHR devices Autometer Ultra-Lite II gauges with LED back lighting (160mph speedometer, tachometer, oil pressure, oil temp, water temp, volts) Autometer LED dimmer for dash lights (under-dash mount) high / low headlight switch (under-dash mount) Single, lightweight horn with under-dash pushbutton activation LED Shift light LED low oil pressure light Accusump 35psi activation switch light (flashing LED) Left / right / neutral three-position LED turn signal toggle switch (not self-cancelling) Pro-5.0 shifter * Steeda Tri-ax forged aluminum shifter handle Wildwood clutch / brake floor-mounted pedal assembly Cable operated throttle pedal mounted to firewall frame Grant 13” GT Performance steering wheel with yellow top marker Grant quick-release hub *Vented footwells for improved cooling during warm weather driving (car does not overheat in footwell area) Fire extinguisher (passenger-side floor board) Other: Four windshield / windscreen combinations: - Low-profile, full-length, half-height Lexan windshield - Brooklands - Carbon fiber aero screen - Full-length, full-height Lexan windshield which sits atop the carbon fiber aero screen; best combination for street driving, but functions nicely on track as well (car pictured with the windshield / aero screen combination installed) *SPA Technique carbon fiber Formula F1 side mirrors with convex lens SPA Technique high impact nylon rearview mirror with convex lens Tilton three-chamber remote hydraulic reservoir Moroso oil-air separator (catch can) 1500psi panel-mount on / off valve for parking brake from McMaster-Carr (located low on driver’s side transmission tunnel cover) Front / rear aluminum fenders (modified for weight reduction and louvered to reduced lift) Dual hood support strut rods Aluminum diffuser (POST 3 OF 3) CONTINUED IN FOLLOWING POST

-
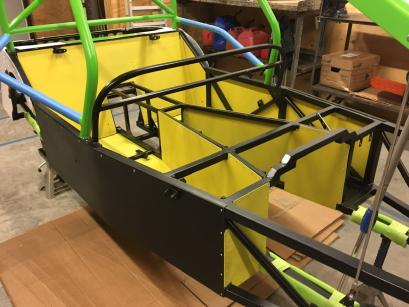
(POST 1 OF 3) FOR SALE: LS-powered Stalker. Very well-sorted, turnkey, street / track-ready with spares and extras. Over 3,000 build / event history photos along with all receipts and part numbers dating 2006-present. Following what has been many years of enjoyment, it’s time to move on to a new father-son project with my eldest; you only get to raise them once. While this car is street legal and very easy to drive on the street, the function and theme of the car will appeal more to the hardcore driver whose aspiration is more toward HPDE events with the occasional cars and coffee, cruise night or Sunday afternoon drive along a favorite back road thrown in for additional fun. Brief History: 2006 – purchased new in kit-form from Dennis Brunton as chassis #85 Titled as a 1964 Lotus 7 Originally built using a GM 3.8L supercharged L67 V6 and Camaro V6 5-speed transmission 2008 – car sold to Mike Sharkey While in Mike’s care, the car was sent to Scott Minehart of Stalker Cars where the L67 was replaced by a 2004 Cadillac CTS-V LS6 and a TKO 5-speed Mike ran the car at Virginia International Raceway (VIR) (first track event for the car) 2012 – car purchased back from Mike Sharkey Between 2012 and 2015 the car underwent several modifications geared toward improved track performance while not sacrificing drivability on the street 2015 – accident at Texas World Speedway (TWS) which resulted in a complete rebuild (rebuild completed in 2017) using a new, upgraded classic chassis built by Scott Minehart (other upgrades / modifications were also completed during the rebuild and are indicated below with an *) Prior to the rebuild, the car saw a combination of street / HPDE track duty at VIR, Cresson Motorsport Ranch (MSR Cresson), New Jersey Motorsports Park (NJMP), Circuit of the Americas (COTA) and TWS Post rebuild HPDE events have included VIR, NJMP, Barber Motorsports Park (Barber) and Eagles Canyon Raceway (ECR) To reiterate, the function and theme of the current build is designed more for track oriented driving with the car remaining very drivable on the street A Glance at the Car *Chassis (new in 2015 by Stalker Cars): *Full roll-cage, redesigned with driver and passenger side impact bars *Classic chassis with widened transmission tunnel designed to accommodate a variety of transmissions such as the TKO 500/600, T-56 or 700R *Reinforced lower front a-arm brackets Powder coated black and green Basic Construction: Car constructed using a combination of locks nuts wherever a nut/ bolt fastener was required Aluminum lock nuts and aluminum bolts were used whereever higher grade hardware was not required with the objective being to reduce overall vehicle weight; mounting examples are radiator, carbon fiber wings, air-oil separator Aluminum body panels attached using assorted sized aluminum rivets Where component mounting would not allow for the use of a bolt / nut fastener, rivet nuts and machine screws were used and secured with blue Loctite blue threadlocker 242 (no self-tapping screws in this build) All suspension components are mounted using aircraft grade -AN bolts and lock nuts from Aircraft Spruce (all suspension bolts have the required specific grip length to ensure no premature wear on bolt / component surface) *Engine: *GM 6.2 L / 376 c.i.d. LS V8. Built in 2017 specifically for road / track duty by SNL Performance *GM L92/ LS3 aluminum short block (purchased new from SNL Performance) LS6 (243 castings) heads with Total Engine Airflow Stage 2 porting which consists of - 2.04 and 1.57 Ferrea intake and exhaust valves - Custom PAC dual .650 spring and Titanium retainers - Full CNC ported 229cc intake and 84cc exhaust ports - Custom 4 angle intake / radiused exhaust valve job - Hand finishing of Valve job into Porting - Standard 67cc CNC Chamber - Deck surface finished with CBN cutter for ultimate surface finish - Blueprint assembly in which all spring heights and pressures are checked *GM LS7 lifters *ARP head bolts *Custom ground camshaft (227 / 230 .641 / .600 111+3) Callies core * LSX ported / shimmed oil pump * FAST LSXR 102mm intake manifold * Nick Williams 102mm cable-driven throttle body with Lokar stainless steel braided throttle cable * Manley Performance 7.4" hardened push rods * Racetronix 42lb injectors * NGK TR6 plugs (gapped at .035) Taylor sparkplug wire set with burn-proof silver heats socks *Improved Racing aluminum crank scraper / windage tray combo GM Fox body oil pan with Improved Racing aluminum baffle *Lightweight aluminum coil mounts Canton Racing Products Accusump three-quart oil accumulator setup comprised of - 35psi electric switch (on-track protection during high G loading; switch activates at ≤ 35psi engine oil pressure) - Manual shutoff ball-valve - Plumbed with Earl's Swivel-Seal 10-AN fittings, Pro-Lite 350 braided hose - Dash-mounted LED activation light (LED light flashes with 35psi switch activation) *PennGrade 5W30 partial synthetic high performance oil; car requires 5.5 quarts for street use (Accusump empty and manual shutoff valve closed) and 8 quarts for track use (Accusump manual shutoff valve open, Accusump pre-charged to 10psi and filled with 2-2.5 quarts) *Custom headers with 1 7/8” primaries Flowmaster Hushpower mufflers * Jet-Hot ceramic coating on headers and exhaust (Electric Blue) * Headers and mufflers wrapped with Design Engineering Titanium exhaust wrap *Stock GM computer with custom tune *Speed density tune (tuned at SNL Performance on 93 octane; ) Cooling: Car runs in the neighborhood of 180˚F highway with fan off and 180˚F in town with fan on All HPDE events have been run with the fan off with the exception of the cool down lap (no overheating issues with this car) *C&R Racing custom aluminum radiator with Spal 14” pusher fan (fan mounting integrated into radiator design by C&R Racing) * C&R Racing 22psi billet aluminum radiator cap *2:1 mixture of distilled water / Prestone GM Dex-Cool antifreeze *16 ounces of hy-per lube Super Coolant (one bottle) *Oil cooler from Smileys Racing, comprised of - Improved Racing EGM-106 low-profile oil cooler adapter - Earl’s Ultrapro one-way check valve - Plumbed with Earl’s Swivel-Seal 8-AN fittings and Pro-Lite 350 braided hose Various NACA vents Hood vents (POST 2 OF 3) CONTINUED IN FOLLOWING POST
-
Very welcome.
-
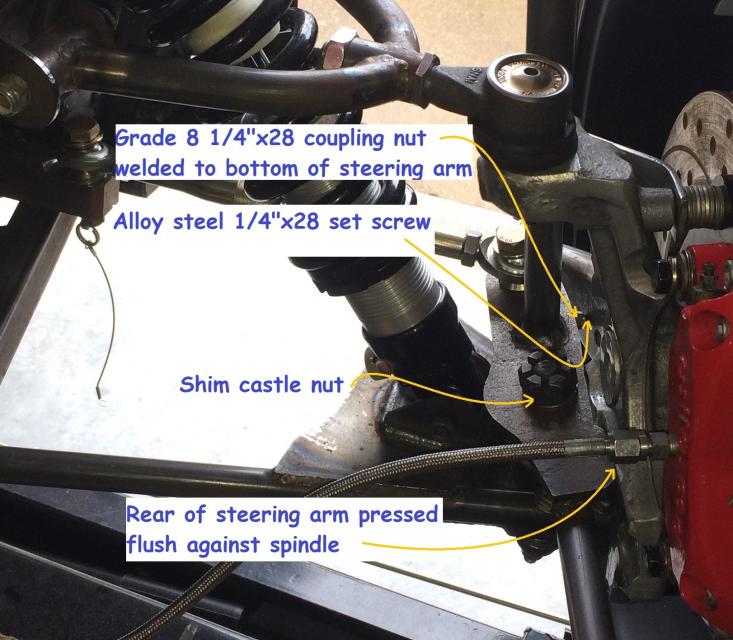
rnr, see photo. Easy, straightforward fix. Been running this setup since 2013 with ZERO issues. Solid, zero-slop steering. - Rear of steering arm needs to be placed flush against the spindle - Castle nut needs to be shimmed with a 1/2" grade 8 washer to ensure the steering arm is torqued to the lower ball joint - The coupling nut/set screw is the icing on the cake Coupling nuts and set screws available from McMaster-Carr Coupling nut: https://www.mcmaster.com/90983A261/ Set screw: https://www.mcmaster.com/94105A638/
-
Ryan, great first post....and congrats on the purchase! And thanks for sharing the story of your adventure. What an awesome first drive!:cheers:
-
LOL! I knew the moment I saw that photo you’d be gunning for me. But remember, I’m not the only one who likes to do ‘hang time’......Merry Christmas!:jester:
-
Stalker and Intech trailer with Grundy. Never been asked for a HP resume unless attending an HPDE with a new host. https://www.grundy.com/
-
437 miles for me....practically in my back yard.
-
 Awesome photos in those articles. The colors are fabulous.
 -
VRG Turkey Bowl 2020 - racing at Summit Point in a Super Seven!
xcarguy replied to d15b7's topic in General Sevens Discussion
Fantastic! -
Pretty much, this! As a LS Stalker owner who has driven Caterhams, I’ll add this; if you plan on buying a prebuilt Stalker, do your due diligence and check out the car throughly. The build quality will only be as good as the builder. As for performance, both cars get the job done. Personally, the Caterham is easier to drive fast, but the LS power makes for an exciting drive. The Caterham is the well-disciplined martial arts master who knows just when and to apply the blow and force necessary to overcome his opponent while the Stalker is more blunt force trauma.....scalpel or machete.
-
Mike, I wish my son could take credit, but this was a ride-along with an instructor, though not there instructing that particular day...just enjoying the track. The Miata has an Ecotec engine swap; 175hp bone stock $500 junkyard engine. The 99 Miata we purchased last year has lived out its ‘phase 1’ usefulness...to teach my kids how to drive a stick. With that completed, phase 2 is to turn the Miata into a track car for future fun.
-
Shot some video segments while my son was on track in the ‘Snow Leopard’ Miata. Not the best footage, but may help with tying together some locations of the elevation changes, blind areas and off-camber curves lined out the the earlier post.
-
Great color!
-
The Regular Summary of Classified Ads of Se7ens Found For Sale
xcarguy replied to Croc's topic in Cars For Sale
Seen this car before. Nice build. Not sure, but I think Scott Minehart may have built this at Stalker Auto; not a 100% on this. Been running in the Stalker circle for many years now and this is the only example of this particular Stalker (known as a Classic R) that I’ve seen personally where Stalker Auto combined the looks of the classic (legacy) chassis with inboard shocks (front and rear) and IRS with the CTS-V Getrag diff. A final thought. This car is running a larger Wilwood brake kit than my car (for comparison) along with. 17x9 wheel. Not sure how well a smaller (15” or....) wheel would fit if one wanted to track the car. Research that if you’re a serious buyer with HPDE or auto cross in mind. -
Sander, glad you’re ok. And glad the car faired very well. Having said that, can you post a couple of photos for others to review. I wouldn’t take it at face-value that no more damage exists; cracked welds, slight deformities not readily visible may become more apparent with closer inspection on a lift, and a second set of eyes. However, I hope it’s nothing more than a damaged license plate light and a bit of bruised owner pride.
-
Haven’t seen that in a while, Skip. That photo is worthy of sooooo many memes.:jester:
-
My thoughts exactly.
-
Great photos, Mike. Thanks for posting and sharing.:cheers:
-
Mike, thank you for the kind words. I heard the Cresson track was in the midst of being repaved; had become a bit rough over the years. The runoff areas at Cresson are much more forgiving than those of ECR, but ECR is more technical. Paddock parking at Cresson is more user friendly; short walk to the club house vs. an uphill hike at ECR. In all fairness, I’ve only run the 1.7 at Cresson. With the 1.7 combined the 1.3 (recalling this off the top of my head,,, I could be wrong), I believe you end up with a 2.3 track that is more technical than the 1.7. Also, the 1.7 can be run both clockwise and CCW. That’s what happens when you show out and try to impress one of my family members. However, my eldest was impressed....as was I.:jester: Your favorite Mustang ride-along passenger....my son. Aside from running interior trailer/exterior flood lights, the wench, the fans and the portable air tank...to keep the beer cold.:cheers: Yes, that one is worth a revisit. I truly expected to do a bit of farming at ECR, but, nothing to see here....move along.:cooldude: However, Sunday morning, during the warmup session, a black Z06 challenged me for the John Deere award and was trailered back to the paddock. From the looks of the front end, there were some wounds that needed licking. I still have visions of Stalkers flying in my head.
-
A couple more photos with a little better quality than the iPhone
-
About the track.... [ATTACH=CONFIG]17875[/ATTACH] ECR is an excellent 2.75 mile venue with more than 200’ of elevation changes combined with some blind corners/track outs and off-camber turns. Grounds are nice, well maintained and seem to be under continuous improvement. All paddock parking (sans club members and garages) is located just past, and to the right of, the entry gate in the low-lying SW corner of the property. It’s a short, easy drive to the grid, but be prepared to get your daily exercise if you don’t have a pit bike. Corner by corner.... T1 - slightly downhill once you hit the braking zone with a bit more than 90 degrees of turn. Enter the turn to the far left. Off the apex and slightly right of the track centerline will help tremendously with the setup entry for T2 which comes rather quickly. T2 - off the apex and track out to the right all the way to T3 T3 - EGR actually refers to this turn as 3A and 3B. Coming into the braking zone, you’re wondering ‘where is the track’. The braking zone markers seem to disappear over the rise, which they do. Once you reach T3, you’re at the crest of the hill and the turn is off camber. Apex off of 3B with a track out to the right and then back to about center track to set up for T4. T4 - quite a downhill elevation change from the apex of T4 to T5. If you haven’t given slip angle much thought lately, you’re in for some remedial training here. T5 - coming off the T5 apex presents you with an uphill run, a blind track out and an early, and fairly aggressive, crest. It was a mental thing, but I never found the confidence I needed for the track out (car would get very light very quick at the top of the crest). It was only during the third session that I finally began to trust that the track would be there beyond the crest once I tracked out to the left to set up for T6. T6 - this corner reminded of The Bowl on NJMP’s Lightning course....but not as long...and flat (no positive camber). Just as the bowl, search for a late apex and stay slightly right of the center of the track during track out to set up for T7. By the third session of the day, I was carrying enough speed off the apex of T6 that I was braking slightly for the T7 entry. T7 - is also a late apex. If you’re not slightly right of track centerline coming out of T6, you’ll apex early and muck up the set up for T8. T8 - this corner was a bit intimidating for me; more than 90 degrees of turn and slightly starting back downhill on track out. My car was never loose in this corner so I think was the simply sight of the edge of track rushing up to greet me as I tracked out of T7. On the track out, track all the way right and then slightly left to set up for T9 entry. T9 - use the rumble strip/curb to straighten out the track between T8 and T10. Not really a late apex, but apex and stay to the right on track out for T10 entry. T10 - late apex with a track out to right. Now, you’re on the back straight; slight uphill run with the straight cresting around the beginning of the braking zone. This is the longest straight at about 1/2 mile. At the end of this straight (braking zone for T11) is one of the two places on track where I enjoyed the smell of my own brake pads. T11 - apex and stay far left to set up for T12. Slight uphill climb off the apex followed by a descent to T12. T12- this turn was a bear for me. Down hill, off-camber. Coming off the crest between T11 and T12, my car would get light. That, combined with less-than-stellar slicks and the off-camber turn made for an interesting ride. Following the apex, it’s a short, up hill track out with the crest coming about mid-braking zone for T13. On the track out, stay about mid track while working your way to the right to set up for T13. T13 - the braking zone is down hill followed by a downhill turn that is slightly beyond 90 degrees. Just as T12, T13 was my nemesis for every lap of every session. Similar to turn 3, this is a 13A and 13B corner with apexes for both A and B being about mid curb. After apexing off of 13B, stay far right to set up for T14. T14 - sweeping, up hill turn with the apex at the top followed by a blind track out. On the track out, going far left will assist with getting back on throttle quicker as you find the crest and transition far right for the the T15 entry. For me, T12 through T14 was the most technically challenging portion of the track. T15 - another A/B corner with slightly more than 90 degrees of initial turn. Following the B apex, drive far right during track out while coming back on throttle. This puts you back on the front straight where you’ll transition back to far left for T1. Places to stay.... ECR is located NW of Dallas, TX and somewhat between Gainesville and Decatur with Decatur being closer (15 minute drive from hotel to track). There are several hotel options in Decatur. We chose the Fairfield, a nice Marriott property that’s around three years old. Places to eat.... Leepers Creek BBQ - if you’re a fan of good BBQ, then you will need to add Leepers Creek BBQ to your bucket list. They’re brisket is a good gauge as to what brisket should be. Catfish O’Harlies - they have more than just catfish. I’ll be trying the chicken fried steak next visit. This is one of those places where you need to show up hungry. Villa Grande Ranch - it’s Tex Mex...and located right next door to Catfish O’Harlies in case you’re still hungry.
-
For a little more than a year, the family and I have been trying to work a track day into our busy lives with the objective being that of my now 17 year old son getting on track with me (ride along, not necessarily driving….yet). This past weekend, after several months of battling constantly changing schedules where the planets never aligned, another job change (thank you, COVID-19), a pandemic, and ongoing school activities, the family and I were able to sneak off to ECR for a last-minute weekend of fun on their revamped 2.75 mile track. Old track layout with new turns drawn in. New track layout. Thursday morning, we received news from a schoolcast that my son and daughter’s basketball games were being canceled for the weekend and rescheduled for a later date. I knew that Chin would be running at ECR Saturday and Sunday, and once we got the word about the game cancellations, I pretty much hit the ground running and began preparing for a track event that would have us pulling into ECR the following afternoon. All slicks were un-bagged and aired for the trip, my small, portable generator was run for a couple of hours on fresh gas to ensure dependability and the Stalker received a fresh oil change. By 9pm Thursday night, with all details worked out and the trailer loaded, we hit the road. Plans were to spend the night at my mother-in-law's house (two-hour drive) to shorten up the next day’s drive to ECR. With the trailer in tow, we arrived at ECR Friday a bit past noon along with one Stalker that was in need of another degree or so of negative camber along with some additional rear brake bias. However, we would run it just as it came off the trailer. For track duty, we brought along one splendid six-year old set of Avon bias-ply slicks and one slightly stickier (relative term) set of 4-year old Hoosier radials that were ‘used’ when I purchased them (yes, Croc, these are the same slicks I ran on at NJMP in 2018….it is what it is). Once trackside, I hooked up the generator to the trailer only to have the d$%#n thing give up and die immediately (not good for anything to sit and not get used for long periods of time). When we pulled the slicks off the tire rack, I discovered one of the Hoosiers had gone flat overnight. Found a fellow with a shop on site who repaired the Hoosier and had it ready the next morning (turns out both tire beads needed to be reseated to the rim). Saturday morning, with the tired Avon’s installed, my son and I hit the track for the 8am warmup session while my wife drove 22 miles to the nearest Harbor Freight for a new generator (she would drive to HF twice before the day was over). No passing during this session, but a brisk enough pace at times to figure out very quickly we were going to be severely handicapped in the turns with the old tires. When we returned to the paddock, my son thought it was cool that we were drifting at times through some of the corners….took this as an opportunity to further explain the challenges I was experiencing on track with a severe lack of proper grip. Back at the paddock, I stiffened up the dampening on the front shocks with the hopes of getting the front to push a bit in the turns thus making the car more predictable and manageable in the turns. 9am, first session of the day. Sans the 60-minute happy hour run at the end of the day (which we didn’t run), this would be our longest session; 40 minutes. On track, the car was a bit more predictable with the stiffened dampening. About midway through the session, the old Avon’s found a brief second wind and gave a few good laps. We even managed to overtake a few of the cars we had humbly pointed by earlier in the session. But the moment was short lived. The Avons, as quickly as they came to life, died a quick death and we finished the session as cautiously as we had started it. 11am, second session. Decided to give the Hoosier radials a try. Knowing the radials would want more camber, I softened up the front dampening to try and coax the front tires into behaving. For the first few laps, the car both pushed through some of the turns and over steered slightly. Once the Hoosiers warmed up, it became apparent they had a bit more grip than the Avons; not a ton more, but better. The push through the turns decreased to an almost unnoticeable level, but the radials didn’t like the lack of negative camber in a couple of the turns and let me know by screaming like a scared school girl. After a few laps, we found a C7 Z06 running a good pace and fell in behind him for the rest of the session. Following the second session, we decided the generator my wife purchased earlier that day was not the best choice for our needs. I don’t know how fast she drove, but she managed to return the generator, purchase another generator and make it back to the track in time for lunch and the parade....88 total miles of generator chasing for the day. 12:45pm parade laps. For me, this was the highlight of my day. My son and daughter took the Stalker out on track while my wife and I followed in the Tundra. On the second lap, coming out of turn two, my son’s foot slipped off the clutch during a gear change and the Stalker responded accordingly with a bit of oversteer. My son claimed it was an honest mistake. Personally, I think he’s following in my footsteps. My son and daughter on track together during the parade laps. 1:30pm, third session. This would be our last session of the day and for the weekend due to our needing to pack up and head out on Sunday. The track event had turned into a family and friend gathering with my wife’s mother, aunt and uncle having driven over to visit for the day. In addition, a buddy of mine came up from the Dallas area to hang out for a bit. This was our best, and quickest, session of the day. I was feeling good about the track layout (I had zero time to look at and study this venue prior to arrival), was running a fairly good line and was fairly comfortable driving the car to the limits with the old tires, even with my son in the car with me. Once the Hoosiers found some heat, we picked up the pace and found ourselves receiving point-bys from some of the cars that had been outpacing us earlier in the day. I don’t know what our fastest lap time was (no video, no data recorder) but sometime during this session, my wife’s aunt clocked us with her iPhone at 2:15. I believe with new tires, proper negative camber, perhaps a bit more rear brake bias and readjustment of my rear wind (sits too low and too far forward on the cage for my liking) there is a sub two-minute lap waiting for me at ECR. Perhaps in the near future. Sunday morning, my son and I decided to attend the novice drivers’ meeting. Felt it would be a good opportunity for him to tie together in his mind some of what had been going on the day before during our sessions. As many here know, I purchased a 99 NB Miata last year for the sole purpose of teaching both my kids to drive a stick. With that mission accomplished, my son has taken a strong interest in turning the Miata into a dedicated track day car. During the drivers’ meeting, I asked him if he would be interested in getting on track one last time in a Miata if I could arrange a ride; he was all in on that. Got him a ride with an instructor in an Ecotec-powered NB which I affectionately dubbed the ‘Snow Leopard’. I told him it would be an excellent opportunity to experience the differences between the Stalker (gradually feeding throttle out of the turn) and the Miata (power through the turn or stand on the throttle at the apex). He came off track in awe and smiling. Overall, an awesome time was had by all; always good to get away with family while doing something you're passionate about. As for me, driving the Stalker on old tires was an excellent experience. It showed me that, while not as fast or as quick, I could drive the car to the limits of my ability under less-than-ideal conditions and still enjoy the drive. I’m also glad to confirm that all bump steer experienced during previous track events was completely gone; Sorry, Croc, but no off-road excisions to report; managed to keep the car on track the entire day.
-
2020 Racing Montage in Brunton SuperStalker (3.8L Supercharged)
xcarguy replied to searya's topic in Seven Videos
Great time had by all. Write up coming later today. LS engine not dry slumped. Using a combination of parts from Improved Racing that show to no longer be available on their web site (baffled oil pan, crank scraper/windage tray combo) and a Canton Racing Accusump. This combo has worked well for me. -
Congrats on the pirchase!