
mrmustang
-
Posts
917 -
Joined
Content Type
Profiles
Forums
Store
Articles
Gallery
Events
Library
Everything posted by mrmustang
-
What year is your car, and is the BRG you are trying to match the original paint? Are you planning to paint the car yourself? If not, your local paint shop will be able to match the paint. If they are not equipped with the computer laser reader, their supplier of choice can get it from their manufacturer of choice. As for BRG, even the "HU" (Mazda) or "1753,8461,HDJ, HFB, HER, and 753 (Jaguar) color codes will each come back with multiple "alternate mixes" that will each require a spray out card and most likely additional tweaking of the mix (down to 1/10th of a gram per toner used for the mix itself) to perfectly match your cars exact color. Bill Retired bodyshop owner
-
I plan to upgrade from my standard 3 point to the Caterham 4 point I got from Rocky Mountain Caterham. Did this in my 2014 Caterham without any issues. No flapping in the wind, if they did, they make strap holders for this.
-
Welcome to convertibles anonymous, we like spending other peoples money. Bill
-
Ahem, I resemble that remark and respond with the following: You can never have too many convertibles Now I guess I have to sell one Bill

-
Fuel Filter on 2007 Caterham 7 SV with Ford Zetec SVT?
mrmustang replied to Taber10's topic in General Tech
To break out the quote of my post above: Fram G3727 and the ACDelco GF952 will both be a bolt in swap for your current fuel filter. Bill -
Here in South Carolina those could be fighting words
-
Headlight replacement/upgrade---IE: Holley Retrobright
mrmustang replied to mrmustang's topic in General Sevens Discussion
Lights are in, on first blush, they are 5-10 times brighter than the originals. The first picture is a comparison between the two. New LED light assembly on left, original on right Next is the low beams of both new lights installed Followed by the high beams also to show light pattern As for the original concern with the nut and bolt at the bottom, that was much to do about nothing, as the bolt does not go through the headlamp retaining ring like I initially thought. I kick myself for not wearing my glasses when I was removing the original, made more work for myself than I should have. Now I need to find a level area and wall so I can adjust them, if needed. Bill
-
Headlight replacement/upgrade---IE: Holley Retrobright
mrmustang replied to mrmustang's topic in General Sevens Discussion
I chased the ground wire back when I first saw how it was set up and found a secondary ground on the chassis already. Figured I'd duplicate what I saw, better to have too many grounds then not enough. The one I'll not be reinstalling is the extra ground wire for the daytime running light, which was missing it's bulb and clearly not being used. Hoping to have the new lights here tonight or tomorrow (says today by 7pm, I'm pessimistically optimistic), will fit in the housing to see if they will work, then go from there. Thanks again for your input and guidance Bill -
I'm only here for the pretty pictures
-
Headlight replacement/upgrade---IE: Holley Retrobright
mrmustang replied to mrmustang's topic in General Sevens Discussion
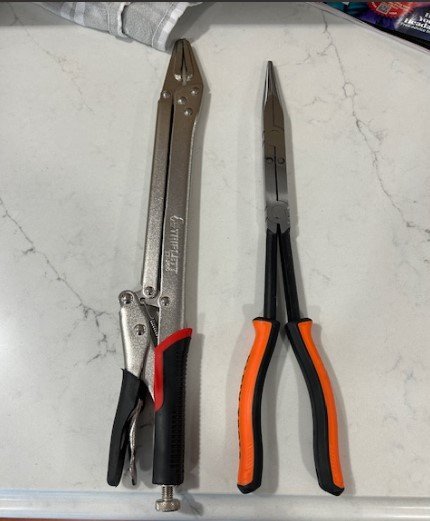
This is plan "B" if the above does not work the way I want it to both are 15" in length, but will require a third hand from SWMBO in order to make it work.
-
Headlight replacement/upgrade---IE: Holley Retrobright
mrmustang replied to mrmustang's topic in General Sevens Discussion
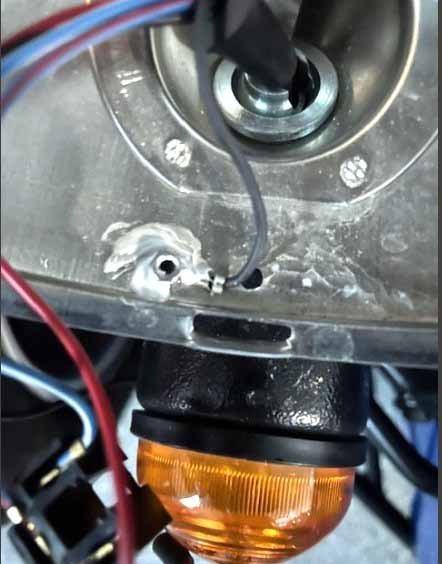
This is what I had in mind when I was talking about using an epoxy to hold in place the nut, star washer, and ground wire while I tighten the lower housing screw in place. In theory, the epoxy will hold the nut to the point that the star washer bites into the housing and the nut, then allowing the nut to be tightened to factory specifications. I'm going to give it a shot, worse comes to worse, I did order a 15" needle nose plier set off Amazon in case I need to hold the nut while tightening it down. Bill
-
Headlight replacement/upgrade---IE: Holley Retrobright
mrmustang replied to mrmustang's topic in General Sevens Discussion
I had a rivnut kit a few years ago (lost in the last move) not certain they make them small enough. Thought about epoxying the nut to the inside of the housing with a star washer underneath just so it would hold till I get the screw started. (see below) I like that idea, will have to see if I can find a small enough stainless steel rivet to install it properly. Might have to swing down to the local commercial Grainger-hardware supply and see if they stock anything similar to McMaster Carr in the AM to see if it will work. Thanks Bill PS: Headlamp assemblies due in some time Friday or Saturday, will jump on the install as soon as I can and post my results. -
Got the initial email, will figure out which of my two eligible cars I end up bringing. Bill
-
The door to the cobra does not open all the way, giving you 16.5" of usable space between the windshield/hinge area and the top of the door frame,, less than 12" at the bottom of the door opening, with the top on you have 24.5" of height, but then in a cobra, the seats are much higher in the passenger compartment making the same opening with the fixed larger diameter steering wheel, the dash being closer to the door opening (3") and flat floor makes for a difficult time to get in. Worse with the side windows in place. You basically go head first, can't put any weight on the door assembly as they are not that sturdy, then you stretch all the way across the transmission tunnel with one hand on the passenger seat, or in the case of the FIA rollbar, one hand on the rollbar, you then push back while twisting around and getting your feet and legs below the steering wheel, and your behind in the seat. This is the only way into a Cobra for me with the top up. Where the 7 you have a door that flips completely out of the way, and more headroom with the top on, allowing for ample room to swing in semi gracefully, or at least I can after kneeling on the drivers seat. The biggest difference is in the footbox area, as the Cobra is further into the engine compartment than the 7. Again two similar, yet different setups. Bill
-
The one above is an original, sold for $1.1M last year I believe. Mine is just a replica, used to be tracked, last two years I detuned it for the street.
-
Headlight replacement/upgrade---IE: Holley Retrobright
mrmustang replied to mrmustang's topic in General Sevens Discussion
Anyone have any ideas for a way to secure a nut to the inside of the housing for the lower securing bolt? Bill -
You guys think getting in and out of a Caterham 7 is a pain with the top on, try an AC Ace or Cobra Owning both (this is not my car pictured), I can tell you that the 7 is much, much easier to get in and out of with the top on vs the Cobra. One of the reasons why after 30 years of ownership, and 140,000+ miles combined, I can still count on both hands the times I had the top on. 85% of the time because SWMBO was with me in the sub freezing temps while still living in the northeast. Anyone want to see for themselves, as soon as the daily temps go up into the high 70's, I'll pull both tops out in the sun to warm up and I'll show you up close and in person. Bill
-
I'll start off with the fun stuff that I didn't really have fun with earlier this afternoon, took me 20 minutes to get the headlight ring and headlight off the drivers side (RH). Seems to me that the lower nut and bolt were put on after the fact as the nut was not attached to the housing. Allen headed top bolt came right off, bottom was a small phillips head with a star washer and nut. Thankfully, I was able to figure it out after just a few minutes, then was able to get the screw loose enough for me to be able to then use my fingers to grab and pull down while carefully turn an 1/8th at a time till it came apart. Taken off as the low beam was not working, saw that there is no bulb in the daylight running light either, but was also hoping to be able to polish out the inside of the lens as it was fogged, then realized that the inside is burnished/burned. Now I'm looking at replacements, again sans the DLR which is not required here in the US. Since I installed a set of the new Holley Retrobrite (LFRB155) on my 65 Sunbeam Tiger I'm wondering if it will work on the Caterham. Looking at the stock headlight assembly, I'm thinking it will, but wondering if anyone has already installed them on their car? Wiring is a direct fit. Only thing different is the flat lenses, since they fit the trim ring on the Tiger, this should not be an issue, but I'm wondering if the flat lens will look funny. Anyone care to respond with their experiences? Thanks in advance, Bill
-
Thanks for posting. Bill
-
Good looking 7 Can't wait to read more about it Bill
-
I blamed him first
-
Having yet to attach a computer to my Pectel ECU (if it's not broke, I'm not ready to touch it), I'm eagerly watching this thread Bill
-
I'll be curious to see what is left of the frame after an acid dip and wash to neutralize the corrosion both inside and out. Forget about brazing the melted welds, I'm actually more concerned how brittle the frame has become since the fire was hot enough to melt the aluminum body panels. I suspect the VIN, if not marked in the California DMV/MVS as salvage, might end up on a donor chassis for it's phoenix like rise from the ashes. Bill
-
It's missing a decent rollcage
-
I'm wondering what the stage "1" and stage "2" cams from Caterham are (or were for my US based Zetec) and whether they might be a place for you to start before you start to redesign a cam profile from scratch. Bill