-
Posts
3,087 -
Joined
-
Last visited
Content Type
Profiles
Forums
Store
Articles
Gallery
Events
Library
Everything posted by JohnCh
-
I was just questioning the degree of improvement. Better oil flow is a good thing, but it's not clear to me if this is fixing an actual problem with the Duratec (i.e. stock oil flow is insufficient at this rpm level) or just an improvement in the strictest sense that doesn't make a practical difference. -John
-
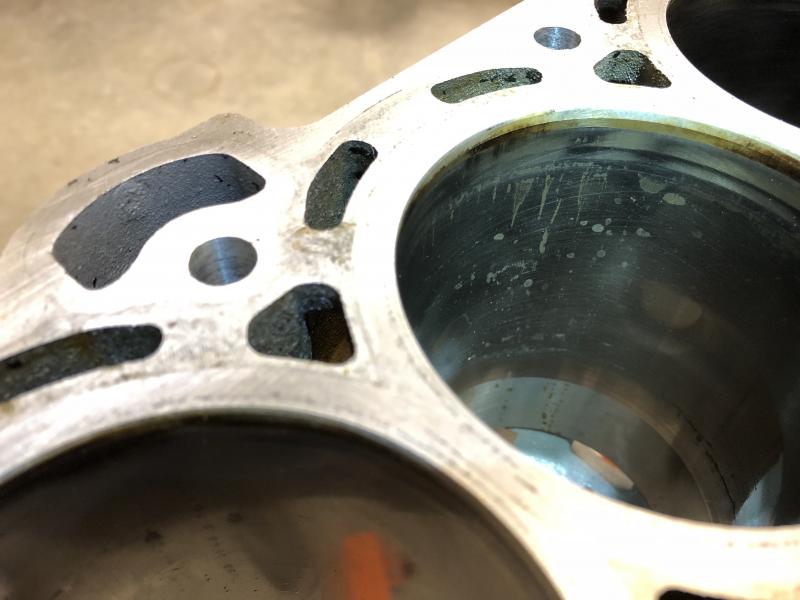
Speaking of the block, as per the Cosworth CSR260 assembly manual, various areas including the mains bearing journal edges, head oil drains, and mains oil feed drillings were de-burred. Here are some before and after photos. As you can see, the state of the head oil drains was pretty nasty. Whether this clean up actually makes a difference, I can't say, but it's easy to do with a small file and a Dremel. If a new block is required, then I get to do it again. BTW for some reason when I copy and paste the text for these posts from another app, the space between random sets of words disappears which doesn't help readability. Apologies if I missed any. I should find an admin and complain... Before: and after -John
-
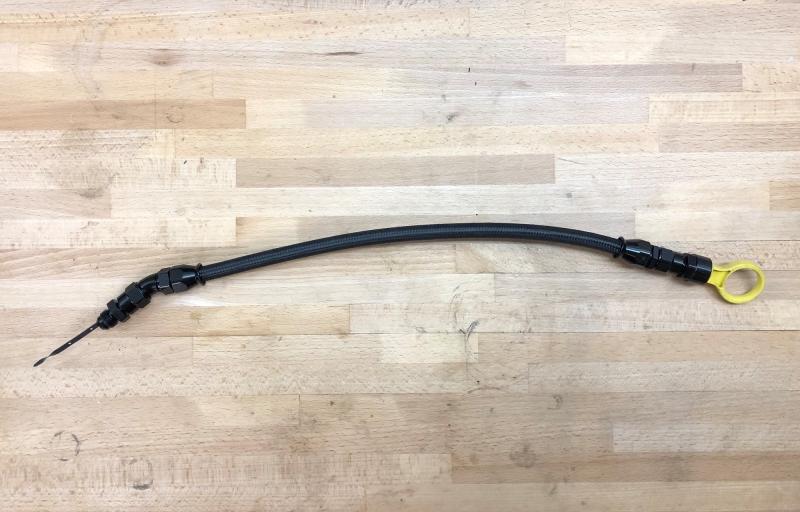
Part of the plan for this project is to correct a few things I never liked with the original engine installation. Back in late 2003 when the order was placed with Raceline for the Duratec conversion parts, I was only the second person to try their kit in a Westfield and the first one with a LHD car. This created unexpected problems like an alternator mount that placed the alternator directly inline with the steering column, a header that fouled the right front wheel on full lock, and engine mounts that were out by a couple of inches on my frame. The local shop that was hired to build my roll bar was also engaged to make a replacement header to Raceline's specs (kind of a long story that may get covered later) and craft new engine mounts based on the Raceline items. Unfortunately when they fabricated the engine mounts, I hadn't yet installed the dipstick tube. Not a big deal, right? Well, when trying to install that part a few weeks later, I discovered their design placed the left hand mount directly over the dipstick port in the Raceline sump. My workaround was a hand formed copper tube attached to a pressure fitting that threads into the port. Although it worked, it didn’t look very professional and always bothered me. The replacement uses a flexible 6AN PTFE hose with a 30 deg fitting that just clears the engine mount and can be easily snaked around the engine mount up through the DTHTBs and looks much better. Next on the annoyance punch list is rectifying the lack of a low oil pressure switch and finally installing the mechanical oil temperature sensor that has spent the last 15 years recording under bonnet temps. When designing the interior and dash, I went with Racetech mechanical gauges including a dual gauge for oil pressure and temp. What I didn’t realize until the installation is that the mechanical temperature bulb is big and the only mounting option with my setup was a modified sump plug. For some reason I always put off doing that mod until now. The plug was drilled and tapped to accept the 5/8-16 end of an adapter that mates with the Racetech's 3/8 BSP fitting. The pressure switch was another challenge. Heck, just attaching the 3AN fitting at the end of the hose that fed the pressure side of the gauge was a PITA back in the day. The Raceline oil filter plate uses an M12 port. At the time, I was unable to find an M12 to 3AN adapter, so something was cobbled together from 3 fittings that (going from memory) took it from M12 to 8AN, 8AN to 6AN, and finally 6AN to 3AN. Fast forward to today, when Pegasus comes to the rescue. First, they now offer an M12 to 3AN adapter. Second, they have a 3AN female to 3AN male coupler with a 1/4 NPT port on the side -- perfect for taking an oil pressure switch. Here are the old and new adapter setups: -John
-
Possibly, but from what I've seen replacement blocks are cheap, so probably not worth the effort. I'll know more once my slot opens up at the machine shop. BTW sorry for not taking your suggestion of titling this thread "Eye Candy" but I thought Croc might take that as an invitation to start posting selfies. -John
-
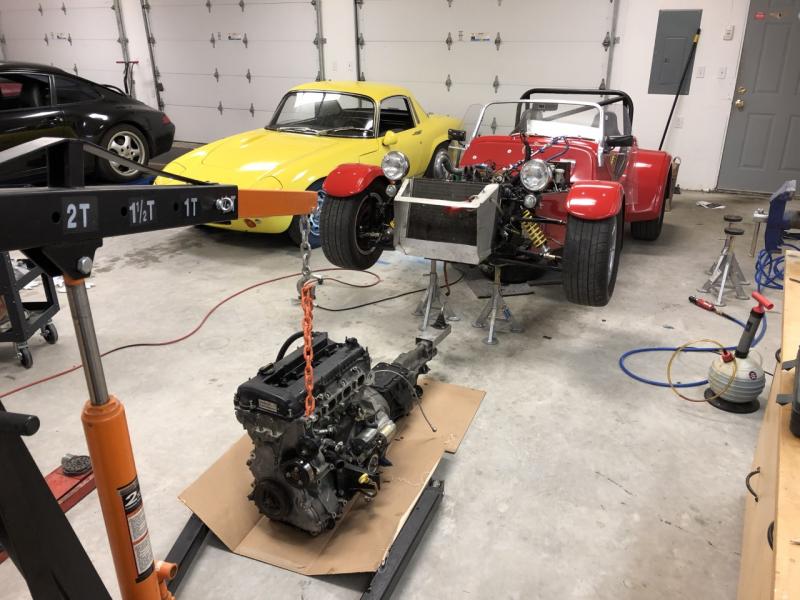
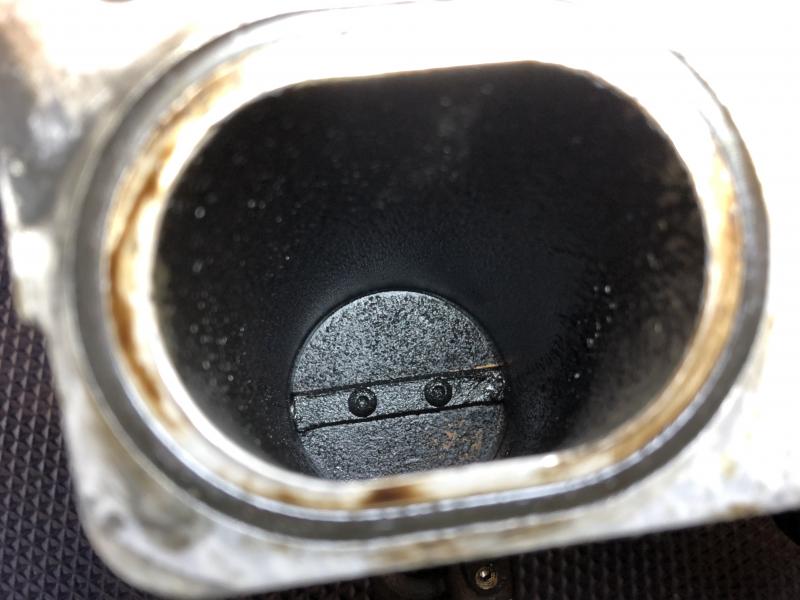
Although the engine came out without issue and initial disassembly went well, it did reveal the first potential problem with engine health. As covered in this thread, the throttle body for #1 and to a lesser degree #2 had a lot of carbon deposits and there was evidence of overfuelling or blowback of unburnt fuel. There is nothing obvious about the cause but the engine had intermittent misfire issues throughout the years that were eventually traced to a failing engine loom that was subsequently replaced 2years ago, so perhaps this is simply the result of that old problem? Things turned a bit south when it was time to remove the windage tray that forms part of the Raceline wetsump assembly. It attaches to the mains girdle via five M6 dome head screws held in place by red loctite. The problem is twofold; first,the all alloy girdle and block create a giant heat sink, so it takes a lot of heat on the screw head to get the loctite to the proper temperature to release. Second, the tops of those little dome headcap screws become soft when heat levels are too elevated and subsequently strip very easily. Although I was able to remove two of the five, I had to call in a mobile welder to attach 4mm hex sockets to each remaining screw to aide removal. To avoid this issue in the future, the screws for both windage trays are being replaced with Torx Plus dome head screws from McMaster Carr. The drive profile enables the application of a lot more torque before stripping than the hex drive head of the stock items. Or at least that's the working theory. With the windage tray out of the way, the crank, rods, and pistons could finally come out for inspection. Not all was as good as hoped. There is some burnishing on the middle crank main journal that is not visible on the mating bearing surfaces and does not go all the way around journal. Not sure what caused this or if it's a problem. Next, there is some odd staining on the bores of #1 and #2 that looks similar to water spots on glass. Closer examination also shows some damage to #1 in the form of small gash running horizontally about 2" down from the top that easily grabs a fingernail, but is difficult to photograph. The Duratec block can safely be over bored by 0.5mm, so I'm hoping that is more than enough to clean things up. If not, it's time for a new block. -John
-
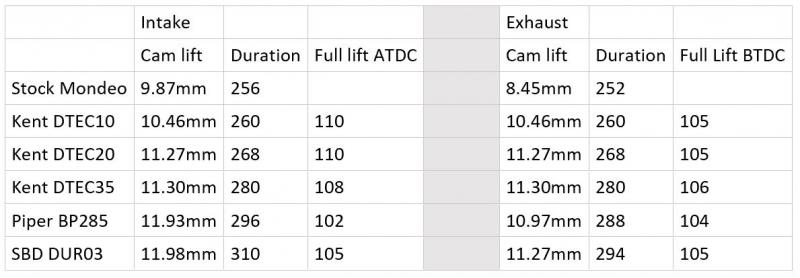
I'm very late starting a thread on my engine rebuild, so I'll begin with posts over the next couple of days to catch up everyone on the status. For background the oil pressure relief valve appears to have failed, taking with it the mechanical oil pressure gauge. The simple solution was to replace the gauge and the oil pump and quickly get back to the end of blatting season, but sadly I don't do simple. Instead, I've opted to do things the slow, pricey, hard way with a full rebuild and performance upgrade. My garage is now in chaos. The first 8,500 miles of my 2.0L Duratec's life were covered with stock internals, while the last 24,000 were with Kent DTEC10 cams, stiffer valve springs, some head work, and ARP Rod bolts. For the latest iteration, cams are changing to DTEC20s, pistons to Omega (11.7:1 vs. stock Mondeo 10.8:1), rods to forged items from K1, crank will be keyed and the bottom end fully balanced. The goal is 225-230hp, with limited torque loss from 2000-3000 rpm, similar torque from 3000-5000rpm, then a noticeable jump from there to 8000rpm with the ability to rev higher if needed. Cam selection was a struggle. After much internal deliberation, protracted mulling over specs, and multiple conversations with people of various expertise, I decided that for my specific goals, DTEC20s were the right choice. Interestingly, feedback from everyone but Kent was consistent: if you are going through the effort of changing pistons so you can add more lift than DTEC10, you should step up to cams that can support 250+ hp. Although Kent makes cams in that category (the DTEC35 are essentially the R500 cams and they have even more aggressive grinds available) they alone told me I wouldn’t be happy with the bottom end of anything with that much overlap. Also, and this is something that particularly resonated with me, the gap between the DTEC20 and DTEC 10 is much larger than the gap from stock Mondeos to DTEC10. Since I previously make that switch and was pleased with the performance increase, it seemed to me that the jump to DTEC20 would suffice. The chart shows how the various cams under consideration compare and includes the stock Mondeo cams and DTEC10s for baselines. -John
-
Save the Date - 2020 Annual Sevens HPDE Event at NJMP - October 17/18, 2020
JohnCh replied to Croc's topic in National Events
-
People say my typos are very, very, very huuuge. But not the Democrats. No. The Democrats would tell you they aren't any bigger than the teeny tiny little ones Pelosi makes. But their wrong. Believe me.
-
Doh!!! BUG, not big. Damn editing issue...
-
No, you can't. But that's not a big. it's a feature. :jester: -John
-
I'm also seeing the issue as well as some error messages when going Advanced and have alerted Mazda. Seems like we'll need to open a ticket with the hoster. -John
-

The Regular Summary of Classified Ads of Se7ens Found For Sale
JohnCh replied to Croc's topic in Cars For Sale
I kind of like Hayahams... -John -

Lowered floor, Prescription Goggles et al.
JohnCh replied to ottocycle's topic in General Sevens Discussion
I've always worn baseball hats with infinitely adjustable size adjusters (either velcro or sliding buckle) that allow me to tightly cinch down the hats. The bill stops the glare and seems to minimize draft behind my eyeglasses, which I attribute to blocking airflow out of the top and upper sides of the glasses. In ~40k miles of driving, I've yet to lose a hat, although I do have very large wind deflectors which reduce turbulence compared to running without side curtains. -John -
Thanks Skip. This photo from the thread made me laugh http://www.usa7s.net/vb/attachment.php?attachmentid=16071&stc=1 -John
-

The Regular Summary of Classified Ads of Se7ens Found For Sale
JohnCh replied to Croc's topic in Cars For Sale
Hard to be wound up by that statement given car companies have taken that approach long before the invention of the PC, let alone the founding of Microsoft I'm a firm believer in PPIs, particularly when buying remote, but finding a local shop that understands a se7en and can do that is difficult. I do encourage people looking to buy a se7en out of their area to post a request here for a local with knowledge to look it over. I'm sure if people have the spare time, they'd be happy to accommodate the request. -John -
Why wait for their plans and be reactionary? Be offensive (you're good at it :jester: ) and set a high bar to which they need to respond. -John
-
Small list for me: Refresh and upgrade the engine, repack the silencer, install AEM WBO2 (replacing old Innovate LC1 and will be incorporated into new engine loom), replace failing heat barrier on tub by header, aesthetic clean up under bonnet wiring, re-torque everything, check suspension wear items, and a few other things I don't yet realize are needed Who else has big plans? -John
-

The Regular Summary of Classified Ads of Se7ens Found For Sale
JohnCh replied to Croc's topic in Cars For Sale
Wow, he didn't keep that long! -John -
I carefully use a pick to remove/replace. Just run it between the underside of the rubber gasket and the top of the lens (or metal trim ring if you have that style) and pry down as you pull up on the lens. There is generally a lot more swearing and need for alcoholic beverages when attempting to reinstall it. -John
-
I'm using a slightly modified factory rail (AN fitting brazed onto inlet end) which includes a schrader valve. Simply screw on a test gauge when you want to check fuel pressure. Very easy to do and eliminates additional fittings and failure points. -John
-
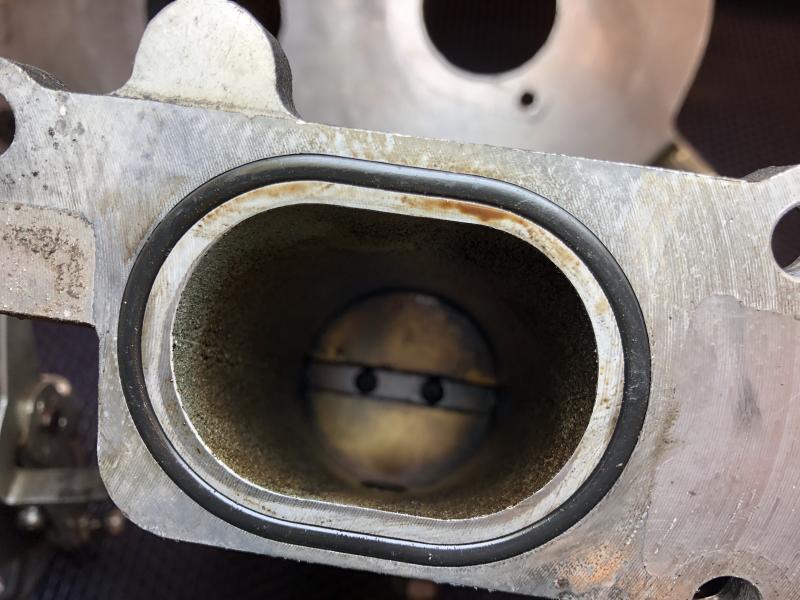
Good idea, but everything is clean on the other side of the throttle plates. #2 also has the problem, but not to the same degree. I suspect that it's a combination of TB wear and dirty/failing injectors. Although the engine only has about 33k miles, it's been in the car for 15 years. I plan to speak with Pete at Raceline in the morning to discuss. Thanks, John
-
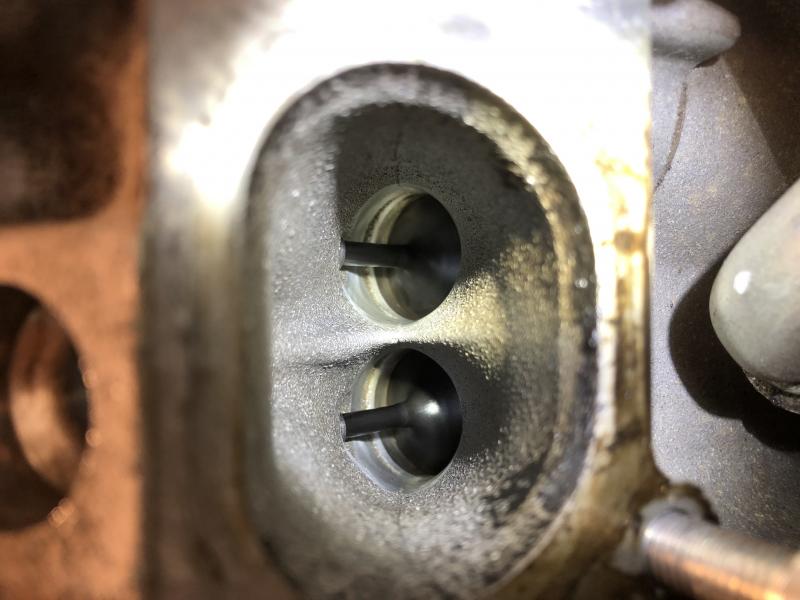
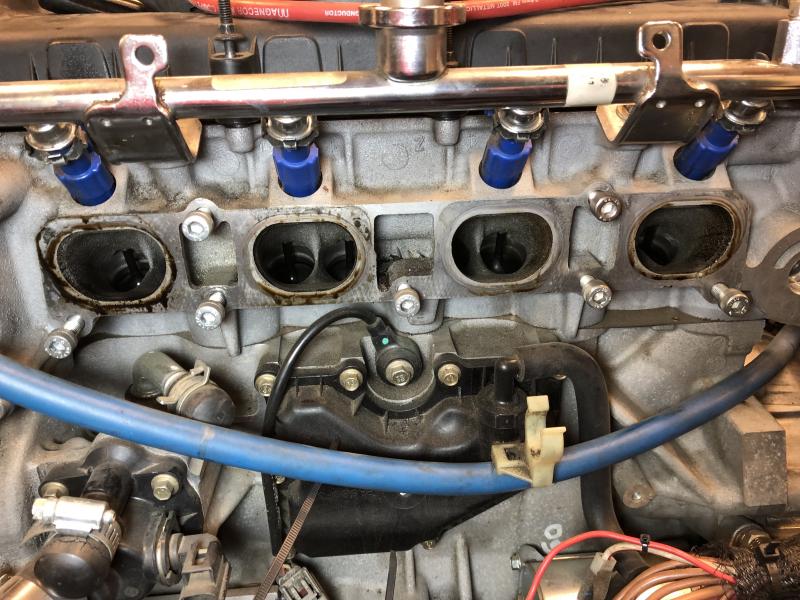
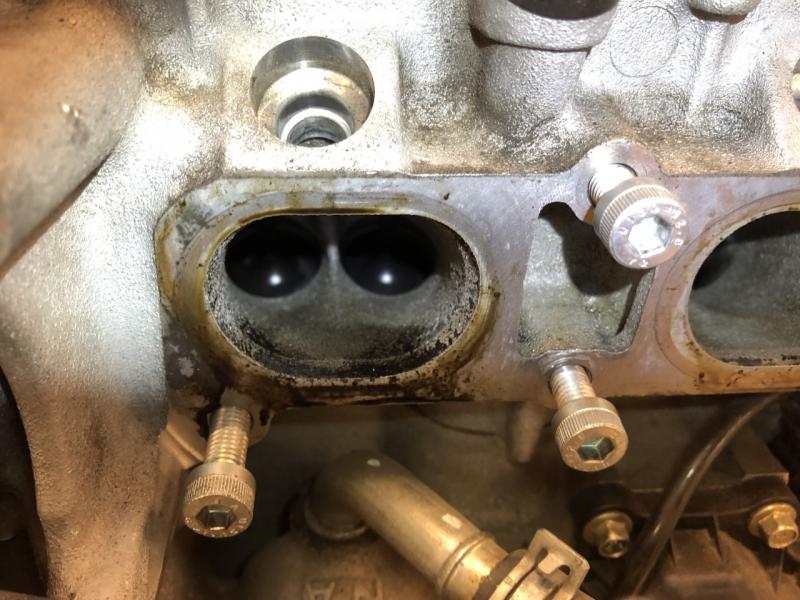
It's the same runner in the head and the TB. Here is better photo of that port and back of the valves. As you can see, it's very clean, just like the rest of the head. Although it looks like oil in the seal area, it's present to varying degrees on all of them, and it's a tacky consistency with a fuel odor. Given there is no way for oil to get there except through the valves or from a outside leak, my guess is it's a mixture of fuel and carbon giving it the color of oil. The Raceline/Jenvey DTHB are fed through a Pipercross sausage filter with nothing venting into that system. http://www.usa7s.net/vb/attachment.php?attachmentid=15884&stc=1 http://www.usa7s.net/vb/attachment.php?attachmentid=15885&stc=1 Thanks, John
-
Nope. I'm wondering if I'm getting some wear in the spindle assemble for that TB? I need to call Raceline next week about some related items, so I'll ask them if they've seen this before. As for the 2.5L, you have a PM and you now have me rethinking the head decision Thanks, John
-
The plot thickens. Yesterday afternoon I warmed up the car and redid the test. I set #1 to TDC then confirmed it was correct with a dial indicator. Leak down was 10%. Hmm... Did again, with the same result, then checked the other cylinders using the dial indicator to confirm TDC. Those numbers were all the same as the last test. I suppose something was stopping a valve in #1 from fully seating and a short drive knocked it out. With that done, I started prepping the engine for removal, ending up with this Saturday morning. And then I found another head scratcher. http://www.usa7s.net/vb/attachment.php?attachmentid=15857&stc=1 Removing the Raceline/Jenvey DTHTBs revealed another "what the?" moment. The rear set looked fine, with a bronze cast of dried fuel running from the back of the throttle plates to rear of the tract. The front TB, however, was filled with shiny black crud that looks like a combination of fuel and carbon. #1 is the worst, yet the ports and back of the valves are very clean. Any idea what would cause this? I'm not running breathers into the filtration system so it's not oil. Pics below show #1 and #4 TBs for comparison purposes, and #1 intake ports. Tough to photograph, but outside of the very front, the intake ports and back of the valves look very, very clean. http://www.usa7s.net/vb/attachment.php?attachmentid=15858&stc=1 http://www.usa7s.net/vb/attachment.php?attachmentid=15859&stc=1 http://www.usa7s.net/vb/attachment.php?attachmentid=15860&stc=1 Thanks, John
-

So, tell us a little about yourselves
JohnCh replied to slngsht's topic in General Sevens Discussion
Good to see a new member from the PNW! Agree with Bruce on your choice in cars and the request for photos -John


