MV8
-
Posts
2,297 -
Joined
Content Type
Profiles
Forums
Store
Articles
Gallery
Events
Library
Everything posted by MV8
-
The machinist can measure the cap you have or you can if you have a dial caliper. I expect it to be around M32.5-4.0. Apparently not a common size.
-
Obviously, drilled holes in a stat is a bypass. No stat would only slightly improve flow since the main restriction is the size of the holes in the head gasket, but traditionally, stats have been a common failure part that wasn't necessary, like vacuum advance. I don't think there is an internal bypass like on the mgb. If they aren't bypassing at all, that sets up hot spots throughout until the stat starts opening. A little flow spreads the heat for more even expansion and less chance of cracking. With no bypass, conservative running until warm can minimize eventual problems.
-
Why would they if there is no stat installed for warm up? Do you think a cable controlled heater valve completely blocks coolant flow? Bypasses have been used for more than 50 years. Sometimes they are internal and not obvious. Happy to share examples.
-
With either capped, there needs to be another path for some bypass flow around the closed stat during warm up. Drilling the stat or looping the htr circuit with a hose but restrict the flow with a drilled plug or a washer at one end. Similar to Westfield7, I'd block the pump port, drill the stat, fit an NPT to male AN manifold for an AN6 to 1/2 inch pushloc hose elbow (with a floating nut so the pipe can be indexed before tightening), then add a cushion clamp to the engine at the rear, but no bleeder line on the water neck with the higher tank feed. I'd fit a larger tank to mostly fill. If that proved not to be adequate, completely fill it for more coolant mass with an overflow bottle for expansion.
-
For those cutting tires but happy otherwise, the travel indicating rubber ring on the shaft (if equipped) can show if/how much foam taper bumper can be used to prevent damage without a sudden spring rate increase from bottoming on a standard solid rubber bump stop. The gradual rate increase can start an inch of shaft travel before the cutting begins, so as not to upset the car. That may be all the change you want to make. Many oems (typically struts) come with foam bump stops. They are usually included with the gaiter/dust boot kit.
-
 I like your hat! Standard calibration of cable driven speedometers is usually 1000rpm at 60mph/100kph and adjusted by the tooth count at the transmission end of the cable. I expect any similar specification vdo speedometer from that time would have the same worm drive trip indication gears but a different face numbering. I think all you need are the bronze gears. The gears you have could be cast in plaster or a flexible mold, a copy of the worn gear made from wax and then built up as a pattern for casting in red bronze or silicon bronze by a jewelry maker with a kiln and centrifugal casting spinner. The new gears could be tested off the car with a drill to turn the cable. Another option is to take the old gears to a machinist for a production run to cut from bronze rod. It is a lot more trouble and expense than installing a modern gps speedometer with no cable. If the throttle breaks again, consider using bicycle brake cable, teflon lined or sleeved that is cut to fit. Should be a 1.5mm cable with 5-6mm housing. Do you like hoshigaki? I've not made any yet. I usually just dehydrate. I grow many fruiting trees and vines including a few types of asian persimmons; Giombo, Tanenashi, Hachiya, Fuyu, Saijo, "coffee cake", and "Honan Red". All grafted to cold-hardy root stocks.
 -
Beautiful scenery! The gears that engage the worms are worn. I expect that soon it will not work at all. Worm gear engagement is adjustable with the screw on the side, over the slotted worm bracket in your picture. I'd look for a replacement of the same model, new or used, then swap the gears or simply note the replacement in the log book. It may not be allowed in Japan for anyone to calibrate the indicated mileage on a replacement speedometer. The clutch cable reliability could be improved by allowing the cable eye to rotate freely without the hardware being loose on the pedal. One way is to replace the socket head screw by modifying the pedal. A stepped diameter steel pin can be pressed into the pedal and spot welded on the side opposite the cable eye. A washer would be on each side of the eye followed by the cotter pin. Another way is to use a larger cable eye to fit a shoulder bolt or sleeve over the original socket head bolt and add washers. Another way would be custom made stud/pin with threads for the pedal side, a thin flange, with a unthreaded pin/shank on the cable side with a cotter pin hole. Disregard clutch cable mods. No need to modify the pedal at all. The nuts should be jambed together against the pedal and not tightened against the cable eye. It would be better to have an unthreaded shank bolt and washers on each side of the eye.
-
The camber setting from the upper ball joint will impact the toe, so you might want to check the instructions on that as well. If you would like to check your work before driving to an alignment shop, get a digital protractor and mason layout string with two small jack stands. I use one like this for alignments and driveshaft angle checking: https://www.ebay.com/itm/284864070161?hash=item425338c211:g:-J8AAOSwmS1h4EW5 The string comes in bright colors so it is easier to see. When cutting, tie a knot on each side of where the cut will be then melt the ends with a lighter to prevent unraveling. I assume they provide alignment specs for toe-in and negative camber. If not, I would set them at 1deg neg camber on the front with 1/8 (0.125") toe-in and leave the rear as-is. Let me know if you'd like a step by step how-to on the initial alignment.
-
If you want to adjust it, you can rotate the silver link without removing the tierod end from the spindle boss by loosening the nut I mentioned before.
-
The yellow ring on the boot is not in a groove on the tierod pin. The boot will slide away from the boss so you can get a lip to pull against but there is no need to remove it. Don't worry about the alignment now. Part of that process will correct anything you've done.
-
Pull back the black sleeve on the silver link toward the rack to expose the jamb nut and flats on the tie rod body. A wrench is placed on each to loosen the nut to free the silver link to rotate freely on the inner tie rod joint that is inside the gaiter on the rack. For separating a tie rod taper from a steering arm, a tool is used to apply a reasonable amount of force. If it is still stuck, with the tool still applying force, the steering arm boss is struck with a hammer a couple times. One of the tools in this kit will fit but there is no need for adjusting toe: https://www.ebay.com/itm/403709361501?epid=19012854471&hash=item5dfef3fd5d:g:Zq4AAOSw5XViov2P&amdata=enc%3AAQAHAAAAwDlIOqPEKhY%2FOtnU4M%2BY4rlVi%2B070Cz4YtSja1pJOJ7LlQ9jXQVwZgpwW01UHGcXBXY7miNEiDX9XrCj5%2F1FkPRpYWewAAXkqo4JzlacnfM6ncv5CTJ5BbbTlvW%2Bt0j6tV%2BUR7b%2B8vcrn6wMvXuaowc6UaYPLO3bEjjvhwIkSE%2F6o60phA1izOL1FyGFBDvfaOu1AzVhjO1jrZ1Tv3%2Fnb4%2Fmx63rc6nV%2FV8NbR2mt72n6V46f7D9q7T7KsiTiDKv%2Bg%3D%3D%7Ctkp%3ABlBMULz7jJTGYA
-
The Regular Summary of Classified Ads of Se7ens Found For Sale
MV8 replied to Croc's topic in Cars For Sale
No problem at all; just conversation. -
The Regular Summary of Classified Ads of Se7ens Found For Sale
MV8 replied to Croc's topic in Cars For Sale
Nothing to be sad about. My point is a person listed as having won several auctions may not have bought anything. You seem to be suggesting that I think it would be ok not to follow through. Nothing could be further from the truth. I like the car, but I don't know how much running around can be done. It may be problem passing inspection for registration when a new screen is not available. An out of State sale usually requires inspection. When I lived on Whidbey Island, the police were sticklers about very minor things, imho. -
Hydraulic clutch set up for Crossflow w/ Rocket box Seven
MV8 replied to Vinman1's topic in General Tech
https://onemoreford.co.uk/product/clutch-fork-boot/ May fit: https://www.ebay.co.uk/itm/Genuine-Ford-Gearbox-Clutch-Boot-6180410-/272380082578 Road trip to Turkey? https://asfordparts.com/ford-sierra/153-ford-bellhousing-rubber-boot-clutch-arm.html A bag of crisps, and he's off! -
Hydraulic clutch set up for Crossflow w/ Rocket box Seven
MV8 replied to Vinman1's topic in General Tech
It's nice to have but not absolutely necessary. -
The Regular Summary of Classified Ads of Se7ens Found For Sale
MV8 replied to Croc's topic in Cars For Sale
That's a bit high for a fixer upper with a cracked, unobtainium windshield, left out in the sunny WA weather for a while. My understanding is the winning of the auction only provides a direct introduction to the seller, and may not result in a sale, with no penalty for winning auctions but not buying. They get paid anyway. Looks like he had instant "buyer" remorse. -
I've used it before and it helps as a band aid, but I'd much rather use green 50/50 with water and make other changes to improve cooling if needed.
-
Greg, when you say #2 and #4, I assume you mean ecu pins 15 and 35 for a 1342 firing order. I'll assume your test was idling and same reference clip connections, cmos and pulse settings for all tests. All the coil triggers should flash green at the same rate with the same brightness. A higher resistance would be dimmer but same rate. A higher rate may be brighter or dimmer depending on the probe circuit design. Check the specs for your specific probe. I'm not sure I would conclude anything from the test results with the logic probe. Since you probably don't have the extender I was talking about before, you could also remove a good coil and plug, ground the plug body with a jumper cable, connect the coil to #2 connector and crank to observe. Connect to a different one to compare. If it still doesn't work, I'd try an ecu swap.
-
ACK! Long life coolant strikes again!
-
I reread your posts in case I missed something. My understanding is: You've tested the coil in a different position to fire a different plug. You've tested the wire between the ecu and the coil connector and found no issue. But: You have not actually tested the ecu output, plug, or coil connection. If this is the case, before replacing the ECU or changing programming, I suggest: Using a test probe with an led or incandescent handle, put the grounding clip on the battery positive and back probe the ecu control grounding signal at the coil connector while running. Do not test the ecu output without the coil connected. You may need a paper clip to reach the wire side of the connector. If it flashes, continue. Wiggle the wire back and forth. Does it continue to flash regularly? Continue. Replace or swap the plug with another position to see if the problem follows.
-
Looks like an H&S Seven. Porsche 914 seats. Pinto/ mustang II suspension. Probably $5-10k in pieces.
-
Allow me to clarify. I'd try moving the wiring around at the connector with it idling and listen if it tries to pickup (intermittent at the pin). Generally, ECU failures isolated to one cylinder are not unheard of.
-
A larger gap is better if the coil is up to the task. Under boost, gaps may be reduced to have as reliable a spark as NA with the same ignition system.
-
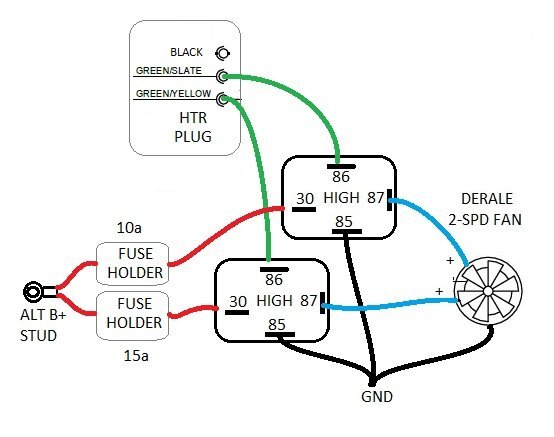
Thanks for the pic. The heater circuit cannot handle the amps to wire it per the diagram for both speeds. You need another relay in order to use the heater control for both speeds. I would have put the relay(s) near the fan for less wire to run. If you have no existing hole for another switch and would like to return control of the heater blower, I'm sure a removable mounting tab could be added under the dash panel yet over the tunnel for a hidden switch that you can't kick or hit with your knee, such as a 3-position toggle.
-
ATO 12ga fuse holders: https://www.ebay.com/itm/222701017687?hash=item33da03da57:g:RrwAAOSwax5Yucq~&amdata=enc%3AAQAHAAAA4HXq938zEWacFxxo%2BoXAro%2BVA92qXKpfmq%2BMHg568oPD808QBGZlpT%2FnLV8kKq%2BTj02JqWmoA7JWTYXZezWN8Y%2B1vROmudjCOayXoC2e%2BXCWZTX00vpOoH5u4TNFMOMBtKBwNGE2TvYLCz0hvGAOovTpsEyy1VQltgJYQyzDyighuLmw2T0k870DiB1%2BY1YthQ104cy1rFt2zFa05rxJUka0dbr9LzP8hYba%2BMQEqTLim5b9RQaRja019dAqhw3bbWDP9F%2B4OXk3euktOiZQbfWT6OxX83L9rPHM%2BpJU2zNI%7Ctkp%3ABk9SR4imsYvEYA Relays with standard sockets, wire, and spares for $11. (Ignore their instructions. Colors versus pin # are wrong): https://www.ebay.com/itm/193476931588?_trkparms=amclksrc%3DITM%26aid%3D1110006%26algo%3DHOMESPLICE.SIM%26ao%3D1%26asc%3D240677%26meid%3D401c0c74c78b44819aa64889a88fa2bc%26pid%3D101195%26rk%3D2%26rkt%3D12%26sd%3D181830593598%26itm%3D193476931588%26pmt%3D1%26noa%3D0%26pg%3D2047675%26algv%3DSimplAMLv9PairwiseWebMskuAspectsV202110NoVariantSeedKnnRecallV1BERT&_trksid=p2047675.c101195.m1851&amdata=cksum%3A193476931588401c0c74c78b44819aa64889a88fa2bc%7Cenc%3AAQAHAAABMEro4ql1SUJ1li87bKftud%252BHNR6f%252BZqZvMWaqvYIq1S%252FWkIBqj9FQDQRu6mAcNzuioXWUR932%252F68tDooavd6O6RvCCK3TeOHWkQHDWVcom10WbzComl5EbRzgV9CqOJMQUuOa5b%252FYT%252F%252Bhj2k145OKDcRDlZcKKZnUOytXBh5Dx3L05aXN6TjgNFcLL4bI0HIubDN7bnbShjZj9ZOJN7mmlH%252BOlDpDw8B%252FSGhZfVKnmZzh2KTv6NBv15S7rILihl08Wij1WPEZeVXuQK5Eq%252BhRzb0Rmlbzi7ae2YoaIu8%252FXUVPWrKHsMEVdgGe0fHpw2OtSLIdN4OVgQGyNQjCC8tjRRwtin4HIqMTRDOhZlJaFJ81aEcM7dlEPP0sV5alacEYGP4uYn%252F4%252FfOjrBOPXefmuc%253D%7Campid%3APL_CLK%7Cclp%3A2047675&epid=11051074327 Heat shrink assortment. Just need a smoking lighter's heat to shrink it: https://www.ebay.com/itm/384790486322?epid=27053026603&hash=item59974cdd32:g:kTYAAOSwTcNiN5SG&amdata=enc%3AAQAHAAAA4LWZf6or4A3ErQXDZXoFvUxEBUV%2FA9us3vMqKtvclrScNrlGL5dhr2jrFVQyooWrnmp3q0PpPWYeAG0Ci0SAVYycZ%2F%2Bt5mqByIJpJwvaAFlscnvnLtZwkjPuGSvdXF1NqlDUbGCZGf4Vn9fxy6T6fm0d9PCDZH4KTIQo821GuE%2BAeMXoh8C%2Fr92rFoSiPQjEFEWVkS7VVV3fKZ2k%2BDG8a25VOHyZ7scxY1K3V9r5mxa2QbHu1AjJjs6lFnaUaQLmeCVRe8rnR4aQXJM5Xp82KQBRq6PWiY3I5RcAMB9L2Bdb%7Ctkp%3ABk9SR7CZwZDEYA