All Activity
- Today
-
If someone in the Bay Area (Oakland, CA) wants to compare one of these gizmos to an alignment rack I’d be willing to do it. I’m curious to know if it’s accurate. Andy
-
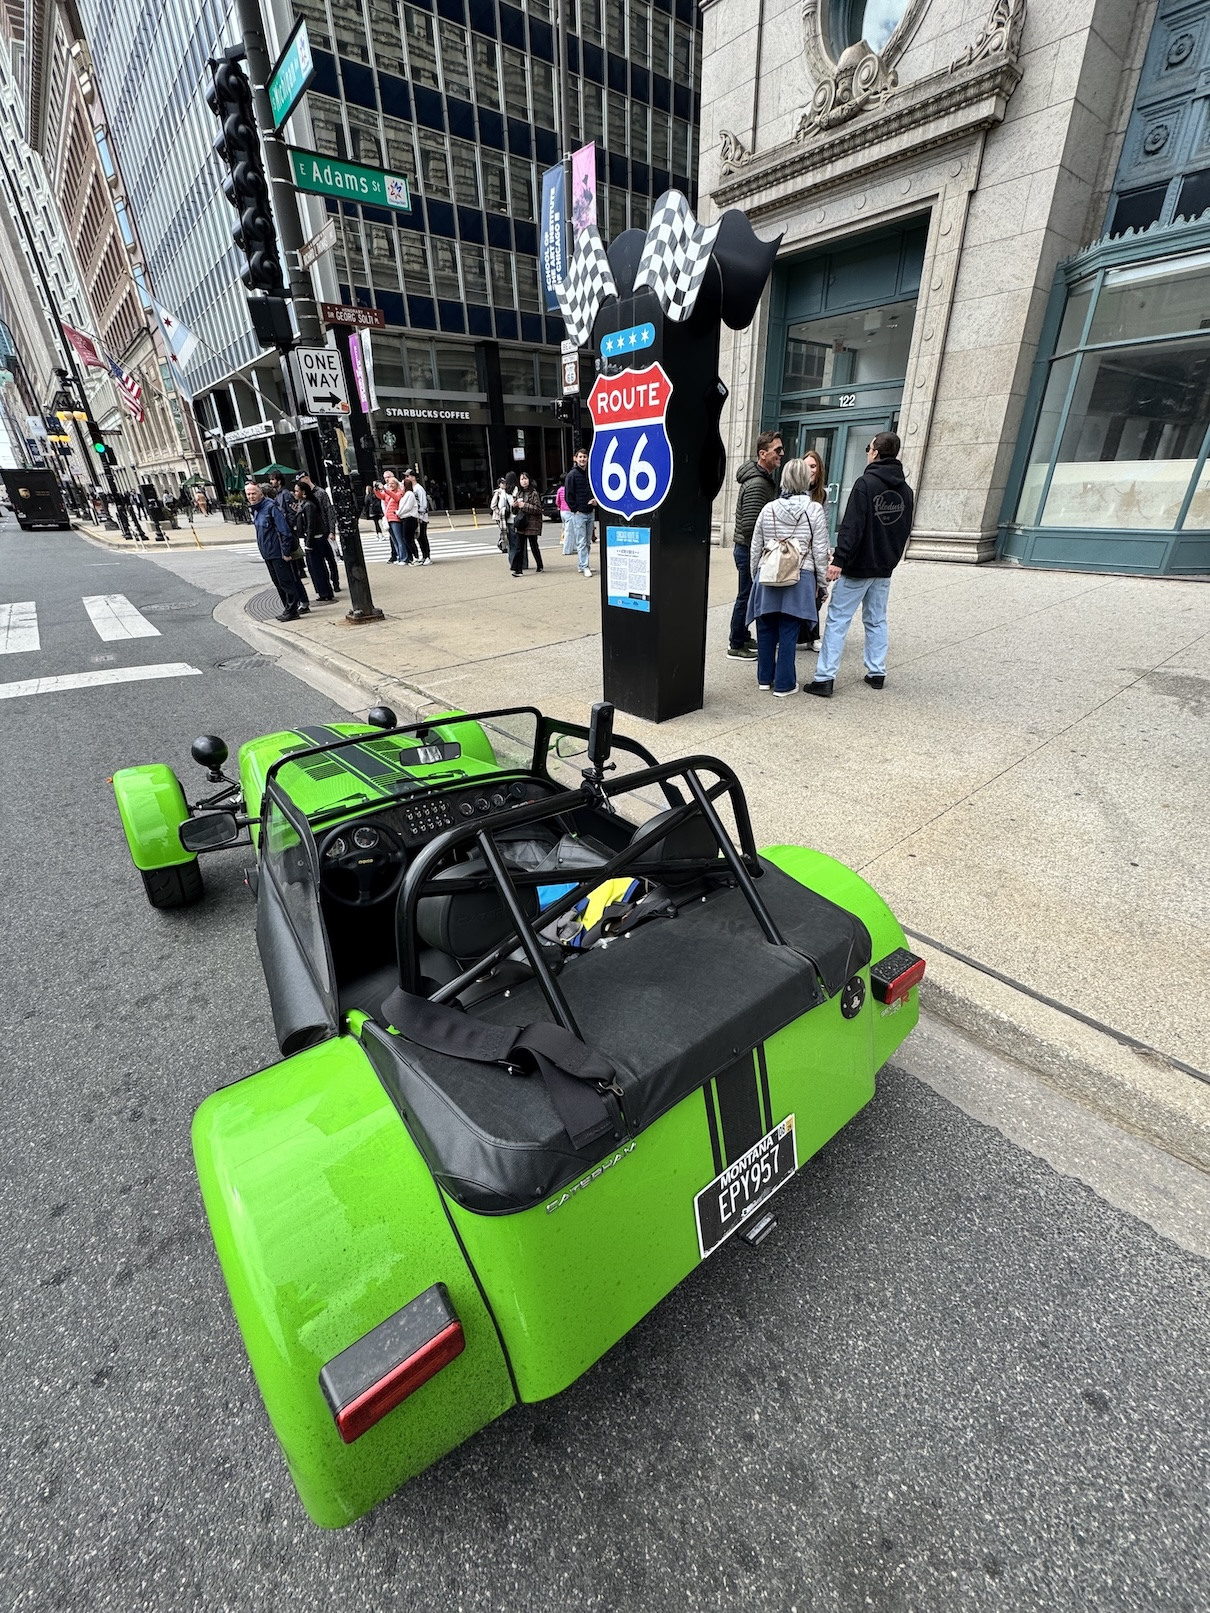
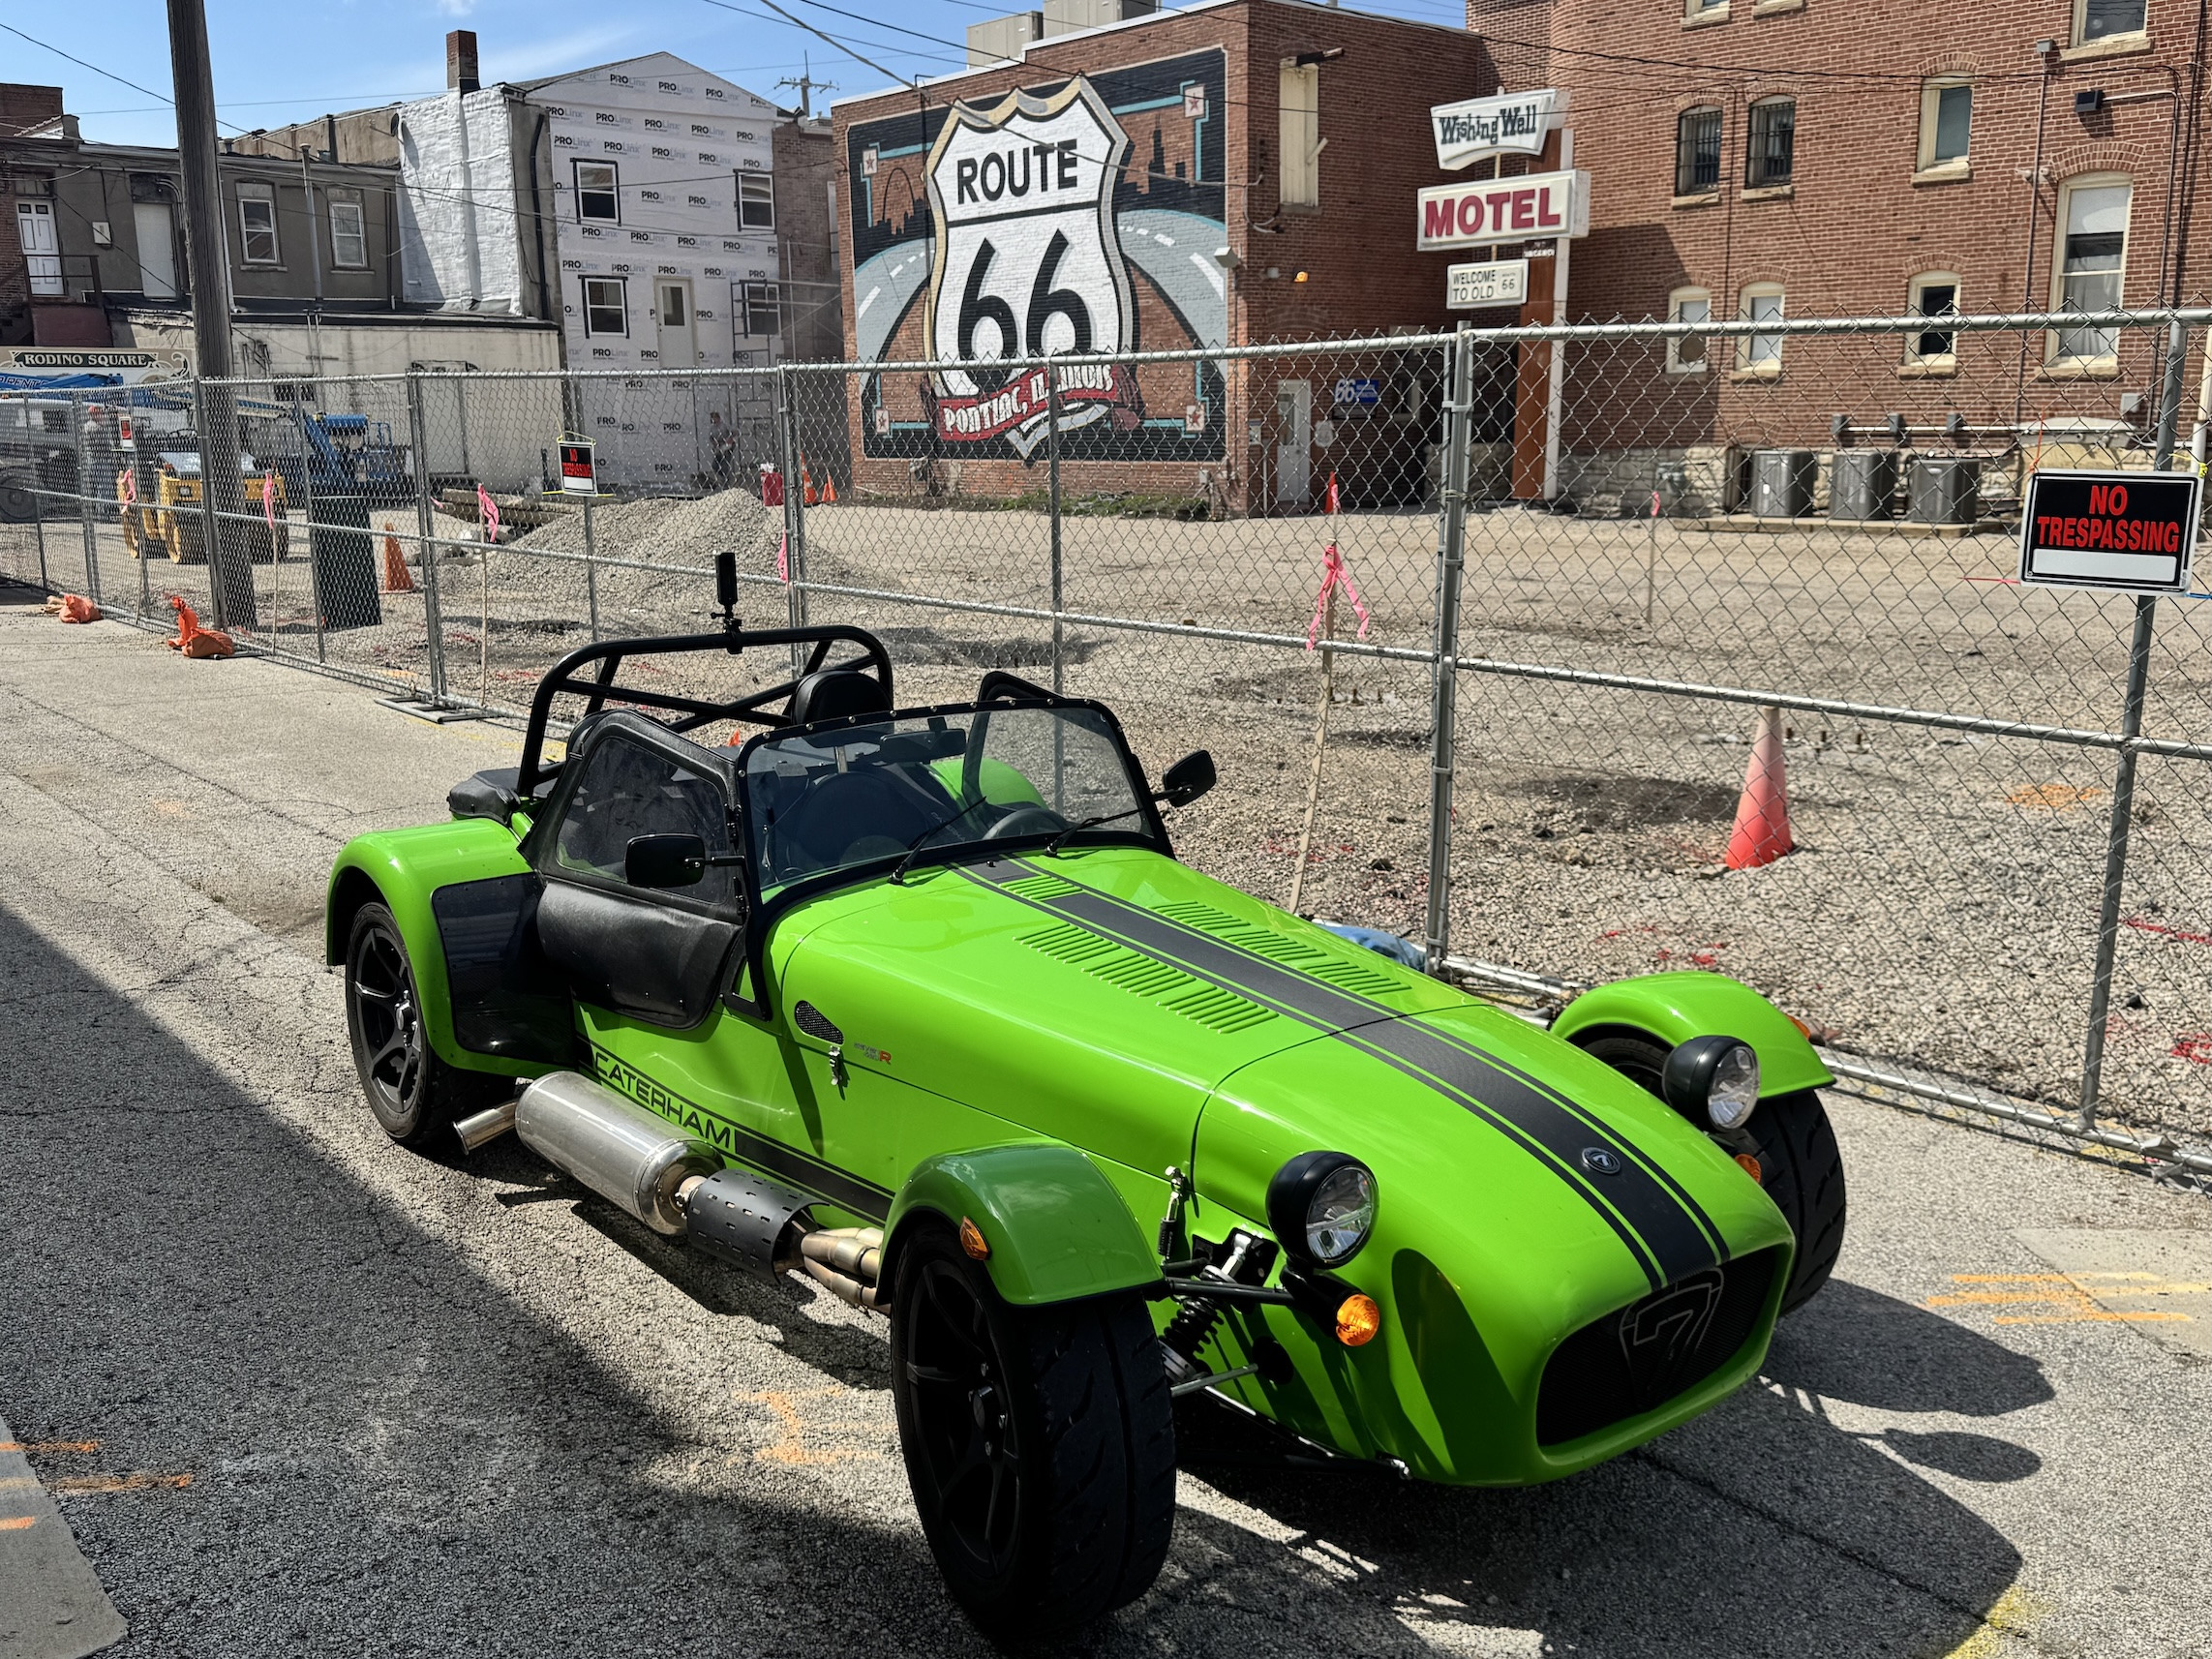
Hi All, I acquired a 420R late summer last year and am now relocating from Boston to LA. I decided to do a route 66 road trip with my car (Boston to Chicago, then route 66 to LA). I've just made it to St Louis so one state down (+ MA, PA, OH and NY getting to Chicago). Couple of questions: Anyone done this before and have any recommendations on places to stop and visit? I'll generally planning 24 hours ahead and finding a hotel towards the end of the day. Its worked out pretty well so far! :-) Any thoughts on traveling through the "hot states"? Particularly New Mexico and Arizona. I'm not sure how sparse those sections will be but obviously I'll pack extra water, top up gas more frequently and keep close eye on engine temps. Any other suggestions/prep anyone recommends? While doing this as a once in a life time trip, I'm also raising money for charity at the same time. On the off chance, anyone is interesting in sponsoring, my donation page is https://charity.pledgeit.org/road2resolve Thanks

-
- 1
-

-
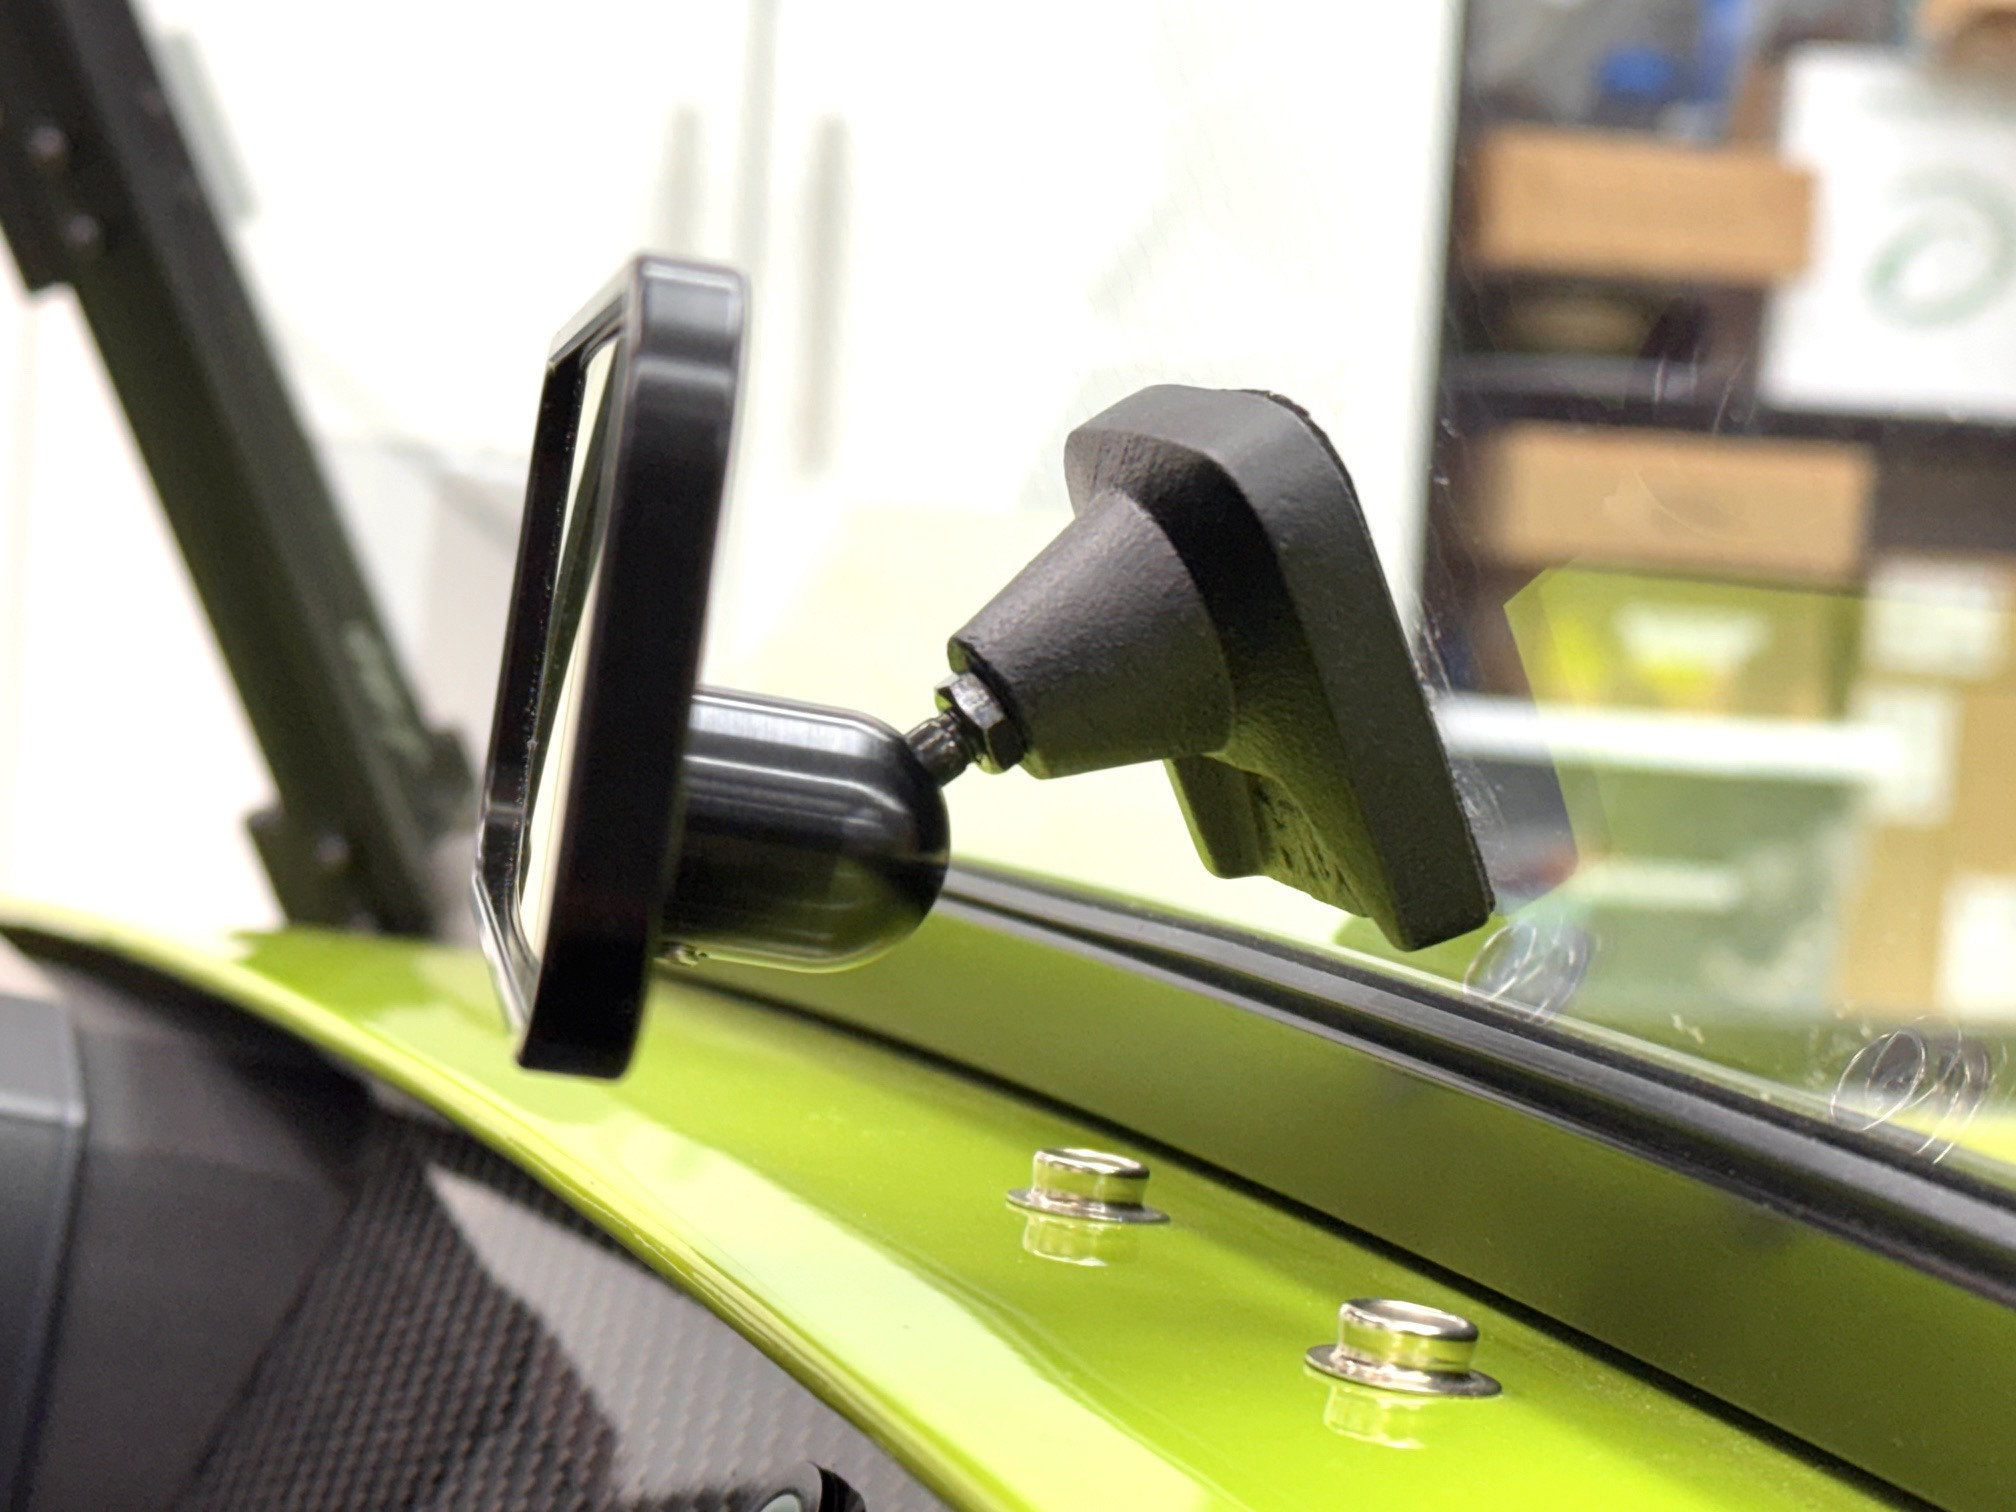
Got ‘er done! Studied it a bit and jumped in. A somewhat delicate modification of the mirror body and part of the mount for the ball joint enabled enough angle to mount the nice mirror in a usable way. Being a retired Dentist helped, a straight handpiece and what I call a flame shaped acrylic bur worked great on the carbon. A straight 557 fissure bur cleaned up the delicate part right up to the ball joint. 2.5 illuminated magnification eyewear quite handy. Not driven it yet, just got in a mood and fixed it.
-
FWIW I'll give my initial review of the Gyraline G1, the little brother to the G2 ($200 plastic unit readable to nearest 0.1 degree vs $600 aluminum unit? readable to nearest 0.01 degree), with software on your i-phone, as discussed by Austin David. Gyraline has several on-line Youtube videos which have been very helpful. The biggest thing I've found is I can measure and tweak the suspension as many times as I want very quickly w/o having to schedule / visit an alignment shop and depend on their technicians. This is very handy when rebuilding / refreshing or tweaking your suspension etc. etc. I've had the unit for several months and used it to dial in the suspension on my 2006 Lotus Exige after a complete overhaul / rebuild front and rear w/ new: Delrin bushings, tie rod ends, ball joints, Penske DA shocks, wheel bearings, powder coated a-arms, etc. i.e. 6-months plus effort. I first used the rotors as the reference for the G1 and then followed up w/ the wheels as the reference. Consistency in measurement technique provides incredible repeatability which followed by road testing and the occasional "string" check even for fairly minor adjustments gave me a lot of confidence in the G1. Of course, it helps that everything on the suspension (and tires) is new so the car has a completely different feel (far more precise and responsive). Toe (individual relative to car CL and total front and back) and camber are easily dialed in as well rapid checking for bump steer. After getting the Exige to 90% of where I want, still working on bump steer w/ limited options for adjustment on the Lotus, I moved to my 2009 Caterham S3. I upgraded to Penske DA shocks and revised spring rates, checked all suspension bushings, rod ends, ball joints etc. As a precursor to replacement of all bushings (Powerflex), rod ends, tie rod ends and ball joints (using Jack Webb's (UK) incredible Caterham suspension bits for improved camber and bump steer) I checked, adjusted / tweaked the alignment w/ the G1. Again, incredible how fast I can measure and adjust everything, and feel immediate results on the road. I'll give further update(s) as I get into the S3 suspension overhaul / rebuild but the $200 spent on the G1 has been well worth it for me. Of course, as always "your results may vary". Cheers! Steve
-
I picked up the G1 when they had a sale, but haven’t tried it yet. Hopi g it gets me in the ballpark and then I can compare to a real one.
- Yesterday
-
Yeah, that's what I'm thinking; I've got an NC getting suspension now, if I can confirm it's "about right" then it'll save me $150 and half a day. I was expecting my dedeon rear end to be pretty consistent. Maybe I should check my neighbor's live axle charger and see if it has any "toe".
-
I think there's case use for somebody like me who's never done an alignment on the 7 and would at least like the ballpark values dialed in If it gets close enough and can do a number of cars in my fleet I think it would pay for itself with just a few uses
-
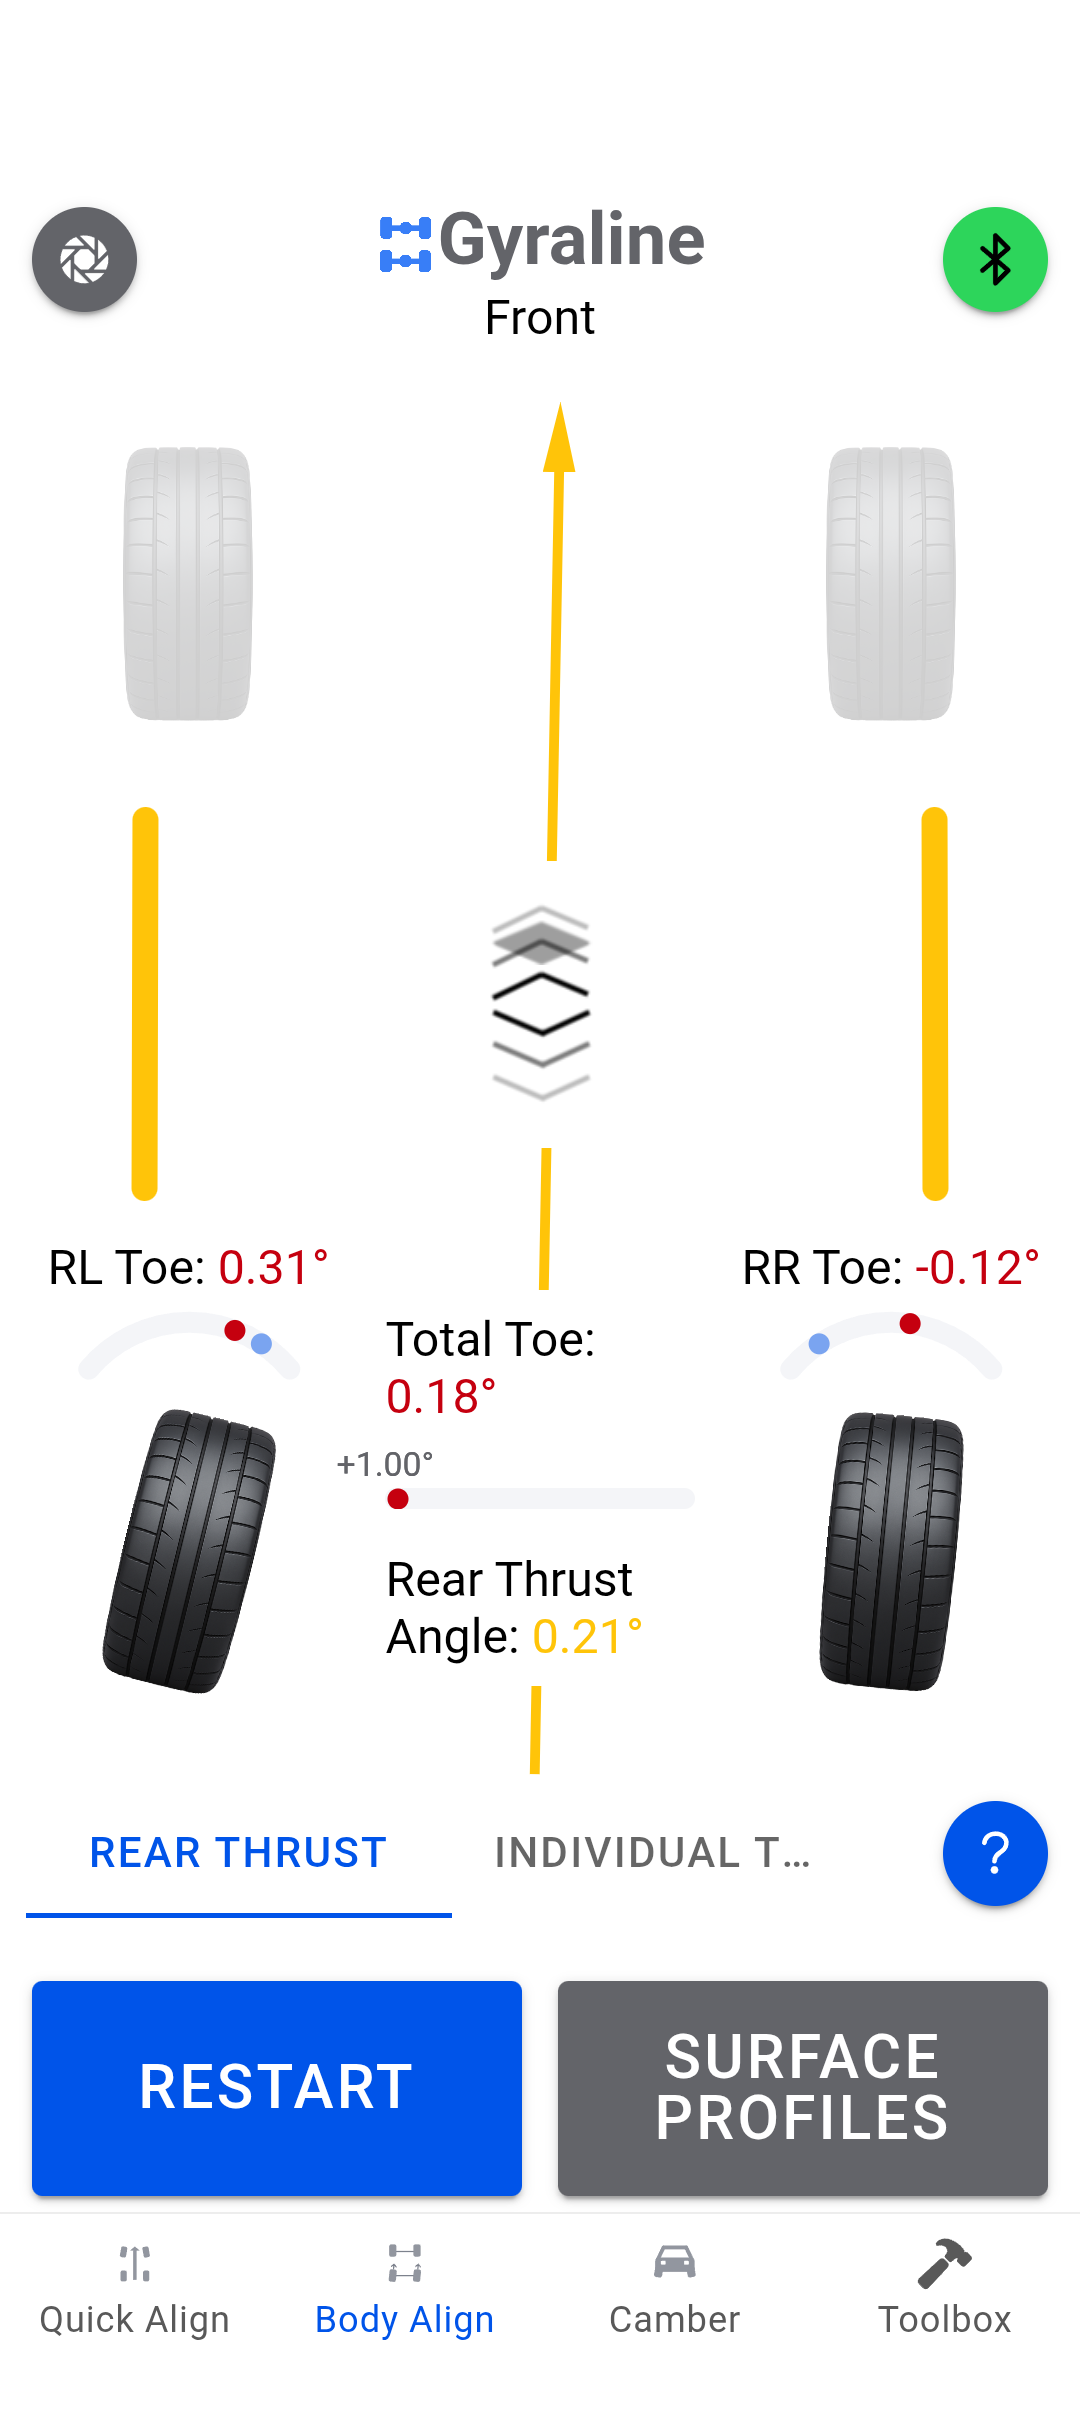
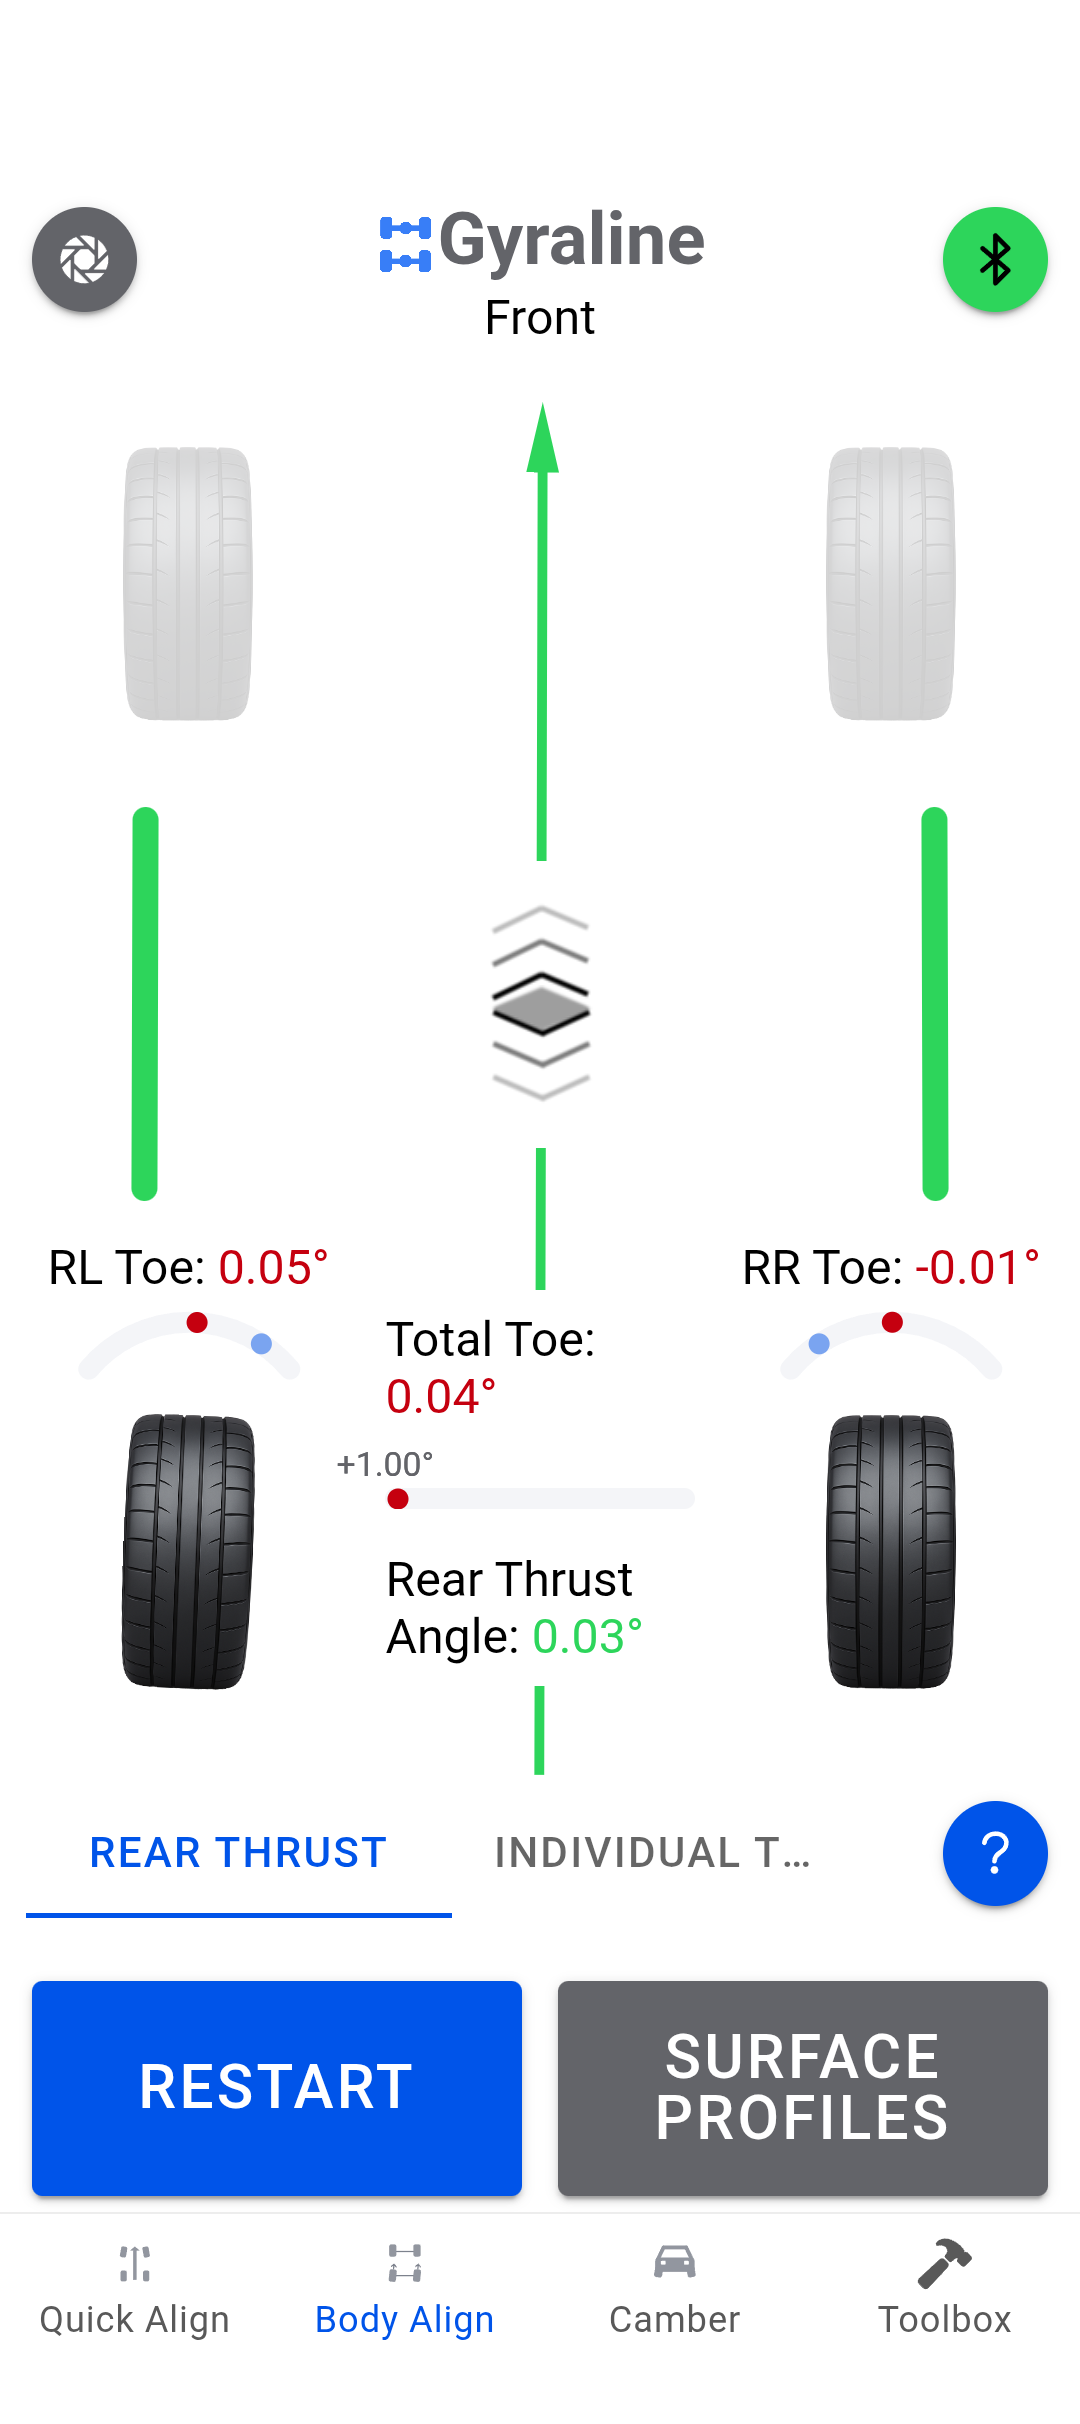
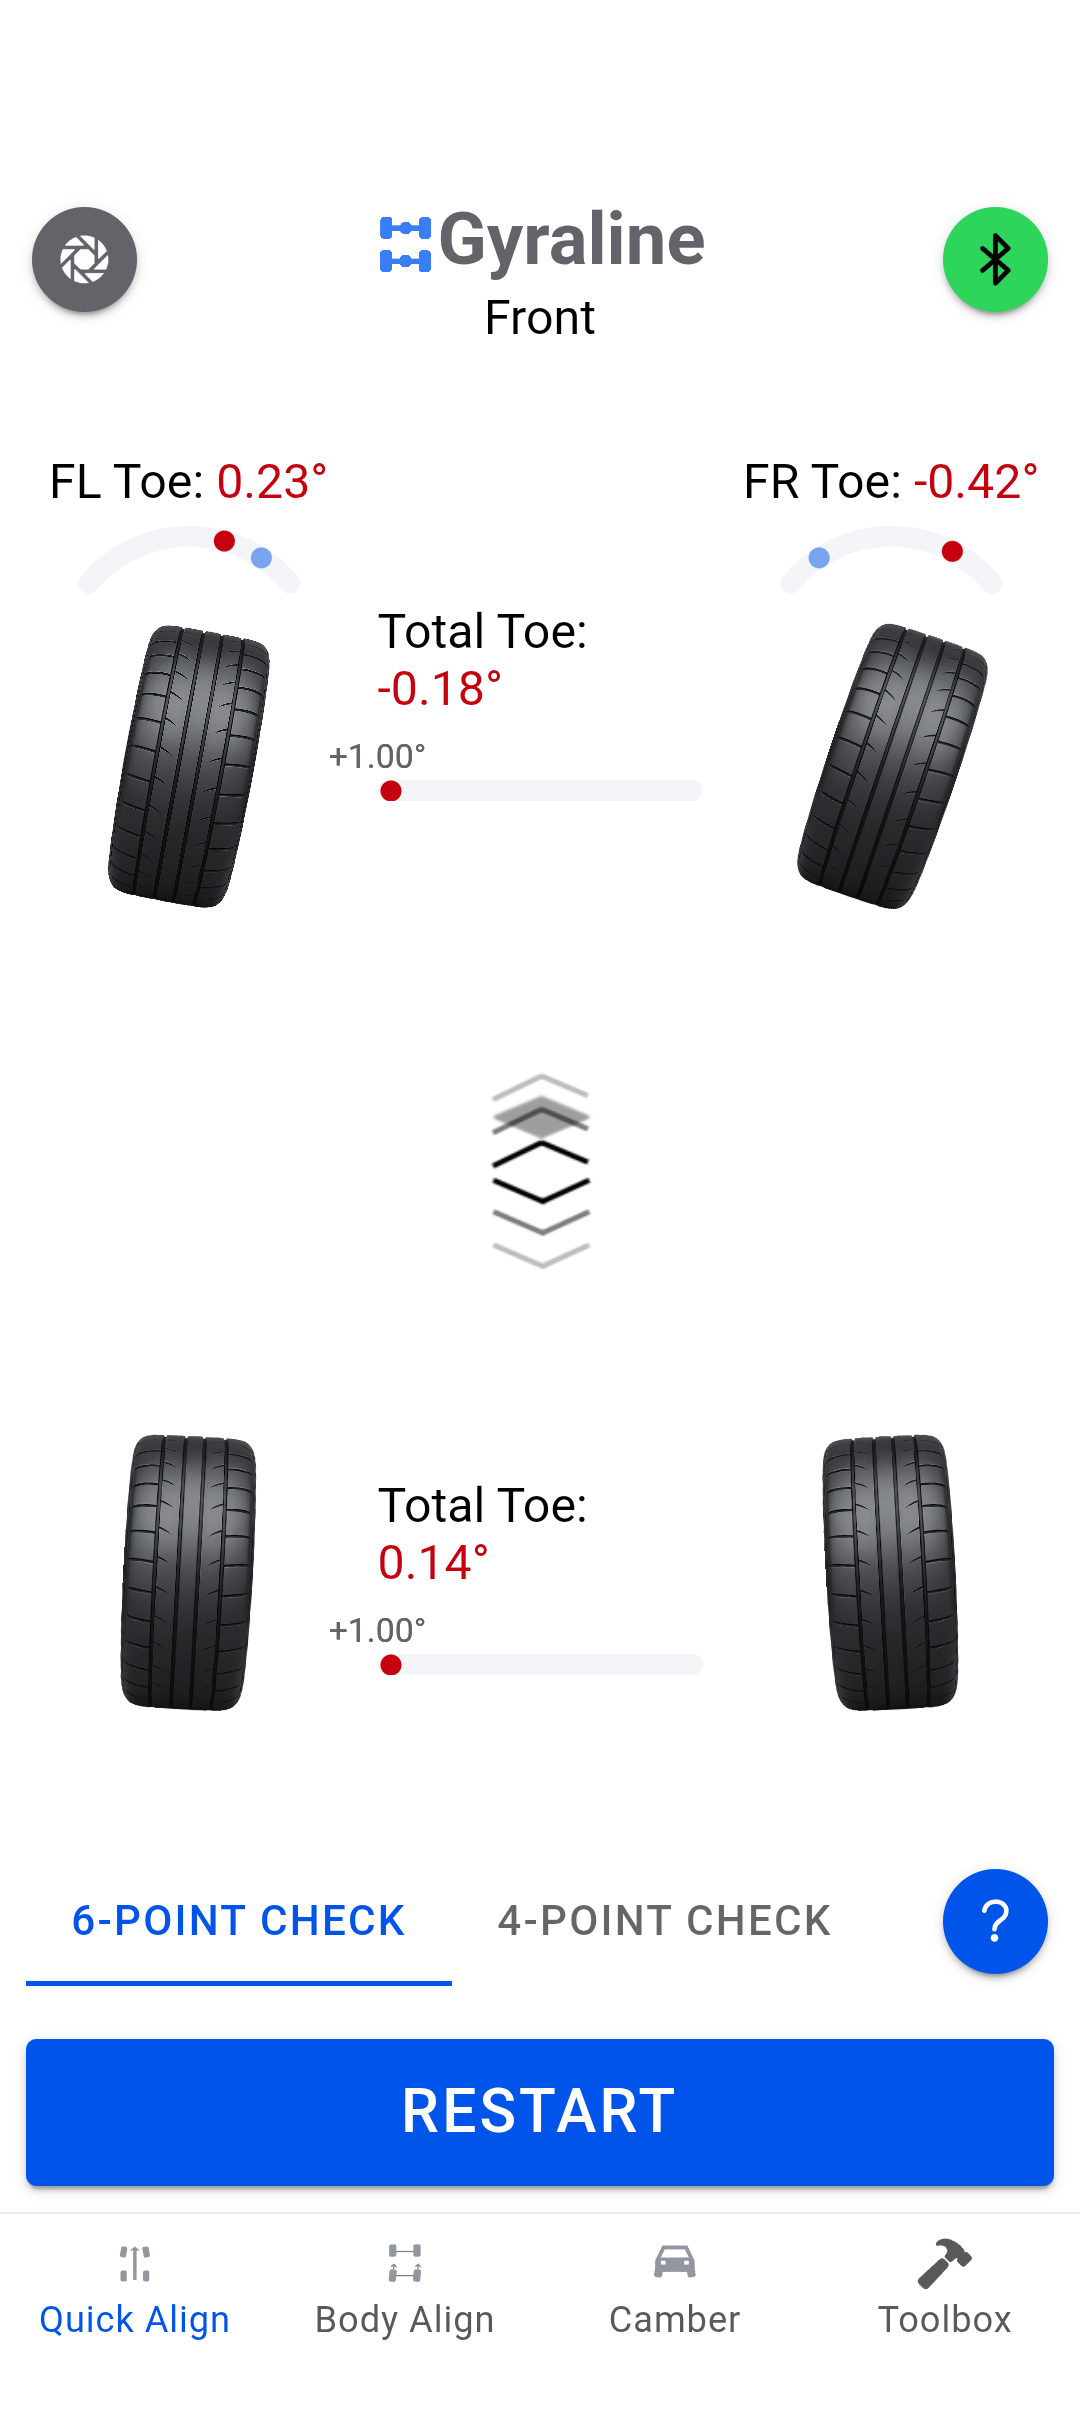
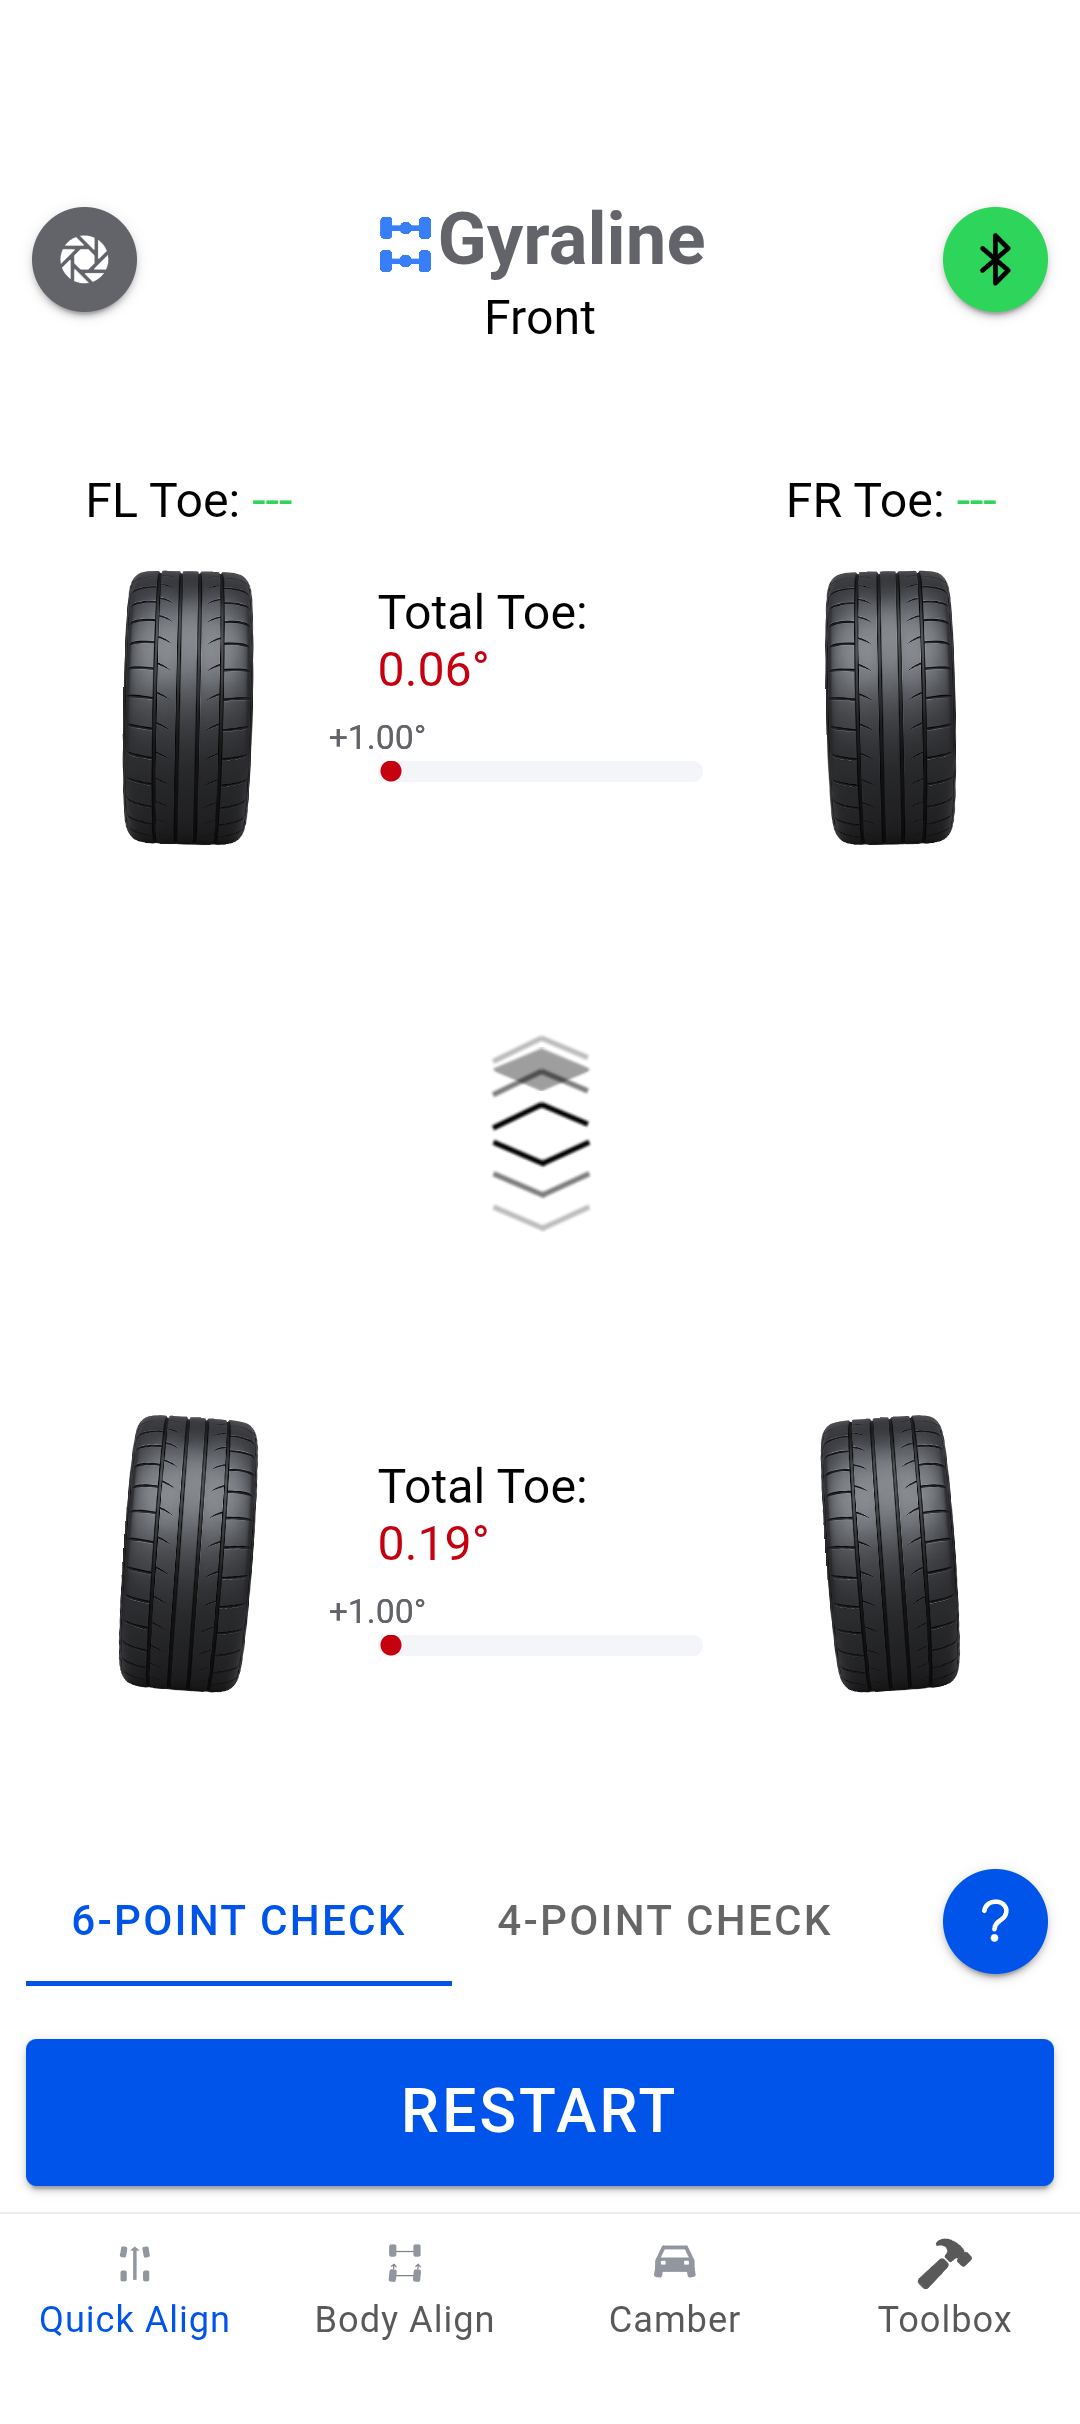
Mine came in over the weekend. It's the "G2" which has some sort of internal hardware and runs an app on my phone. I've reached out for some support, hopefully will hear back during the week. I did a check of my wife's car, which has unknown alignment but I assume it's OK. The numbers weren't crazy, but I didn't save them. IIRC it was something like -0.25 toe front + rear, but very precise-looking values like -0.18* and -0.37* The app has a few modes including a 4-point and 6-point check, plus a thrust angle which uses a body reference. The body reference I chose was the sill where the scuttle hits the "door". I'll assume my car is still square, it's never touched anything. The rear is a dedeon with machined plates, so I further assume the toe is controlled very precisely, tho thrust angle could be off slightly. note that in the photos below the "+1.00*" is a configuration I added, it doesn't actually mean anything for the measurements. here's #1 and #2. The pictures look alarming but the actual values are small. Note that the car didn't move at all during these two measurements, I just repeated the same test twice. The procedure involves holding the phone+device flat (the diamond in the center is your level reference), then hold it against the reference point on the body or the wheel. One of those will blink saying which one it wants next, you align it then tap to confirm. It sends you back and forth a few times to get the measurements before showing the result. I do expect some toe in here, and I think it's underestimating twice. As this is a dedeon I don't feel like toe has much room to wear -- it's steel or aluminium all the way around. I also did the "6 point" check for toe front+back, twice: again, the car wasn't moved between tests. This time the rear toe is more consistent but the front varied a lot. I have not tried to independently measure in 15k miles but I expect the front to be toed in a little. I'd already reached out to the team to see if they could help with the square-check. I don't know if a good set of thrust values would really help here... maybe? My dedeon doesn't have any thrust angle adjustment, I think the two swingarms will constrain that angle. At best I could try and shim the assembly left or right but I don't think the gyraline (as currently provided) can account for that. And It was shimmed + measured when I built it... The above 6-point rear toe check is encouraging, but the fronts and the thrust angle seem ... variable. I'm not sure what the expected accuracy is. I assume something like 0.5 or 0.25 degrees, just based on the swing in the numbers below. But if that's the case I have a front that may or may not be neutral. Based on the very obvious inside wear on both tires after 17k miles I assume they're toed in just fine. I have not yet attempted camber measurement. Again with the dedeon I expect the rears to be very precisely constrained. The fronts were aligned when new and with no accidents and mostly grocery and road trips, I expect the fronts to be about -1.5*.
-
 I am having the Stalker Tilt Trailer sandblasted and repainted in the coming weeks by the trailer repair company that redid the wiring and added the electric brakes. The trailer will essentially be like an almost new trailer, especially with the Torflex axle as opposed to a leaf spring suspension that is like a pogo stick. I am not sure at this point that I want to sell my beautiful ensemble?
 -

The Regular Summary of Classified Ads of Se7ens Found For Sale
Croc replied to Croc's topic in Cars For Sale
Week Beginning May 10, 2026 USA7s Classified Ads of Cars for Sale USA7s classified pages - USA7s club members have the benefit of selling their cars by listing them for free on USA7s forum. https://usa7s.net/ips/forum/26-cars-for-sale/ New Ads This Week Caterham https://bringatrailer.com/listing/2023-caterham-seven-420r/ Repeat Ads From Prior Weeks Caterham https://ebay.us/m/N9vevX Caterham https://ebay.us/m/7vLyH5 and here https://www.facebook.com/share/1EjC9T5FWZ/ Caterham https://ebay.us/m/7vLyH5 and here https://www.hemmings.com/classifieds/listing/1998-caterham-super-seven-fort-lauderdale-fl-2914012 and here https://www.facebook.com/share/18mpNjKYZb/ Caterham https://www.hemmings.com/listing/1999-caterham-all-models-526915 Caterham https://www.hemmings.com/classifieds/dealer/caterham/super-seven/2638345.html Caterham https://www.hemmings.com/classifieds/listing/2026-caterham-seven-miami-fl-2916813 and here https://www.facebook.com/share/1DBn3zPh5H/ Lotus 7 https://www.hemmings.com/classifieds/listing/1963-lotus-super-seven-cochranville-pa-2891143 Caterham SP300R https://www.facebook.com/share/1D67y9sZVg/ Caterham https://www.facebook.com/share/18ppKoxUNX/ Locost https://www.facebook.com/share/1ENevnUwdn/ Caterham https://www.facebook.com/share/1BMgPS4Dtp/ Caterham Project https://www.facebook.com/share/1azSPmCiQM/ Caterham https://www.facebook.com/share/1avG4NQ5FM/ Locost https://www.facebook.com/share/1GaL3oqt2d/ Westfield Pre Lit https://www.facebook.com/share/1ZyVypSmNH/ Lotus 7 https://www.facebook.com/share/1H7wXbdEuP/ Canada Ads Westfield https://www.facebook.com/share/1CejHz2pc6/ Locost Project https://www.facebook.com/share/1C8GZTsjq7/ Lotus 7 S3 https://www.facebook.com/share/178YRz7o5t/ Eva https://www.facebook.com/share/1E73BzJqDH/ -
 s1dandilevko joined the community
 -
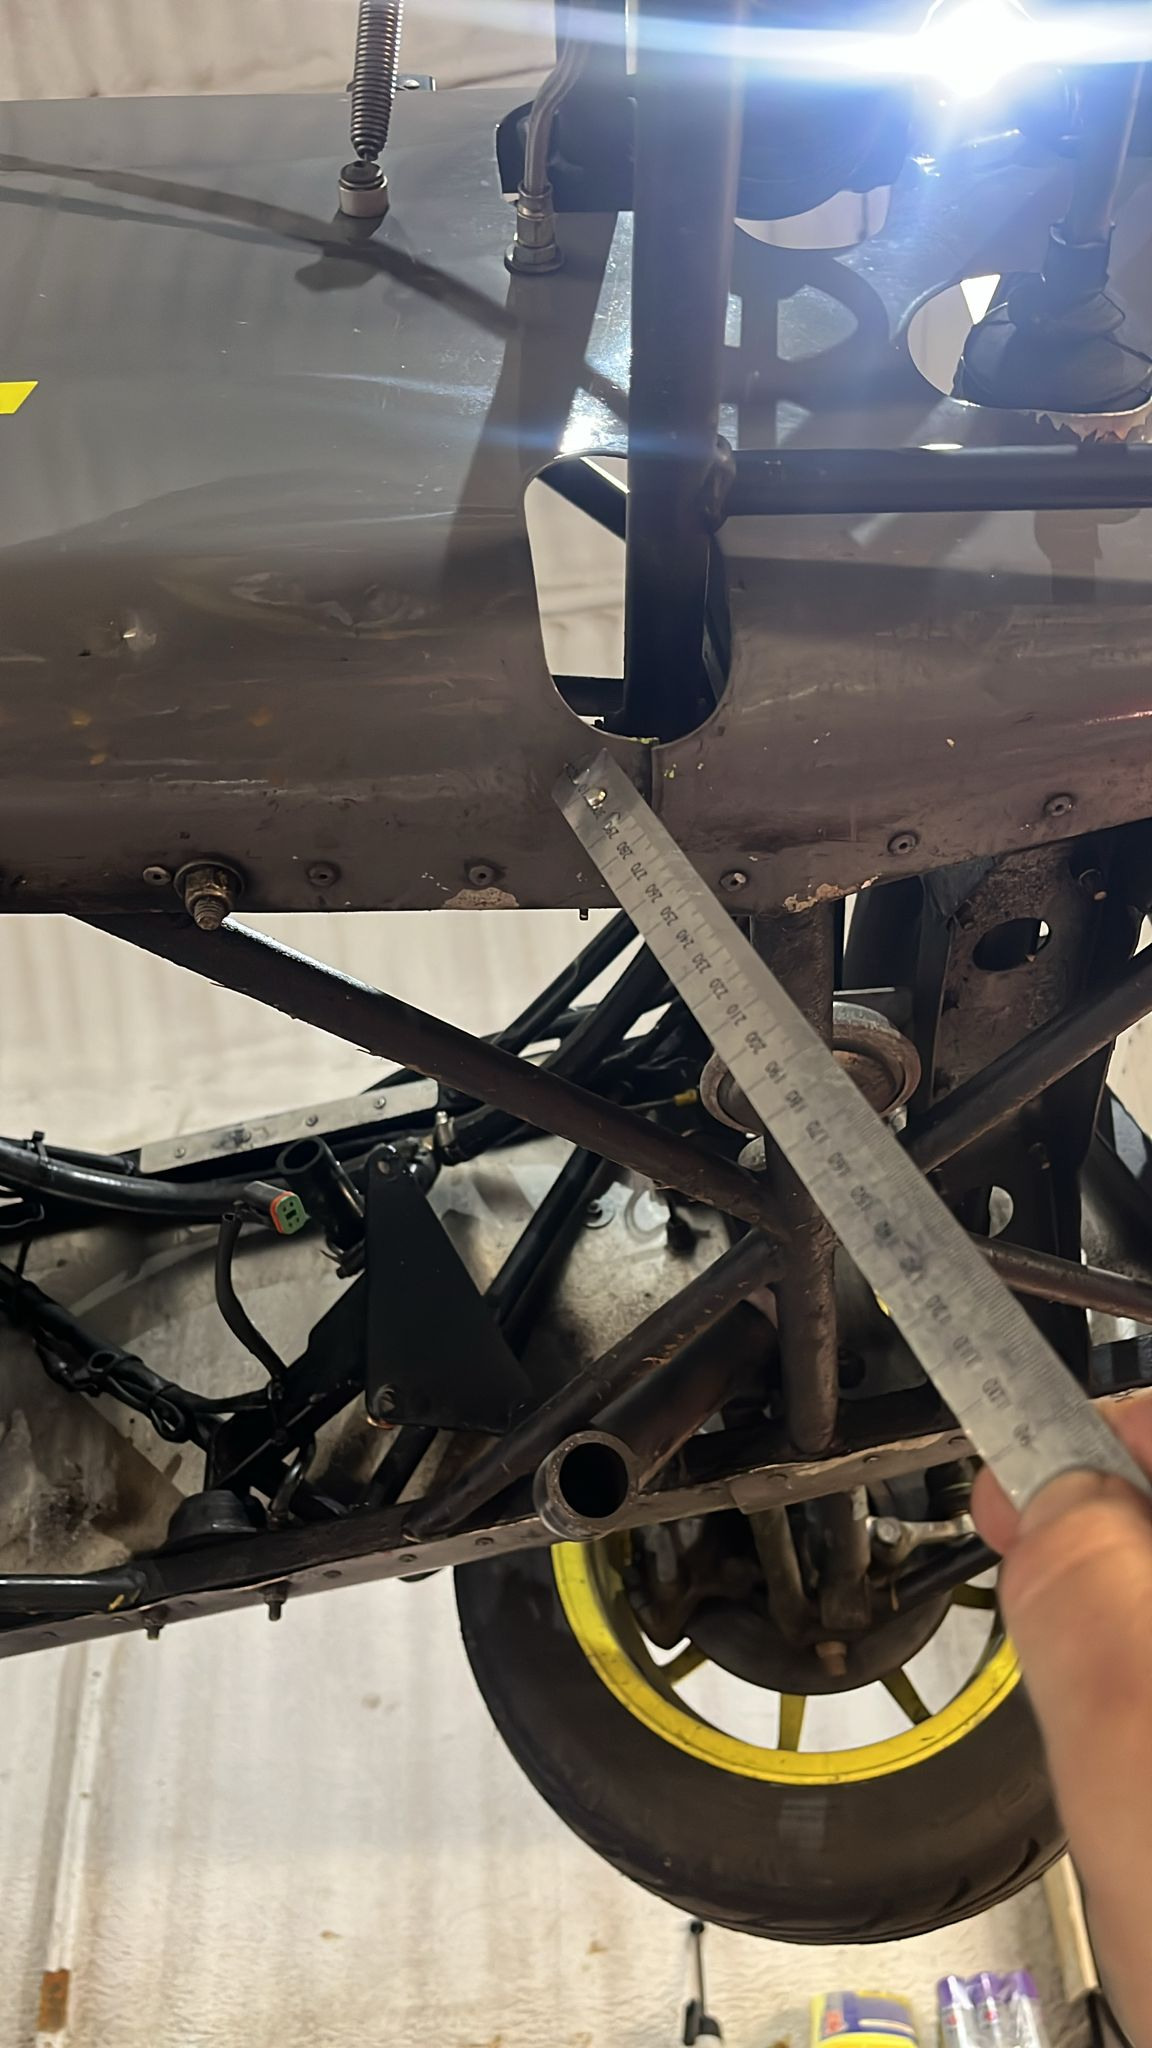
Its a big readjustment process but incredibly rewarding as a driver. Most people come from bigger cars which have enough weight over the nose to just hammer the wheel left or right and the car just goes. However, a Caterham (or Birkin or Westfield or Locost) just do not have the nose weight when under acceleration so a left or right turn in that state will just lead to scrub. A brief lift of throttle or light tap on brake is nearly always enough to put more weight on the nose/front wheels to get them to bite for your turn. Then you can play with throttle in the corner to adjust attitude. Think of it in a sequence. Corner coming up. Brake to get weight over nose. Once weight is on nose then off brake and turn in. Once turn iniitated then start to feed in power progressively to come out of corner quickly. Slow in and fast out. Ross Bentley in his Speed Secrets series has a good section on managing weight transfer around the 4 wheels for varying outcomes. Find his first book in the series and have a read. Then go out and experiment - great opportunity for a track day since you can do it safely plus repeat corners to adjust technique and get a good seat of pants feel. Also read his section on trail brake as this is a great technique for keeping the rear end controlled under late braking entry to corners - Caterhams respond well to trail braking. Its more lack of weight on front tires under acceleration. Its not a 50/50 weight distribution front to rear as a driver is a lot heavier than a 4 cylinder Ford engine. Obviously with the aerodynamics of a brick, there is some front end lift which exacerbates the problem. The example corner for me is Copse at Silverstone. Its the old turn 1 if you are using the old pits. Its 60 foot wide track going and about 80 foot wide coming out. I go in at redline in 4th and have 15 feet of available track on exit, even without braking or lifting. And I scrub understeer the whole way through. I do not need to tap or lift as the track is so wide. But I have to do a lift to set the front tires up for a quick corner. Frustrating. Luckily there are not many places where that is an issue - top corner just past the rising esses at VIR, Copse at Silverstone, two corners at Portimao, entry into corner 1 at double Gauche at Spa, etc. Caterham sell one for rear camber and toe: https://caterhamparts.co.uk/de-dion-tube/6531-camber-and-toe-shim-kit-de-dion-cars.html I would ping Josh at Rocky Mountain - I bet he has some in stock. You do need to know where you are starting from on rear alignment. How much rear camber is dialed in from the standard de Dion. Should be 2.5deg but that is not guaranteed - check will tell you. Borrowing a photo from someone else since I am flying this month and won't be near my cars until June. Front - back of wishbone. Photo shows a more recent model Caterham with ali skin. The ruler points at measuring point. My measurement was ground to chassis tube as not all cars are covered in ali there (e.g. older chassis and race cars) but you can deduct the right amount of ali skin cover from the 120mm. For the rear measurement point, do it ground to chassis tube at the rear axle point - no photo handy right now. Its not much - only +5mm rake front wheels to back wheels.
-
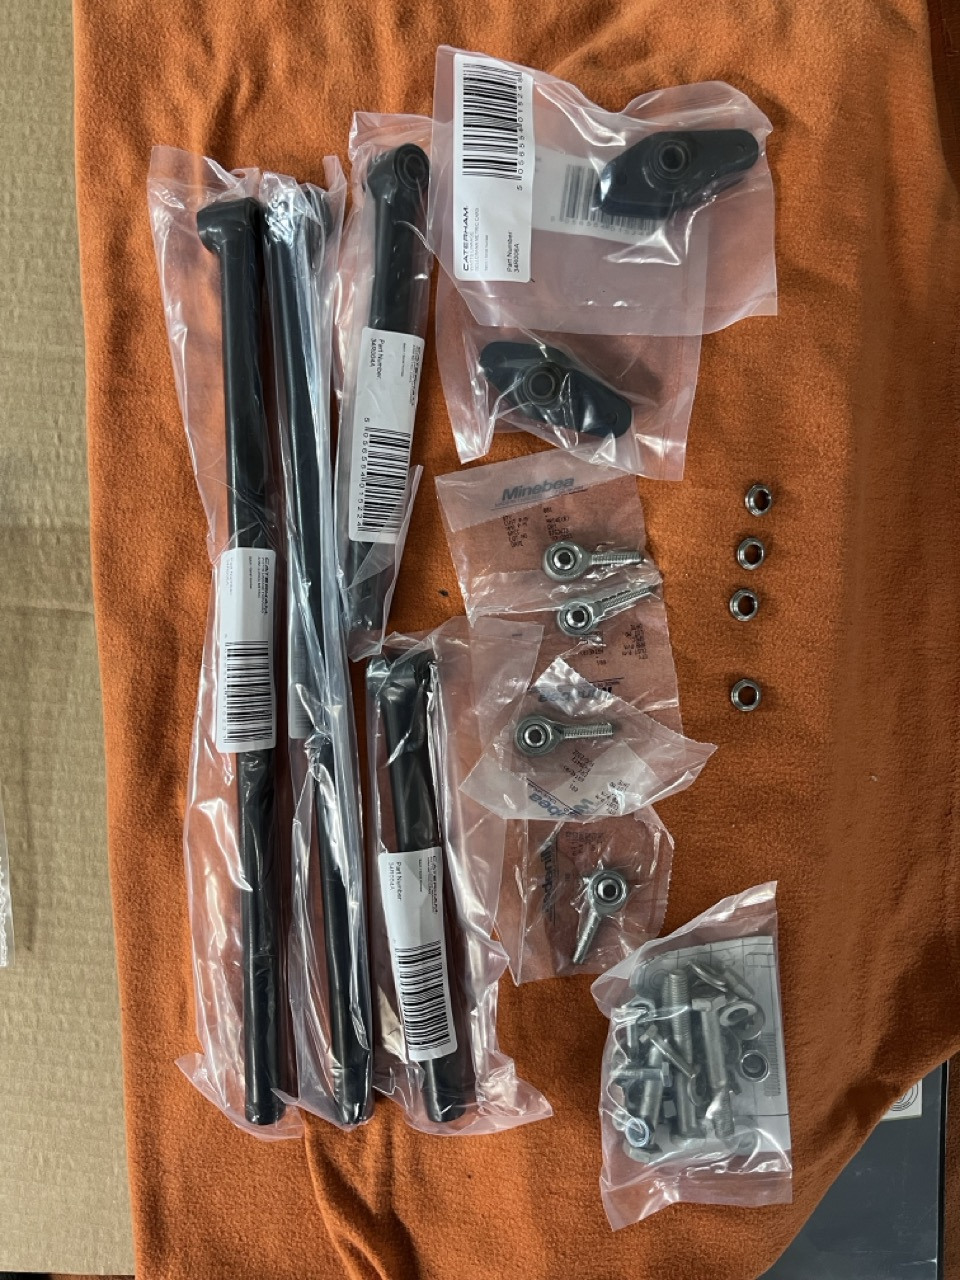
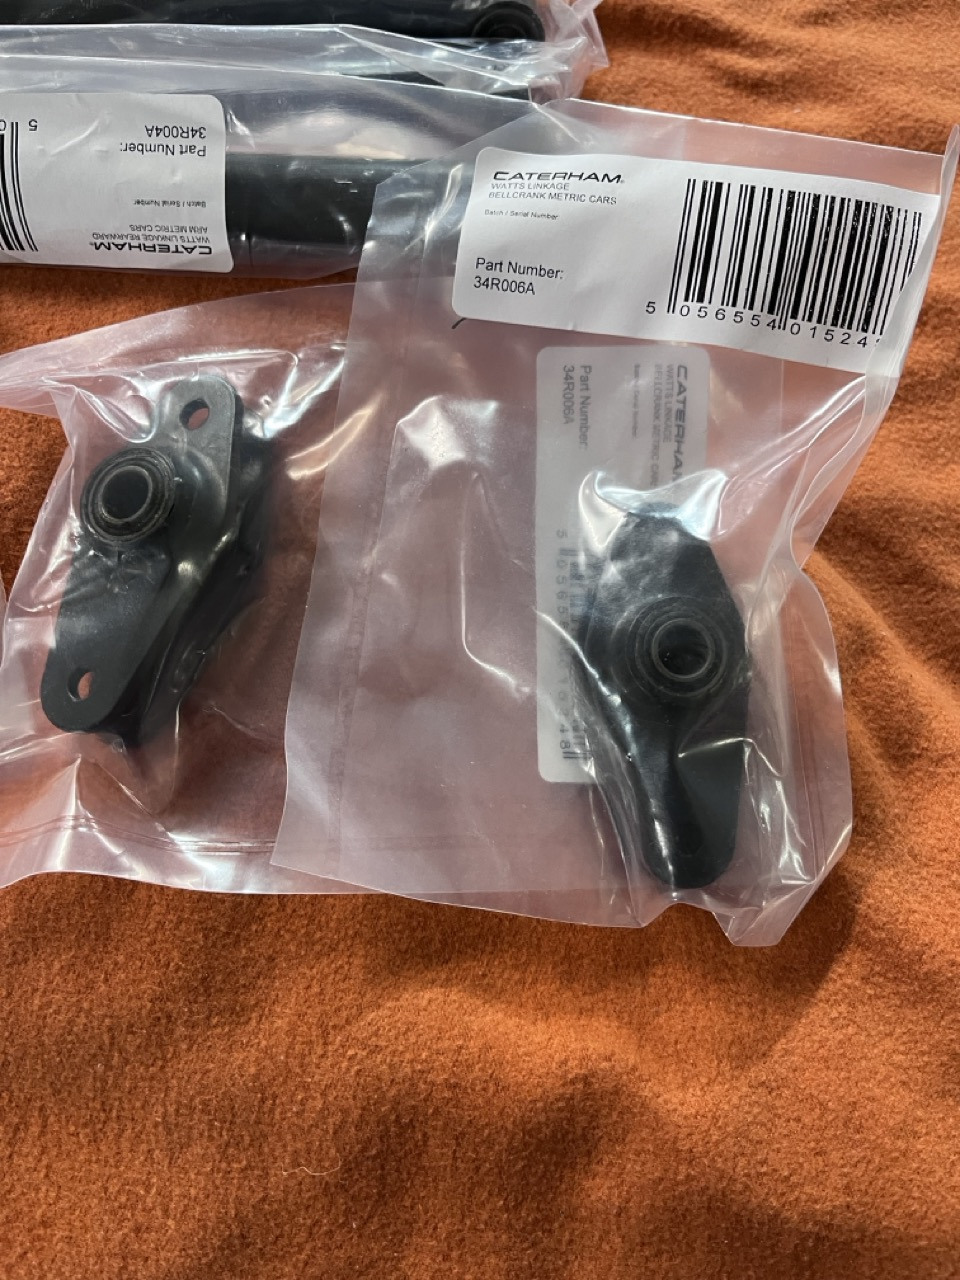
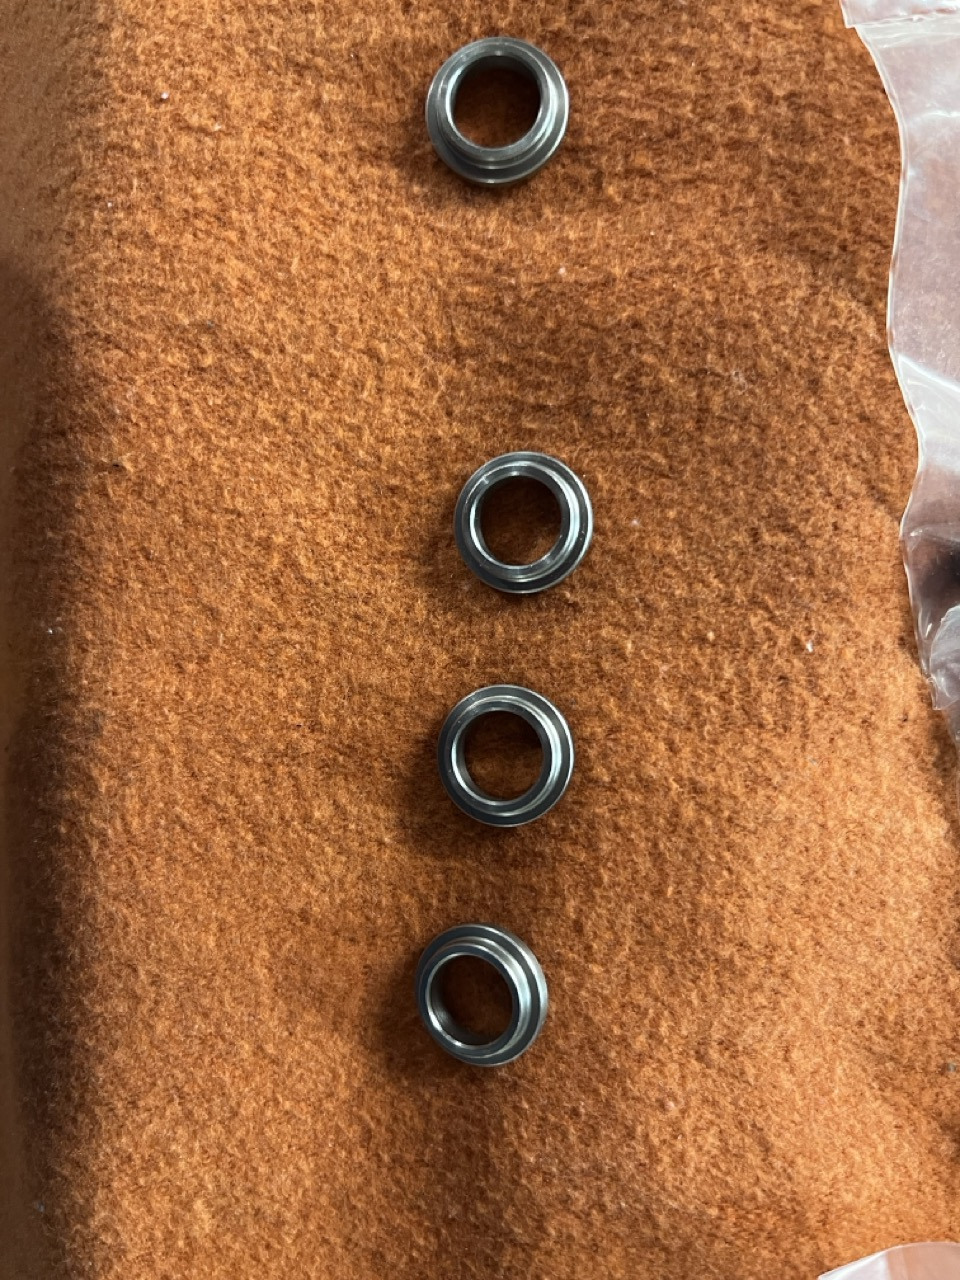
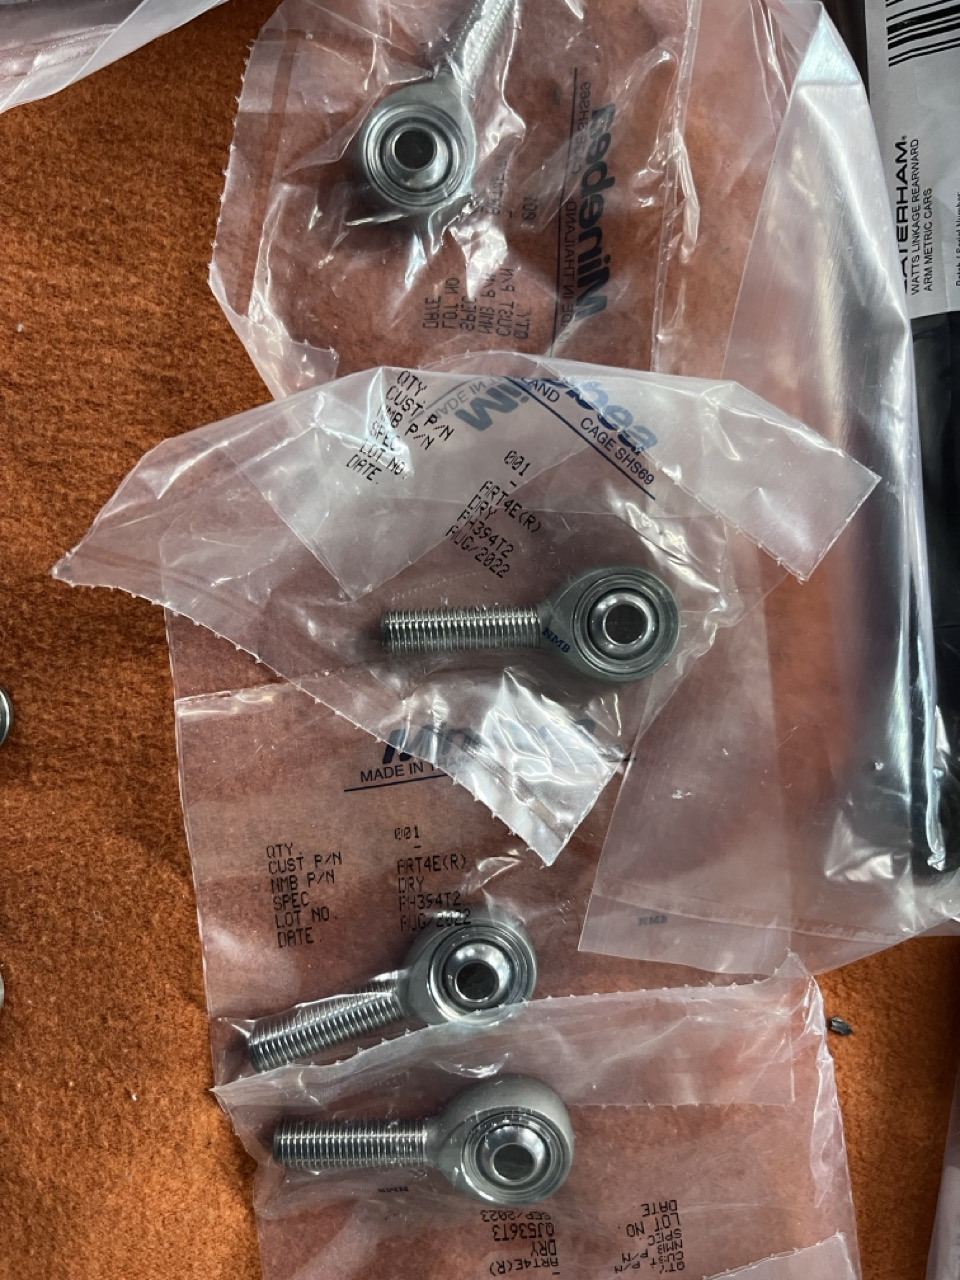
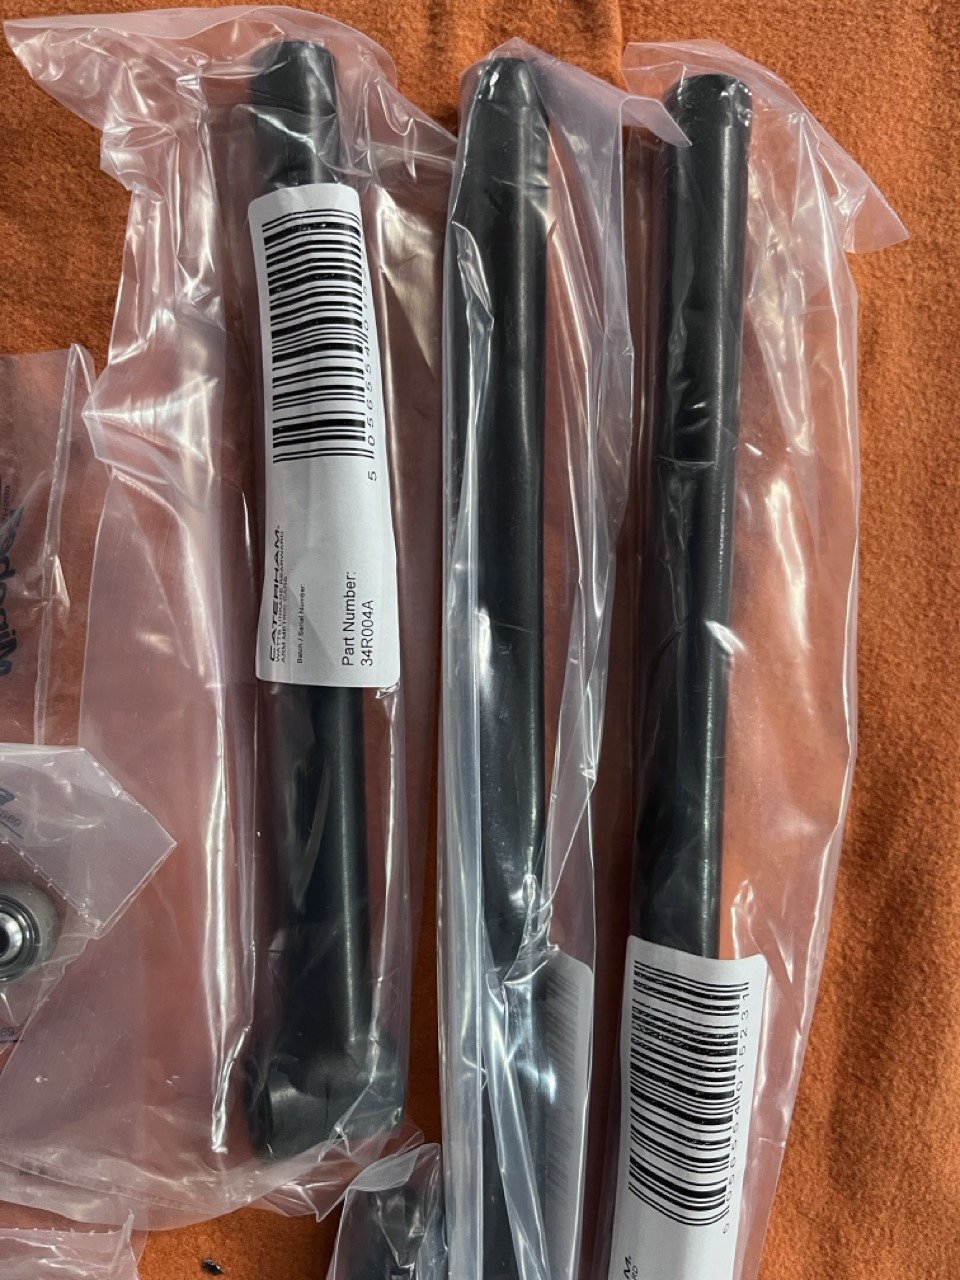
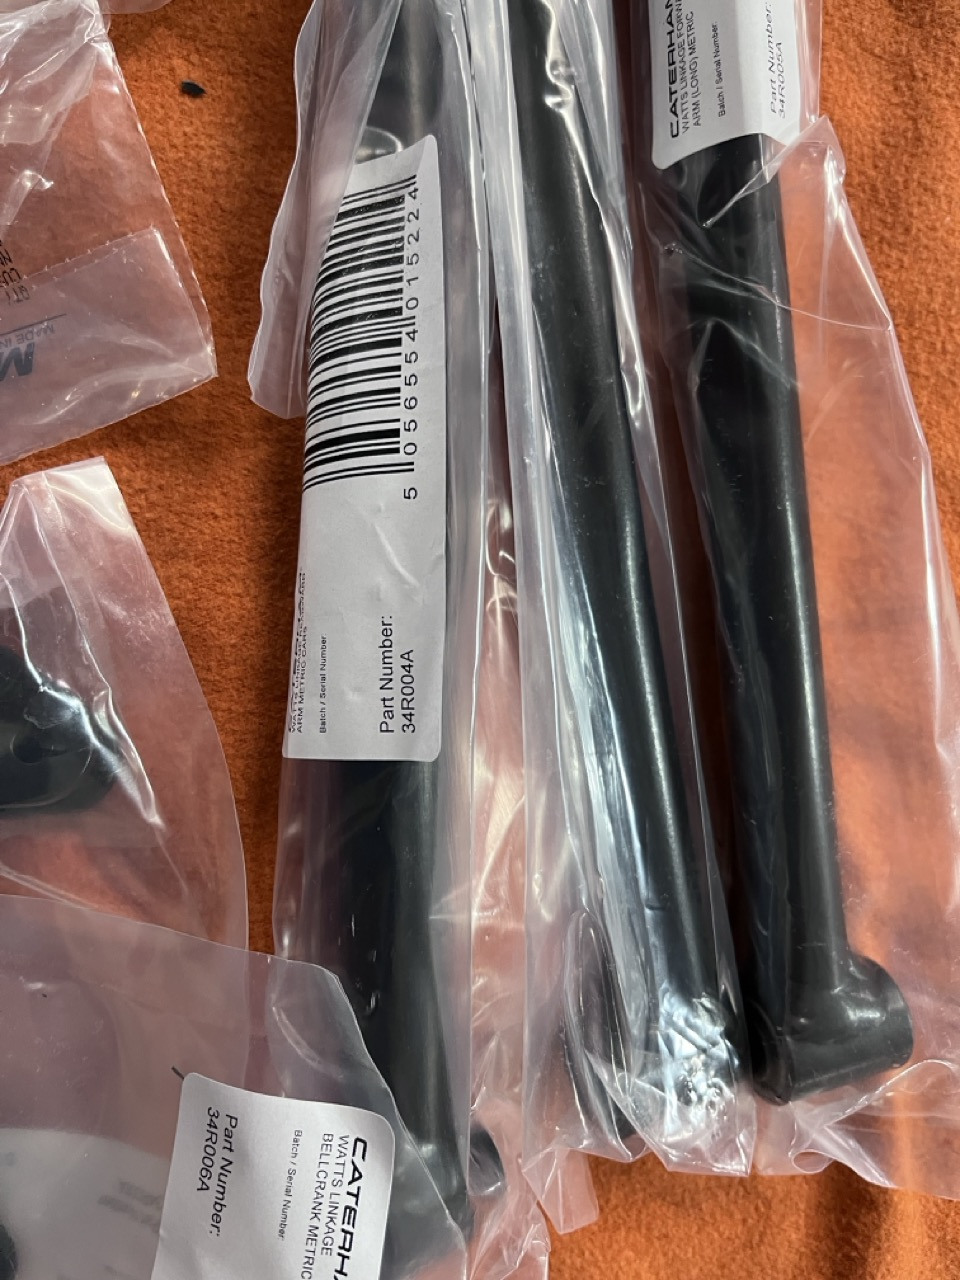
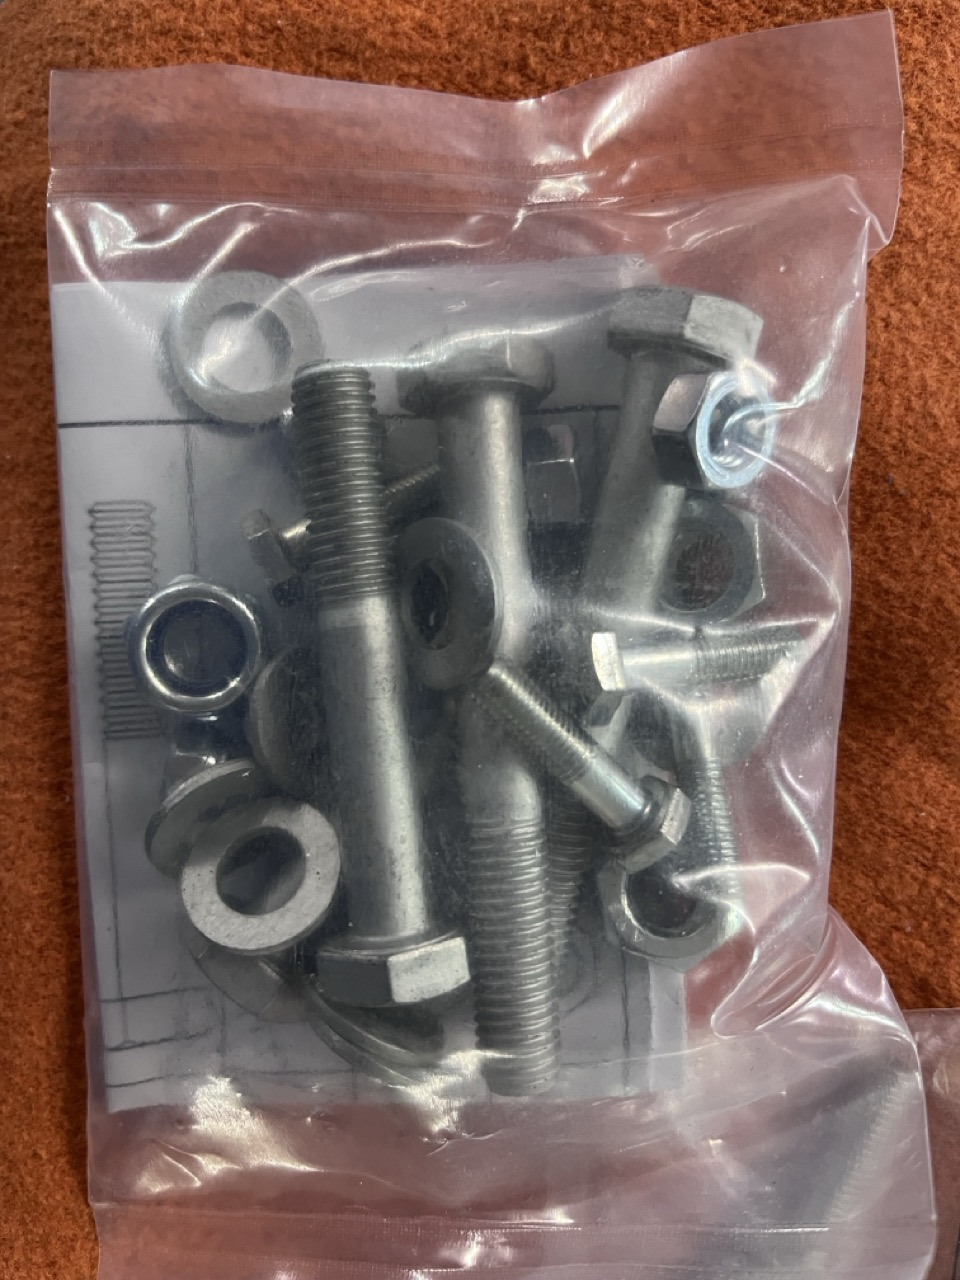
A complete Watts linkage kit for LH and RH. This is for metric chassis. S3 or SV. Might be adapted to imperial cars. $600 plus shiping
-
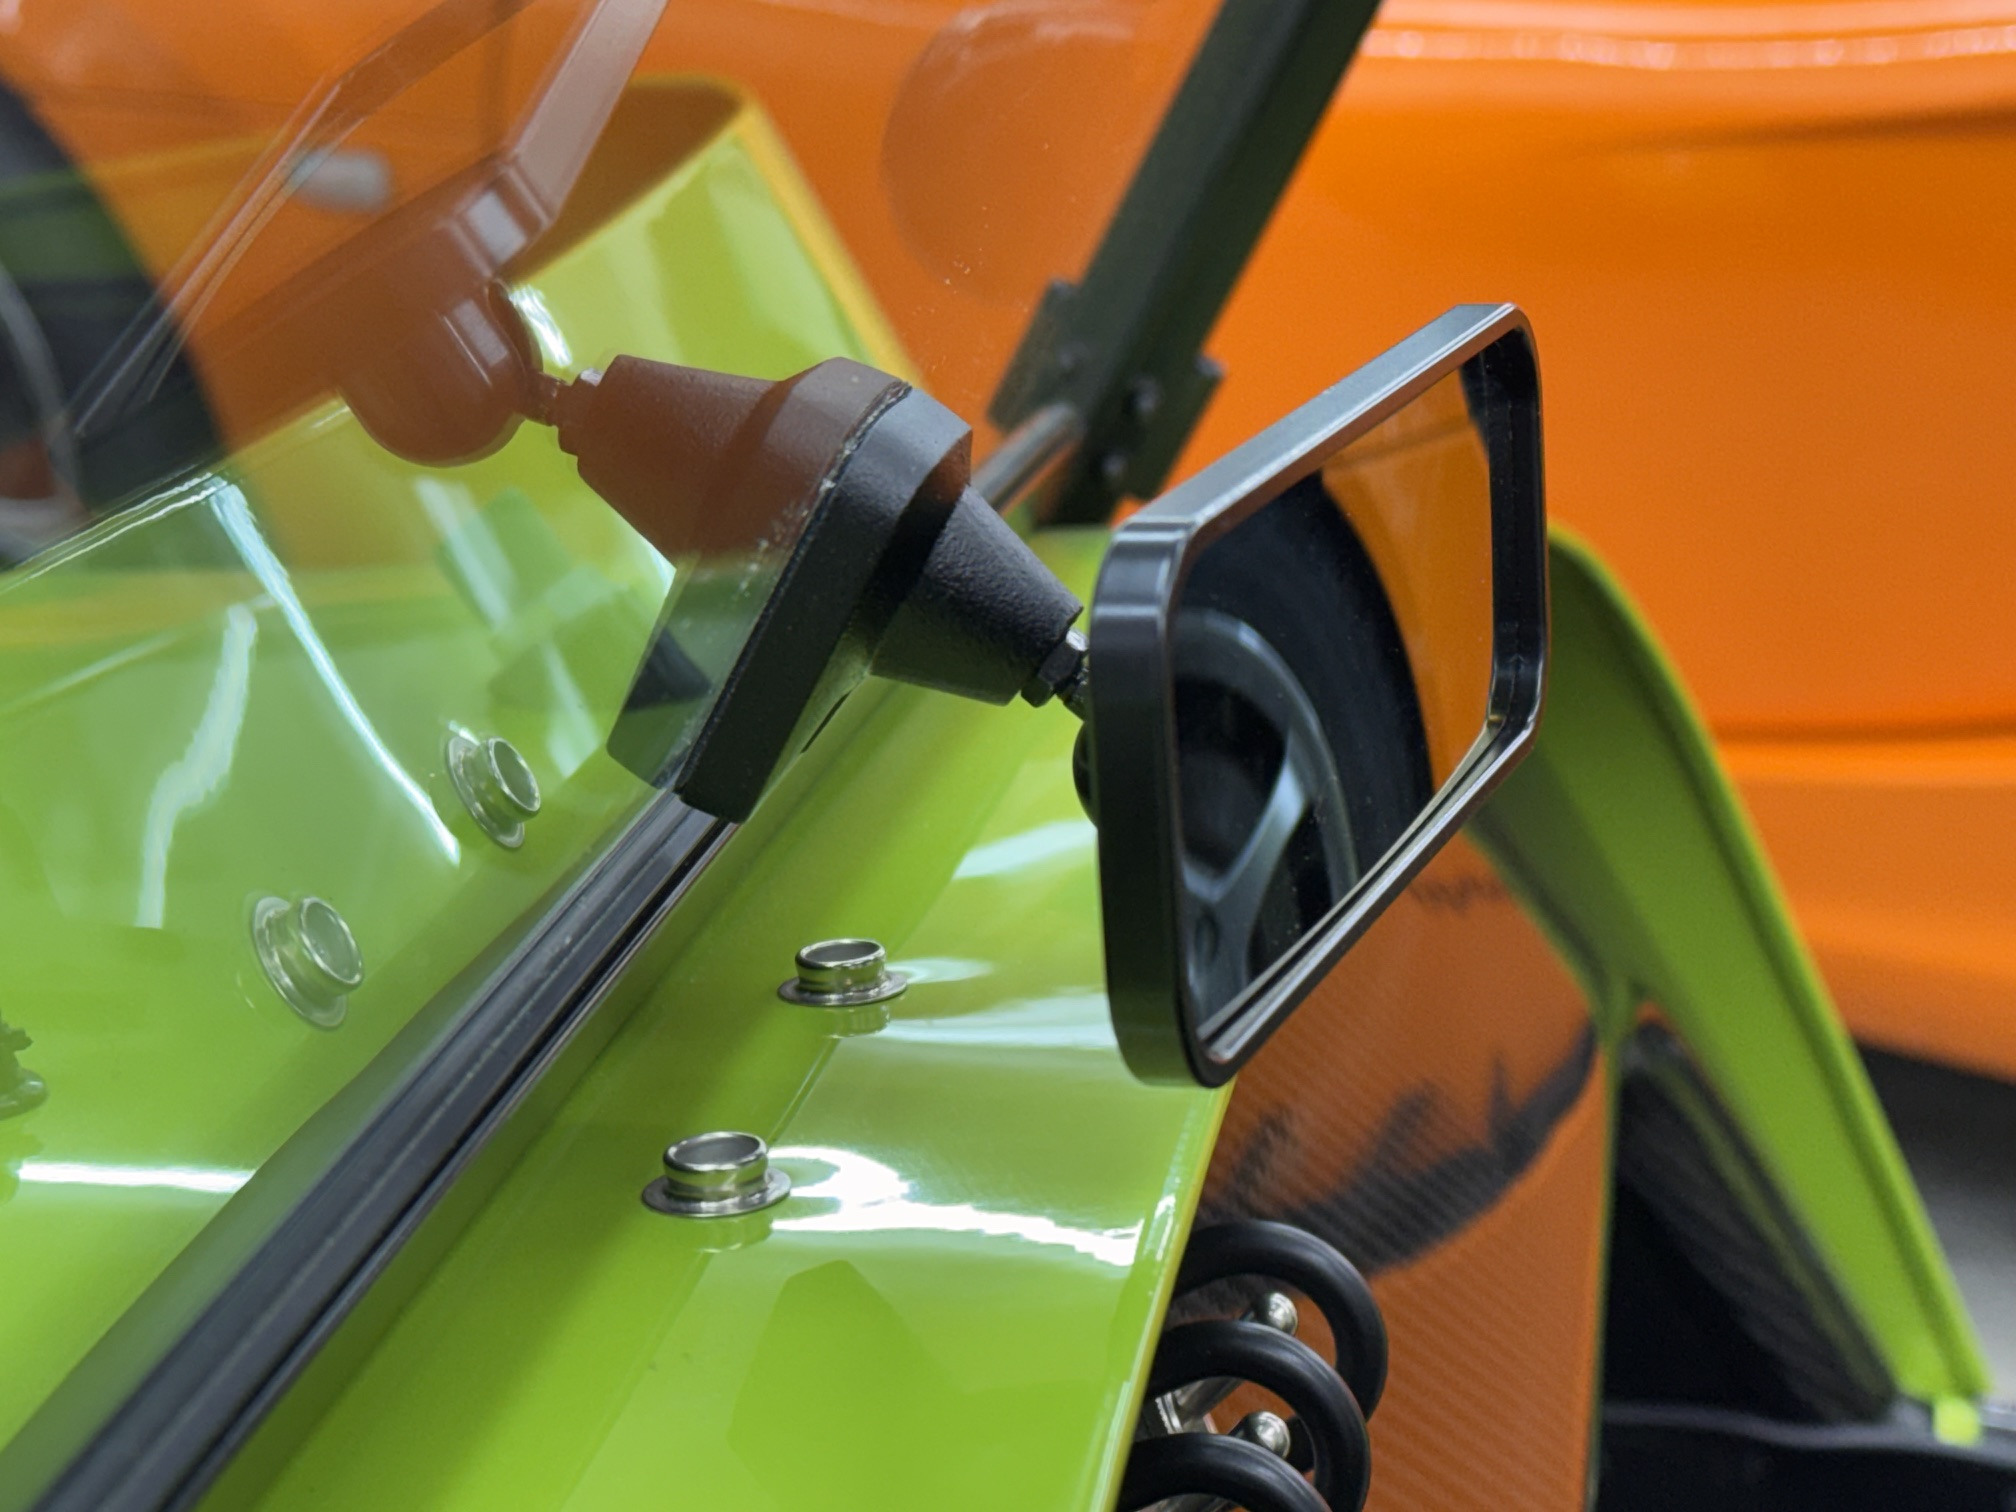
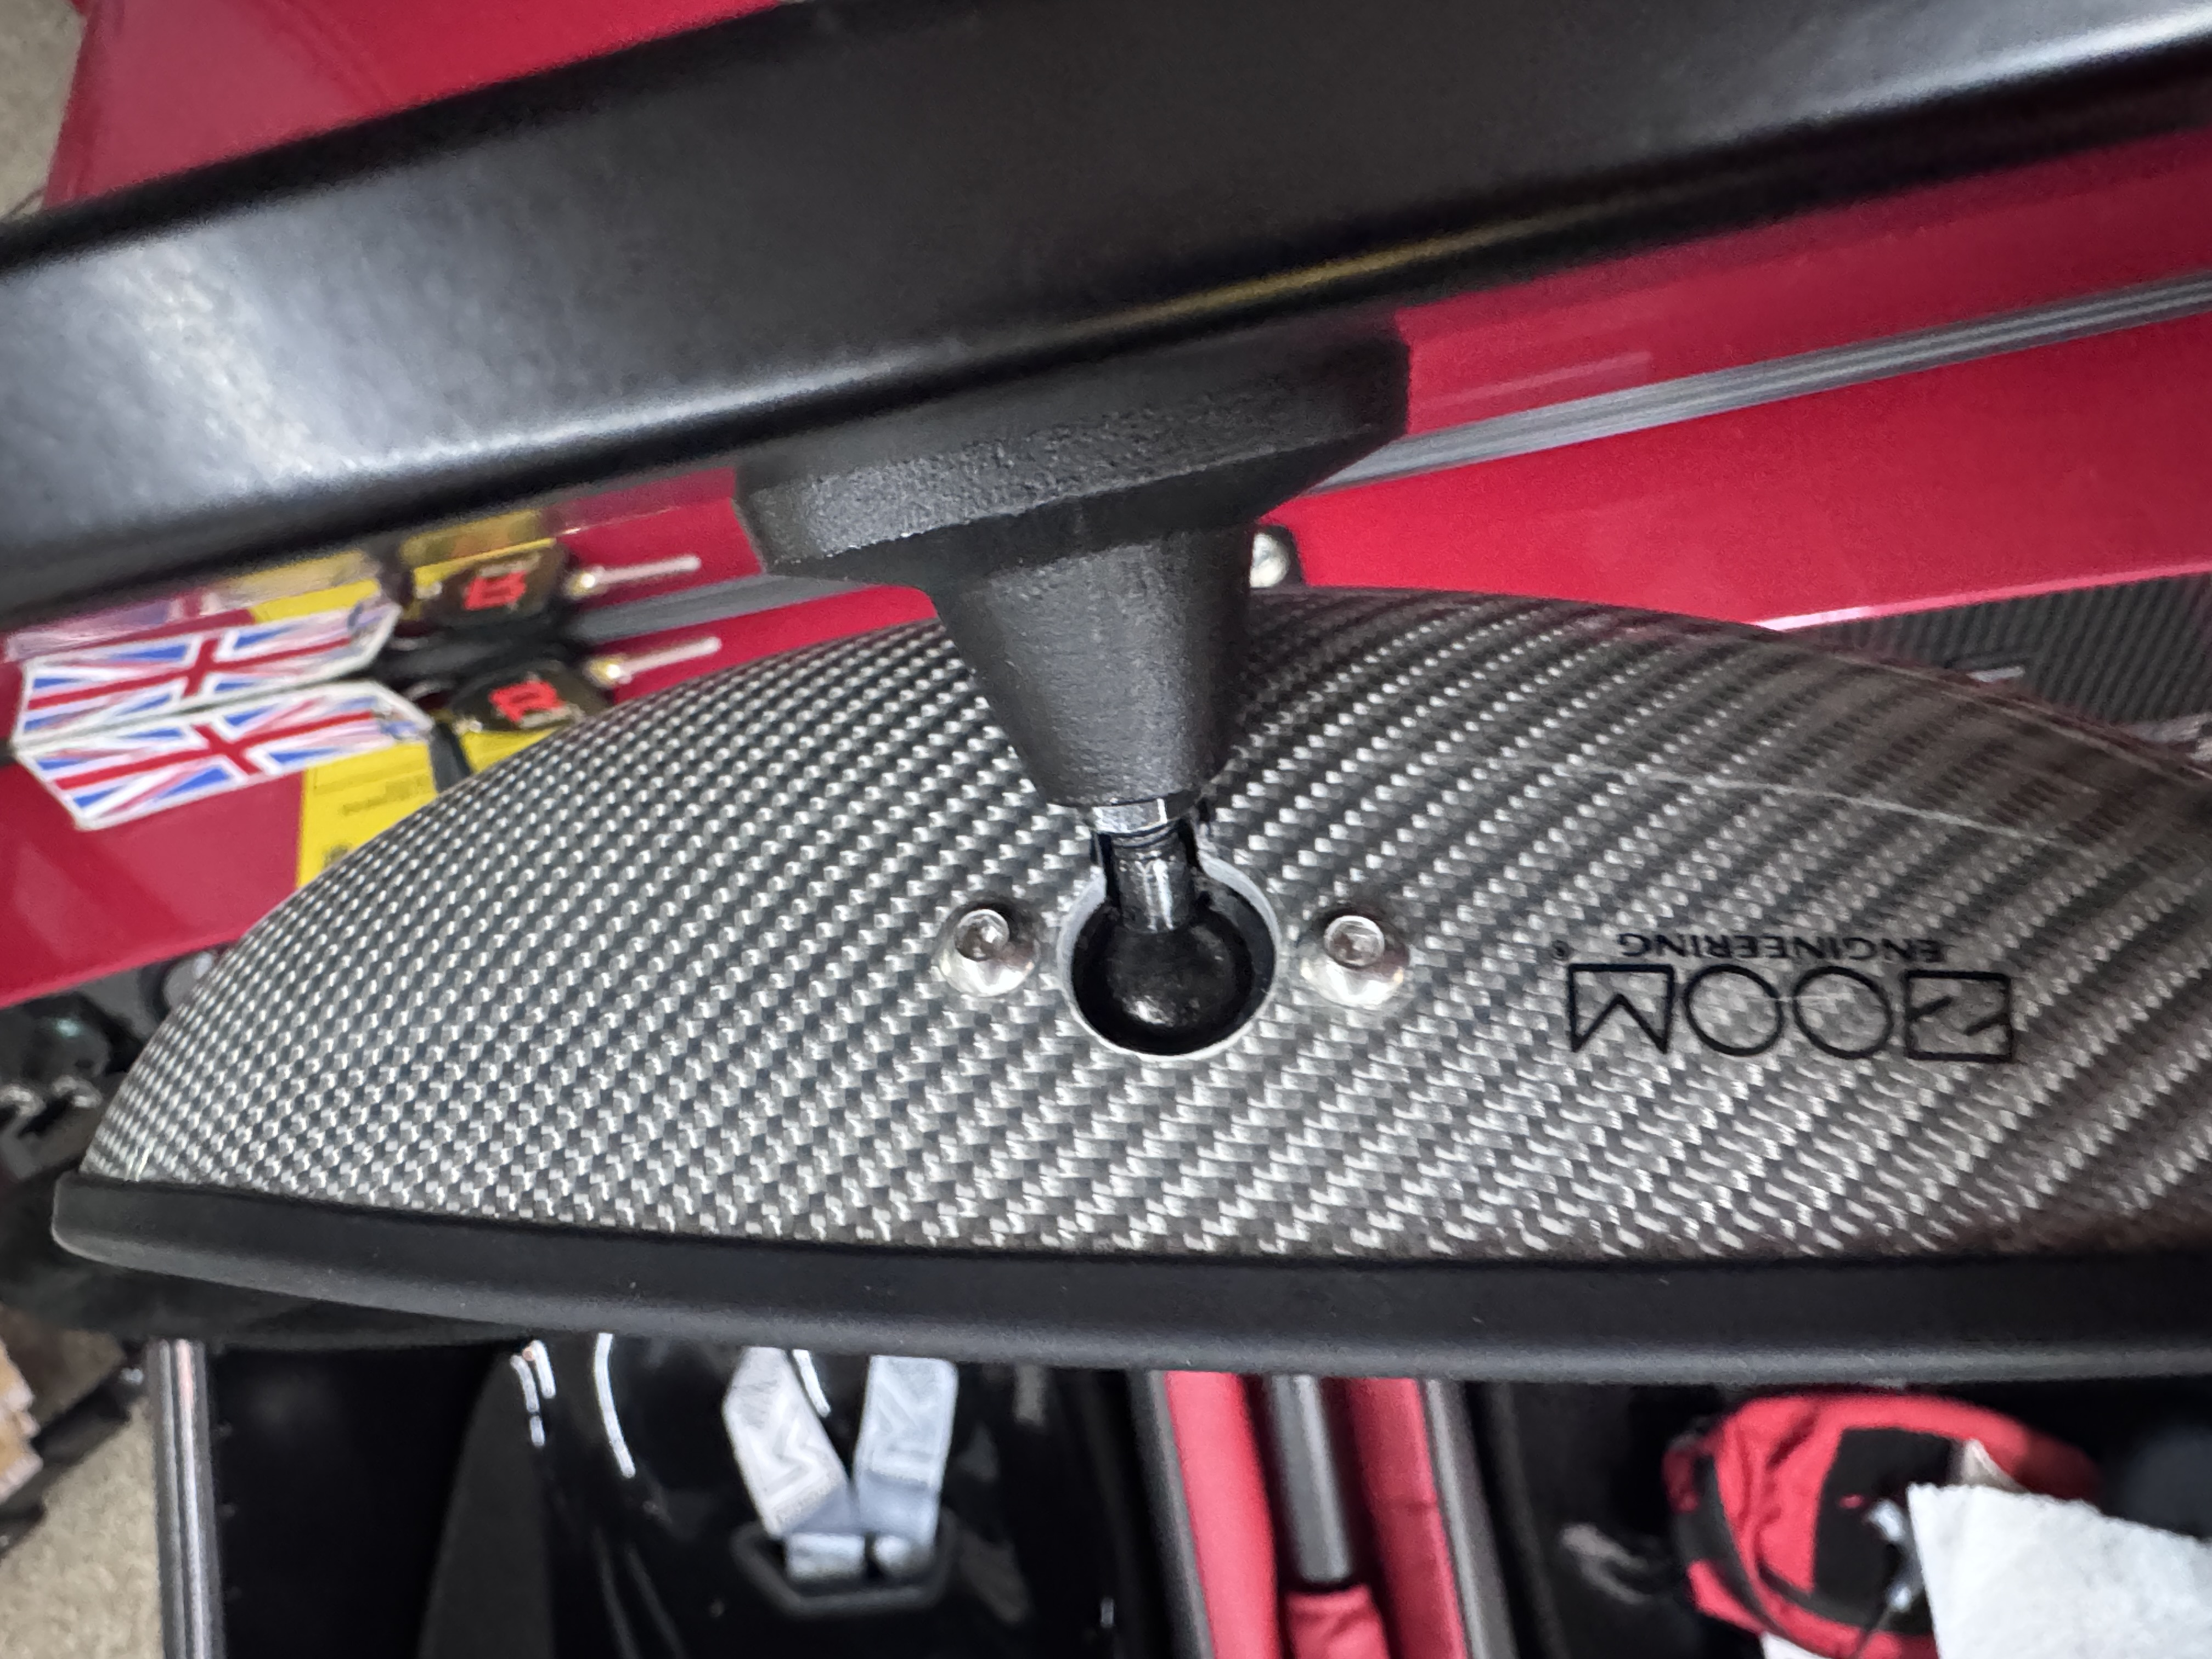
Same mount I received, the forward side of the mirror is quite convex. Going to take considerable modification.
-
Ordered. Thanks. @JohnCh and @Outbound
-
yep, the same setup @Outbound mentioned earlier. Zoom ships via Japan Post who handles the tariff payment and bills through Zoom, which simplified everything. The mirror was $115.23, the mount another $28.81, shipping to Seattle was $28.55, and tariffs were $20.03 for a grand total of $192.62.
-
@JohnCh is this the mirror you got? https://zoom-eng.com/en/collections/モナコ-エアロ-ts-コンパクト-リトル-ペンタ-ルームミラー/products/コンパクトルームミラー単体-車種取付用アーム別 was it the small or medium size ? Do you mind sharing the mounting arm you used ? Sorry. Just re read the thread assume it’s the h03 general arm and the small mirror.
- Last week
-
It's not a badge, it's the horn button. I had it laser engraved with the logo.
-
Nice. Could you show us a view from the side? Looks like I need to prepare a 3/4” long channel to give it a prayer of being usable with this mount. i could use a badge like that for my steering whell as well. Looks thick and solid.
-
I installed the Zoom Compact mirror today. I had previously lowered the factory mirror to the base of the windscreen to reduce some of the annoying vibration, but the Zoom takes things a noticeable step further. While shake isn’t completely eliminated, it’s no longer objectionable. The mirror is slightly convex and, despite its small size, provides a good field of view between the seats. There’s no day/night function, but the surface is coated with a blue tint to help reduce headlight glare. I was concerned the coating might be too dark during daytime use, but it seems fine. My only complaint is that adjustment requires loosening and tightening a set screw. This isn't a big deal unless you regularly share driving duties, but with a wider channel machined into the socket housing, and a Belleville washer to apply constant tension to the ball, it could operate like a conventional mirror.
-

Help picking a tow vehicle and trailer for my Caterham
pethier replied to savagete2860's topic in General Sevens Discussion
Of course they can be removed. Grab pair of cutters and cut the back side of the block. Don't use a box cutter or the like or you could damage the strap (not as big a risk if you had Diamond Weave straps). Then just bend the block and pull it off the strap. If, after your experiment, you think you need them, just pop them back on. They will function just the same as if you had not cut them. It should be a long time before you need to replace the straps. What usually kills straps is UV radiation. You are going to use and store these straps in an enclosed trailer. I renew my endorsement of the Diamond Weave straps with the European-style friction sleeves from www.autohaulersupply.com. I didn't buy these because my original straps were shot. I bought them because they are better. -
Help picking a tow vehicle and trailer for my Caterham
pethier replied to savagete2860's topic in General Sevens Discussion
Let's start with "It probably does not make much difference due to the friction of the strap". Now, let's neglect the friction for a moment like a lot of classical physics illustrations do. If the straps go straight down to the roller and clip, then the portion of the strap between the two is at the shortest length it can be. The tire can't go anywhere because that would require more strap length. The yellow things are not ramps, but chocks. I believe they attach to the E-track. I therefore suppose they offer more resistance to the car moving forward in braking (or, heaven forfend, a crash). I don't think that strongly-enough to go out and buy a pair. What they are good at is stopping the car while you load it at the exact place you had it last time. Since I use a remote-controlled winch so I can see exactly what I am doing, I don't need permanent stops. Non-Seven sidebar: I have left door on my full-width trailer so I can open my car door. I don't bother with the winch when unloading the car, I just get and drive the car out. Some cars are set up so the car door will not clear the trailer inner fender and the trailer door. I have fashioned plywood risers that key into the E-track. I place two of these on the left track where the tires land. The front one has a wood strip at the front to prevent the car from rolling off the front of the riser if the trailer happens to be pointing downhill when I am winching a car in. These risers tilt the car enough to get door clearance. This is really a good thing, since my Cayman has a dual-clutch transmission, so just like with a conventional automatic, I have to step on the brake to get it out of park. The risers are sized so that I can still get the tire straps to the E-track slots. I don't need these risers with a Seven. I can enter either side of a Seven inside my trailer even if it has top and doors. -

Help picking a tow vehicle and trailer for my Caterham
SENC replied to savagete2860's topic in General Sevens Discussion
I would double-check the specs and manual on your truck to see if there is a max tongue weight (in pounds) for the vehicle and/or hitch (without a wright-distributing hitch). Also check the rear axle weight limits GAWR). As loaded, you've moved a lot of weight off the front axle and onto the rear axle - which I suspect is why it feels sluggish to you - much reduced steering. I might be hesitant to get much above 55 with that much weight moved off the front axle, but you'll know by feel. As an example, my LR3 is rated for 7700 pounds towing capacity... but the hitch is only rated for 750 or 800. So if towing near the max I can only go to 10% tongue weight. At any rate, adjusting your load so that your tongue weight is closer to 10% may improve driveability. -
Is there a predetermined correction for measuring to the Ali skin? Or just measure both front and rear to Ali and it’s consistent. (I switched over from Avon zzs to Toyo r888r and I think there was a jump in front tire diameter vs the rears ). Although I never check ride height and rake with the avons. I feel like now is a good time to dial it in.
-
 Those rubber guys are captive on the straps and cant be removed. There are 3 per strap. The also have little nubs that are supposed to go in a center groove on a tire to hold the car in place even more. However, on the r888rs, the center groove is offset so you cant really use it. When these straps need replaced I will likely grab some regular straps. I plan on doing something like this eventually. I am planning on getting a second set of wheels for the caterham along with one or two trailer tire spares. This seems like the best solution for secruing them as well as maybe a few other things. You're including the 240lbs that is coming from the front axle with the trailer loaded. it would be (3020-2240) - (2800-2560) = 540 Thank you and good catch, I will move the roller closer next time and pay attention to that. I assumed it was close when i did this yesterday but you're right, looking at the photos at least the one could move at least on slot closer to the tire. If they are touching or could touch the tire in any capacity, is that too close?
 -
Check your inbox, I sent a message you can respond to yesterday.


.thumb.jpg.885191d302e6c3704c848a8f5ac3a612.jpg)