JohnCh
-
Posts
3,406 -
Joined
-
Last visited
Content Type
Profiles
Forums
Store
Articles
Gallery
Events
Library
Everything posted by JohnCh
-
I am far from an expert but have been researching the Duratec for the past 20 years and during that time have spoken at length with a number of tuners and owners on both sides of the pond who have built and dyno'd these engines. I've also had Duratecs in three different stages, each of which has been on the dyno. The following is probably more than you want to know but synthesizes what I've learned over that time. Hopefully others can fill in the gaps provided they can make it all the way through this post The 210-220hp range is an inflection point. Going beyond that puts you on the precipice of a steep, slippery slope thanks to piston-to-valve clearance limitations. Although you can "simply" pocket the stock pistons, that need leads many to do the as-long-as-I'm-in-there dance, resulting in new, higher compression, forged pistons that can already handle the higher lift, forged rods, keyed crank, fully balanced bottom end, headwork, etc. Been there, done that, and have no regrets. Depending on cams, you can comfortably get to the 235-260hp range without resorting to a forged crank and short rebuild cycles. The most verified power I've heard an engine make with 420 equivalent cams, Jenvey's, and headwork was 226hp. Most, however, come in the 210-220hp range. Heads are another consideration. I've been unable to determine which of the two Duratec heads are fitted to the 420. The early 2.3L from the Ranger and all US 2.0L use the same version, but when Ford added the 2.3L to the Focus in the US, they changed the head to something people later coined the high-port. The casting is different and accommodates larger intake ports; specifically, the area over the valve guide is increased. Ford of Europe used this head on the 2.0L in the Fiesta ST150 and possibly others, but I've never seen that casting on any US-based 2.0L. The stock head is good for about 220hp, removing a small exhaust tumble intended for emissions increases this to about 235hp, and the stock high port flows to 250hp. You can modify the low-port head to close most of that remaining gap. Some claim the high port head is an immediate 10+hp upgrade on any engine. Others state you need to have an engine already in that 220hp range to start seeing an improvement. I've never seen before/after data either way. There is also the 2.5L head which has enormous intake ports, and is bolt on, but does require some additional work to fit a se7en. I've also never heard stock power potential, but as the person who does my heads told me, the stock flow is less than one would expect based on the visuals. 250-260hp maybe? The reason the head matters is if the 420 uses the high-port head, you could probably knock on the door of 230hp with your current engine by adding roller barrels or throttle bodies, a good custom map and optimizing cam timing on the dyno. You'd probably be 5-10hp less if it's the low-port head. This is a lot easier, cheaper, and far less time intensive than rebuilding the engine as described above. It really comes down to the age-old question, how fast do you really need to go and how much do you really want to spend? -John
-
Another option is with the engine loom plug to which this harness connects. I've seen factory harnesses before where a pin isn't fully seated which creates an intermittent issue. Easy enough to check and rule out.
-
Caterham has just delivered a bespoke optioned 420R for Evo magazine. Things I haven't seen before are the Alcantara covered dash and center tunnel, and houndstooth upholstered seats. The combination of roll cage, S seats, and the 10-way Bilsteins and central fuel filler from the 420Cup, is certainly unique. It should be interesting to watch what they do with it. https://www.evo.co.uk/caterham/7/206061/caterham-seven-evo-edition-revealed-bespoke-420r-joins-the-fast-fleet -John
-
In my experience, when it comes to boundaries, many people don't view se7ens in the same way as a normal car. I have caught a 4-year-old trying to climb into my car at dog park while using the silencer as a stepping stool. Parents watching their 10-year son attempting to get behind the wheel while the family stood around the car in a store parking lot. And foreign tourists at Mt. Rainier asking in broken English if they could take photos of my car, only to find them a few minutes later taking those photos while one of them posed behind the wheel. I suspect the desire of some miscreants to take a souvenir of the encounter is also higher than normal which is why I didn't option either the quick release wheel or the master cutoff switch. To be fair a lot of people have those and have never had an issue. But with my luck, I wouldn't be in that category. -John
-
I pinged Caterham about a 22% rack for the SV since I didn't see one listed on their web store. I'm sure their answer isn't new information for a lot of people, but it was to me: "we only offer a 22% for non SV cars as the steering rack body is different on an SV." -John
-
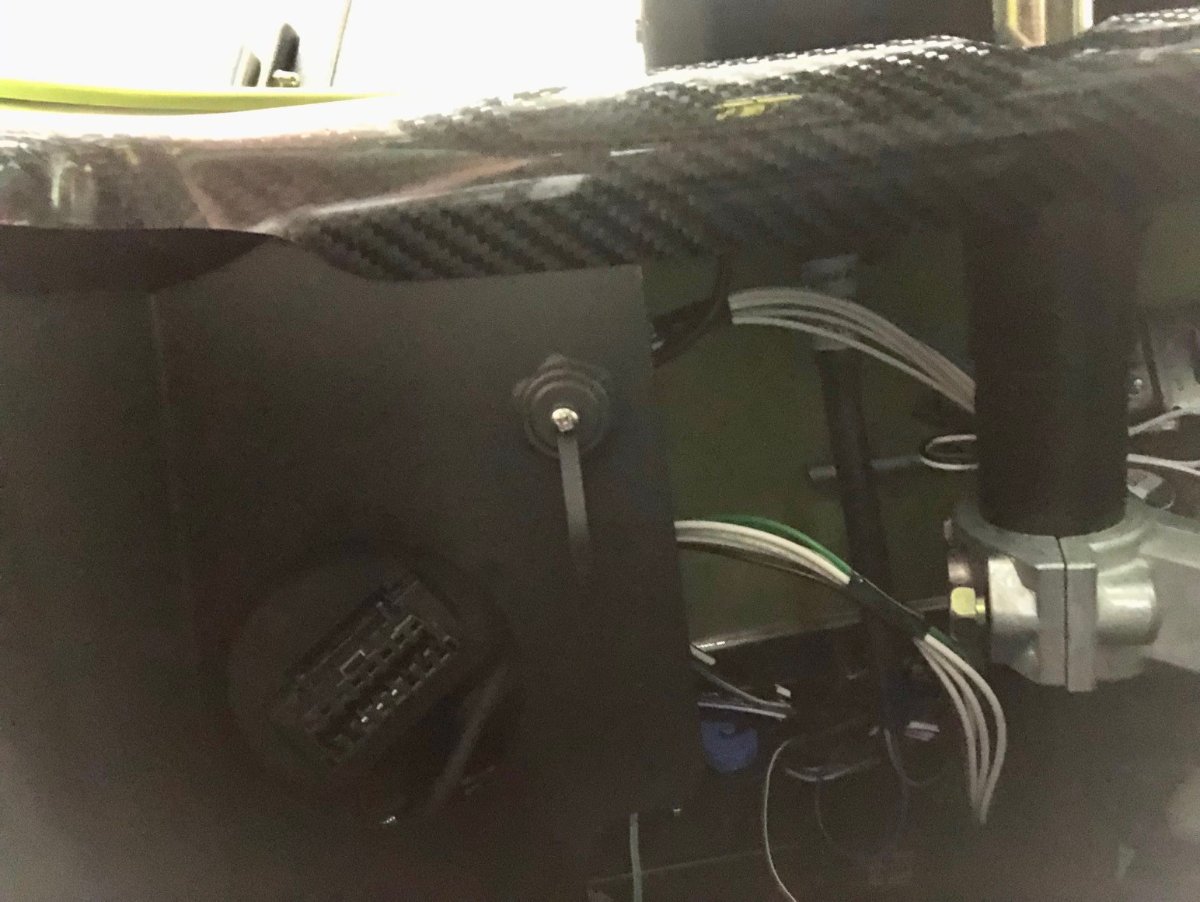
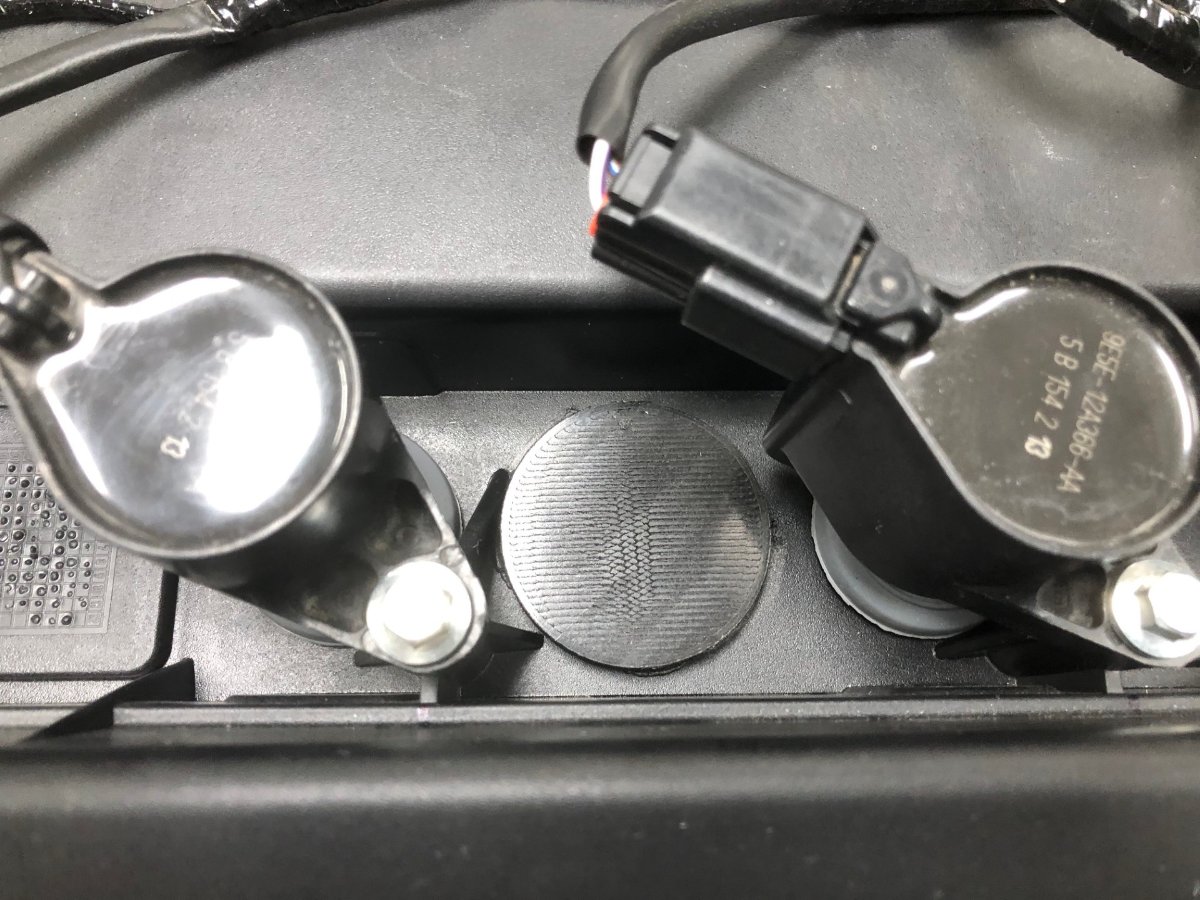
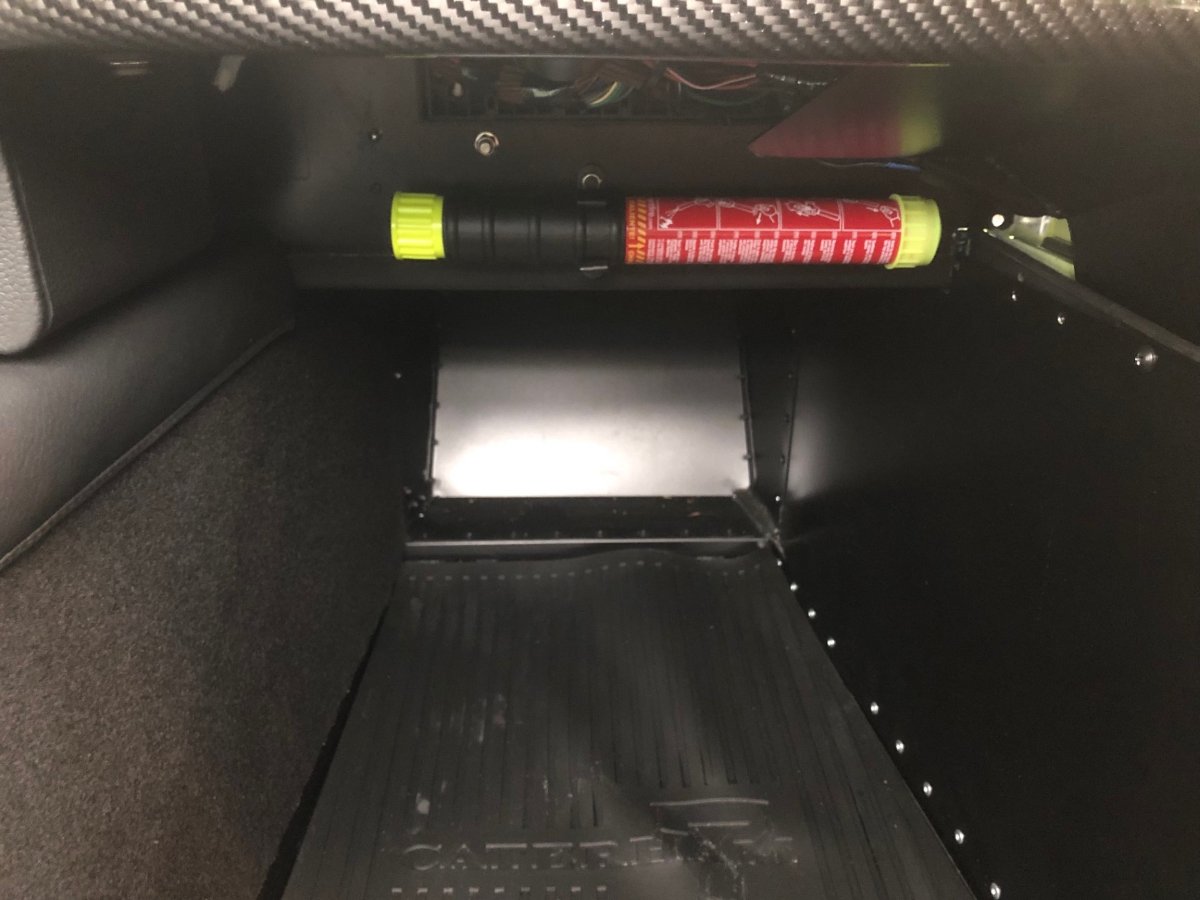
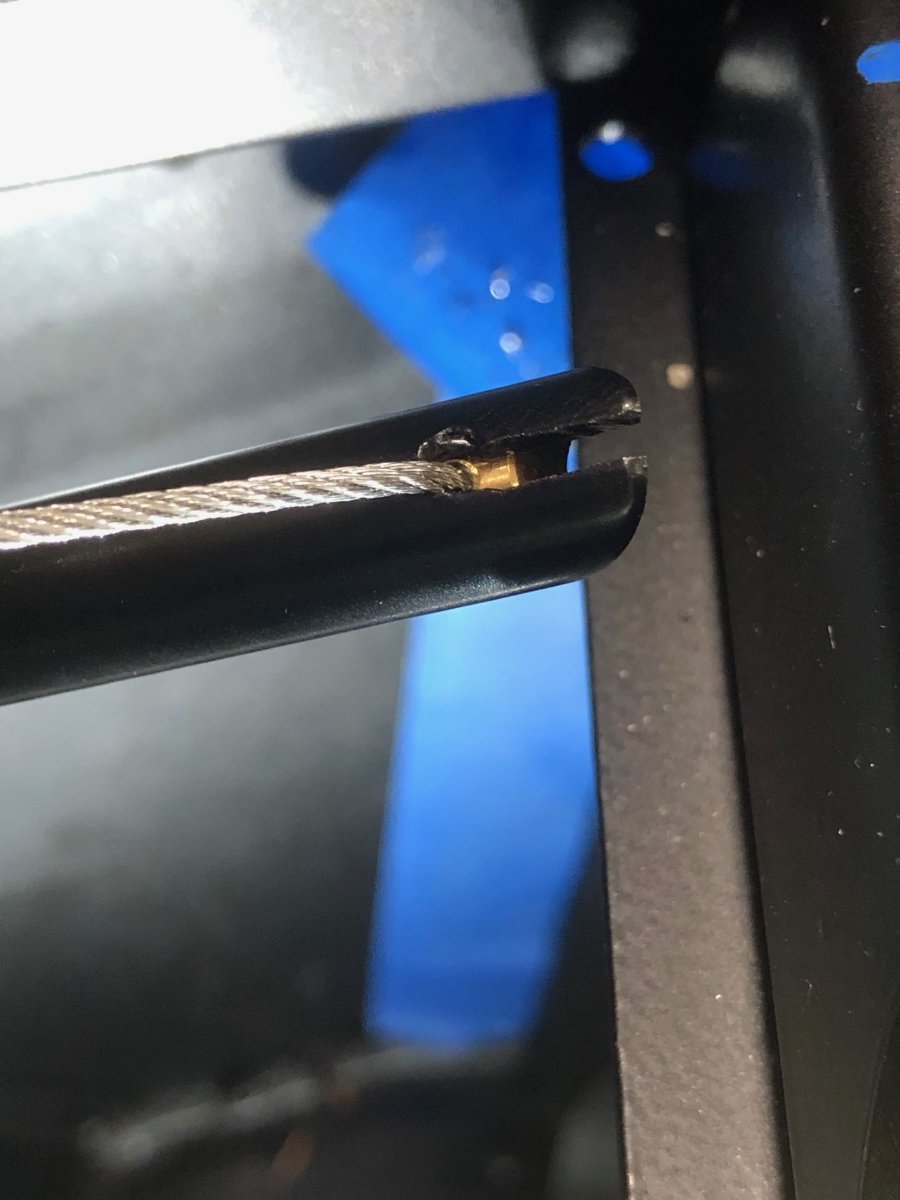
In preparation for the dyno, I took care of some things I previously punted for various reasons. The big one was soldering in the pull-up resistor for the oil temperature sensor so the AiM could read it correctly. That necessitated removing the scuttle, which is very easy to do after the conversion from rivets to rivnuts with M4 fasteners -- highly recommended mod. The AiM now reads about 9 degrees cool at room temperature. Once I run the car again, I'll check accuracy at running temps and adjust the calibration accordingly. I had also planned to install the remote button interface for the AiM which provides a dedicated button to reset the trip odometer. However, when attempting to install it, I discovered my mount for the AiM makes that a difficult process. When doing the original design, I had incorrectly assumed this was a push in fitting. It turns out it's screw in. With insufficient finger space, I was faced with removing the rear mount, or punting again and doing this as a winter project which includes printing a slightly redesigned rear mount. I've gone with option two. That means rather than resetting the trip odometer with a single push of the button on the steering wheel, I need to go through a couple of menus on the display. Not a huge inconvenience. I also ran power to the 12V outlet attached to the glove box and confirmed the on/off switch is doing its job to stop parasitic drain from the USB adapter. The knee trim panels finally went in, with the driver's side first drilled to mount the data port for the AiM. The Element fire extinguisher was installed above the passenger footwell. Easy to reach, but not in a location that screams "steal me!" Next was adjusting the throttle pedal stop and putting silicone on the throttle cable ferule where it mounts in the top of the accelerator pedal. A close look revealed that at full throttle, the rough, sharp edge of the cable cutout pushes into the cable. That seems like an eventual break point. A few minutes with a small file rounded over the edge. I also attached the cover I printed to plug the hole for the cylinder head temperature sensor Ford uses in most applications of the Duratec. Without this plug, water can fill the void that leads to the top of the spark plug ports for #2 and #3. The 420 uses a valve cover that doesn't have this opening. I've never seen it on a US car so perhaps it's a European fitment. Does anyone know the source, or if Caterham has these modified? Finally, I did some general clean up: removed last vestiges of blue tape, cut off the ends of any zip ties I missed earlier and sealed a couple of unneeded holes in the firewall with rubber grommets. Next step is the dyno on the 14th-16th, followed by an alignment, and (hopefully) registration. If things go well, my 420R garage sale is just around the corner. -John

-
Dez, a quick check of the Burton catalog shows two manifolds. The Details section of each page has dimensions, including the angle. If you haven't already seen this, it might be worth comparing these to your modified manifold and pay particular attention to how your carbs are currently located. How much clearance before any part of them contact the bonnet and also clearance over the top chassis rail. https://www.burtonpower.com/inlet-manifold-ford-1-6-x-flow-ohv-kent-2x40dcoe-3-1-im4242a.html https://www.burtonpower.com/inlet-manifold-ford-1-3-x-flow-ohv-kent-2x40dcoe-4-25in-im4240a.html They also sell a kit with the Webers. It's hard to tell, but it almost looks like the intake manifold length may be slightly different than the other two. Might be worth contacting them to ask. https://www.burtonpower.com/weber-twin-carb-kit-40dcoe-x-2-ford-x-flow-ohv-webpfo202.html -John
-
There is a member here with the same username as the person who won the BaT auction. Might be worth sending a PM to see if it's him.
-
Thanks Bob. Once I have a chance to drive the car hard, I can determine if the seats are too loose and require additional padding. My guess is they are just fine. A little looser than I prefer and not as optimal for me as the Mogs, but more than good enough. The dyno is scheduled the week of the 14th, with the alignment hopefully happening around that same time. Once those two things occur, I should be in a position to better evaluate all aspects of the car.
-
Steve Nichols, who designed the hugely successful McLaren MP4/4, has released a new car. Given the pedigree, this should be a very special driving experience. Time to start a GoFundMe page. https://www.autoblog.com/2023/07/27/nichols-cars-n1a-can-am-mclaren/ -John
-
Thanks, was this something that happened with increasing frequency or was it just random and occasional? I think I'll pull the scuttle this weekend to finish up a few jobs in preparation for the dyno and registration and see if jiggling that ground connection to the AiM does anything. The ground for that circuit has two connections I introduced: the connection to the Binder plug for the AiM harness and the connection from the factory gauge harness to the 24 gauge wire required by the Binder plug. I'll also check the sensor connector and pin into the ECU connector.
-
For the heck of it, I measured the width differences between the Tillets and Mogs. It's about 10mm at the hips and 20mm further forward about the location of the crotch strap cutout. Bigger than my estimation above which explains why I notice it, but again, not a massive difference. I also tried the car again, repeating the ring seating process to see if I could replicate the weird oil pressure readings from yesterday. Nothing. Oil pressure read perfectly normally during the entire drive. Intermittent electrical issues are such a pain. I'm hoping this was some really weird anomaly that doesn't reappear so I can proceed with the dyno session.
-
It wasn't a complaint. it was an observation.
-

The Regular Summary of Classified Ads of Se7ens Found For Sale
JohnCh replied to Croc's topic in Cars For Sale
When your Ariel Atom just doesn't draw enough attention.... I'm curious if the build is documented anywhere? It may not be to my taste, but it's fascinating as a build project. I wonder how far gone the original Europa donor was before this began? -
Yes, they are definitely the S3 version; labeled and measured. The difference in width to the Mogs is slight, but noticeable to me. I wouldn't characterize the seats as loose, but they are not quite as snug as the Mogs which are similar to the older R500 seats in this regard. I'm not sure anyone else would notice the difference, but there is a subtle reminder for me each time I get in the car. With the Mogs, the fastest entry is done with one hip pointing slightly downward, then rotating my hips once it passes the lap belt. Sitting with both hips level results in the belts being caught between my hips and seat and often wedging in place. With the Caterham's seats, I can sit straight down without this happening. Yes, the belts touch my hips, but it's not tight enough to pull them down. I haven't measured but I suspect there is a very slight difference between the two in this area. Maybe 3-5mm? By contrast the SV seats have noticeable gaps between my hips and the sides. The photo below shows the differences between the two versions of the carbon fiber seats. Tillet didn't provide a measured drawing of the R500 seats, but he did provide the following about the differences: "The original Caterham R500 seat was not made for a crash helmet or Hans device so when we made the 620R seat we moved the headrest back ¾ of an inch and lifted the belt holes. The inner shape of the 620R/ B6 is very slightly larger and the lack of side carpet also give a little more room. The B6 620R version is more symmetrical in the seating area and has a carbon top layer facing forward only. The R500 seat has an epoxy carbon Kevlar front and rear surface, with a black vinyl glass base moulding. The base frame of the 620 R seat is handed and tipped in towards the centre to give a better driving position with the shoulders inside the car. Nothing that cannot be done to the R500 seat with two 8 mm spacers under the outside runners." -John
-
Thanks Bob, if I wasn't able to get Caterham to agree to the seat switch, I would have needed to do something like that. However, although the seats are a little looser than I'd prefer, it's not to the degree that a correction is required.
-
I decided to attempt seating the rings today. The plan was to vigilantly watch the Lambda reading while doing reasonably heavy throttle from 2000-5000rpm, then snap off the throttle to push the rings into the cylinder walls. Provided there was nothing concerning in the readings, repeat a few more times. A camera was pointed at the exhaust to record any signs of smoke. It went okay. Lambda was safe, the car sounded fine, there was zero smoke visible in the video, but… After my last run, I noticed the oil pressure was down to 5 psi. Oh crap. Then suddenly it was up to about 70 psi then immediately fell to -3 psi, then up to 50psi, then… Clearly a sensor issue, but I decided to stop the fun and carefully drive the mile and a half to my house while keeping an eye glued on the oil pressure reading. It did the weird stuff a couple of more times, then went to a steady reading and was fine idling and after subsequent restarting when I played with revs. Interestingly the oil pressure alarm programmed into the AiM never came on, so it might be an issue inside that device rather than the sensor itself. Regardless, I want to sort this before going on the dyno or have a manual gauge back up installed. First step will be the old wire jiggle routine to make sure it's not a connection issue. Although it's early days and I haven't yet had an opportunity to drive the car even reasonably hard, I do have some initial observations. Some good, some not. The car is big. Shoulder room in the S3 has always been tight for me with a passenger. I don’t like that and have been spoiled by the Westfield's additional 2" of cabin width, hence the reason I opted for the SV. However, the cabin feels immense. Yes, I'm aware I'm probably the first person to ever publicly describe any Caterham this way, but in fairness, all my tin tops have narrow cabins. My references are a bit skewed. The seats seem comfortable enough but are unnecessarily wider than the Mogs. This despite special ordering the narrower S3 version of the carbon fiber seats. For me, the Westfield is the Goldilocks for seat and cabin size. The turning radius is big. The Westfield's is significantly tighter. The steering is also a little slow for my taste. Not as slow as the original rack on the Westfield, but much slower than the version I've run for the past 18+ years. The quicker Caterham rack is likely in my upgrade future. Steering is very nice. Really linear and smooth on turn in. I've only driven 2 other cars that had that same sensation: another Caterham and a modified late 80s 911 with a lot of front suspension updates and an absence of rubber bushings. The CORE dampers are really good on abrupt bumps. The sharp input on that initial transition is really smooth and takes the edge off the hit. So far, glare has not been an issue with the AiM display. The custom mount appears to be doing its job. The steering wheel buttons are similar to the Westfield's and perfectly positioned. The wheel though is slightly bigger at 280mm vs. 270mm. That 10mm difference is noticeable. I prefer the smaller wheel, but it's a minor nit. -John
-
I have the Caterham (Raceline) dry sump system and the engine is effectively the same from an oiling standpoint. I wish there was a definitive view on optimal capacity but it's all over the map. I've seen references anywhere from 6-8 quarts. Of course, what really matters is how much of the missing oil is down to combustion events vs. user error/inconsistency in filling each time. I really hope this is simply a case that I'm an idiot. In my favor is a long history of being an idiot. So I'm hopeful...
-
@Anaximander, I saw your other post and glad to see it's sorted, and you did so well at the recent autocross. If this turns out to be a non-issue, then I am close to tying things up. Pop the scuttle to finish up a couple of wiring items and install the knee panels, get on the dyno, then sort registration. How hard can that be?
-
Thanks, I added nearly 6-3/4 quarts to get it just below the top of the baffle, but I can't guarantee I filled it to exactly that same spot before. The fact that you add a little over 6 quarts makes me feel much better. Now who is going to come along and make me feel much worse?
-
Thanks Simon. My lean spikes are at tip in at low load sites. I haven't yet tried heavier application like you would have on track. That said, when I drove the car yesterday and tried to ignore the Lambda readings when tipping in the throttle to avoid a bias, it seemed to run better. It might be good enough for the 35 mile trip to the dyno. Well, there is an asterisk to that comment which reads "if the engine isn't bad." <cue foreboding music> I'd covered over 60 miles and it was time for its first oil change. My recollection is that I initially put in 8 quarts. However, after sucking out the oil from the tank, removing the finger and oil filters, I had a shade over 5-1/4 quarts in the Pella. The plugs were sooty but dry, yet when looking into the bores, a coat of oil on the top of every piston stared back at me. After refilling with fresh break-in oil, I confirmed there is no visible oil smoke from the exhaust. There was a brief puff of very black smoke but it coincided with a stumble when blipping the throttle and was consistent with earlier Lambda readings. A compression test showed 240psi across the board. That seems high, but it could be my gauge. It has historically shown 200-210 psi with the original iteration of the Westfield's Duratec which had 10.75:1 pistons vs. 12:1 in the 2.4L. Leak down showed 2% in each cylinder and a borescope revealed nothing out of the ordinary beyond the thin film of oil. Esslinger responded to my email Sunday evening (nice customer service). His initial reaction was bad and led to much swearing and invoking the names of various deities on my part. However, after seeing the leak down numbers and my confirmation I've never seen visible smoke from the exhaust, he thinks it might have been oil from initial startup before the rings had begun to seat. That would also mean my estimation of how much oil is missing is, well…wrong. At this point I'm not sure what to think. Other than the issues related to the fuel assembly and the map not being ideal -- yet according to the logs, nothing unsafe -- there are no other signs of issues. No odd noises, starts and runs fine, no smoke from the exhaust that I've seen or smelled, and it doesn’t run hot. If the rain holds out, I'll try to put another 10 miles on it today to see if there is measurable oil decrease in the tank and also keep an eye open for smoke. There is still the possibility that I missed it or that running it for several minutes wasn't sufficient. When I started this thread many, many months ago, I recall writing this was going to take a while. This, however, is not quite what I had in mind. -John
-
Thanks Andy, Simon was kind enough to share his map from SBD for comparison. It also has the acceleration fueling disabled, so this seems intentional. In contrast, Emerald does enable it on the map I'm using in the Westfield and it didn't show those lean spikes when logging after the engine was completed. Perhaps part of the issue is that I'm seeing the lean spikes as they occur because the Lambda is shown in my AiM display? I see it, so I'm aware. I'll see what happens if I intentionally ignore the display under normal driving. If I feel the issue, then I'll know it's not simply my reaction to a reading.
-
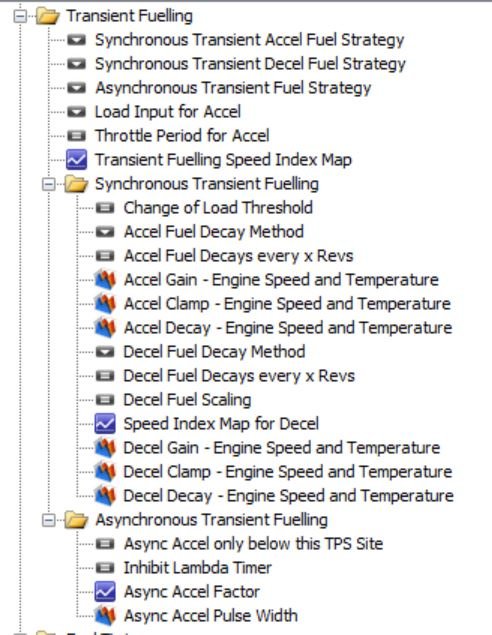
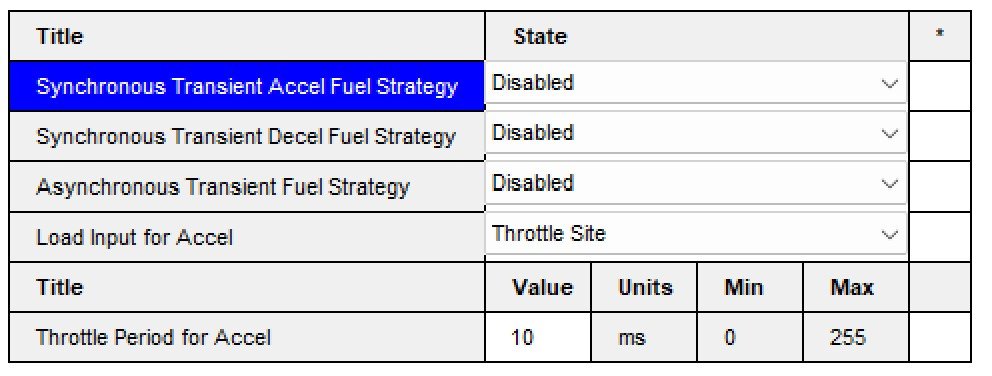
Thanks MV8. As per the screenshot below from the software, there are a number of individual pages associated with this function and it appears they all have data. However, it's unclear if that data is for whatever he normally uses as a base map -- which could be old and for a very different engine -- or if these are the values used in his maps for his similarly tuned Duratecs. I'm hoping I can get a hold of an MBE map for a Duratec so I can compare. If I don't get a hold of one in a bit, I may just click the enable button for Synchronous Transient fueling and see what happens.
-
I put 22 miles on the car today. No issues, and looking at the logs, the random lean spike seems to have disappeared. However, it still goes lean (about 1.10 Lambda, 16 AFR) when adding throttle. Looking at the map, it appears SBD didn't enable either of the acceleration fueling options. Does anyone know if that's expected with the MBE? If it's not, does anyone have settings from another Caterham I could try as a baseline? Thanks, John
-
Thanks MV8, I'll keep that in mind if for a winter project. The interesting thing for me, assuming my hypothesis is correct, is that my mods didn't create a problem, but rather exposed a shortcoming of the stock tank. If I treat empty as the same fuel level where the stock pickup can no longer access fuel, then the issue will remain masked. I should be able to program the AiM to reflect this virtual empty point. Looking back at when the engine first died, I was driving in a straight line, and the prior turn was a gentle sweep to the right. This tells me that yesterday's experimentation was either fraught with false positives, or there were actually two issues at play: in-tank fuel plumbing issues (now addressed and possibly causing the random lean spikes) and fuel surge as fuel was consumed. I'll report back later with today's results. Thanks, John