MV8
-
Posts
2,297 -
Joined
Content Type
Profiles
Forums
Store
Articles
Gallery
Events
Library
Everything posted by MV8
-
That's a great power train. M2 is a popular IFS. Looks like a TBI intake in the pic but it is hard to tell. It Also looks like you kept the bumpsteer in check and added some ackerman too. There are several locost books now. I assume you are referring to Champion's book.
-
I don't think anybody is still making the original reservoir design which I believe is identical to the late mgb original reservoir. I think the replacement master square reservoir from a late mgb would fit the Caterham master (res PN 6505-06041911) and the price should be around $15. I'd probably replumb to fit the 13/16" bore AP replacement from Caterham or use a standard spitfire master.
-
I think this is the best looking stalker I've ever seen. Beautiful! Does she drive it much?
-
That is an adventure! There should be a ground cable between the engine and the chassis as well as the battery. Generally, they get left off or break and are not replaced, grounding the drivetrain through the throttle cable. That and the condition of the bat cable could explain intermittent problems. I'd use 4ga cables for this. I buy marine grade cable and copper lugs as needed for the right eye size, then crimp, solder, then heat shrink.
-

Source for rear (solid) brake rotors?
MV8 replied to KnifeySpoony's topic in General Sevens Discussion
Spitfire 63-80, Elan 68-73, Europa 67-74, Herald 61-67. Part numbers: 208715, 12030000, GBD154, 586-521 https://www.ebay.com/itm/171693333431?hash=item27f9b85bb7:g:-twAAOSwcZJbv~qa -
I'd look for tables with kpa and rpm with timing or afr in the cells.
-
I see you have all the normal sensors based on the upper right corner. IAC is more likely Intake Air Temp. You have only one map under the FILE tab when plugged in to the powered on ecu ("online")?
-
To prevent yourself from being immobilized (for whatever reason) in the future, terminals could be added to bypass the immobilizer control box. It may only be interrupting one wire, such as keyed power in start and run to the ecu. Then it won't matter if you use a standard key or any immobilizer component fails. I like the idea of a momentary switch for the horn button to be a start button while holding the momentary, with the key in the run position. Thieves don't normally want to hit the horn. Another idea is a fuel pump that stops working after 15 seconds, disabling the car; likely blocking traffic. Air tag is a good idea to keep in the car too. The battery is replaceable but I'm not sure how long it works but it seems the car could incorporate a 14vdc charger/maintainer with tag mods. https://www.pcmag.com/how-to/apple-airtag-tips
-
Posting pics of the screen with different tables and settings displayed might help too, so everybody can see and we all may benefit. I don't think you can use any software other than the desc pro and data logger add-on for the T2. Someone would need to write a program (BIN) to bridge the hardware differences for display and making changes on more common software that works off the shelf with common aftermarket ecus. T2 is no longer supported. Carl, Have you tried hitting "cancel" instead of entering a windows password in the laptop? DESCProW-Manual.pdf pectel t2 ecu.pdf
-
Does a Pectel T2 ecu use a MAP/barometric sensor or is it Alpha-N? I guess fuel control only/no ignition control through the ecu? I expect the resolution is limited. You can probably widen the steps at the extremes for tighter maps/smaller steps in the problem areas. Sudden throttle closure would go instant rich, at least monetarily. I see it supports MAF and MAP. More modern than I though.
-
The diff mount lower cup washer is upside down. Yes, you need the toothed lower mount insert to work with the oem upper in properly isolating and locating the diff without binding. No need to glue the lower back together. If it were still bonded together, the tabs would keep it from rotating during tightening. You can hold the lower and torque the upper end of the fastener if that is a problem, but I don't think it will be.
-
If the wording is greyed out and the "light" is black, you probably do not have the data logging software which is an add-on. What version of Desc PRO are you running? I guess you have an old XP laptop or running virtual?
-
Drilling only the outer tube, not the new rod/pipe/tube.
-
That would keep it original looking for sure. If going that route, I'd find a thick wall tube, pipe, or rod that barely fits inside, insert it as far as it will go, drill 5/16 holes two inches apart that rotate 90 deg along the original tube, drill the two bolt flange 3/8" so the rod/tube can be welded to the flange from the engine side of the flange, install, tack, remove, fully weld, then grind and sand the plug welds smooth for an invisible repair.
-
In order to repair the original engine mount bracket/arm, the pieces need to be installed, the engine supported to the correct height, and then tack welded together. Then it can be removed and fully welded. After fully welding, it can be reinforced with a single, 0.125 gusset across the two-bolt flange and plug welded to the tube. If clearance is tight due to the flange being narrow, the bolts could be replaced with allen or torx socket head bolts. Here is the general idea of the gusset.

-
I would return all holes to original. When the block was cast then drilled, those holes were not intended to locate the bell. There are hollow eccentric/offset dowels available but I don't know if there are any that would fit this block. Stepped od dowels could be machined and tapped in if the bell was a loose fit to the oem dowels.
-
CBuff, composite is the method of assembly. The material is either fiberglass or carbon fiber. The binder or "matrix" of the material is usually epoxy but traditionally polyester resin and both work well. I'd have bare CF clear coated or FB undercoated.
-
Bell alignment is normally done with adjustable dowels to replace the original dowels. The bolts and holes in the bell are unchanged. The adjustment is only as good as the current condition of the crank and bearings. The dowels align, not the bolts which are just clamps. Countersinking might make a bell concentric to the crank, but it has to be confirmed with a gauge to know. I'd replace the countersunk bolts with the standard bolts and washers torqued to the minimum spec. If I could not reach minimum spec on one, I'd leave it out and race with plans to pull and repair before the next race. You'd need an AC TIG to repair it. Vee'd crack, welded, and redrilled. Find a professional welder.
-
Hey, you're too good to me. I guess I'm "smart" about the Sabre at least. It's one of the best imho. I always ask for the "delta pilot discount". I left early for other aviation work I am still engaged in. Started pulling delta retirement early before the recent cuts but no, I was not one of their pilots. Your friends experience does not surprise me.
-
Having the nut on before cutting is handy for clearing the burr at the cut, after you've squared up and radiused the end slightly with light application of the side of the grinder blade to take the corner off.
-
Looking at the Raceline site, I see they sell engine mounting brackets/arms and call them "engine mounts", so I assume you are talking about the metal arms that bolt to the block and not the rubber mounts that bolt to the chassis. Why not use the original arms? The new arms should not raise the engine a 1/2 inch in the chassis. They also sell duratec arms for changing engine placement longitudinally. They look very similar to zetec arms so maybe they sent you the wrong ones. I'd take a pic of each against a carpenter square and takes some measurements to email to raceline so they can determine if they sent you the wrong parts. I thought you were referring to the rubber mounts. There is a replacement rubber made by vibratec that uses a stud instead of a bolt and is about 1/8" taller than the standard rubber mount. I'd stick with the standard mount. Duratec: https://www.raceline.co.uk/products/part_section.asp?categoryID=1 &SectionID=27 Zetec: https://www.raceline.co.uk/products/part_section.asp?categoryID=2 &SectionID=46
-
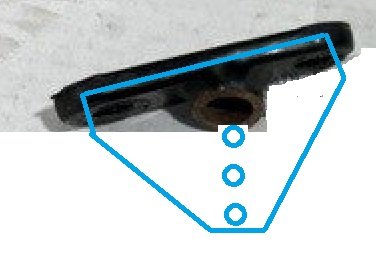
Mr. Bart, I see you are in the Beltway. Just want you to know that we are from USA7's and we are here to help. Seriously though, your engine mount arms on the block look odd but it isn't a very good pic. They are appear to sweep forward. Maybe some sort of custom brackets to install a zetec?
-
What is my prize? Some sort of "Delta pilot" discount?
-
Any pics of the engine mounting brackets sitting on the too tall mounts? I'm not sure why you don't use a standard cap which is very low profile and costs $5.
-
For metric, it is measured one major to one major (i.e. the gap from tooth peak to adjacent tooth peak) so 2.5 sounds right. The svt cap should be the same. They have either a cam lock or threads. Bart, why not do a quick print of a thread profile gauge with 2.5, 2.75, and 3.0 in 25mm runs then check you new cap? Measure the new caps OD of the thread in inches, convert fractions to decimal and multiply by 25.4 for mm. I'm not sure how long your print will be stable in 225f oil and the allen socket will likely strip and require broaching to machine. I suggest aluminum with two round, 3/8x7/16 pockets as far apart as practical to use a universal pin wrench.