MV8
-
Posts
2,297 -
Joined
Content Type
Profiles
Forums
Store
Articles
Gallery
Events
Library
Everything posted by MV8
-
 A pretty good explanation imho: https://www.motortrend.com/how-to/1607-tune-your-vacuum-advance-for-better-drivability/
 -
No, I'm saying it is better for an ignition system to include manifold pressure when adjusting timing, just like oem efi and carb systems. Most stand-alone ignitions do not. It's just another thing to consider. Some electronic ignition systems are a drop in replacement for the points but still a fly weight and vac adv (if installed) system. Some lock the flyweight and vac adv or use a distributor from an efi application that has no fly weights or vac adv, set the total timing by rotating the distributor body, then retard electronically based on rpm input. The mid-60s and older vac adv used manifold vacuum, which could be a port (not "ported" vac but full vac at idle) on the carb or directly on the manifold. Closed throttle=max vac adv, full throttle= zero. Completely separate system from the fly weights. Fly wts act on the shaft. Vac adv acts on the breaker plate.
-
Might be a good time to check the vac adv for leaks and hand pump to see how far it rotates the breaker plate on the base plate, clean and lube the fly weights and springs, then checking how far it is set to rotate and how easily against spring pressure. Note, the degrees of movement at the distributor will be half the degrees at the crank. A protractor and divider are handy for checking. I'm thinking this is a pre-ported vac design ignition so full manifold vacuum, pinched off for setting initial timing, fly weight tension enough to stay pulled in fully at idle but however far they are pulled in, rotation of the distributor compensates at the expense of total timing (inital plus fly weights only. Vac is it's own system). These electronic systems are no replacement for vac adv unless they have a map sensor and a shunt to lock it out like older oem efi systems.
-
FWIW, I'll share the MX procedure for what a similar but mass produced design entails for replacement (not a unitized hub assy like most cars). Could be helpful to others trying to remove and replace dedion bearings without picking up a hammer. I guess a North American sierra factory service manual would be most applicable?

-
The problem with one-piece, led fixtures is the leds cannot be easily replaced unless you have some electronics and precision soldering skills (I do). Leds do fail individually and production quality varies. Most commercial trucks use leds now as a replacement for incandescent with same size and GA aircraft are allowed to direct fit / replace incandescent with leds in a same fitment bulb config (no wire gauge or fuse changes to match as the operator may need to refit an incandescent enroute in a pinch or simply following MX instruction, but I digress). I've noticed many commercial trucks with bad leds in a cluster. The fix is to wait until enough fail so the value for intended safety use is questionable or go ahead and replace the fixture; usually for a lot more than a led bulb. I love leds in a bulb config for incandescent fixtures for shop lights, tail lights, interior lights, instrument clusters but have been disappointed in headlight performance short of a servo controlled projector; enough to go back to H4. I don't go for higher equivalent wattage out of consideration for other drivers despite loop hole provided by antiquated FMVSS. Led bulbs in an incandescent fixture usually results in a better performing, higher quality assembly. The led chips are arranged as needed to mimic the incandescent pattern they are designed to replace. The more lumens, the better but the additional heat at the board means a shorter life. Fork lifts have very similar if not identical appearing lights to traditional Sevens. Each fork lift mfg has a little different design. There are some all led fixtures that have amber, clear, and red. I have some I bought for a project a few years ago but have not done more than test to see if they work. Not for sale, but let me know if anyone would like to see pics or want measurements. Just another consideration. We can talk about led headlights as well. I have box full of different designs I've tried.
-
A flanged ring around the tube to drip over, supporting ring under the cover to keep it from being a low spot? A pic might help.
-
Quite a range of head gasket thicknesses available for the pre-crossflow. I wonder if it was a just a gasket change. Pushrod length would need to be taken into account but you could drop that down to a non-ethanol pump friendly ratio and tweak the static timing if needed. https://www.cometic.com/applications/automotive/ford/pre-crossflow-ohv-kent/15l--0ci15l-i4 As for 100ll, it's still a lot of lead compared to auto fuel. Generally a credit card machine and grounding clamps but somebody would need to show you the procedure once for filling your cans. Another issue is the actual percentage changes with the season and filling of the station's in-ground tank. A busy station is safer.
-
Also, an ultrasonic cleaner is nice to for that parts that will fit in it. The screws for the butterflies are probably staked so if trying to reuse the screws, you'd need a new way to lock them that is fuel resistant.
-
I don't think the vent hole is too small but it my be blocked internally. Blow air into the filler port and feel for a breeze at the vent. You may be able to remove the vent cover with the trans installed. I'm thinking the front face of the main case is leaking into the bell mating surface. If the vent is clear, maybe there is no gasket at the bearing retainer. Since it is low, you might as well pour it out and compare the flow/thickness to the 80wt going back in. You might also spray a little ospho or other phosphorus metal prep underneath to stop the bare metal from rusting, let it dry, then rattle can rustoleum clear so it wont be solid rust by the end of the season. Nice thing about matte clear is you can't see the overspray or just spread the leaked dope all over until you can deal with it this winter.
-
2000E/ "Bullet": https://www.burtonpower.com/tuning-guides/tuning-guide-pages/ford-2000e-bullet-gearbox-guide.html Looks like all your leak is from the front around the input shaft. I suggest pulling it to replace the seal. You could pull it and with the slip yoke installed, use a rubber tip air nozzle to blow a little air into the vent and enjoy the show in the bell. May be leaking around the rails.
-
Should be 2.1 US pints (0.95 liters) 80wt. It could have something thinner in it to reduce parasitic loss for racing or an additive. I'd look for a vent on the tail housing in the web above the speedo drive.
-
Series 2 Pre-Cross Flow Distributor and Ignition Timing
MV8 replied to Henry VII's topic in General Tech
I spy an adjustable temp cooling fan switch with remote sense capillary tube. Looks like a lot of effort was made to ensure things don't get rubbed the wrong way, but the clutch metal braided line appears to rub the oil tank. Three inches of fuel hose split lengthwise and placed around the line would fix that. -
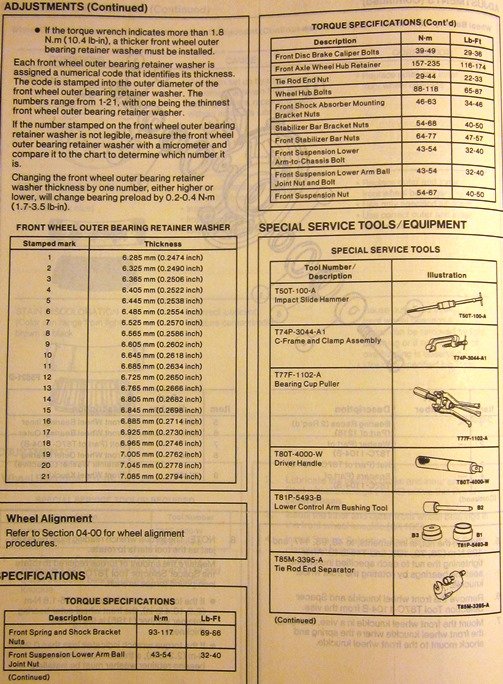
Yesterday, I replaced the wheel bearings on a car with a virtually identical hub design. There must be a small spacer ring that slips over the hub tube that is positioned between the inner and outer caged bearing assemblies. After installing the races, caged bearing assemblies, and seals into the carrier, the hub tube had to be installed. To do this, I used a one foot 7/16" threaded rod (1/2 inch is more common to find and may fit the arbors), a few washers stacked for more thickness and a standard home construction, low grade/strength nut on each end. I selected arbors from an aluminum bearing race and seal installer like the one linked below that would fit well yet press against the caged bearing inner races ONLY. The threaded rod made assembly very easy and perfectly aligned everything; no hammering. If the spacer ring is left out or is too thin for the bearing tolerances, once the rod is tightened (with minimal effort), the hub won't rotate easily or at all because the caged bearings are clamped too tight into the pressed-in carrier races. The threaded rod lets you know what will happen when you install the axle. This should be a check if there was a factory manual for service. Selective spacers should be offered due to variables in the replacement bearing tolerances / clearances. Steel driver sets are better but this is what I used: https://www.ebay.com/itm/300930042361?hash=item4610d409f9:g:Z~wAAOSwM4xXYI40&amdata=enc%3AAQAHAAAAsFaYjr2V6l1cWgL%2FxFeoTOUhVLqFyiZYnTrcfWuNJJFi4ggJ6mFDslPrCtdV2xdWRFiMVDOI%2FvO1gBMAHj9kbMJpOAgGT%2BLoP3DaWggZ91w2%2FhY7O1m6qpt%2F7e6rLumPxcgrIRWF8EPAqCuRQakyZZqmns1pLI4ds5IqPaEVwnBfFmmvJ%2BM7cX7qAtdmeuV%2BDTr%2F1zi%2FBpyH9lMwoXpJ4cpJ9HZk3vetshSMwQ6XPrPz%7Ctkp%3ABk9SR5aa8troYA Better: https://www.ebay.com/itm/393110706383?hash=item5b873958cf:g:fugAAOSwyd1gENjO&amdata=enc%3AAQAHAAAAsN%2F1NGB%2FtROLlCa5vNUiz8GvJ%2BCV3mS3ObuHLuoly1wrz5n0ryCGKSqzhzz2fonlzMyV%2FC0vxqNQXpyqLEElFJXyiJCPko%2BfbhHIKFZGqlDjVmHtqC5zfkf7lDJfOhXIt4UmNwzbGKIunwEAtTqWZ0F8Yw9r7ajC25EO%2FeVS22y%2F2YOFgPhIH6yn7Y9uqn60gSxSgCzPNckpk38QXcrDY7ONqKMnVeI6GZpchdLRfrCU%7Ctkp%3ABk9SR6qa8troYA 7/16 threaded rod (home depot, tractor supply, lowes, online, etc): https://www.lowes.com/search?searchTerm=threaded%20rod&refinement=4224552713&view=List I think I found waldo in one of your picks.
-
Series 2 Pre-Cross Flow Distributor and Ignition Timing
MV8 replied to Henry VII's topic in General Tech
Ditto. I would expect at a minimum a carb cleaning, balancing, adjustment, and vacuum leak checks at the carb mounting gaskets. Some as-is/rough pics all around would be nice. Use non-ethanol fuel if available. Check the cap for crusties on the terminals and rotor to clean or replace. Check plug wire resistance or if labelled carbon, replace with spiral core inductive. -
The ebay marine type sender I linked to has a flange od of 2.75" with the five bolt circle approx 2.25" (quick checked with a tape measure). I said nudge with a resistor but since the range of the marine unit (0-190) is outside vdo specs (10-180), one could add a stop (black nylon zip tie, hose clamp, .050-080" aluminum strip bent around to form a clamp with fingers to form a float seat, etc) to reduce the travel on both ends, so the gauge doesn't go too low or high. No need to install the sender in the tank to figure out what it needs to be. The nice thing about the marine tubes is that no electronics are exposed to the fuel/ethanol/water with an inductive float.
-
New Jersey out does California? !
MV8 replied to panamericano's topic in Politics, Religion and Controversy
He must not have sought or followed sound, legal advice. Those are the rules in NJ. Imho, to avoid the penalty for offering it for sale, he could have reinstalled the parts removed and had it inspected. Then if the equipment was there but it didn't pass, he'd should be off the hook for the penalty and in the same boat as any vehicle failing to meet emission requirements (i.e., pay so much to repair at that point (not to reinstall equipment) then get a pass to register that year). Getting rid of it by destruction, giving it away to someone out of state, or moving doesn't change that they appear to have him just for offering it for sale (up to $5000 penalty). To avoid the penalty, he must comply. Failure to comply and his actions since the prelim notice will likely have an impact on the actual penalty amount. This is about offering it for sale. I refuse to enter NJ for a number of reasons. Now I have one more. -
I'd look for a 10-180 ohm in 200mm or consider swapping the gauge for a sweep more common to marine use or a 0-190 nudged with a resistor. If it were 0-90: https://www.ebay.com/itm/384881309274?hash=item599cb6b65a:g:ia4AAOSwAiRie3G7&amdata=enc%3AAQAHAAAAsC1a4UoyP8AinGvzK5kTFshAupATZBfB0FubHQoezV5D4IQlU3yKwxLKurT9XpwuFRdpLOzwJYSZ5GAxuNN4NGmhQ8qr6NICjUgex%2FbYWFaZhr%2FPbXpiwdmruHliYoNKLgCU1x4Dk0oKrklxAf6%2BENNRbMvmjc29RYUfYLc%2B0%2BXPZat3WiCzbjvBvZusnDz5Jm%2FFafc3bcxWbJ4MJd9qS9x091udz3RQAHGdUJQxRyhb|tkp%3ABk9SR_yk3MTnYA https://www.ebay.com/itm/134213812640?hash=item1f3fc441a0:g:9KwAAOSw2LljDIhn&amdata=enc%3AAQAHAAAA8C7BGO6LO1PDx0xEZQSMENqp7FPPYGtjSxMuJqgBQDLPw8i%2Fs3PxN1wpMnIqGgzye234IFII0r5k2NCzqvwUkk5XL5xnkPyU0ftG89BFqiG25M%2B%2Fweg4%2F3OuCNdgQ8G077PRrlpbqqJ7T3sES%2Fzvhati5CYxWPP75d5VOkcPJ9Wtjek2OKA4UMzhZpdIzCtjzXo7UvLpBMjg9C2g19vfa6SZ4nXQUE9eS1bMbCMv7pEQFUhpOfcwx5Z2rlW0XCk13ebhgzLBwUywlLqiWLy0wkQvv%2BWeDGIk4Ws8MU%2BRH4F7FhQ9s3uqFgLZooOKCVLT4Q%3D%3D|tkp%3ABk9SR4Tkk8XnYA
-
I believe your '03 uses the older engine and sensors. The newer sensor is very long and drop into the center of the head.
-
I didn't mention that since it this was for a direct replacement, but I've converted to a stainless tube sensor. It primarily depends on the gauge ohms sweep, tank depth, and minor tank mods to the opening. I'm guessing 240 ohm empty, 33 ohm full for an old Smiths? You can check this with the old (semi-functional) sender removed from the tank and a dvm to check the ohms at the travel extremes. Or, you can temporarily fit a 1k potentiometer between the sensor wire and ground. With the key on, rotate the pot knob until it reads empty then check the pot value with a dvm. Unplug to read full (or vice versa). I think the sevens have a six bolt flange of unknown (to me) bolt circle where most tube senders are five bolt.
-
Did it set a code/check engine light or is it just that the gauge is not functioning properly? Blue connector is a push-in sensor where a brown connector is threaded. Perhaps last time, you paid for an original ford sensor at $35 each but they installed a typical replacement at about $5 each. Can't actually see the difference but the output values may be off or not hold as well.
-
If the ohms are compatible, it looks like TR4 (763-020) would be the best match and allow the most accurate gauge with a little tweaking of the long rod.
-
I'd not seen the bead version. Beads or foam sheet do the same thing to prevent you from not having any cushion below. If you can be raised a bit, the curvature and pressure will be more even. Just found a video of the traditional method: https://www.youtube.com/watch?v=VTGELArtLVE Businesses that ship sensitive avionics equipment have foam guns that dispense into shipping containers with a thin layer of plastic (and the equipment bag) isolating the equipment. Nothing special. The fabric is stretchy felt applied with an aerosol adhesive that is safe for foams (3m) and typical of what is used to install headliners, which are often foam backed fabric glued to cardboard. Not very durable material but conforms well.
-
Best results will be to either suspend yourself relaxed, an inch off the floor with a strong belt (chastity belt or wedgie option?) and hoist/rafter or add a 1/2 inch of high density foam below the cured poured foam (yoga mat?). I'm not sure what the kits cost but it's just regular density two-part foam and a large HD trash bag. Don't try it without an assistant to hold the bag top and pour. May want to double bag just in case. Don't get liquid foam on your skin and consider how much it will expand when deciding how much to pour.
-
'89 Caterham electrical gremlins - indicators and flasher problems
MV8 replied to truckin-on's topic in General Tech
Hooray! ISO is European; JSO is North American. Any early 90s Lexus, any vw, any volvo, etc should have the ISO pin config. If you are considering LED lights in the future, consider using an "electronic" flasher made for LEDs that is not dependent on the electrical load of filaments to control the flash rate. -
Sounds like you could use a creeper like this. Stow it on the wall. Several useful techniques if getting up off of it might be a problem. Otherwise, just roll off. https://www.ebay.com/p/15019994121 Maybe an extra low stool as well. Cheap hbf stool to transfer the casters and seat to an H frame of 1x1x.083 square tube and 1/8x3x3 strips for caster attachment. May be able to cut down the center to retain height adjustment. The tray is not much use anyway.