Dave W
-
Posts
297 -
Joined
Content Type
Profiles
Forums
Store
Articles
Gallery
Events
Library
Everything posted by Dave W
-

WCM ultralite stiff clutch pedal info.
Dave W replied to MudHut's topic in General Sevens Discussion
You can actually have both a lighter pedal and short travel. Install a clutch stop! I feel the same way, I definitely prefer a short travel cltuch pedal. You can adjust the stop so you only have about 1/4" of pedal travel after the clutch disengages. Dave W -
WCM ultralite stiff clutch pedal info.
Dave W replied to MudHut's topic in General Sevens Discussion
You want a smaller diameter master cylinder. Will give you higher pressure but a longer stroke. You my also want to look at changing the clutch pedal ratio. Typically they are around 5 to 1, but depending where you are at right now, you could go to a 6 or 7 to 1 ratio. Dave W -
I opened up a pear shaped hole in my hood using an air nibber after it was painted. I layed out the lines on masking tape, and cut about an 1/8" inboard. The final hole size was opened with a fine grit sanding roll and die grinder, then deburred with a file. The only problem using the air nibber was it would dig into the tape, if you where not flat to the surface. Dave W
-
Dan I had a problem with a 4AGE TPS, not aligned correctly. My solution was to remove the TPS and pull the tab bracket that engages the TPS, off the TB shaft. It was postioned by two locating flats on the shaft. I just filed the flats about a .04" [in opposite cross corners] allowing it to rotate slightly. Then re-attach the shaft nut while hold the tab bracket in the new location. Dave W
-
I had the same problem. My tank only has one internal baffle, and with hard cornering or auto-x I needed half a tank + to prevent fuel starvation. My solution was to add a sump to the tank. The walls extend 4" up into the tank, with hinged gates on each side. With the pump extanded to the bottom of the tank sump, I can now suck very last drop of gas without any problems. Dave W
-
Drew I actually flat floored my seven first before going to corner wt'ing. I was within 18lbs using that process with a 5/8" rake. To be honest, my middle name is not Shumacker, I could not tell the difference between the two processes. Dave W
-
You can corner wt using bath scales. I was able to get two bath scales for less than $25. You will have to fabricate a bridge that will span across both bath scales and is wide enough for your tire to set on the bridge. The bridge can be made from wood or steel, but the higher the bridge, the thicker the spacers will be required at each of the other three wheel leveling pads, so you can keep the working surface level. First locate the car on your four level garage pads, with the appropriate shims. [There is NO short cut here] First, start on any corner with your bath scales and record the weight. Then move the scales one by one to the other front and rear pad areas. Compare RH side to LH side front and rear recorded weights. If the Suspension is light on corner turn up the spring and if heavy reduce the spring pressure on the shock. The difficult part is that raising or lower a single spring perch not only changes the wt on that wheel but will also affect the weight the opposite diagonal wheel besides the opposite wheel. It will probably take several tries to get the corner weights reasonable close to even. If you are set up with only the driver you will probably have to settle for a diagonal balance only Vs a side to side balance. After you have finished adjusting the spring perches go back and verify that the axel pan hard is close to horizontal. The panhard rod may need a slight adjustment with static wt included. Once the task is completed, wrap tape around the threads of each shock to prevent road damage that would make it difficult to adjust the shock at some later date. After the final spring adjustment I went back and rechecked all four corners and the weights where repeatable within 3 lbs using a bridge and bath scales for adjusting corner Wt. Dave W
-
So you want to put on a Se7ens Gathering. Here are some pointers
Dave W replied to locost7018's topic in National Events
Russ Here a couple more suggestions. Plan for gas stops every two hours. A few cars only have 5 gal tanks. Plus time to stretch your legs a little. Trip tickets:, with the following, plus copies for each car. LH or RH turns and road names [possible cross roads] I like to even color code the lettering for L or R turn. ID the direction of the turn such as N for north or NW for a NW turn. SOS phone number at the top of the ticket, or right on the name tag. The trip ticket needs to be small and narrow so it can be clipped or taped on the dash or console. Hi-lite warnings on trip ticket, such as Rough RR crossing, pot hole, or a turn that is easy to miss. The last car in the convoy should carry a flag that sticks up several feet, so you can be sure everyone is still with you and that car has a phone that works in the boonies. Dave W -
Russ I would guess you could have several possible problems. The first thing I would check is the alignment of the starter. If drive is miss-aligned you will have adjust the engagment clearance. [Ck manual for tooth clearance spec, you may have to open up one of the starter mounting holes] 2nd if it's been a problem for a while, then it possible that the teeth on the flywheel are be on hope, and will have to be replaced the ring [press fit ring gear or new flywheel] 3rd verify amp draw at the starter or resistance of the power lead wire and connections. last clean the drive worm, and only lube with light wt oil, or lubriplate, do not use grease. Dave W
-
I can tell you for a fact, a Seven will not go thru 5 or 6" of snow! That nice flat bottom will just slide right up on top of the snow. Not a whole lot of traction! Dave W
-
Trying to keep polished spats looking good is next to impossible. By the 2nd year I could not polish out the sand blasted surface. I've settled on a brushed surface finish. 15 minutes with an 80 -200 grit flap roll [depending on the surface you want] and they are ready for another season. Dave W
-
Using any polished surface on spats, is next to impossible to keep it in any decent shape. Go with a bushed SS surface. You will still need to remove the spats every couple years, to pound out the small dents and give them a good polish them with a 180 grit wheel. The bushed surface is a lot easier to maintain on a daily bases. It just takes a minute with a [White] scot-bite pad and soft scrub for SS sinks to remove the gopher guts an to clean and polish the surface. Dave W
-
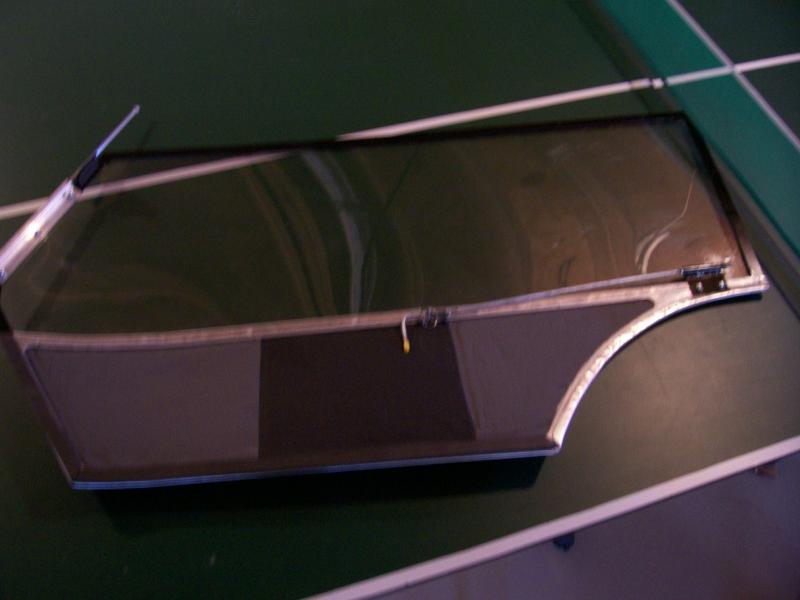
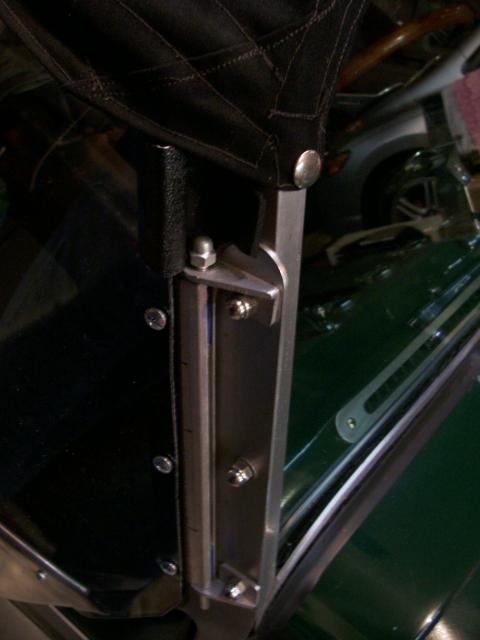
Here a few shots of the doors that I had fab'd up. The frame is made from 1/8 x 5/8" covered with aluminum. The door hinge uses the same brackets that I use for the winglets. I just run a solid aluminum hinge pin thru the center of the brackets. The orignal design had a sliding panels that allowed you to open it about half way. I never open them more the an inch, and it was a PITA to clean between the panels, so after a year I went to a solid window. The latch is just a sliding pin that attaches to a small tube bracket on the rear corner [next to the roll bar]. You may also want to look a half doors. They reduce a lot of the buffeting that come off the rear fenders, plus you can actually store them in the rear boot. Dave W

-
Here is another possibility. It could be water pump cavitation at high RPM. The pump is turning to may revs. Try a larger pulley or cut down the vanes and reducing inlet /out cooling system restrictions to/from the motor. May even require addition plumping. Dave W
-
I was having the same issues with my 4" Dia. x 30" lg muffler. After breaking two rubber bonded mounts I changed to a spring suspened mount with a lower rod end attachment at the muffler. The rod end allows the system to twist with the engine torque movement, plus you can reload the spring attachment to limit over all movement. This will not break! Dave W
-
That was great!! We needed another 5 minutes on that video. I can not believe how little traffic was on those scenic roads. Dave W
-
I would say somebody is looking after you!! That lead wire to the starter is not fused and is HOT all the time. Dave W
-
Try Pit Stop USA or http://www.sealsit.com for the rod end seals. Dave W
-
I've seen builders use computer mouse pads and "U" shaped brackets to cradle the rad. I just used thick rubber washers on both sides of the rad and tighten the hdw down using elastic stop nuts so you do not apply a lot or torque. 30K+ and no problems. Dave W
-
If you torch out the bushing, Do it OUTSIDE, there lots of black smoke! Dave W
-
I can not say how to apply the Granger waterproofing, But I used Scott guard in the spray can on my bikini top which is made from Cortex. Goes on even and there wasn't any color change. Dave W
-
"all good judgement goes away once we turn the key" Isn't that the truth!!! Dave W
-
Allan You can simply add an aluminum spacer block under the pedestal as you mentioned. But you are 2/3s of the way in adjusting for bumper steer. I would check the bump steer, first before fab'ing the spacer! A .02" change in the spacer can effect the steering. Also do not assume that both sides have equal spacing. Dave W
-
Try your local lumber yard, look for window seal. I got a 1" wide strip, foam rubber about 3/16" thick and comes with an adhesive backing. Dave W
-
I would avoid all that trouble and just get metric allen socket cap screws. Any good industrial supplier in your area will carry the correct lenght/Dia. Dave W